
Summary of Contents for Powermatic OPENSKY
- Page 1 Doc Ref: M805 Issue 1.1 Jan 2022 ® OPENSKY Operation and Maintenance Manual Issue 1.1 Jan 2022 w w w . p o w r m a t i c . c o . u k...
- Page 2 Certificate Of Guarantee ® Certificate of Guarantee This is to certify that this Opensky Vent is guaranteed for a period of one year, parts only from the date of original installation. To make a claim In the first instance you must contact your appliance supplier, or installer and provide:- 1.
- Page 3 Wall Installation 2.1.2 Roof Installation 2.1.3 Optional Windshields 2.1.4 Optional Birdguard Mesh Electrical Connection Servicing Additional Documents Fault Guide Risk Assessment Declaration of Performance page no. 3 of 20 Opensky Installation & Servicing Instructions Doc Ref M805 issue 1.1 Jan 2022.
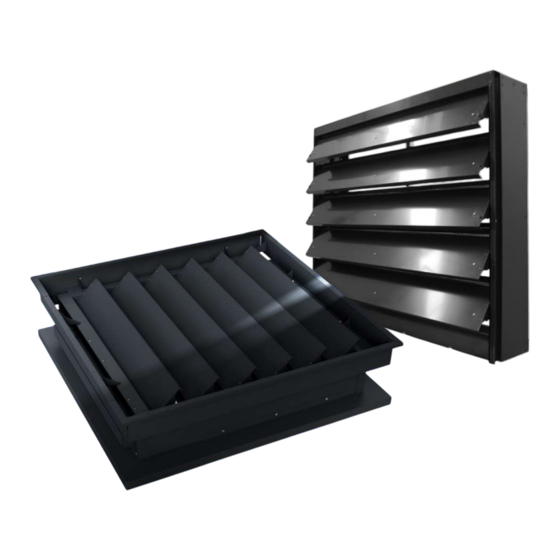
- Page 4 HEAD applications. Opensky can be roof or wall mounted for exhaust or air inlet. The system offers effective fire safety with units tested for use as smoke ventilators to BS EN 12101-2.
- Page 5 • At the cill there is a nominally 5mm high slot for the full width of the louvre where the water exits the body The Opensky Vents are designed in such a way as to of the louvre. manage any water landing on the Vent itself.
- Page 6 1.2 Dimensions 1.2.1 Roof Mounted 1.2.2 Wall Mounted Note: Refer to individual project installation drawings for full dimensional details. page no. 6 of 20 Opensky Installation & Servicing Instructions Doc Ref M805 issue 1.1 Jan 2022.
- Page 7 Check the 4. Carefully seat the Opensky into the wall opening contents are undamaged and conform to the packing list. ensuring the head of the vent is at the uppermost of the vent.
- Page 8 Locate any burglar bars / personal guards / insect mesh / bird guards etc. (where necessary) prior to fitting the Opensky Vent. 3. Carefully seat the Opensky onto the roof upstand ensuring the head of the vent is at the upslope end of the vent.
- Page 9 NOTE Position of the HEAD END relative to the cut outs in the TURNDOWN BASE UNIT JAMB 5. Secure Opensky Vent with M6 x 20mm screws and washers through Ø12 slots located at 200 ctrs along positioning angles into nutserts in vent body.
- Page 10 2. Using the Cill Windshield as a template, drill Ø5.5 holes through the holes down the length of the Cill Windshield as well as the pre-drilled brackets. 3. Fix the Cill Windshield to the Vent Opensky with the 4.8mm pop rivets supplied. page no. 10 of 20 Opensky Installation &...
- Page 11 Ø5.5 holes through the holes down the length of the Jamb Windshield as well as the pre-drilled brackets. 6. Fix the Jamb Windshield to the Vent Opensky with the 4.8mm pop rivets supplied. 7. Position the second Jamb Windshield central to the jamb on the vent.
- Page 12 Ø5.5 holes through the holes down the length of the Head Windshield as well as the pre-drilled brackets. 12. Fix the Head Windshield to the Vent Opensky with the 4.8mm pop rivets supplied. All Windshields fixed into position. page no. 12 of 20 Opensky Installation &...
- Page 13 2.1 Fitting the Unit 2.1.4. Optional Birdguard Mesh Birdguards (Qty to suit vent size) Where Roof Opensky units are installed, a Birdguard mesh All Birdguards are supplied complete with M6x25 Bolts can be attached to the top of the windshield to stop any and Washers ingress of unwanted debris or foreign objects.
- Page 14 (std 160) (std 160) 8. FOR ANY SLOPE ON UPSTAND, HEAD MUST BE ROOF OPENSKY c/w TURNDOWN BASE 2.2.3.1. Johnson Controls - Drive Open/ 8. FOR ANY SLOPE ON UPSTAND, HEAD MUST BE POSITIONED UPSLOPE, OPERATION AT HEAD...
- Page 15 Powrmatic Limited will offer quotation for the supply of endangerment. spare parts on request. page no. 15 of 20 Opensky Installation & Servicing Instructions Doc Ref M805 issue 1.1 Jan 2022.
- Page 16 Vent not installed square gap for squareness Vent not fully closed Check and adjust operation. Water ingress Vent seals broken Replace vent seals page no. 16 of 20 Opensky Installation & Servicing Instructions Doc Ref M805 issue 1.1 Jan 2022.
- Page 17 3.2 Risk Assessment Risk Assessment of the Opensky installed into the roof of a building. RISK ASSESSMENT The ventilators do not provide any risk to persons on site, however, the following points should be noted. 1. The ventilators should not be stepped upon.
- Page 18 3.3 Declaration of Performance page no. 18 of 20 Opensky Installation & Servicing Instructions Doc Ref M805 issue 1.1 Jan 2022.
- Page 19 Notes page no. 19 of 20 Opensky Installation & Servicing Instructions Doc Ref M805 issue 1.1 Jan 2022.
- Page 20 Company to confirm whether any material alterations have been made since publication of this brochure. w w w . p o w r m a t i c . c o . u k page no. 20 of 20 Opensky Installation & Servicing Instructions Doc Ref M805 issue 1.1 Jan 2022.
Need help?
Do you have a question about the OPENSKY and is the answer not in the manual?
Questions and answers