Advertisement
Quick Links
Thank You!
Thank you very much for choosing our radios
for your communication. This radio is a
multifunctional FM handheld Two Way Radio.
It combines the latest communication
technology and a rugged mechanical
framework. Whether you are a professional
who needs to keep in touch with the event
team (such as pastoral, self-driving, hunting,
exhibition, trade fair or hotels) or a casual user
who simply wants to communicate with
friends and keep in touch with families, this
radio will bring convenience to your work, life,
and leisure.
Please read all information carefully before
using our radio to avoid personal injury or
Advertisement

Related Manuals for TIDRADIO TD-M11


Summary of Contents for TIDRADIO TD-M11
- Page 1 Thank You! Thank you very much for choosing our radios for your communication. This radio is a multifunctional FM handheld Two Way Radio. It combines the latest communication technology and a rugged mechanical framework. Whether you are a professional who needs to keep in touch with the event team (such as pastoral, self-driving, hunting, exhibition, trade fair or hotels) or a casual user who simply wants to communicate with...
- Page 2 property damage due to improper operation. NOTICE: Changes or modifications to this equipment without our express permission may void your authority to operate the equipment. Your radio is set up to send a modulated signal at a specified frequency. It is illegal to change or adjust settings beyond the radio limitation.
- Page 3 sunlight long time or to extremely hot condition. 4. Do not place the radio on the unstable surface. 5. Keep the radio out of dust, moisture, and water. 6. Do not operate the radio or charge the battery pack under explosive conditions.
- Page 4 CONTENTS Packing with Walkie Talkie ........1 Button Description ............. 2 LED Display .............. 3 Preparation ..............4 Charging the Battery .......... 4 Assembling the Accessories ......7 Assembling the Battery ......7 Removing the Battery ........ 7 Assembling Audio Accessories ....8 Basic Operation ............
- Page 5 Crack &Copy Frequency via Side Button ..10 English and Chinese Switch ......12 Monitor ............13 Scan ..............13 NOAA Weather Forecast ......... 14 High/Low Power Selection ......14 Troubleshooting Guide ..........17 Clean ................ 19 Maintenance ............. 20...
- Page 6 Packing with Walkie Talkie Name Quantity Walkie Talkie Battery Power Adaptor Belt Clip Hand Strap User Manual...
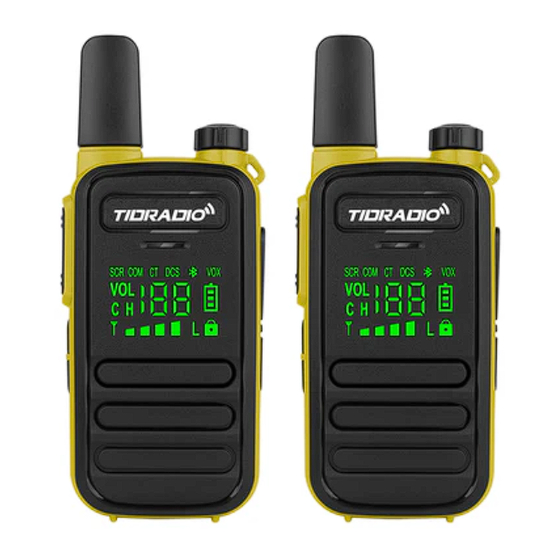
- Page 7 Button Description Earphone/ Programming Type-C Port Jack Antenna Power/ Volume Switch Screen PTT Button CH+/CH- Key; Sidekey1/2 Battery Release Clip...
- Page 8 LED Display Radio Status ① Scrambler ② Compander ③ CTCSS ④ CDCSS ⑤ Bluetooth (Not support) ⑥ VOX Indicator...
- Page 9 ⑦ Battery Indicator ⑧ Channel Capacity ⑨ ⑩ High/ Low Power ⑪ Receive Signal ⑫ NOAA Weather Indicator ⑬ Channel Preparation Charging the Battery 1. Insert the plug of the power adapter into the power socket; 2. Insert the other end of the power adapter into the jack on the back of the charger;...
- Page 10 directly plugged into the 5V/1A charging cable for charging.) 3. Insert the battery into the charger correctly. The indicator light on the charger shows the charging status. When the indicator light turns red, it means charging has started. When the indicator light turns green, charging is complete.
- Page 11 and do not use the radio during charging. 2. Please use the charger designated by our company to charge the battery. 3. For the best battery performance, charge for at least 3 hours when charging for the first time. 4. Battery Indicator: Battery Icon Battery Status High Power...
- Page 12 Assembling the Accessories Assembling the Battery Turning the back of the radio toward you, pry the back cover and align the positive and negative poles of the lithium-ion battery with the radio then press the battery into the radio. Removing the Battery Turning the back of the radio toward you, pry up the battery from the bottom recess until the battery is completely separated from the radio.
- Page 13 Assembling Audio Accessories 1. Lift the accessory interface cover; 2. Align the accessory plug with the accessory interface and push it firmly to the end. NOTICE: Please assemble accessories correctly otherwise the external headset or radio programming may be affected. Basic Operation Switch Power On and Off To turn on, please turn the Power/ Volume Switch...
- Page 14 you hear a "click" . Adjust the Volume After power on, turn the Power/ Volume Switch clockwise to increase the volume and counterclockwise to decrease the volume. Select Channel When the radio is on, short press the 【CH+/CH-】 key to select the channel upward or downward and the voice will announce the corresponding channel.
- Page 15 into the microphone in a normal intonation. Receiving: There will be an end of transmitting tone after releasing the 【PTT】button. The radio is available for receiving. The green light indicator will be on constantly when receiving. NOTICE: For the best volume of reception, keep the distance between the microphone and your mouth at 2.5 cm to 5 cm when transmitting.
- Page 16 select the channel you want to crack and store. After the transmitter transmits the signal, the radio emits a "beep" and the green light will flash. This means the crack is successful. The radio will enter the next channel to crack automatically. Press the 【PTT】 button again will exit the crack mode.
- Page 17 manually to exit the transmit code. ②Wireless copy receiver: The radio must be on channel three. Press the 【PTT】 button to turn on the radio and enter the copy receive mode. When the receive copy begins, the green light turns on and the screen shows a full display.
- Page 18 1. The radio must be on channel fifteen. Long press the 【PTT】 button and 【CH+】 key at the same time to turn on the radio. 2. You can select the language of voice announcement on programming software. Operation as follows: Parameter→ VoicePrompt→ select Chinese/ English/ Off Monitor Set any of the side keys to be long pressed as...
- Page 19 NOAA Weather Forecast Set any of the side keys to be long pressed as NOAA weather forecast function through the programming software. NOTICE: When this function is turned on, the icon of weather appears on the screen. When is turned off this function, the icon disappears.
- Page 20 Technical Specification General PMR446 (EU) Frequency Range (USA) Channel Capacity 16 EU /22 USA Channel Spacing 12.5kHz Operation Voltage DC 3.6V Battery Capacity 1000mAh Li-ion Operating Temperature 0~﹢40℃ ±2.5PPM Frequency Stability 50Ω Antenna Impedance ≤ 20mA Standby Current Dimension (with Antenna) 135×55×20 Weight (with Battery and 103g...
- Page 21 Transmitter Carrier Frequency Tolerance ± 2.5PPM ≤ 0.5W PMR446 Carrier Output Power ≤ 1.0W/0.5W ≤2.5kHZ Modulation Limiting ﹢1~﹣3dB(0.3~3kHZ) Modulation Characteristics ≤ 5% Audio Distortion ≤ 1200mA Emission Current ≥ 70dB Adjacent Channel Power ≤﹣36dBM Spurious RF Components Occupying Bandwidth 11kHz Receiver ≤0.25µV Receive Sensitivity...
- Page 22 ≥ 84dB Blocking Characteristics Troubleshooting Guide Fault description Failure Cause Analysis Troubleshooting The battery may not be Take out the battery installed properly. and reinstall. The battery may be Charge or replace the exhausted. battery. Clean battery contacts. Boot failure problem still cannot Poor contact due to solved,...
- Page 23 same Different frequencies frequency or signaling settings signaling other Can't talk are used than other members members of the members of the group. group. group. away from close members of the group. members as possible. Change to a new Interference from frequency point or co-channel users.
- Page 24 Clean 1. Please regularly use a clean and dry lint-free cloth or brush to wipe off the dust attached to the surface of the product and the charging pole piece; 2. Radio can be cleaned with neutral detergent and non-woven cloth. Please do not use chemicals such as detergent, alcohol, spray, or petroleum preparations to avoid damage to its surface and shell.
- Page 25 Maintenance 1. Do not use hard objects to puncture or scratch this product; 2. Do not store this product in an environment containing substances that corrode electronic circuits; 3. When the accessory is not in use, please cover the accessory interface cover. SAFETY STATEMENT INFORMATION This device complies with part 15 of the FCC Rules.
- Page 26 The equipment has been tested and found to comply with the limits for a Class B digital device, pursuant to part 15 of the FCC Rules. These limits are designed to provide reasonable protection against harmful interference in a residential installation.
- Page 27 Face up (25mm): 0.024W/Kg Body back (0mm): 0.075W/Kg Hand (0mm): 0.312W/Kg CAUTION: RISK OF EXPLOSION IF BATTERY IS REPLACED BY AN INCORRECT TYPE. DISPOSE OF USED BATTERIES ACCORDING TO THE INSTRUCTIONS. WARNING: MODIFICATION THIS DEVICE RECEIVE CELLULAR RADIOTELEPHONE SERVICE SIGNALS IS PROHIBITED UNDER FCC RULES AND FEDERAL LAW.
Need help?
Do you have a question about the TD-M11 and is the answer not in the manual?
Questions and answers