Advertisement
Available languages
Available languages
Quick Links
Item #1007857846
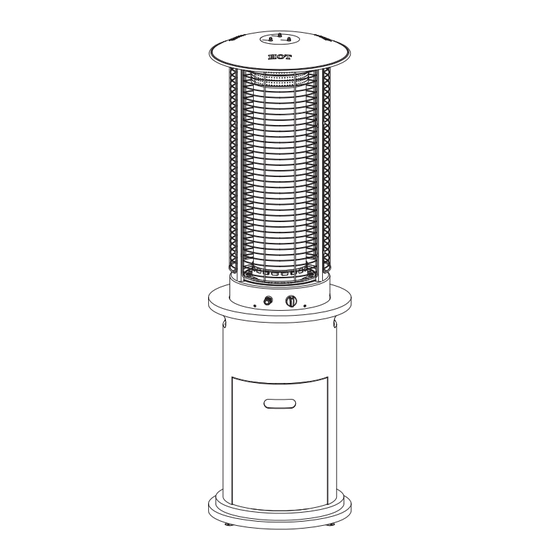
Model #52541
USE AND CARE GUIDE
STONE-LOOK RAPID INDUCTION AREA HEATER
Questions, problems, missing parts? Before returning to the store,
call Home Decorators Collection Customer Service
8 a.m. - 7 p.m., EST, Monday - Friday, 9 a.m.- 6 p.m., EST, Saturday
1-800-986-3460
HOMEDEPOT.COM/HOMEDECORATORS
THANK YOU
We appreciate the trust and confidence you have placed in Home Decorators Collection through the purchase of this area heater. We strive
to continually create quality products designed to enhance your home. Visit us online to see our full line of products available for your home
improvement needs. Thank you for choosing Home Decorators Collection!
Advertisement

Subscribe to Our Youtube Channel
Related Manuals for Home Decorators Collection 52541

Summary of Contents for Home Decorators Collection 52541
- Page 1 THANK YOU We appreciate the trust and confidence you have placed in Home Decorators Collection through the purchase of this area heater. We strive to continually create quality products designed to enhance your home. Visit us online to see our full line of products available for your home...
- Page 2 Table of Contents Table of Contents ............Assembly..............Safety Information............Operation ..............Warranty ..............Maintenance .............. Care and Cleaning ............. 1 Year Limited Warranty............Troubleshooting ............What Is Covered..............Service Parts ............. What Is Not Covered .............. Pre-Assembly.............. Planning Assembly..............Tools Required...............
- Page 3 Safety Information (continued) WARNING: The installation of this unit must adhere to local WARNING: Discontinue use if any part of the propane tank is codes or Propane Storage and Handling Code, CSA B149.2. damaged. WARNING: THIS UNIT IS INTENDED FOR OUTDOOR USE ONLY! WARNING: Rust and dents may be hazardous and should be This product shall be used outdoors, in a ventilated space inspected by a gas supplier.
- Page 4 Safety Information (continued) WARNING: If the flame goes out while burning, turn the gas WARNING: Be aware of the hazards of high temperatures valve off. Wait for 5 minutes before repeating the initial and stay away from the unit to avoid any burns or injury. lighting procedure.
- Page 5 Safety Information (continued) WARNING: A disconnected cylinder must have dust caps WARNING: Appliance may shut down in windy conditions in tightly installed and must not be stored in a building, garage excess of 3 miles per hour (4.83 kilometers per hour). or any other enclosed area.
- Page 6 Pre-Assembly PLANNING ASSEMBLY Carefully remove all pieces from the carton and make sure that you have all parts listed (refer to hardware included and package contents lists). If you are missing parts, please contact 1-800-986-3460 for further assistance. TOOLS REQUIRED Phillips screwdriver Hardware Included NOTE: Hardware not shown to actual size.
- Page 7 Pre-Assembly(continued) PACKAGE CONTENTS Part Description Quantity Tank support Glass tube ring Door (pre-assembled) Reflector Upper radiation screen Lower radiation screen Body Glass tube Mesh Guard Upper support Battery (AA) Feet (pre-assembled) Touch-up pen HOMEDEPOT.COM/HOMEDECORATORS Please contact 1-800-986-3460 for further assistance.
- Page 8 Assembly Assembling the tank support Assembling the upper supports Flip the body (G) upside down on a protected surface. Slide the three upper supports (J) into the slots in the burner at the top of the body (G). Remove the glass tube (H). Be sure that they are fully inserted.
- Page 9 Assembly (continued) Assembling the glass tube ring Assembling the upper and lower radiation screens Remove the three preassembled screws from the burner Attach the upper radiation screen (E) to the lower radiation at the top of the body (G). screen (F) using three M8 studs (GG) and three M8 nuts (DD).
- Page 10 Assembly (continued) Assembling the reflector Assembling the reflector Attach the reflector (D) to the radiation screen assembly Remove the three preassembled screws from the upper using three M6 studs (FF), three M6 washers (BB) and supports (J). three M6 cap nuts (AA). Place the reflector (D) onto the top of the upper supports (J).
- Page 11 Assembly (continued) Attaching the glass tube Attaching the mesh guards Carefully slide the glass tube (H) in between the upper Attach the three mesh guards (I) onto the hooks at the top supports (J) and place on top of the glass tube ring (B). of the upper supports (J).
- Page 12 Assembly (continued) Attaching the propane gas tank Attaching the regulator WARNING: Please inspect the rubber O-rings in the Remove door (C) from body (G). propane tank valve to ensure it is not worn before Place the propane gas tank (not included) into the tank support (A).
- Page 13 Assembly (continued) Attaching the battery Attaching the anchoring stakes Unscrew the rubber cap on the electronic igniter and slide Use the four anchoring stakes (HH) to secure the the battery (K) into the battery slot. heater in place to the ground. Make sure the positive side of the battery faces outwards.
- Page 14 Operation Performing a leak test Lighting the heater The glass tube may break if it is wet while in use; never WARNING: If the lighting instructions are not followed use the heater while it’s raining outside. directly a fire or explosion may occur resulting in Do not splash any liquid on the heater while it is in use.
- Page 15 Operation (continued) Extinguishing the fire Push and turn the ignition control knob clockwise to the “OFF” position. Turn the propane gas tank valve on the gas tank to close the gas supply and disconnect the propane gas tank. Maintenance Before performing any maintenance always disconnect propane gas tank. Store your product indoors during winter months.
- Page 16 Care and Cleaning Our Envirostone material has been sealed to prevent staining and moisture absorption, but it does require proper maintenance to ® ensure the integrity of the surface. Please see below for recommendations on maintaining your Envirostone surface for years of ®...
- Page 17 Troubleshooting Problem Cause Solution Pilot won’t light. Gas valve may be off. Turn the gas valve on. Gas tank may be empty. Refill the gas tank. Orifice may be blocked. Clean out the orifice. Air is within supply system. Pump out air from all lines. Loose connection.
- Page 18 Service Parts Part Description Spare Part Number Tank support 30-07-980-B 30-01-664 Glass tube ring Reflector 30-01-661 Upper radiation screen 30-01-662 Lower radiation screen 30-01-663 Glass tube 30-01-667 Mesh guard 30-01-668 Upper support 30-01-671 30-07-981-B Feet (preassembled) Touch-up pen 30-07-903-B...
- Page 19 Questions, problems, missing parts? Before returning to the store, call Home Decorators Collection Customer Service 8 a.m. - 7 p.m., EST, Monday - Friday, 9 a.m.- 6 p.m., EST, Saturday 1-800-986-3460 HOMEDEPOT.COM/HOMEDECORATORS Retain this manual for future use.
- Page 20 GRACIAS Agradecemos la confianza que ha depositado en Home Decorators Collection al adquirir este calentador de área. Nos esforzamos en crear continuamente productos de calidad diseñados para mejorar su hogar. Visite nuestra página web para ver nuestra línea completa de productos...
- Page 21 Contenido Contenido ..............Ensamblaje ..............Información de seguridad ........Funcionamiento ............Garantía ..............Mantenimiento ............Cuidado y limpieza ............ 1 Año de Garantía Limitada............ Solución de problemas ..........Incluido En La Cubertura ............Piezas de repuesto ........... Excluido En La Cubertura............Pre-ensamblaje ............
- Page 22 Información de seguridad ADVERTENCIA: La instalación de este aparato debe cumplir ADVERTENCIA: Deje de usarlo si una parte del tanque de con los códigos locales o código de manejo y propano está dañada. almacenamiento de propano, CSA B149.2.B149.2. ADVERTENCIA: ¡ESTE APARATO ESTÁ DISEÑADO ADVERTENCIA: La corrosión y las abolladuras pueden ser ÚNICAMENTE PARA EL USO EN EXTERIORES! Este producto peligrosas y se deben revisar por un proveedor de gas.
- Page 23 Información de seguridad ADVERTENCIA: Si la llama se apaga al quemar, apague la ADVERTENCIA: Tenga en cuenta los peligros de válvula de gas. Espere 5 mituercaos antes de repetir el temperaturas elevadas y no se acerque al aparato para proceso inicial de encendido. evitar quemaduras o lesiones.burns or injury.
- Page 24 Información de seguridad ADVERTENCIA: El aparato puede apagarse en condiciones ADVERTENCIA: Un cilindro desconectado debe tener tapones ventosas superiores a 4.83 kilómetros por hora (3 milas por anitpolvo firmemente instalados y no debe almacenarse en hora). un edificio, garaje o cualquier otro lugar cerrado. ADVERTENCIA: Sólo utilice el conjunto de regulador y ADVERTENCIA: Coloque el tapón antipolvo sobre la vávula manguera provisto con este aparato.
- Page 25 Pre-ensamblaje ANTES DEL ENSAMBLAJE Retire cuidadosamente todas las piezas de la caja de cartón y asegúrese de tener todas las piezas en la lista (consulte la lista de contenido del paquete). Si le faltan piezas, comuníquese al 1-800-986-3460 para obtener ayuda. HERRAMIENTAS REQUERIDAS Destornillador Phillips Contenido de la ferretería...
- Page 26 Pre-ensamblaje CONTENIDO DEL PAQUETE Pieza Descripción Cantidad Soporte de tanque Anillo tubular de vidrio Puerta (premontada) Reflector Pantalla de protección superior Pantalla de protección inferior Carcasa Tubo de vidrio Malla rejilla Soporte superior Pila (AA Patas (premontadas) Pluma de retoque...
- Page 27 Ensamblaje Ensamblaje del soporte del tanque Ensamblaje de los soportes superiores Coloque la carcasa (G) al revès sobre una superficie Deslice los 3 soportes superiores (J) en las ranuras del protegida. quemador en la parte superior de la carcasa (G). Retire el tubo de vidrio (H).
- Page 28 Ensamblaje Ensamblaje del anillo del tubo Ensamblaje de las pantallas de vidrio de radiación superior e inferior Retire los 3 tornillos premontados del quemador en la Sujete la pantalla de protección superior (E) a la pantalla parte superior de la carcasa (G). de protección inferior (F) utilizando 3 espárragos M8 (GG) y 3 tuercas M8 (DD).
- Page 29 Ensamblaje Ensamblaje del reflector Ensamblaje del reflector Sujete el reflector (D) al ensamblaje de pantallas de Retire los 3 tornillos premontados de los soportes superiores (J). protección utilizando 3 espárragos M6 (FF), 3 arandelas Coloque el reflector (D) en la parte superior de los soportes M6 (BB) y 3 tuercas de sombrerete M6 (AA).
- Page 30 Ensamblaje Instalación del tubo de vidrio Instalación de los protectores de malla Deslice con cuidado el tubo de vidrio (H) entre los soportes Sujete las 3 malla rejillas (I) en los ganchos en la parte superiores (J) y colóquelo sobre el anillo tubular de vidrio (B). superior de los soportes superiores (J).
- Page 31 Ensamblaje Conexión del tanque de gas propano Conexión del regulador ADVERTENCIA Revise la junta tórica de goma en la Retire la puerta (C) de la carcasa (G). válvula del tanque de propano para asegurarse Coloque el tanque de gas propano (no incluido) en el que no esté...
- Page 32 Ensamblaje Conexión de la batería Instalación de las estacas de anclaje Destornille el capuchón de goma del encendedor Utilice las 4 estacas de anclaje (HH) para fijar el calentador electrónico y deslice la pila (K) en la ranura de pila. en el suelo.
- Page 33 Funcionamiento Realización de una prueba de fugas Encendido el calefactor El tubo de vidrio podría romperse si está húmedo durante ADVERTENCIA: Si no se respetan directamente las el uso; nunca utilice el calentador cuando llueve. instrucciones un incendio o una explosión podría No deje salpicar ningún líquido en el calentador durante su producirse, provocando daños materiales, lesiones o uso.
- Page 34 Funcionamiento Apagado del fuego Pulse y gire la perilla de control en sentido horario a la posición ‘OFF’. Gire la vávula del tanque de gas propano para cerra el suministro de gas y desconecte el tanque de gas propano. Mantenimiento Antes de realizar cualquier tipo de mantenimiento siempre desconecte la botella de gas propano.
- Page 35 Cuidado y limpieza Nuestro material Envirostone ha sido sellado para evitar manchas y absorción de humedad, pero requiere un mantenimiento adecua- ® do para garantizar la integridad de la superficie. Consulte a continuación las recomendaciones sobre el mantenimiento de su superfi- cie Envirostone para disfrutarla durante muchos años: ®...
- Page 36 Solución de problemas Problema Causa Solución El piloto no se enciende. La vávula de gas puede estar cerrada. Abra la vávula de gas. El tanque de gas puede estar vacío. Rellene el tanque de gas. El orificio puede estar obstruido. Limpie el orificio.
- Page 37 Piezas de repuesto Pieza Descripción Número de pieza e repuesto Soporte de tanque 30-07-980-B Anillo tubular de vidrio 30-01-664 Reflector 30-01-661 Pantalla de protección superior 30-01-662 Pantalla de protección inferior 30-01-663 Tubo de vidrio 30-01-667 Malla rejilla 30-01-668 Soporte superior 30-01-671 Patas (premontadas) 30-07-981-B...
- Page 38 ¿Preguntas, problemas, piezas faltantes? Antes de devolver el producto a la tienda, llame al Servicio de Atención al Cliente de Home Decorators Collection de 8 a.m. a 7 p.m., hora central, de lunes a viernes, y de 9 a.m. a 6 p.m., hora central, sábados 1-800-986-3460 HOMEDEPOT.COM/HOMEDECORATORS...
Need help?
Do you have a question about the 52541 and is the answer not in the manual?
Questions and answers