Table of Contents
Advertisement
Quick Links
Advertisement
Table of Contents

Related Manuals for Body Sculpture BT-3146P


Summary of Contents for Body Sculpture BT-3146P
- Page 1 BT-3146P MOTORIZED TREADMILL www.body--sculpture.com http://www...
- Page 2 INDEX IMPORTANT SAFETY INFORMATION EXELODED-VIEW ASSEMBLY DRAWING PARTS LIST ASSEMBLY INSTRUCTIONS ASSEMBLY STRUCTION FOLDING INSTRUCTION HOW TO USE SAFETY KEY TREADMILL OPERATION BELT ADJUSTMENT MAINTENANCE CONSOLE INSTRUCTIONS TROUBLE SHOOTING...
- Page 3 Important Safety Information Please keep this manual in a safe place for reference. EN957-1 / -6 under class H.C. Suitable for 1. It is important to read this entire manual before domestic, home use only. Maximum weight of user assembling and using the equipment. Safe, and is 100 kg.
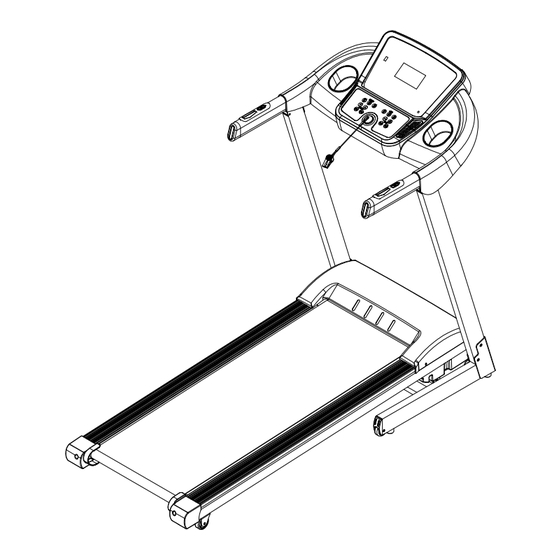
- Page 4 EXELODED-VIEW ASSEMBLY DRAWING...
-
Page 5: Part List
PART LIST DESCRIPTION DESCRIPTION Main frame Transportable wheel Base frame Moving wheel cover Upright frame Standard power wire Motor bracket Power Switch Computer bracket Foam Motor bottom cover Safety key fix bracket Cushion Computer top cover Bolt (ST4.2*2) Bolt (ST4.2*20) Front roller Elastic cushion Rear roller... - Page 6 PART LIST DESCRIPTION DESCRIPTION Bolt (M5*8) Spring Washer (5) Lock nut (M8) Lock Washer (10) Bolt (M8*25) Bolt (ST2.9*6.5) Bolt (ST4.2*19) Light sensor Running board strengthen tube Bolt (ST4.2*28) Strengthen tube cushion Flat Washer C (6) Lock Washer (5) MP3 wire Lock Washer (8) Incline frame Lock Washer (6)
-
Page 7: Fixing Tools
ASSEMBLY INSTRUCTIONS When you open the carton, and you will find the below parts in the carton PART LIST DESCRIPTION DESCRIPTION Main frame Safety key #5 Allen wrench Lock washer (8) Bolt (M8*16) Oil bottle Bolt (M8*40) MP3 wire (OPTION) FIXING TOOLS: 5# Allen Wrench 5mm----1pcs Notice: Do not get through power before complete assembly... - Page 8 ASSEMBLY STRUCTION STEP 1 Open the carton, take out the above spare parts, and put the Main Frame onto the level ground. STEP 2 Hold on the Computer frame and use the 5# Allen wrench (12), M8*16 bolt (51) and lock washer (64), fix the computer frame onto the right and left upright.
- Page 9 STEP 3 Push up the Computer and upright. Notice: Support the upright with hand, avoid falling down to have any hurt.
- Page 10 70 64 STEP 4 Use 5# Allen wrench, firstly lock upright onto base by bolt M8*40 (70) and lock washer(64), then lock upright onto base by bolt (51) and washer (64). Notice: Support the upright with hand during assembly, avoid falling down to have any hurt.
-
Page 11: Folding Instruction
FOLDING INSTRUCTION Pulling up: Pull up the base frame at position A, till hearing the sound that the air pressure bar B is locked into the round tube. Pulling down: Support place A with hand, kick the place of air pressure bar, then the base frame will fall down automatically ( Please keep anybody and any pet away the machine when falling down). -
Page 12: Technical Parameter
TECHNICAL PARAMETER 1576*710*1243mm BUILT UP POWER As the rating label showing SIZE(mm) 831*710*1362mm FOLDABLE Maximum output As the rating label showing SIZE(mm) power 430*1200mm 0.8-12KM/H RUNNING BOARD SPEED RANGE SIZE(mm) 50KG 100KG MAX USER NET WEIGHT WEIGHT Speed, time, distance, Calories, Pulse 1 LCD WINDOW GROUNDING METHODS This product must be grounded. -
Page 13: How To Use Safety Key
HOW TO USE SAFETY KEY Clipping the safety on the clothes USING YOUR TREADMILL HOW TO START : First of all, start out slow and easy. Just walk for 10 minutes. Do this every day for a week. If this was easy for you, add five minutes to your exercise for week 2. -
Page 14: Treadmill Operation
TREADMILL OPERATION Using treadmill will provide you several benefits, it will improve your physical fitness, tone muscle, and conjunctions with a calorie-controlled diet help you lose weight. Read carefully the following before using your treadmill. WARM UP PHASE CALF/ACHILLES STRETCHES INNER THIGH STRETCHES FORWARD... -
Page 15: Belt Adjustment
use your treadmill for extended period. 5. Wipe all treadmill surfaces with a dry cloth or towel---especially perspiration on the handlebars, control panel, running belt or other treadmill components. Warning: Turn off and unplug the treadmill before proceeding with any maintenance or visual do so may result in serious injury. -
Page 16: Walking Belt Centering
WALKING BELT CENTERING The walking belt may occasionally need to be centered. First be certain that the belt is tensioned properly. Start the treadmill and run it at about 4km/h. Place the Allen key through the hole in the left rear end cap and into the socket of the adjustment screw. -
Page 17: Maintenance
MAINTENANCE: WARNING : ALWAYS UNPLUG THE TREADMILL FROM THE ELECTRICAL OUTLET BEFORE CLEANING, LUBRICATING OR SERVICING THE UNIT. CLEANING General cleaning the treadmill will prolong the life of the treadmill and improve performance. Keep the unit clean by dusting regularly. Be sure to dust the exposed part of the deck on either side of the walking belt and also the side rails. -
Page 18: Console Instructions
CONSOLE INSTRUCTIONS 1. LCD WINDOW DISPLAY: SPEED: Show speed. CALO: Show calories. PULSE: Show heart beat data. TIME: Show running time. DIST : Show distance. 2. BUTTONS: “START” button: Press this button to start the machine, the machine will run at the lowest speed or at the speed of default program after 3 seconds time count down. -
Page 19: Heart Rate
3. 3. Inner install program: Press ‘PROG’ button to choose the inner install program from P1----P12. When set the program, the time window will show default data and glitter, press SPEED and INCLINE button to set the running time. Each program has been divided into 20 section, Each exercise time=the setting time/20. - Page 20 6. SAFETY KEY FUNCTION: Pull out the safety key, the treadmill will stop quickly, all data turn to zero, All the windows display“―――”. All normal operation must be in the state of safety key locked 7. SLEEP FUNCTION: Stopped for more than 10 minutes without any operation, the system completed all showed off into the body of sleep state.
-
Page 21: Troubleshooting
USB FUNCTION( Option) When treadmill is power on, you may insert any USB memory stick which contains audio files. The computer will detect the audio files on the memory stick and play the music directly MP3 FUNCTION( Option) When the power on, Contacting the external MP3 equipment, the computer will play. The voice is adjustable from operate the external MP3 equipment, the voice should be adjusted on the proper section to protect the computer loudhailer TROUBLE SHOOTING... - Page 23 COPYRIGHT ©2017 BY BODY SCULPTURE INTERNATIONAL EUROPE LTD ALL RIGHTS RESERVED.UNAUTHORIZED DUPLICATION IS A VIOLATION OF LAW...
Need help?
Do you have a question about the BT-3146P and is the answer not in the manual?
Questions and answers