Advertisement
Quick Links
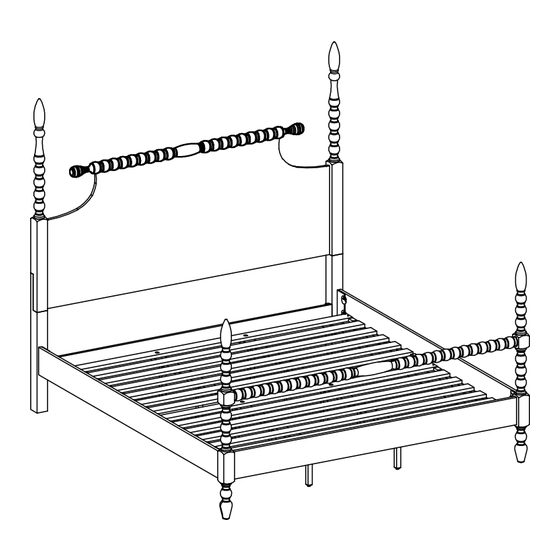
ASSEMBLY INSTRUCTIONS
BECKETT KING BED
Please read below before assembly
Assemble the product on a flat, soft surface such as a carpet or cloth to prevent scratching
the finish.
Do not discard any content until assembly is complete to avoid accidentally discarding small
parts or hardware.
Take out all parts and hardware from box.
Failure to follow these instructions may cause the bolts to misalign during assembly.
DISCLAIMERS:
WHEN PROPERLY ASSEMBLED, THIS ITEM IS SAFE FOR INTENDED USE. SELLER IS NOT LIABLE
FOR ANY DAMAGES RESULTING FROM ITEM BEING IMPROPERLY ASSEMBLED AFTER PURCHASE.
BOLTS MAY LOOSEN DURING NORMAL EVERYDAY USE. THEY SHOULD BE INSPECTED AT LEAST
EVERY 3 MONTHS AND RE-TIGHTENED AS NEEDED TO PREVENT DAMAGE OR INJURY, AND
ENSURE STABILITY.
PEOPLE NEEDED
TOOLS REQUIRED (NOT INCLUDED)
600
lbs per bed
WEIGHT LIMIT
PHILLIPS HEAD SCREW DRIVER
PARK
20
Minutes
ESTIMATED TIME
Page 1 of 13
Advertisement

Related Manuals for Madison Park Signature BECKETT


Summary of Contents for Madison Park Signature BECKETT
- Page 1 ASSEMBLY INSTRUCTIONS PARK BECKETT KING BED Please read below before assembly Assemble the product on a flat, soft surface such as a carpet or cloth to prevent scratching the finish. Do not discard any content until assembly is complete to avoid accidentally discarding small parts or hardware.
- Page 2 PARTS LIST 1 PC HEADBOARD PANEL 2 PCS HEADBOARD FINAL 1 PC RIGHT HEADBOARD LEG 1 PC LEFT HEADBOARD LEG 1 PC HEADBOARD STRETCHER 2 PCS SIDE RAIL 1 PC FOOTBOARD 2 PCS FOOTBOARD POST 1 PC FOOTBOARD DECORATIVE RAIL 2 PCS FOOTBOARD FINAL 2 PCS...
- Page 3 PARTS LIST Page 3 of 13...
- Page 4 HARDWARE LIST LARGE BOLT- Ø5/16’’ x 1-1/2" 10 PCS LARGE LOCK WASHER - Ø5/16’’ 10 PCS LARGE FLAT WASHER - Ø5/16" 10 PCS SMALL BOLT- Ø1/4’’ x 1-1/4" 8 PCS SMALL LOCK WASHER - Ø1/4’’ 8 PCS SMALL FLAT WASHER - Ø1/4" 8 PCS STUD BOLT - Ø5/16"...
- Page 5 STEP 2 STEP 3 2 PCS 2 PCS 2 PCS 1 PC A B C Page 5 of 13...
- Page 6 STEP 4 8 PCS 8 PCS 8 PCS 1 PC BACK OF HEADBOARD STEP 5 Page 6 of 13...
- Page 7 STEP 6 STEP 7 4 PCS PLEASE FLIP THE FRONT FACE UP Page 7 of 13...
- Page 8 STEP 8 4 PCS BACK OF FOOTBOARD STEP 9 Page 8 of 13...
- Page 9 STEP 10 STEP 11 8 PCS 8 PCS 1 PC REPEAT FOR ALL 4 CORNERS Page 9 of 13...
- Page 10 STEP 12 STEP 13 Page 10 of 13...
- Page 11 STEP 14 4 PCS 4 PCS 4 PCS 1 PC STEP 15 4 PCS ADJUST LEVELERS FOR UNEVEN FLOOR 4 PCS 4 PCS 1 PC Page 11 of 13...
- Page 12 STEP 16 8 PCS Page 12 of 13...
- Page 13 Care & Maintenance Do... Wipe up spills immediately. Dust and pick-up spills using a clean, non-colored, lint-free, dry cloth. Use mild non-abrasive soap and water. Don't... Do not put hot items directly on furniture surface. Do not clean furniture with harsh cleansers or polish. Do not place furniture in direct sunlight.
- Page 14 ASSEMBLY INSTRUCTIONS PARK BECKETT QUEEN BED Please read below before assembly Assemble the product on a flat, soft surface such as a carpet or cloth to prevent scratching the finish. Do not discard any content until assembly is complete to avoid accidentally discarding small parts or hardware.
- Page 15 PARTS LIST 1 PC HEADBOARD PANEL 2 PCS HEADBOARD FINAL 1 PC RIGHT HEADBOARD LEG 1 PC LEFT HEADBOARD LEG 1 PC HEADBOARD STRETCHER 2 PCS SIDE RAIL 1 PC FOOTBOARD 2 PCS FOOTBOARD POST 1 PC FOOTBOARD DECORATIVE RAIL 2 PCS FOOTBOARD FINAL 1 PC...
- Page 16 PARTS LIST Page 3 of 13...
- Page 17 HARDWARE LIST LARGE BOLT- Ø5/16’’ x 1-1/2" 10 PCS LARGE LOCK WASHER - Ø5/16’’ 10 PCS LARGE FLAT WASHER - Ø5/16" 10 PCS SMALL BOLT- Ø1/4’’ x 1-1/4" 4 PCS SMALL LOCK WASHER - Ø1/4’’ 4 PCS SMALL FLAT WASHER - Ø1/4" 4 PCS STUD BOLT - Ø5/16"...
- Page 18 STEP 2 STEP 3 2 PCS 2 PCS 2 PCS 1 PC A B C Page 5 of 13...
- Page 19 STEP 4 8 PCS 8 PCS 8 PCS 1 PC BACK OF HEADBOARD STEP 5 Page 6 of 13...
- Page 20 STEP 6 STEP 7 4 PCS PLEASE FLIP THE FRONT FACE UP Page 7 of 13...
- Page 21 STEP 8 4 PCS BACK OF FOOTBOARD STEP 9 Page 8 of 13...
- Page 22 STEP 10 STEP 11 8 PCS 8 PCS 1 PC REPEAT FOR ALL 4 CORNERS Page 9 of 13...
- Page 23 STEP 12 STEP 13 Page 10 of 13...
- Page 24 STEP 14 2 PCS 2 PCS 2 PCS 1 PC STEP 15 ADJUST LEVELERS 2 PCS FOR UNEVEN FLOOR 2 PCS 2 PCS 1 PC Page 11 of 13...
- Page 25 STEP 16 8 PCS Page 12 of 13...
- Page 26 Care & Maintenance Do... Wipe up spills immediately. Dust and pick-up spills using a clean, non-colored, lint-free, dry cloth. Use mild non-abrasive soap and water. Don't... Do not put hot items directly on furniture surface. Do not clean furniture with harsh cleansers or polish. Do not place furniture in direct sunlight.
Need help?
Do you have a question about the BECKETT and is the answer not in the manual?
Questions and answers