Advertisement
Quick Links
Advertisement

Related Manuals for Andres Industries aiRack-10 Ultra Rugged

Summary of Contents for Andres Industries aiRack-10 Ultra Rugged
- Page 1 Ultra Rugged Instruction manual ArtNr:299091...
-
Page 2: Pre-Commissioning
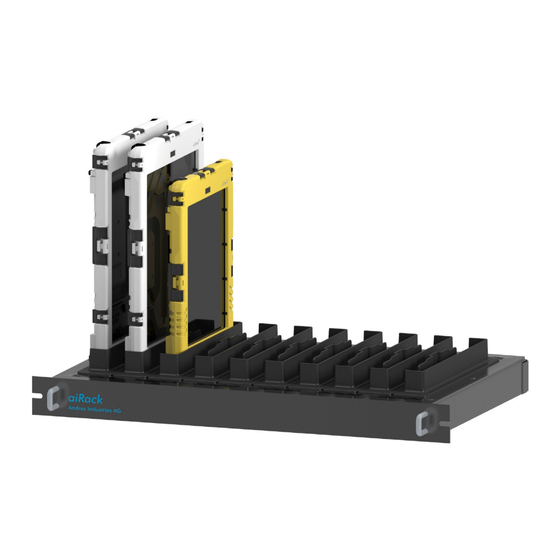
Delivery 1x aiRack-10 1x power cable (type B, C, G or J) 1x Manual Pre-commissioning 1. Put an iPad into the proper aiShell. (according aiShell instruction manual) 2. Open the lower rubber plug to get access to the loading port. 3. -
Page 3: Technical Specifications
Commissioning 1. Connect the power cable to the aiRack. 2. Connect the power plug of the power cable with a power socket. 3. Turn on the power switch. 4. Put the aiShells (incl. connector) in the docking-units of the aiRack. The direction of the displays shows to the closed site of the docking-units. - Page 4 Ultra Rugged Gebrauchsanleitung ArtNr:299091...
-
Page 5: Vor Inbetriebnahme
Lieferumfang 1x aiRack-10 1x Netzkabel (Stecker-Typ B, C, G oder J) 1x Anleitung Vor Inbetriebnahme 1. Legen Sie ein iPad in das entsprechende aiShell. (siehe aiShell-Gebrauchsanleitung) 2. Öffnen Sie den unteren Gummistopfen am aiShell. 3. Stecken Sie den Connector (nach Über- prüfung des Dichtrings) an die untere Öffnung des aiShell. -
Page 6: Technische Daten
Inbetriebnahme 1. Verbinden Sie das benötigte Netzkabel mit dem aiRack. 2. Verbinden Sie den Netzstecker des Netzkabels mit einer Steckdose. 3. Schalten Sie das aiRack am Hauptschalter ein. 4. Stecken Sie ihre aiShells (inkl. Connector) in die Steckplätze des aiRacks. Die Bildschirmseite des aiShell muss zur geschlossenen Seite des Steckplatzes zeigen. - Page 8 Service & Support Tel.: +49 304 580 390 0 Fax: +49 304 580 390 3 E-Mail: info@andres-industries.de Web: www.andres-industries.de aiRack-10 Ultra Rugged Input: 90-264V AC 0.8A 47-63Hz Output: 9V DC +3% 10x1A ambient temperature: -20 / + 40°C protection class: IP30 Made in Germany CE-Konformitätszeichen...
- Page 9 Ultra Rugged Instruction manual ArtNr:299091...
- Page 10 Delivery 1x aiRack-10 1x power cable (type B, C, G or J) 1x Manual Pre-commissioning 1. Put an iPad into the proper aiShell. (according aiShell instruction manual) 2. Open the lower rubber plug to get access to the loading port. 3.
- Page 11 Commissioning 1. Connect the power cable to the aiRack. 2. Connect the power plug of the power cable with a power socket. 3. Turn on the power switch. 4. Put the aiShells (incl. connector) in the docking-units of the aiRack. The direction of the displays shows to the closed site of the docking-units.
- Page 12 Ultra Rugged Gebrauchsanleitung ArtNr:299091...
- Page 13 Lieferumfang 1x aiRack-10 1x Netzkabel (Stecker-Typ B, C, G oder J) 1x Anleitung Vor Inbetriebnahme 1. Legen Sie ein iPad in das entsprechende aiShell. (siehe aiShell-Gebrauchsanleitung) 2. Öffnen Sie den unteren Gummistopfen am aiShell. 3. Stecken Sie den Connector (nach Über- prüfung des Dichtrings) an die untere Öffnung des aiShell.
- Page 14 Inbetriebnahme 1. Verbinden Sie das benötigte Netzkabel mit dem aiRack. 2. Verbinden Sie den Netzstecker des Netzkabels mit einer Steckdose. 3. Schalten Sie das aiRack am Hauptschalter ein. 4. Stecken Sie ihre aiShells (inkl. Connector) in die Steckplätze des aiRacks. Die Bildschirmseite des aiShell muss zur geschlossenen Seite des Steckplatzes zeigen.
- Page 16 Service & Support Tel.: +49 304 580 390 0 Fax: +49 304 580 390 3 E-Mail: info@andres-industries.de Web: www.andres-industries.de aiRack-10 Ultra Rugged Input: 90-264V AC 0.8A 47-63Hz Output: 9V DC +3% 10x1A ambient temperature: -20 / + 40°C protection class: IP30 Made in Germany CE-Konformitätszeichen...
- Page 17 Ultra Rugged Instruction manual ArtNr:299091...
- Page 18 Delivery 1x aiRack-10 1x power cable (type B, C, G or J) 1x Manual Pre-commissioning 1. Put an iPad into the proper aiShell. (according aiShell instruction manual) 2. Open the lower rubber plug to get access to the loading port. 3.
- Page 19 Commissioning 1. Connect the power cable to the aiRack. 2. Connect the power plug of the power cable with a power socket. 3. Turn on the power switch. 4. Put the aiShells (incl. connector) in the docking-units of the aiRack. The direction of the displays shows to the closed site of the docking-units.
- Page 20 Ultra Rugged Gebrauchsanleitung ArtNr:299091...
- Page 21 Lieferumfang 1x aiRack-10 1x Netzkabel (Stecker-Typ B, C, G oder J) 1x Anleitung Vor Inbetriebnahme 1. Legen Sie ein iPad in das entsprechende aiShell. (siehe aiShell-Gebrauchsanleitung) 2. Öffnen Sie den unteren Gummistopfen am aiShell. 3. Stecken Sie den Connector (nach Über- prüfung des Dichtrings) an die untere Öffnung des aiShell.
- Page 22 Inbetriebnahme 1. Verbinden Sie das benötigte Netzkabel mit dem aiRack. 2. Verbinden Sie den Netzstecker des Netzkabels mit einer Steckdose. 3. Schalten Sie das aiRack am Hauptschalter ein. 4. Stecken Sie ihre aiShells (inkl. Connector) in die Steckplätze des aiRacks. Die Bildschirmseite des aiShell muss zur geschlossenen Seite des Steckplatzes zeigen.
- Page 24 Service & Support Tel.: +49 304 580 390 0 Fax: +49 304 580 390 3 E-Mail: info@andres-industries.de Web: www.andres-industries.de aiRack-10 Ultra Rugged Input: 90-264V AC 0.8A 47-63Hz Output: 9V DC +3% 10x1A ambient temperature: -20 / + 40°C protection class: IP30 Made in Germany CE-Konformitätszeichen...
- Page 25 Ultra Rugged Instruction manual ArtNr:299091...
- Page 26 Delivery 1x aiRack-10 1x power cable (type B, C, G or J) 1x Manual Pre-commissioning 1. Put an iPad into the proper aiShell. (according aiShell instruction manual) 2. Open the lower rubber plug to get access to the loading port. 3.
- Page 27 Commissioning 1. Connect the power cable to the aiRack. 2. Connect the power plug of the power cable with a power socket. 3. Turn on the power switch. 4. Put the aiShells (incl. connector) in the docking-units of the aiRack. The direction of the displays shows to the closed site of the docking-units.
- Page 28 Ultra Rugged Gebrauchsanleitung ArtNr:299091...
- Page 29 Lieferumfang 1x aiRack-10 1x Netzkabel (Stecker-Typ B, C, G oder J) 1x Anleitung Vor Inbetriebnahme 1. Legen Sie ein iPad in das entsprechende aiShell. (siehe aiShell-Gebrauchsanleitung) 2. Öffnen Sie den unteren Gummistopfen am aiShell. 3. Stecken Sie den Connector (nach Über- prüfung des Dichtrings) an die untere Öffnung des aiShell.
- Page 30 Inbetriebnahme 1. Verbinden Sie das benötigte Netzkabel mit dem aiRack. 2. Verbinden Sie den Netzstecker des Netzkabels mit einer Steckdose. 3. Schalten Sie das aiRack am Hauptschalter ein. 4. Stecken Sie ihre aiShells (inkl. Connector) in die Steckplätze des aiRacks. Die Bildschirmseite des aiShell muss zur geschlossenen Seite des Steckplatzes zeigen.
- Page 32 Service & Support Tel.: +49 304 580 390 0 Fax: +49 304 580 390 3 E-Mail: info@andres-industries.de Web: www.andres-industries.de aiRack-10 Ultra Rugged Input: 90-264V AC 0.8A 47-63Hz Output: 9V DC +3% 10x1A ambient temperature: -20 / + 40°C protection class: IP30 Made in Germany CE-Konformitätszeichen...
- Page 33 Ultra Rugged Instruction manual ArtNr:299091...
- Page 34 Delivery 1x aiRack-10 1x power cable (type B, C, G or J) 1x Manual Pre-commissioning 1. Put an iPad into the proper aiShell. (according aiShell instruction manual) 2. Open the lower rubber plug to get access to the loading port. 3.
- Page 35 Commissioning 1. Connect the power cable to the aiRack. 2. Connect the power plug of the power cable with a power socket. 3. Turn on the power switch. 4. Put the aiShells (incl. connector) in the docking-units of the aiRack. The direction of the displays shows to the closed site of the docking-units.
- Page 36 Ultra Rugged Gebrauchsanleitung ArtNr:299091...
- Page 37 Lieferumfang 1x aiRack-10 1x Netzkabel (Stecker-Typ B, C, G oder J) 1x Anleitung Vor Inbetriebnahme 1. Legen Sie ein iPad in das entsprechende aiShell. (siehe aiShell-Gebrauchsanleitung) 2. Öffnen Sie den unteren Gummistopfen am aiShell. 3. Stecken Sie den Connector (nach Über- prüfung des Dichtrings) an die untere Öffnung des aiShell.
- Page 38 Inbetriebnahme 1. Verbinden Sie das benötigte Netzkabel mit dem aiRack. 2. Verbinden Sie den Netzstecker des Netzkabels mit einer Steckdose. 3. Schalten Sie das aiRack am Hauptschalter ein. 4. Stecken Sie ihre aiShells (inkl. Connector) in die Steckplätze des aiRacks. Die Bildschirmseite des aiShell muss zur geschlossenen Seite des Steckplatzes zeigen.
- Page 40 Service & Support Tel.: +49 304 580 390 0 Fax: +49 304 580 390 3 E-Mail: info@andres-industries.de Web: www.andres-industries.de aiRack-10 Ultra Rugged Input: 90-264V AC 0.8A 47-63Hz Output: 9V DC +3% 10x1A ambient temperature: -20 / + 40°C protection class: IP30 Made in Germany CE-Konformitätszeichen...
Need help?
Do you have a question about the aiRack-10 Ultra Rugged and is the answer not in the manual?
Questions and answers