Table of Contents
Advertisement
Available languages
Available languages
Quick Links
USA office: Fontana
AUS office: Truganina
DEU office: FDS GmbH, Neuer Höltigbaum 36, 22143 Hamburg, Deutschland
FRA office: Saint Vigor d'Ymonville
If you're having difficulty, our friendly customer team is always here to help.
USA:cs.us@costway.com
AUS:cs.au@costway.com
GBR:cs.uk@costway.com
I T A :cs.i t @costway.com
GBR office: Ipswich
POL office: Gdańsk
ITA office: Milano
POL:sklep@costway.com
DEU:cs.de@costway.com
FRA:cs.fr@costway.com
ESP:cs.es@costway.com
Baby Playpen
Kinderreisebett
Parc pour Bébé
Parque Infantil para Bebés
Lettino per Bambini
Łóżeczko dziecięce
BB0440
IMPORTANT! READ CAREFULLY AND
KEEP FOR FUTURE REFERENCE.
Advertisement
Table of Contents

Related Manuals for Costway BB0440


Summary of Contents for Costway BB0440
- Page 1 FRA office: Saint Vigor d'Ymonville ITA office: Milano If you're having difficulty, our friendly customer team is always here to help. USA:cs.us@costway.com POL:sklep@costway.com IMPORTANT! READ CAREFULLY AND AUS:cs.au@costway.com DEU:cs.de@costway.com GBR:cs.uk@costway.com FRA:cs.fr@costway.com KEEP FOR FUTURE REFERENCE. I T A :cs.i t @costway.com ESP:cs.es@costway.com...
-
Page 2: Before You Start
Before You Start Bevor Sie beginnen Please read all instructions carefully and keep it for future reference. Bitte sorgfältig lesen und zum späteren Nachschlagen aufbewahren. General Warnings Allgemeine Achtung Attention: To prevent possible injury by entanglement, remove this toy Vorsicht: Um mögliche Verletzungen durch Verheddern zu verhindern, when the child starts trying to get up on its hands and knees in a ist dieses Spielzeug zu entfernen, wenn das Kind beginnt, auf allen crawling position. -
Page 3: Avant De Commencer
Avant de Commencer Antes de Empezar Veuillez lire attentivement toutes les instructions et les conserver pour Lea todas las instrucciones detenidamente y guárdelas para futuras referencias. la référence ultérieure. Avertissements Généraux Advertencias Generales Attention: pour éviter toute blessure par enchevêtrement, retirez ce Atención: Para evitar posibles lesiones causadas por enredos, retire jouet lorsque l'enfant commence à... -
Page 4: Prima Di Iniziare
Prima di Iniziare Zanim Zaczniesz Si prega di leggere attentamente tutte le istruzioni e conservarle per Przeczytaj uważnie wszystkie instrukcje i zachowaj je na przyszłość. riferimento futuro. Avvertenze Generali Ogólne ostrzeżenia Attenzione: Per evitare possibili lesioni da impigliamento, rimuovere Uwaga: Aby zapobiec możliwym obrażeniom w wyniku zaplątania, questo giocattolo quando il bambino inizia a cercare di alzarsi sulle usuń... -
Page 5: Manual Instruction
Manual Instruction IMPORTANT: Read all instructions BEFORE assembly and USE of product, and KEEP THEM FOR FUTURE USE. 1. WARNING • Never leave the child unattended. • Do not put the playpen near a fireplace or any other source of heat. •... -
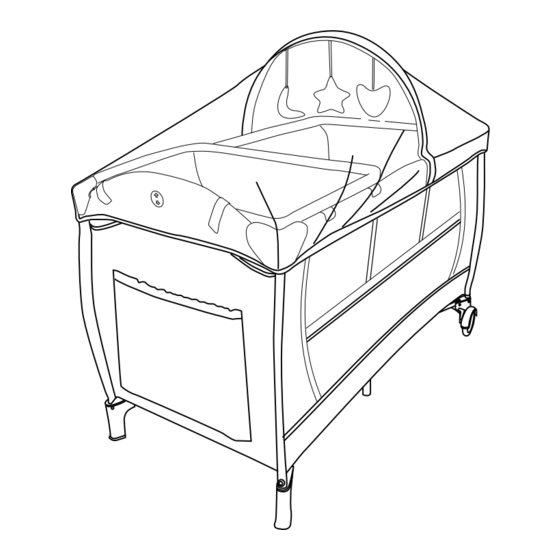
Page 6: List Of Parts
LIST OF PARTS Check that no parts are missing before setting up the playpen. STEP 2: SECURING THE PLAYPEN a.Unfold the structure slightly to push the sides of the playpen apart (Fig. 3). B.1 Carrying bag A.1 Playpen Fig. 3 IMPORTANT C.1 Foldable mattress D. - Page 7 LIST OF PARTS b. Lift up rims A simultaneously while pressing the unlocking button underneath the rim( Fig.9). Fig. 5 c. Lift up rims B simultaneously while pressing the unlocking button underneath d.Finish by banging down on the bottom of the rim( Fig.10).
- Page 8 STEP 2: STORING THE PLAYPEN Make sure all 12 clips are securely attached to the top rails Once the playpen locking mechanisms have been released, fold it up completely b.Insert the metal tubes together in the bottom of the bassinet as shown, MAKE and fit the mattress around the structure, securing it with the self-fastening SURE that the tubes are connected before installing the foldable mattress.
- Page 9 a.Unfold the diaper changer. Canopy assembly Insert the both plastic clips of the canopy onto the handrail. b.Insert the two tubes inside the diaper changer as shown. c.Attach the 4 clips on the top long hand rails. Make sure all 4 clips are securely attached to the top long rails.
-
Page 10: Maintenance Instructions
Handbuch Use the rocker function, adjust to A position, if not, adjust to B position. WICHTIG: Lesen Sie alle Anweisungen VOR der Montage und der Benutzung des Produkts und bewahren Sie sie für spätere Verwendung auf. 1. ACHTUNG MAINTENANCE INSTRUCTIONS •... -
Page 11: Liste Der Teile
3. MONTAGEANLEITUNG EMPFEHLUNG: Verwenden Sie nur Zubehör oder Ersatzteile, die vom Hersteller zugelassen sind. SCHRITT 1: ÖFFNEN DER EMPFEHLUNG: Stellen Sie sicher, dass Ihr Kind nicht aus dem VERPACKUNG Kinderreisebett klettern kann. Um das Risiko eines Sturzes zu vermeiden, Öffnen Sie die Tragetasche (Abb.1) sollten Sie das Kinderreisebett nicht mehr benutzen, sobald Ihr Kind in der Lage ist, aus dem Kinderreisebett zu klettern. - Page 12 c. Befolgen Sie die Anweisungen in Abb. 4c und Abb. 4d auf beiden Seiten 4. ZUSAMMENLEGEN UND AUFBEWAHREN DES gleichzeitig. KINDERREISEBETTS SCHRITT 1: ZUSAMMENLEGEN DES KINDERREISEBETTS a. Nehmen Sie die Matratze aus dem Kinderreisebett (Abb. 7) und heben Sie « Klicken den Boden mit Hilfe des Zugbandes aus Stoff an (Abb.
- Page 13 5. Montage der Korbwiege U-förmig V-förmig a. Entfernen Sie vor der Montage die faltbare Matratze von der Unterseite des Kinderreisebetts, stellen Sie die Korbwiege an die Seite des Kinderreisebetts und befestigen Sie die 12 Clips an den oberen Schienen. (Abb. 15) Abb.
- Page 14 Montage der Aufbewahrungstasche Lassen Sie Ihr Baby NIEMALS auf dem Wickeltisch schlafen. Befestigen Sie die Clips der Aufbewahrungstasche an der Lassen Sie den Wickeltisch NIEMALS stehen, wenn sich das Kind im großen oberen Schiene. Stubenwagen oder im Laufstall befindet. Um Ihr Kind vor Stürzen und anderen Verletzungen zu schützen, legen Sie immer den Sicherheitsgurt an, wenn sich Kinder auf dem Wickeltisch befinden.
- Page 15 Mode d’emploi Montage des Schaukelmechanismus Halten Sie die untere Halterung mit einer Hand, drücken Sie mit der anderen Hand das Kunststoffteil auf das untere Rohr, wie auf dem Foto unten dargestellt. IMPORTANT : Lisez toutes les instructions AVANT l’assemblage et l’utilisation du produit, et CONSERVEZ-LES POUR UNE RÉFÉRENCE FUTURE...
-
Page 16: Liste Des Pièces
3. ASSEMBLAGE RECOMMANDATION : Utilisez uniquement des accessoires ou des pièces de rechange approuvés par le fabricant. ÉTAPE 1 : Déballage RECOMMANDATION : Assurez-vous que votre enfant ne puisse pas sortir du Ouvrez le sac de transport (Fig.1) lit. Pour éviter tout risque de chute, arrêtez d’utiliser le lit dès que l’enfant est capable de s’en sortir. - Page 17 c. Suivez les instructions comme indiqué sur les figures (Fig.4a) et (Fig.4b) 4. PLIAGE ÉTAPE 1 : PLIER LE PARC a. Retirez le matelas du parc (Fig. 7) et soulevez le fond à l’aide de la sangle de traction en tissu (Fig. 8). «...
- Page 18 5. Installer le système de berceau a. Avant d’installer, retirez le En forme En forme matelas pliable du fond du parc, de U de V placez le berceau sur le côté du parc et fixez-le à l’aide des 12 pinces aux rails supérieurs (Fig.15). Fig.
- Page 19 Assemblage de compartiment de rangement NE JAMAIS laisser bébé dormir sur une table à langer. Attachez les pinces sur le rail supérieur. NE JAMAIS laisser la table à langer en place lorsque l'enfant est dans le grand berceau ou dans le parc. Pour éviter à...
-
Page 20: Entretien
Instrucciones del Manual Assemblage de bascule Tenez le fond de support avec une main, poussez la pièce en plastique sur le fond de tube avec l’autre main comme illustré ci-dessous IMPORTANTE: Lea todas las instrucciones ANTES de ensamblar y USAR el producto, y GUARDE ESTAS PARA USO FUTURO. -
Page 21: Lista De Piezas
LISTA DE PIEZAS Compruebe que no falten piezas antes del montaje. PASO 2: ASEGURAR EL PARQUE a. Despliegue la estructura ligeramente para separar los lados del parque (Fig.3). B. Bolsa de A. Parque x 1 transporte x 1 Fig.3 IMPORTANTE C. - Page 22 b. Levante los bordes A simultáneamente mientras presiona el botón de desbloqueo debajo del borde (Fig.9). Fig.5 d. Termine golpeando hacia abajo la parte c. Levante los bordes B simultáneamente mientras presiona el botón de inferior del parque (Fig.5) para asegurar el desbloqueo debajo del borde (Fig.10).
- Page 23 PASO 2: ALMACENAR EL PARQUE b. Inserte los tubos de metal juntos en la parte inferior del parque como se muestra, ASEGÚRESE de que los tubos estén conectados bien antes de Una vez liberados los mecanismos de bloqueo del parque, dóblelo instalar el colchón plegable (Fig.16).
- Page 24 Montaje del toldo a. Despliegue el tablero para cambiar pañales. Inserte los dos clips de plástico del toldo en los pasamanos. b. Inserte los dos tubos dentro del cambiador de pañales como se muestra. c. Fije los 4 clips en los rieles cortos superiores. Asegúrese de que los 4 clips estén bien sujetos a los rieles cortos superiores.
-
Page 25: Istruzioni Di Montaggio
Istruzioni di Montaggio Si desea utilizar la función de balancín, ajuste a la posición A, si no, ajuste a la posición B. IMPORTANTE: Leggere tutte le istruzioni PRIMA del montaggio e dell'uso del prodotto e CONSERVARLE PER RIFERIMENTO FUTURO. 1. ATTENZIONE •... -
Page 26: Lista Delle Parti
LISTA DELLE PARTI Verificare che non manchino le parti prima di montare il lettino. PASSO 2: FISSARE IL LETTINO a.Piegare leggermente la struttura per separare i lati del lettino (Fig.3). B. Borsa per A. Box per il trasporto bambini Fig.3 IMPORTANTE C. - Page 27 b. Sollevare i bordi A contemporaneamente premendo il pulsante di sblocco sotto il bordo ( Fig.9). Fig.5 d. Terminare sbattendo sul fondo del lettino c. Sollevare i bordi B contemporaneamente premendo il pulsante di sblocco (Fig.5) per fissare il meccanismo di sotto il bordo ( Fig.10) bloccaggio.
- Page 28 PASSO 2: CONSERVARE IL LETTINO b. Inserire il tubo di metallo insieme nella parte inferiore della culla, come mostrato, assicurarsi che i tubi siano collegati prima di installare il materasso Una volta sganciati i meccanismi di bloccaggio del lettino, ripiegarlo pieghevole (Fig.16).
- Page 29 a. Spiegare il fasciatoio. Assemblaggio della cappottina Inserire i due clip di plastica del della cappottina sul b. Inserire i due tubi all'interno del fasciatoio come mostrato. corrimano. c. Fissare le 4 clip sulle guide lunghe superiori. Assicurarsi che tutte e 4 le clip siano fissate saldamente alle guide lunghe superiori.
-
Page 30: Instrukcja Obsługi
Instrukcja obsługi Utilizzare l’asta a dondolo, regolare in posizione A, altrimenti regolare in posizione B. WAŻNE: Przeczytaj wszystkie instrukcje PRZED montażem i UŻYWANIEM produktu, I ZACHOWAJ JE NA PRZYSZŁOŚĆ. 1. OSTRZEŻENIE • Nigdy nie pozostawiaj dziecka bez opieki. ISTRUZIONI PER LA MANUTENZIONE •... -
Page 31: Wykaz Części
3. INSTRUKCJA MONTAŻU ZALECENIE: Należy używać wyłącznie akcesoriów lub części zamiennych zatwierdzonych przez producenta. ZALECENIE: Upewnij się, że twoje dziecko nie może wydostać się z łóżeczka. KROK I: OTWARCIE PAKIETU Aby uniknąć ryzyka upadku, przestań korzystać z łóżeczka, gdy tylko dziecko Otwórz torbę... -
Page 32: Lista Części
4.SKŁADANIE I PRZECHOWYWANIE PRODUKTU c. Postępuj zgodnie z instrukcjami pokazanymi na ryc. 4c i ryc. 4d po obu stronach jednocześnie. KROK I: SKŁADANIE ZESTAWU a.Wyjmij materac z kojca (ryc. 7) i unieś spód za pomocą paska na materiale (ryc. 8). «... - Page 33 5. Zainstaluj gondolę a. Przed montażem wyjmij kształt U kształt V składany materac z dolnej części kojca, umieść gondolę z boku i przymocuj 12 klipsów do górnych szyn. Ryc. 15 Ryc. 15 Ryc. 11 Ryc. 12 Upewnij się, że wszystkie 12 klipsów jest bezpiecznie przymocowanych do górnych szyn WAŻNE Jeśli krawędzie kojca nie złożą...
- Page 34 Montaż przewijaka Montaż schowka OSTRZEŻENIA: Przymocuj klipsy schowka do górnej szyny produktu. PRZYMOCUJ przewijak do łóżeczka. Gdy przewijak znajduje się na łóżeczku, należy go przymocować do ramy za pomocą zatrzasków lub innych dołączonych elementów mocujących. POD ŻADNYM POZOREM nie pozwalaj dziecku spać na przewijaku. POD ŻADNYM POZOREM nie mocuj przewijaka, gdy dziecko znajduje się...
- Page 35 Montaż biegunów Jedną ręką przytrzymaj dolny wspornik, drugą ręką wepchnij plastikową część na dolną rurkę, jak na zdjęciu poniżej Return / Damage Claim Instructions DO NOT discard the box / original packaging. In case a return is required, the item must be returned in original box.
- Page 36 Rücksendung Instructions De Retour / Beschädigung Anweisungen / Réclamation De Dommages NE PAS jeter la boîte/l'emballage d'origine. Werfen Sie den Karton / die Originalverpackung NICHT weg. Dans le cas où un retour est requis, l'article doit être retourné dans Falls eine Rücksendung erforderlich ist, muss der Artikel in der sa boîte d'origine.
- Page 37 Instrucciones de Devolución Istruzioni Per La Restituzione / Reclamación de Daños / Reclamo Per Danni NO deseche la caja/embalaje original. NON scartare la scatola / confezione originale. En caso de que se requiera una devolución, el artículo debe ser Nel caso in cui sia richiesto un reso, l'articolo deve essere restituito devuelto en la caja original.
- Page 38 Zwroty i reklamacje Nie wyrzucaj oryginalnego opakowania. Jeśli chcesz zwrócić produkt, musi znajdować się on w oryginalnym opakowaniu. Towar zwrócony w nieoryginalnym opakowaniu nie zostanie przyjęty. Zrób zdjęcie oznaczeń na opakowaniu. Jeśli jakakolwiek część wymaga wymiany, zrób zdjęcie oznaczeń kodu produktu, który znajduje się na opakowaniu. Pozwoli nam to zidentyfikować...
Need help?
Do you have a question about the BB0440 and is the answer not in the manual?
Questions and answers