
Related Manuals for SEVVA 480WATT

Summary of Contents for SEVVA 480WATT
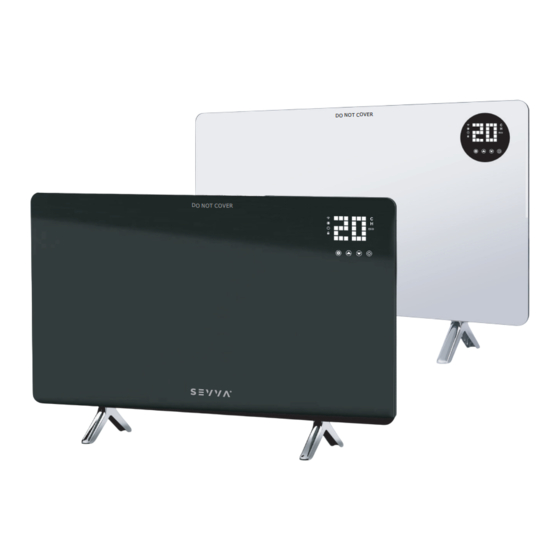
- Page 1 480WATT Smart Infrared Panel Heater Bring style and comfort to your home with SEVVA® Instruction Manual...
- Page 2 Important PLEASE READ AND SAVE THESE IMPORTANT SAFETY INSTRUCTIONS When using electrical appliances, basic precautions should always be followed to reduce the risk of fire, electric shock, and injury to persons, including the following: Read all instructions before using this heater. Extreme caution: This appliance is not intended for use by persons (including children) with reduced physical, sensory or mental capabilities, or lack of experience and knowledge, unless they have been...
- Page 3 Use this heater only as described in this manual. Any other use not recommended by the manufacturer may cause fire, electric shock, or injury to persons. Avoid the use of an extension cord because the extension cord may overheat and cause a risk of fire. However, if you have to use an extension cord, the cord shall be rated not less than 800 watts(under 220-240V).
- Page 4 UNPACKING AND WALL MOUNTING INSTRUCTIONS Unpack your package and find the heater together with the wall mounting accessories pack. Mark the positions of the four holes to be drilled on the wall, and drill the holes with the drill bit. Make sure the distance between each holes is same as the holes on the brackets at back of the heater.
- Page 5 FREE STANDING INSTRUCTIONS Place the free standing feet on the ground, cover the 4 caps onto the 4 screws on the brackets on the back side of the heater. Snap the stander into the groove of the bracket on the bottom , cover the caps and the screws , then screw the bolts in to the holes on the bracket.
- Page 6 Display Part Child Lock key Timer Heating indicator light WiFi indicator light C- Degree indicator light H - Timer indicator light ECO- ECO indicator light Display of temperature/timer Instructions of the indicator light: ON/OFF : Press to turn on /turn off the heater; Setting Key:...
- Page 7 Remote Control Instructions Note Before using the remote control, make sure that 2 pieces of AAA battery are installed correctly. Instruction of Remote control RC2 : Press to screen off , press again to screen on. RC6: Press to lock ,the icon of will be light on, then all the keys on the control panel or on the remote control will be unavailable;...
- Page 8 OPERATING INSTRUCTIONS There are 2 modes to use this heater Simply Heating ON/OFF mode with 24 hours timer Check the heater to be sure it is not damaged before using. Insert the plug in the socket; Turn the main switch on, you will hear “beep”, the big display screen will be light on , then display “--”, WIFI light flashing and the heater is in standby mode;...
- Page 9 Open Weekly mode 7*24hours ( Connect WIFI and APP to operate with smartphone) Connecting to WiFi 8.1 - To connect your heater to the WiFi, the first step is to download the TUYA Smart app onto your smartphone . You can find the app by scanning the QR code below or searching “TUYA Smart”...
- Page 10 8.5 - If the WiFi icon is not flashing, press the “on/off” button back to the stand by mode . Once the icon is flashing, go to the app and press Add a Device. Select the device type (Small Appliances > Heater) and confirm that the indicator is flashing.
- Page 11 8.7 - The Heater will beep and display a solid icon when the device is connected. 8.8 - The app will confirm that the heater has been added. You can now name the device Select ... at top right in the control screen, then select Modify Device Name to give your heater a logical name so that it is clear to you which heater it is.
- Page 12 9.2 - When the heater is online, tap the device name to go to the control interface. Note: when the heater is offline, you will not be able to control it with the app. 9.3 - Using the Wifi and App to control the heater. 9.3.1 - Switch : Turn on/off the heater ;.
- Page 13 Current name of Change the device the device name as you like Setting temperature ECO MODE Child Lock Current room temperature Setting temperature Setting adjust temperature adjust 24 hours timer Setting ON/OFF * ECO mode * Child Lock * Screen on/off * 7*24hours timer...
- Page 15 TROUBLES SHOOTING If your heater fails to operate, please follow these instructions: Ensure that your circuit breaker or fuse is working properly. Be sure the heater is plugged in and that the electrical outlet is working properly. If the ON/OFF switch is not illuminated at ON position, send it to service center for reparation directly.
- Page 16 Commercial Warranty Warranty period We offer a 2-year warranty from the date of purchase on SEVVA® products. This warranty covers material and manufacturing defects. Keep your proof of purchase safe, as this serves as proof of warranty. Warranty Coverage This warranty covers the cost of parts and labor necessary to correct defects due to defects in materials or workmanship.
- Page 17 Warranty Claims Procedure If you would like to file a warranty claim, please follow these steps: Contact our customer service at o klantenservice@sevva.nl Describe the problem and, if possible, include photos or videos of the defect. Make sure you have the original proof of purchase at hand.
- Page 18 Belangrijk LEES EN BEWAAR DEZE BELANGRIJKE VEILIGHEIDSINSTRUCTIES Bij het gebruik van elektrische apparaten moeten altijd de basisvoorzorgsmaatregelen worden gevolgd om het risico op brand, elektrische schokken en verwondingen te verminderen, inclusief de volgende: Lees alle instructies voordat u deze verwarming gebruikt. Extreme voorzichtigheid: Dit apparaat is niet bedoeld voor gebruik door personen (inclusiefkinderen) met verminderde fysieke, zintuiglijke of mentale vermogens, of gebrek aan ervaring en kennis, tenzij zij onder...
- Page 19 Om brand te voorkomen, blokkeer de ruimte tussen de verwarming en de muur niet. Een verwarming heeft hete en boogvormige of vonkende onderdelen aan de binnenkant. Gebruik het niet in ruimtes waar benzine, verf of ontvlambare vloeistoffen worden gebruikt of opgeslagen. Gebruik deze verwarmer uitsluitend zoals beschreven in deze handleiding.
- Page 20 Handleiding voor het uitpakken en monteren aan de muur Pak uw pakket uit en vind de verwarming samen met het accessoirepakket voor wandmontage. Markeer de posities van de vier te boren gaten op de muur en boor de gaten met de boor. Zorg ervoor dat de afstand tussen de gaten hetzelfde is als de gaten in de beugels aan de achterkant van de kachel.
- Page 21 ZELFSTANDIGE INSTRUCTIES Plaats de vrijstaande voeten op de grond, bedek de 4 doppen op de 4 schroeven op de beugels aan de achterkant van de kachel. Plaats de standaard in de groef van de beugel aan de onderkant, bedek de doppen en de schroeven en draai vervolgens de bouten in de gaten op de beugel.
- Page 22 Weergavegedeelte Kinderslottoets Timer Controlelampje verwarmingssysteem WiFi-indicatielampje Indicatorlampje van 9 graden Celsius Timer-indicatielampje 10 uur ECO-ECO-indicatielampje Weergave van temperatuur/timer Informatie over de indicatorlampjes: AAN/UIT : Druk op om de verwarming aan/uit te schakelen; Instellingen knop: Druk op de knop om te schakelen tussen temperatuur en timer.
- Page 23 Warmte -indicatielampje : Druk op de insteltoets om de snelheid van het knipperen aan te passen. Het verwarmingsindicatielampje geeft aan dat het apparaat aan het opwarmen is wanneer het brandt Handleiding voor de afstandsbediening Opmerking Voordat het gebruik van de afstandsbediening, zorg ervoor dat de twee AAA-batterijen correct zijn geplaatst Handleiding van afstandsbediening RC2 : Druk op om het...
- Page 24 Start de verwarming opnieuw om het apparaat te activeren. GEBRUIKSAANWIJZING Er zijn 2 modi om deze verwarmer te gebruiken. Eenvoudige verwarming in AAN/UIT-modus met 24-uurs timer. Controleer voor gebruik of de kachel onbeschadigd is. Plaats de stekker in het stopcontact. Zet de hoofdschakelaar aan, een "pieptoon"...
- Page 25 Open wekelijkse modus 7*24 uur (Verbinding maken met WiFi en de app om te bedienen met een smartphone) Verbinding maken met WiFi 8.1 - Om uw verwarming met WiFi te verbinden, dient u eerst de TUYA Smart-app op uw smartphone te downloaden. U kunt de app vinden door de onderstaande QR-code te scannen of te zoeken naar "TUYA Smart"...
- Page 26 U kunt WiFi verbinden en het apparaat toevoegen aan de TUYA APP met uw smartphone. 8.5 - Als het WiFi-pictogram niet knippert, druk dan op de "aan/uit"-knop terug te keren naar de stand-bymodus. Zodra het pictogram knippert, ga naar de app en druk op Een apparaat toevoegen. Selecteer het apparaattype (Kleine apparaten >...
- Page 27 8.7 - De verwarming maakt een piepend geluid en toont een vast pictogram wanneer het apparaat is ingeschakeld. 8.8 - T De app bevestigt de toevoeging van de verwarming. U kunt nu een naam aan het apparaat geven. Kies ... rechtsboven in het bedieningsscherm en selecteer vervolgens Apparaatnaam wijzigen om uw kachel een logische naam te geven, zodat het duidelijk is welke kachel het is.
- Page 28 9.2 - Wanneer de verwarming actief is, tik je op de naam van het apparaat om naar de bedieningsinterface te gaan. Let op: als de heater niet online is, kun je hem niet bedienen met de app. 9.3 - De verwarming bedienen via wifi en een app. 9.3.1- Schakelaar: Zet de verwarming aan/uit.
- Page 29 Current name of Change the device the device name as you like Setting temperature ECO MODE Child Lock Current room temperature Setting temperature Setting adjust temperature adjust 24 hours timer Setting ON/OFF * ECO mode * Child Lock * Screen on/off * 7*24hours timer...
- Page 31 PROBLEEMOPLOSSING Indien uw verwarming niet functioneert, gelieve deze richtlijnen te volgen: Controleer of uw stroomonderbreker of zekering naar behoren functioneert. Controleer of de verwarming is aangesloten en of het stopcontact naar behoren werkt. Als de AAN/UIT-indicator niet brandt in de AAN-stand, stuur deze dan onmiddellijk naar het servicecentrum voor reparatie.
- Page 32 Deze wettelijke garantie is van toepassing onverminderd de onderstaande commerciële garantie. Commerciële garantie Garantieperiode Op SEVVA®-producten bieden wij 2 jaar garantie vanaf de aankoopdatum. Deze garantie dekt materiaal- en fabricagefouten. Bewaar uw aankoopbewijs goed, dit geldt als garantiebewijs. Garantiedekking Deze garantie dekt de kosten van onderdelen en arbeid die nodig zijn om defecten als gevolg van materiaal- of fabricagefouten te corrigeren.
- Page 33 Normale slijtage. Garantieclaims Procedure Om een garantieclaim in te dienen, volgt u deze stappen: Neem contact op met onze klantenservice via klantenservice@sevva.nl Beschrijf het probleem en voeg indien mogelijk foto's of video's toe van het defect. Zorg ervoor dat u het originele aankoopbewijs bij de hand heeft.
- Page 34 Important LIRE ET CONSERVER CES INSTRUCTIONS DE SÉCURITÉ IMPORTANTES Lors de l'utilisation d'appareils électriques, des précautions de base doivent toujours être suivies pour réduire le risque d'incendie, de choc électrique et de blessure, notamment les suivantes : Lisez toutes les instructions avant d'utiliser ce radiateur. Extrême prudence : cet appareil n'est pas destiné...
- Page 35 Pour éviter les incendies, ne bloquez pas l'espace entre le radiateur et le mur. Un appareil de chauffage comporte des pièces chaudes qui produisent des arcs électriques ou des étincelles à l'intérieur. Ne l'utilisez pas dans des zones où de l'essence, de la peinture ou des liquides inflammables sont utilisés ou stockés.
- Page 36 Instructions pour le déballage et le montage au mur Déballez votre colis et trouvez le radiateur avec le paquet d'accessoires de montage mural. Marquez les positions des quatre trous à percer sur le mur et percez les trous avec la perceuse. Assurez-vous que la distance entre les trous est la même que celle des trous dans les supports à...
- Page 37 INSTRUCTIONS AUTONOME Placez les pieds autoportants au sol, recouvrez les 4 capuchons des 4 vis des supports à l'arrière du poêle. Placez le support dans la rainure du support en bas, couvrez les capuchons et les vis, puis serrez les boulons dans les trous du support. AVERTISSEMENT: Le radiateur ne doit pas être utilisé...
- Page 38 Zone d'affichage Bouton de verrouillage enfant Minuterie Voyant du système de chauffage Voyant Wi-Fi Voyant lumineux de 9 degrés Celsius Voyant lumineux de la minuterie 10 heures Voyant ECO-ECO Affichage de la température/minuterie Informations sur les voyants: ON/OFF : Appuyez pour allumer/éteindre le chauffage; Bouton Paramètres:...
- Page 39 Voyant de chaleur : appuyez sur le bouton de réglage pour régler la vitesse de clignotement. Le voyant de chauffe indique que l'appareil chauffe lorsqu'il est allumé. Manuel de la télécommande Remarque Avant d'utiliser la télécommande, assurez-vous que les deux piles AAA sont correctement insérées.
- Page 40 Redémarrez le chauffage pour activer l'appareil. MANUEL D'UTILISATION Il existe 2 modes pour utiliser ce radiateur. Chauffage simple en mode ON/OFF avec minuterie 24 heures. Avant utilisation, vérifiez si le radiateur est en bon état. Placez la fiche dans la prise. Allumez l'interrupteur principal, un «...
- Page 41 Ouvrir en mode hebdomadaire 7j/7 et 24h/24. (Connectez-vous au WiFi et à l'application pour contrôler avec un smartphone) Connectez-vous au WiFi 8.1 - Pour connecter votre chauffage au WiFi, vous devez au préalable télécharger l'application TUYA Smart sur votre smartphone. Vous pouvez trouver l'application en scannant le code QR ci-dessous ou en recherchant «...
- Page 42 Vous pouvez connecter le WiFi et ajouter l'appareil à l'application TUYA avec votre smartphone. 8.5 - ASi l'icône WiFi ne clignote pas, appuyez sur le bouton « Power » pour revenir en mode veille. Une fois l'icône clignotante, accédez à l'application et appuyez sur Ajouter un appareil.
- Page 43 8.7 - Le radiateur émet un bip et affiche une icône solide lorsque l'appareil est allumé. 8.8 - L'application confirme l'ajout du chauffage. Vous pouvez maintenant donner un nom à l'appareil. Sélectionnez ... en haut à droite de l'écran de commande, puis sélectionnez Modifier le nom de l'appareil pour donner à...
- Page 44 9.2 - Lorsque le chauffage est actif, appuyez sur le nom de l'appareil pour accéder à l'interface de contrôle. Attention : si le chauffage n'est pas en ligne, vous ne pouvez pas le contrôler avec l'application. 9.3 - Contrôler le chauffage via WiFi et une application. 9.3.1 - Interrupteur : Allumer/éteindre le chauffage.
- Page 45 Current name of Change the device the device name as you like Setting temperature ECO MODE Child Lock Current room temperature Setting temperature Setting adjust temperature adjust 24 hours timer Setting ON/OFF * ECO mode * Child Lock * Screen on/off * 7*24hours timer...
- Page 47 DÉPANNAGE Si votre chauffage ne fonctionne pas, veuillez suivre ces directives : Vérifiez que votre disjoncteur ou votre fusible fonctionne correctement. Vérifiez que le radiateur est connecté et que la prise fonctionne correctement. Si l'indicateur ON/OFF ne s'allume pas en position ON, envoyez-le immédiatement au centre de service pour réparation.
- Page 48 Garantie commerciale Période de garantie Nous offrons une garantie de 2 ans sur les produits SEVVA® à compter de la date d'achat. Cette garantie couvre les défauts de matériaux et de fabrication. Conservez précieusement votre preuve d’achat, elle sert de preuve de garantie.
- Page 49 Réclamations au titre de la garantie Procédure Pour faire une réclamation au titre de la garantie, suivez ces étapes : Contactez notre service client à klantenservice@sevva.nl Décrivez le problème et, si possible, incluez des photos ou des vidéos du défaut.
- Page 50 Eemnesserweg 11-3, 1251 NA Laren The Netherlands www.sevva.nl By offering this warranty statement, we strive to provide our customers with complete satisfaction and support with their purchase. We appreciate your confidence in our product and hope that you will enjoy your Infrared Panel Heater for a long time.
Need help?
Do you have a question about the 480WATT and is the answer not in the manual?
Questions and answers