
Related Manuals for Outdoor Cameras Australia Swift Enduro 4G

Summary of Contents for Outdoor Cameras Australia Swift Enduro 4G
- Page 3 Contents 1.0 Quick Start Guide ....................- 4 - 1.1 What’s in the Box ............................- 4 - 1.2 Let’s Get Started ............................- 4 - 1.3 How to Setup the Enduro ..........................- 5 - 1.4 Camera Layout ............................- 7 - 2.0 Enduro 4G .......................- 8 - 2.1 Figure 1: Front View ...........................- 8 - 2.2 Figure 2: Bottom View ..........................- 9 - 2.3 Figure 3: Internal, Side and Back View .....................- 10 -...
- Page 4 The rst few pages of this manual give you a Quick Start Guide as an introduction to the Swift Enduro 4G. However, for more detailed and important camera instructions, please see Part 3.
- Page 5 SIM card and that it has credit on it. 1.3 How to Setup the Camera Now it’s time to con gure your Swift Enduro 4G camera for your unique situation. 1. Con gure Camera Settings Switch the Power switch to SETUP. The screen will light up with the Enduro logo brie y and then you will be able to see what the camera can see.
- Page 6 2. Entering your 4G Settings If it comes up with a signal bar and no other pop-ups, it means the network is auto-matched and no manual setup is needed. Go to the 4G Menu tab and complete the “Send To” section by entering phones/emails or FTP that you want the camera to send images to.
- Page 7 1.4 Camera Layout (Default Settings in Red Letters) Other Cam ID Language PIR Switch SIM Auto Match OFF/ON English... ON/OFF Auto/Manual Cam Mode Sensitivity Date/Time Manual Setup Photo/Video High/Middle/Low Auto/Manual MMS/4G Pic + Video Date Type Delay IR LEDs OFF/ON YY/MM/DD ON/OFF High/Low...
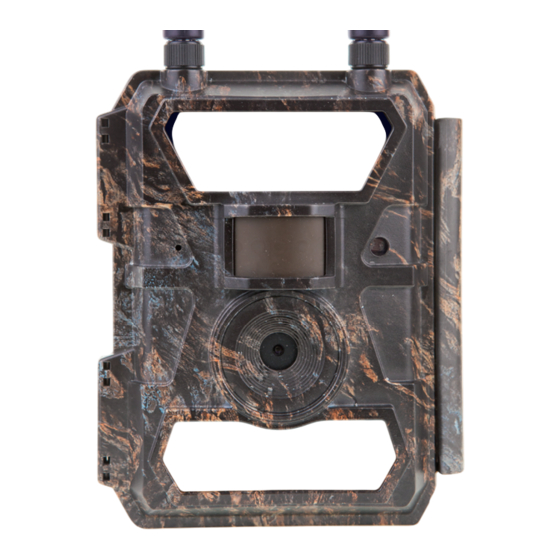
- Page 8 Enduro 4G Layout Take a few moments to familiarise yourself with the camera controls and displays. 2.1 Figure 1: Front View Antennas 27 IR LEDs Indicator Light PIR Sensor Light Sensor (day/night) 59 IR LEDS in Total Lens 32 IR LEDs...
- Page 9 2.2 Figure 2: Bottom View SIM Card golden part faces front housing side. SD Card Slot Battery Bay DC in USB port MENU Button LCD Screen...
- Page 10 SD Card Slot Battery Bay 2.3 Figure 3: Internal, Side and Back View DC in USB port LCD Screen MENU Button Power Switch Navigation Buttons/ Battery Bay (ON/OFF/SETUP Test Mode) OK Button...
- Page 11 3.1 Introduction Thank you for purchasing the Swift Enduro 4G Camera. Now it’s time to capture those images or videos you need from your camera. Just remember, if you are having any di culties with your camera, or nd yourself struggling with the manual, please call us from 9am-5pm Monday to Friday.
- Page 12 The table below shows the approximate number of photos or videos the camera can take with 12AA alkaline batteries. Even better performance can be achieved with rechargeable NiMH batteries or lithium batteries. Test Condition: LCD screen o . Mode: “Power On” PIR motion detection on; 4G O 12AA Alkaline Batteries Photos shot per day Working time...
- Page 13 If you insert a smaller sized sim card it can fall into the camera and will need to be returned to Outdoor Cameras Australia to be removed. If this occurs do not attempt to remove the sim card yourself as the sim card slot is very sensitive.
- Page 14 3.6 4G Key Features 1. 0.35 seconds trigger speed; 2. Up to 24MP/ 1080P@30FPS; 3. Programmable 5/8/12/24 Megapixel high-quality resolution; 4. 59pcs invisible IR LEDs (black fl ash), off er 20 metres (65 feet) real night vision distance; 5. Clear day & night photo/video quality; 6.
- Page 15 4.2 Delete In Playback Mode (see 4.1 above), press the “Menu” button to delete les, or format SD card. Press “OK” to choose Delete, then press“” and “”for selection of “ONE” (deletes one image) or “ALL” (deletes all images), then “Yes”...
- Page 16 The “Cam” Tab Settings Programmable Options Select “ON”, press “OK”, to set 4 digits/ letters for each camera. This function can help the user to identify Cam ID what photos are from what camera. Photo, PIC+VIDEO, Video 1. Photo: camera shoots photos only based upon the selected Multi-shot & Image Size; Cam Mode 2.
- Page 17 Settings Programmable Options OFF/ON The PIR switch is the cameras motion sensor. With the PIR Switch OFF the camera will not be able to take PIR Switch photos or video upon motion. With the PIR Switch ON, the camera is able to take photos and videos when the camera detects movement.
- Page 18 setting camera only operate during speci ed time period. Timer1 Select “ON”, press “OK”, to set the beginning time and the end time (hour/minute). i.e.: 15:00 – 18:00; camera only works during 15:00 – 18:00 The camera has two timers so you can set two separate working periods. For instance you can have a morning Timer2 operating period set in Timer 1 and an afternoon operating period in Timer2.
- Page 19 Enter your local carriers 4G APN, and corresponding Username and Password. Note: Only with 4G settings added, can SMTP and FTP functions work. 4G Setup Note: it’s not a must to enter Username and Password of APN. But some carriers may require this password access to enable GPRS function.
- Page 20 SMTP/FTP Pic Options This controls the size of the images you receive via SMTP (email) or FTP. Pic Size: Small/ Bigger/ Original; Small (640*480/30-40kb), or Bigger (1920*1440/ 300-400kb), or Original (5M/ 8M/ 12M/ 24M /1MB-4MB) based on the Image Size you set in the CAM menu. Multishot Send: 1st/2nd/3rd/4th/5th Pic;...
- Page 21 Daily Report You can set the camera to send you a report at a set time each day containing the below information. 1) OFF; 2) ON; Choose ON to set up the time when you want the camera to send you the Daily Report; Contents of the Daily Report: Device IMEI Number, CSQ (Signal Strength): 0~31, Camera ID, Temperature, Date &...
- Page 22 The “Other” Tab Settings Programmable Options Language English… Auto/Manual Auto: camera will synchronize your date/time when switched to Live mode (ON) Manual: manually set your date/time Date/Time date : Month MM: year YY; hour HH: minute MM: second SS Month : date : year; hour : minute : second Note: Please adjust camera date/time to ensure some functions work as expected.
- Page 23 Specifications Image Sensor 5 Mega Pixels Colour CMOS E ective Pixels 2560x1920 Day/Night Mode IR range IR Setting Top: 27 LEDs, Foot: 32LEDs Memory SD Card (8MB – 32 GB) Operating keys Lens FOV=60°/100°; Auto IR-Cut-Remove (at night) LCD Screen 2”...
- Page 24 Device Serial No. Time Lapse SD Card cycle ON/OFF Operation Power Battery: 9V; DC: 12V Battery Type 12AA External DC Stand-by Current 0.135mA Stand-by Time 5~8 months (6×AA~12×AA) Auto Power O In Test mode, camera will automatically power o in 3 mins if there is no keypad touching. Interface USB/SD Card/DC Port Mounting...
- Page 25 How to Enter Text How to Enter Text in the “Send To” Email Section and FTP section. 1. Hitting the menu button changes from numbers to capitals to lower case and then to other characters. Hit the menu button to toggle through to nd the correct set of characters you require. Then hit the arrow buttons to scroll through the characters and the OK button to select the desired character.
- Page 26 Trail Camera APP Please note, this App is not required to use your camera. Only a small percentage of users will need to use the App. It is used to remotely change the settings of your camera. The TrailCamera App is available for free on both iPhone and Android.
- Page 27 5. Select your camera. 6. Hit the other Setting button 7. This takes you into the camera settings screen where you can enter all the camera settings. Make sure you have the cameras phone number in the top right (Camera Phone Number). 8.
- Page 28 9. Hit the Send button. Depending on whether your phone is Android or iPhone the phone will react di erently. iPhones bring up the standard “Messages” App which allows you to then send the message in that App, while Androids bring up send message con rmation screens to which you just hit Con rm.
- Page 29 12. “Complete all the settings to your desired con guration. If sending by MMS or email complete the relevent section Send To Phone or Send to Email (or both). In the “Send To Phone” section enter the phone numbers you want the camera to send the images to. Same for the Send To Email section.
- Page 30 Trouble Shooting 8.1 Photos Do Not Capture Subject of Interest 1. Check the “Sensor Level” (PIR sensitivity) parameter setting. For warm environmental conditions, set the Sensor Level to “High” and for cold weather use, set the sensor to “Low”. 2. Try to set your camera up in an area where there is less environmental heat (hot air vents, higher o the ground in summer to get less of the ground’s heat) in the camera’s eld of view.
- Page 31 5. Try formatting the SD card with the camera. Also ensure the SD card is 8GB to 32GB in size. No smaller or larger. It is also a good idea to sometimes try another SD card. 8.3 Night Vision Flash Range Doesn’t Meet Expectations 1.
- Page 32 Warranty We are very happy to o er our customers a two year warranty on the Swift Enduro 4G camera. Our products are warranted against defects in materials and workmanship for a period of two years from the date of original purchase.
- Page 33 Notes _________________________________________ _________________________________________ _________________________________________ _________________________________________ _________________________________________ _________________________________________ _________________________________________ _________________________________________ _________________________________________ _________________________________________ _________________________________________ _________________________________________...
- Page 36 36 36...
Need help?
Do you have a question about the Swift Enduro 4G and is the answer not in the manual?
Questions and answers