Advertisement
Quick Links
Advertisement

Summary of Contents for MIRI X510
- Page 1 Miri X510 User Manual...
- Page 2 Content Overview ......................................3 Owner Guide ....................................5 Safety Information ................................5 Interfaces....................................6 Installing in a 1U Rack ..............................8 Getting Started ................................... 9 LCD Touchscreen ..................................11 Web UI ........................................ 14 Accessing the Web UI ..............................14 Viewing Device Information..........................20 Managing the Internet ...............................
- Page 3 Multi-Path Network Bonding for Flexibility and Convenience Miri X510 can simultaneously bond up to 8 network connections, including 1 x 5G, 1 x 4G, 2 x wired networks, 2 x Wi-Fi 6 wireless networks and 2 x USB shared networks, providing users with a highly flexible network bonding solution and a stable and reliable mobile network connection anytime, anywhere.
- Page 4 Easy to use, no need to build aggregation server Miri provides unified network bonding services and back-end operation and maintenance, and deploys cloud servers globally. When using Miri X510, users do not need to build their own server, effectively reducing network operation risks.
- Page 5 Owner Guide Safety Information Electrical Safety Seek professional assistance before using an adapter or extension cord. These devices could interrupt the grounding circuit. Make sure that you are using the correct power adapter for the local voltage. If you are not sure about the voltage of the electrical outlet you are using, contact your local power company.
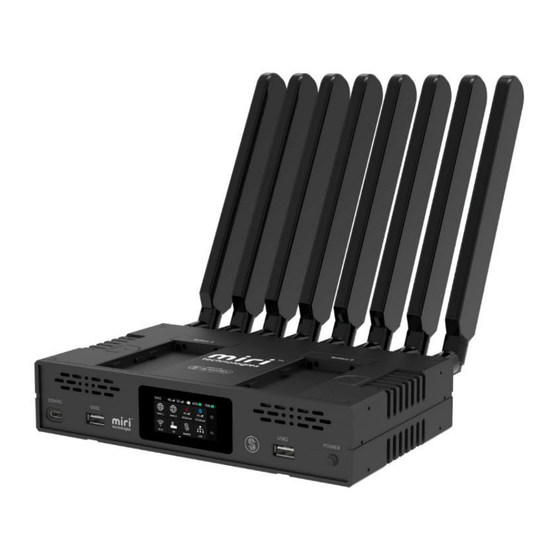
- Page 6 Interfaces Front View Rear View...
- Page 7 Top View...
- Page 8 Installing in a 1U Rack Miri X510 provides substantial performance in a space-saving design. It is easy to deploy and offer flexibility to expand later on. You can install two devices side by side in a 1U rack with provided short rack ears and retainer plate, see Fig1, or one device...
- Page 9 Getting Started Activating your device via the touchscreen Connect the supplied antennas. Connect to the internet by inserting a SIM card, connecting a USB modem, or connecting an Ethernet cable to the WAN port. Note that the antennas for WiFi and cellular are not interchangeable. The two WiFi antennas have a reversed connection (RP-SMA) to match industry standards.
- Page 10 Sign in to your Speedify account (or create a new account), and the device will automatically be linked to your account. Switch back to the Miri Web UI webpage, and click “Go to use” to start using the Web UI.
- Page 11 LCD Touchscreen Through the LCD touchscreen, you can intuitively and conveniently view a variety of important information, including the current network connection status, network bonding status, device operation status and related hardware information. It allows you to grasp the operation status of the equipment at any time during operation, thus improving management efficiency and ensuring the smooth operation of the system.
- Page 12 return to home page go back to the previous page Main screen icons: Icon Subpage Description Scroll up and down to view information about WAN1 or WAN2. Scroll up and down to view information about the cellular network of 5G SIM or 4G SIM.
- Page 13 Turn off the switch of WLAN to enable the AP mode, and then the STA mode of the corresponding band will be disabled. View the current traffic usage of network bonding, with data visualization charts showing the current server connection Speedify status.
- Page 14 Web UI The Miri X510 provides a Web UI that allows users to manage network bonding, view information, and set up devices. Once the local computer and the device establish a network connection, you can access the Web UI. Users can use the tabs in the navigation bar on the top of the Web UI to navigate: Device Status: Displays the basic information of the device, its operation status, ...
- Page 15 USB network provides a virtual network connection. Using this technology, you only need to connect the device and your computer with a USB cable so that your computer can access Miri X510. Linux, macOS 10.12 and later, and Windows 10 19H1 and above are supported.
- Page 16 Using the IP address of the LAN port You can use the IP address of the LAN port to access the device. This method is available on Windows, Linux, and macOS. Use a network cable to connect the LAN port of the device to the network port of your computer.
- Page 17 You can use the AP network to access the device. on the touchscreen to view the AP's QR code, or swipe up or down to view the SSID. The default SSID is Miri X510 Router_#_5G or Miri X510 Router_#_2.4G, # for last four digits of serial number Connect your computer (or other mobile device) to the device’s AP network.
- Page 18 Common user None administrator. Miri X510 allows multiple users to simultaneously log in to the Web UI and perform configurations. However, this may lead to previous configurations being overwritten by latter configurations. Therefore, to prevent configuration conflicts, different users should avoid changing configurations at the same time.
- Page 19 After using the Web UI, make sure you log out so as to prevent unauthorized access. Changing the Login Password Periodically changing the login password can improve your account security. Log in to the Web UI using an account. Click the user name at the upper right corner, and click Change Password. In the displayed dialog box, enter the old password, new password, and confirm the new password.
- Page 20 Basic Device Information The "X510 Router" area displays the device's basic information and operating status. Device name: Displays the name of the device, which defaults to the serial number. ...
- Page 21 Fan Speed: Displays the fan's RPM, which changes with the device's temperature. CPU Temperature: Current temperature of the CPU. To prevent overheating, keep the device's environment clean and at a moderate temperature. Wi-Fi Temperature: Current temperature of the Wi-Fi module. To prevent ...
- Page 22 No SIM Card: 4G/5G SIM card not inserted. Real-time speed of 4G/5G network. Locked: The SIM card has a PIN code and needs to be unlocked on the device's touchscreen. Wi-Fi 5G/Wi-Fi 2.4G (displayed when enabled): Down: The network port is down. ...
- Page 23 Setting Network Priority Miri X510 uses network resources in the order of “WAN 1 > WAN 2 > 4G > 5G > Wi-Fi 5G > Wi-Fi 2.4G > USB Tethering” by default, in which the Wi-Fi network is not enabled by default, and the USB Tethering is prioritized by the one that is plugged in first.
- Page 24 Tethering automatically moves to the bottom of the network list. Viewing and Setting the WAN Viewing WAN Information In the WAN1/WAN2 area of the WAN page, view Ethernet connection information. Status: Ethernet connection status. Down: The network port is down. ...
- Page 25 Receive: Data receiving speed. Configuring a Static IP Address for WAN The device uses an DHCP-assigned IP address by default, which can effectively avoid IP address conflict, but can also result in constant IP address changes. If no DHCP service is available in a network, you can manually set a static IP address.
- Page 26 Viewing the 4G/5G In the “4G” or “5G” area, you can view the current mobile network connection. Status: Displays the connection status of the mobile network, or the possible reasons why the mobile network is not connecting. Connected 4G/5G network and signal strength. ...
- Page 27 base station. The larger the value, the better the signal quality. SINR: Signal-to-Interference plus Noise Ratio, used to indicate the ratio of signal strength to interference and noise, is an important indicator of signal quality. The larger the value, the better the signal quality. IP address: IP address of the current device.
- Page 28 Connecting Wi-Fi Click the WAN tab. In the Wi-Fi 2.4G or Wi-Fi 5G area, click Enable Wi-Fi. Click Yes in the popup. Enable Wi-Fi will disable the current AP functionality. Click Connect... A list of available Wi-Fi networks are displayed. Mine: Lists all networks that has been connected previously.
- Page 29 for multiple networks, it will connect to the first detected one. A connected network will show in the Mine area with the Connected status. You can: Click Disconnect to disconnect from the network. The next time you connect to the network that requires password, you no longer need to enter the password.
- Page 30 IP address: IP address of the device. Subnet mask: A 32-bit mask that divides an IP address into two parts, network address and host address. Gateway: IP address of the gateway. Primary DNS: Information of the primary DNS. ...
- Page 31 address and host address. MAC address: MAC address of the current network adapter. Send: Data sending speed. Receive: Data receiving speed. ...
- Page 32 Managing the LAN In the LAN page, you can manage LAN, AP and DHCP assignment. Setting the LAN Click to go to the “LAN > LAN” tab. In the “LAN” area, set the following parameters. IP Address: Set the IP address of the device on the LAN. The default address is ...
- Page 33 pool. When a client device connects to the router and requests an IP address, the router assigns an IP address within the end address range of the IP address pool. If no address is available when the end address is reached, the router will not be able to assign an IP address to the new device.
- Page 34 SSID: AP network name, which is used for identifying the AP when you connect to it. The default is Miri X510 Router_#_2.4G/5G, where # indicates the last four digits of device serial number. Supported characters include A-Z, a-z, 0-9, and _-, allowing 1-32 characters.
- Page 35 Viewing Dynamic Lease A dynamic lease is when the router temporarily assigns an IP address to a client device that expires after a certain period of time. It is suitable for devices that do not need a fixed address and helps to manage IP address resources more effectively. When the client device is connected to the Pro Router, click to enter the “LAN >...
- Page 36 Setting Static Lease A static lease refers to the permanent assignment of a fixed IP address by the router to specific client devices, suitable for devices that require long-term stable connections. Click to go to the "LAN > Static Lease" tab. In the "Static Lease"...
- Page 37 Repeat the above steps to assign fixed IP addresses to more devices. To modify, click behind a device's entry, make the necessary changes, and then click "Apply". To delete, click behind a device's entry, and click "Yes" in the pop-up window.
- Page 38 Using Network Bonding Service Miri X510 is powered by Speedify for network bonding. If you have skipped activation when starting using the device, please restart the device and then complete the activation to enjoy Speedify services. Viewing Server Connection Status Once you log into your Speedify account, the router automatically connects to a Speedify server.
- Page 39 Starts and stops the server connection: Turn off the CONNECTION switch to stop connecting to the Speedify server. To reconnect, click on Tap to Connect in the CONNECTION area. Setting Adapter In the ADAPTER area, you can view the info of networks serving for network bonding, include priority, IP address, uplink and downlink rates, daily and monthly usage.
- Page 40 Primary. Backup: Only use this connection for failover when no others are available. Does not do bonding for speed (least used). Never: Don't use this connection. DATA CAPS Daily Data Cap:Daily Data Cap allows you to control the amount of data ...
- Page 41 Using Pair & Share Pair and Share allows easily sharing Cellular connections back and forth between multiple Speedify users on the same Wi-Fi network. In the PAIR & SHARE area of the “Speedify > Guide” tab, you can view the information of devices.
- Page 42 Implementing Performance Tests The PERFORMANCE TESTS area of the “Speedify > Guide” tab test the server performance and make sure your settings are appropriate. Test total connection speed Click the Start button of “Start Speed Test” under “Active”. View the test result under “Recent Test”. The tested item displays the test time, server name, uplink and downlink rates, and connection number.
- Page 43 Selecting Speedify Server In the “Speedify > Server” tab, you can select the server to provide network bonding service. Automatic Selection: The device automatically connects to the best servers for performance. Fastest Server: By default, the device picks the closest Speed Server, which will ...
- Page 44 Dedicated Servers: Dedicated servers can be selected only if the login account is a team account. Country-specific, city-specific, and server-specific options are available. For more information about Dedicated Servers, please go to What are Dedicated Speed Servers? - Speedify Knowledge Base.
- Page 45 internet connections in order to deliver optimal speed and performance. Enhance Streaming: An add-on to Speed mode. When it is enabled, Speedify will automatically prioritize streams (video calls, audio calls, live streaming, etc) over other network traffic and intelligently use both bonding and redundancy to optimize performance.
- Page 46 turning it off. Setting Privacy In the “Speedify > Privacy” tab, you can set privacy encryption and bypass policy. PRIVACY By default Speedify runs encrypted, securing all of your traffic on its way to and from Speed Servers. This stops your internet service provider or hackers from seeing what you're doing online.
- Page 47 Viewing Account Information In the “Speedify > Account” tab, you can view your account information.
- Page 48 The device name can consist of 1-32 characters. Supported characters: A-Z, a-z, 0-9, spaces and _-. Spaces cannot be at the start or end. Click Apply. Click Dashboard in the navigation bar. Check whether Device name in the X510 Router area is changed to the new name.
- Page 49 This connection is convenient, especially when other network connections are not available. Miri X510 comes with a default network IP, namely 192.168.88.1. Viewing USB Network Information Log in to the Web UI as the Admin user.
- Page 50 MAC address: MAC address of the current network adapter Send: Data sending speed Receive: Data receiving speed Changing the USB Network IP Address Log in to the Web UI as the Admin user. Choose System > General. In the USB NET area, click Edit.
- Page 51 Setting the System Time Before using this device, you need to select your time zone and adjust time to ensure time accuracy. Selecting a Time Zone Log in to the Web UI as the Admin user. Choose System > General. In the DATE &...
- Page 52 Setting Time Automatically You can automatically synchronize time from the network. By default, the timer automatically synchronizes time from NTP servers. Network Time Protocol (NTP) servers provide network-based time synchronization service. There are many NTP servers available on the Internet. You may also deploy your own ones.
- Page 53 0.pool.ntp.org. Make sure you enter a valid domain name. NTP server 2: Domain name for NTP server 1, optional. The default is 1.pool.ntp.org. Make sure you enter a valid domain name. Click Apply. Setting Time Manually You can also manually calibrate your system time. Log in to the Web UI as the Admin user.
- Page 54 Joining Magewell Control Hub Miri X510 is a Magewell Control Hub Certified Device, which allows it to be registered with the Magewell Control Hub for remote centralized management. Currently, you can connect two Control Hub instances. Please install and log in Magewell Control Hub at first by referring to...
- Page 55 be consist with that of Control Hub. Port 443 is used by default. HTTP port:: Input HTTP port number, which should be consist with that of Control Hub. The default number is 80. In the CONTROL HUB 1 area, check parameters related to Control Hub management.
- Page 56 Enabling HTTPS By default, you can log into the Web UI via HTTP. You can also enable HTTPS. Log in to the Web UI as the Admin user. Choose System > Security. Add HTTPS certificate. (1) Click From file of Certificate and select the certificate file. (2) Click From file of Private Key and select the private key file.
- Page 57 Upgrading the Firmware Before updating, download the firmware from the official website to your local computer. Log in to the Web UI as the Admin user. Choose System > Firmware. In the MANUAL UPDATE area, click click to upload in the file upload box to select the firmware file stored locally and upload.
- Page 58 Log in to the Web UI again and check firmware version on the Dashboard page. The firmware version should be the one you just updated to. Managing Users Miri X510 has a preset Admin user that cannot be deleted. The Admin user can create and manage users for the current device. Creating Users Multiple users can access the same device for monitoring or other operations.
- Page 59 The user name is case sensitive, ranging from 3 to 12 characters consisting of A-Z, a-z, 0-9 and underscores (_). The password is case sensitive, ranging from 1 to 32 characters consisting of A-Z, a-z, 0-9, and special characters _-~!@#$%^&*-+= Click OK.
- Page 60 Managing Logs When you need support service, providing logs to support engineers can often help troubleshooting your problem. Only the Admin user can export logs. Log in to the Web UI as the Admin user. Choose System > Logs. Check boxes to filter logs. Click Report to export a log file.
- Page 61 Rebooting the Device When the router cannot run properly, you can reboot the device for troubleshooting. Rebooting will not make the current device settings invalid. Log in to the Web UI as the Admin user. At the upper right corner of the Web UI, click the user name, and click Reboot. In the displayed window, click Reboot.
- Page 62 Resetting the Device Both the Admin user and common users can reset the device. To avoid unintended resetting, you can only reset the device after connecting to it through USB network. Use an USB cable to connect the router and your computer. On the computer, open a browser and enter the USB network IP address in the address bar.
- Page 63 Battery Miri X510 supports two hot-swappable NP-F battery packs, which allows for device operation without the need for a physical power connection. You can insert battery and power adapter separately or simultaneously. When they are both inserted, the device uses the power supplied by the power adapter as the priority.
- Page 64 Battery Installation Miri X510 supports 7.4V NP-F type battery packs, such as Sony NP-F550 and Sony NP- F750. You can use the same or equivalent types. Install: press the lock button first and put the battery into the slots until it is locked ...
- Page 65 During operation, your device will use the battery with the lower charge, then swap over to the other when the battery is depleted without interruption. As the device supports hot swapping, you can replace the depleted battery without any interruption to network transmission.
Need help?
Do you have a question about the X510 and is the answer not in the manual?
Questions and answers