Advertisement
Quick Links
Advertisement

Related Manuals for FLOTER AIRBOY nano3

Summary of Contents for FLOTER AIRBOY nano3
- Page 1 nano4 – OPERATION INSTRUCTIONS...
- Page 2 OPERATING INSTRUCTIONS Contents Safety Guideliines Air cushion types Machine overview Technical data Accessories and spare parts Operating instruction Adjustments with control panel Replacement of blade Replacement of high temperature belt Failures and solutions Options and expandability Maintanance and Cleaning Warranty Declaration of conformity Support und Service Document version 10.01.2024...
- Page 3 OPERATING INSTRUCTIONS Safety guidelines Please read the safety guidelines and operating instructions closely before using the machine. - Turn off the machine and disconnect power before opening the machine or performing any repair or maintenance work on the machine. - Switch off the machine if it will not be used for an extended period of time. - Do not insert any objects into the machine when it is connected to power.
- Page 4 OPERATING INSTRUCTIONS Air Cushion filler Our standard version – Polyethylene 20 μm Type 9.7.1 AirWave air cushion filler 100 x 210 mm; 20 µm; 350 lfm Ideal for filling small voids and for use as an intermediate layer Air cushion wrapper Our standard version –...
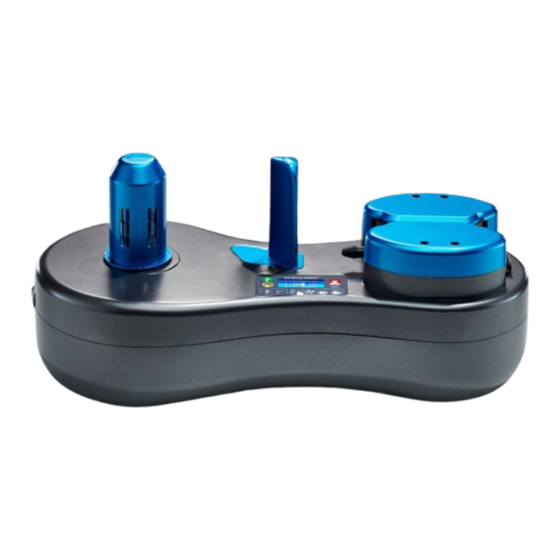
- Page 5 OPERATING INSTRUCTIONS Machine Overview 1. Feeding roller 2. Tension column 3. Control panel 4. Air nozzle 5. Protecting cover 6. Power switch 7. Power socket 8. Heating element 9. Teflon belt 10. Silicone wheels 11. Excentric shaft...
- Page 6 OPERATING INSTRUCTIONS Technical data Input Voltage: AC100-240 1.6A 50/60Hz Working power: 50-150W Speed (4 levels): V1:4m/min; V2:6m/min; V3: 8m/min; V4:10m/min Weight: 2,6 kg Output Voltage: DC 12V 8A Product dimensions (LxBxH): 430 x 190 x 195 mm...
- Page 7 OPERATING INSTRUCTIONS Recommended settings Standard 20µm / ClimaFilm-50 Speed Temperature % Air % 120-130 06-08 9.7.1 / 7.1 9.8.3 / 7.1 120-130 32-34 from Serial-No. > N4 120250XXX please use the following settings : Standard 20µm / ClimaFilm-50 Speed Temperature % Air % 65-75 13-15...
- Page 8 OPERATING INSTRUCTIONS Accessories and spare parts Hex key (2 pcs.) Teflon Belt (2 pcs.) Blade (1 pcs.) Wrench (1 pcs.) Screw Power cord...
- Page 9 OPERATING INSTRUCTIONS Operating Instructions 1. STOP 1. START 2. Set Working Time 2. Film In/Out Speed adjustment 1. Temperature 1. Air volume adjustment adjustment 2. Working time (sec) 2. Working time (min) Control panel: 99:59 Working time (max. 99min:59sec) Speed level V4 (10m/min) 050% Temperature (50%) 010% Air volume level (10%)
- Page 10 OPERATING INSTRUCTIONS Operating Instructions 1.Turn on the power switch Connect the power cable to the socket and turn on the power switch. 2. Install the air cushion film on the feeding roller Load the film roll into the feeding roller and pass the film through with the air channel side down.
- Page 11 OPERATING INSTRUCTIONS 4. Air Cushion production After you have inserted the film and set the parameters (page 6) temperature, air volume, speed according to the type of film - press the "START" button to start film production and check the air filling quantity and sealing result at the same time. If necessary, adjust the temperature and air volume according to the actual situation (room temperature etc.
- Page 12 OPERATING INSTRUCTIONS 4. Adjustment working time Working time presetting: Long press the “STOP” button to enter the run time preset mode (00:01 bis 99:59min), the temperature “+” and “-” buttons refer to minutes; the air volume “+” and “-” buttons refer to seconds. Please press the “STOP” button to save and exit the data 1.
- Page 13 OPERATING INSTRUCTIONS Replacement of blade Please replace the blade if the film bunchs up on the blade or when the cut is seriously uneven. Also replace if rust appears on the blade. Step 1: Switch off the machine and disconnect power Disconnect power to the machine by removing the power cord completely from the machine.
- Page 14 OPERATING INSTRUCTIONS Replace high temperature belt Please replace the high temperature belt when there are abrasions, the heating unit, the conveyor wheels and the sealing wheels will fail if the high temperature belt is worn and not replaced. Step 1: Switch off the machine and disconnect power Disconnect power to the machine by removing the power cord completely from the machine.
- Page 15 OPERATING INSTRUCTIONS Failures and solutions Failure Reason analysis Solution Air leakage temperature increase temperature value value too low sealing is wide and temperature too lower temperature value thin high under-inflation air volume value increase air volume value too low during operation the body Turn off the device, let it cool the foil is jamming...
- Page 16 OPERATING INSTRUCTIONS Options and expandibility Please contact your sales advisor for further information. Mobile table solutions Bring your machine to the ideal working height.(compatible with Docking station) Rolling basket light The rolling basket is mobile and always brings your air cushions to the ergonomically correct working height.
- Page 17 OPERATING INSTRUCTIONS Maintanance and Cleaning The AirBoy nano4 is a low maintenance machine. Mechanically claimed parts can show traces of abrasion after certain operating time and need to be changed. Furthermore there can occur typical contamination or residues of film or dust at the AirBoy nano4. Our recommendation: After 30 roll changes or if required: Check Teflon belts and replace as the circumstances require.
- Page 18 OPERATING INSTRUCTIONS Warranty AirBoy nano4 has a 12-month manufacturer’s warranty that covers all electronic and mechanical components. The warranty period startsautomatically when you purchase the machine. In the event of damage, please contact our Customer Service Center (please see contact below).
- Page 19 OPERATING INSTRUCTIONS Declaration of Conformity The machine AirBoy nano4 is compliant with the relevant harmonized standards listed according to EMC-Regulations 2014/30/EU and LVD Regulations 2014/35/EU. The compliance was verified by an independent specialized certifying company. Technical documentation available on request.
- Page 20 OPERATING INSTRUCTIONS Support und Service If you need support, advice or do you have any questions? www.floeter.com/en/support/ We are here for you: FLÖTER Verpackungs-Service GmbH Robert-Bosch-Straße 17 71701 Schwieberdingen Germany Tel.: +49 (0) 7150 / 92396 - 0 Info@floeter.com www.floeter.com/EN...
Need help?
Do you have a question about the AIRBOY nano3 and is the answer not in the manual?
Questions and answers