Advertisement
Quick Links
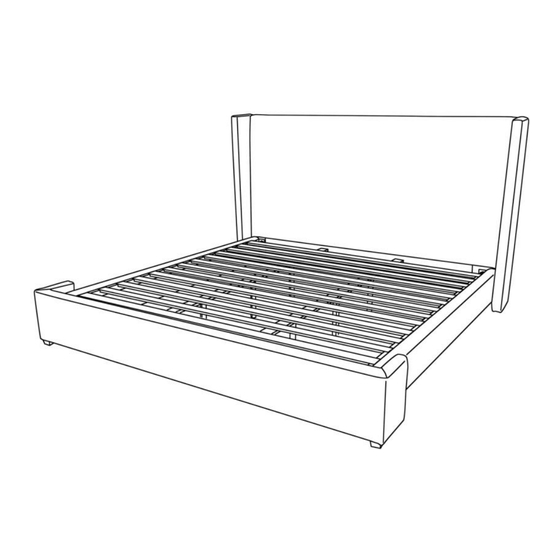
Upholstered King Bed
Upholstered Queen Bed
BR-147
ASSEMBLY INSTRUCTIONS
Est. Assembly Time: 30 mins
Number of People: 2
Date:
2024/5/10
Page 1 / 10
For assistance with assembly or customer service, please contact the Abbyson Customer Experience Team
Toll Free at 1-888-406-0838
www.abbyson.com
Advertisement

Related Manuals for ABBYSON HOME BR-147


Summary of Contents for ABBYSON HOME BR-147
- Page 1 Upholstered King Bed Upholstered Queen Bed BR-147 ASSEMBLY INSTRUCTIONS Est. Assembly Time: 30 mins Number of People: 2 Date: 2024/5/10 Page 1 / 10 For assistance with assembly or customer service, please contact the Abbyson Customer Experience Team Toll Free at 1-888-406-0838...
- Page 2 IMPORTANT SAFETY INSTRUCTIONS: Read all instructions carefully before unpacking assembly parts. Sharp, exposed staple tips can cause injury. For · your protection, please remove any exposed staples used in packing. For your safety, assembly by two or more adults is recommended. ·...
- Page 3 Package Contents PART # Description PART # Description 2 For King Headboard Middle Bar 1 For Queen 6 For King Left Sideboard Support leg 3 For Queen Right Sideboard Slat L Shape Connect Metal Footboard Corner Connect Metal Wood Leg Thank you for your purchase.
- Page 4 PARTS LIST PART # PICTURE PART DISCRIPTION Headboard (HB001) Left Sideboard (SB001) Right Sideboard (SB002) Footboard (FB001) Wood Leg (92105430001) 2 For King Middle Bar (MB001) 1 For Queen 6 For King Support leg (92103970002) 3 For Queen Slat (ST002) Thank you for your purchase.
- Page 5 HARDWARE LIST PART # PICTURE PART DISCRIPTION L Shape Connect Metal Pad (950670030) Corner Connect Metal Pad (950670033) Hex Head Bolts (950340007 M8*30mm) Hex Head Bolts (950340021 M6*50mm) Lock washer (950510006 M8) Flat washer (950500016 M8*22mm) Phillips Head Screw Wood Leg fix use (950080013 Φ5*50mm) 52 For King Phillips Head Screw Slats fix use (950080005 Φ...
- Page 6 STEP 1 Attach Legs 1. Place bed on a clean space on the floor in the desired location. Remove parts and identify all components and hardware. 2. Attach the Wood Legs (E) onto the bottom of the bed frame by inserting the bolts (L) into the pre-drilled holes as shown in the illustrated diagram.
- Page 7 STEP 3 Attach Legs 1. Put the Lock washer (M) on the Bolt (K) and then put the Flat washer (N) as shown in the picture below. 2. And use this Allen Key (Q) and bolt to attach the Footboard (D) to the side rails (B & C) by fastening the L Shape Connect Metal Pad (I) and Corner Connect Metal Pad (J).
- Page 8 STEP 5 Hook middle bar 1. Hook middle bar (F) to pre-assembled connecting brackets on headboard (A) and footboard (D). (2 middle bars For King 1 middle bar For Queen) STEP 6 Fasten bolts 1. Use Allen Key (Q) to fasten bolts (K) connecting side rails (B & C) to headboard (A) and footboard (D). Date: 2024/5/10 Page 8 / 10...
- Page 9 STEP 7 Attach bed slats 1. Attach bed slats (H) to the side rails and middle bar using a Phillips screwdriver (S) and screws (P). (52 screws For King 39 screws For Queen) STEP 8 Adjust the support leg 1. Adjust the support leg (G) until the legs are in contact with the floor. Bed should be level when adjusted properly. Date: 2024/5/10 Page 9 / 10...
- Page 10 CARE & MAINTENANCE Fabric Care Tips Be sure to vacuum on a weekly basis so dust and dirt do not settle into the fabric. · Wrinkles in the fabric are a natural part of normal wear · Fabric can fade when exposed to direct sunlight over a long period of time. ·...
Need help?
Do you have a question about the BR-147 and is the answer not in the manual?
Questions and answers