Advertisement
Quick Links
Advertisement

Summary of Contents for JEET T51X Series
- Page 1 Product Manual Please read the manual before using the equipment.
- Page 3 Declaration The manual is only used for this series of products. Because the editing time is limited, we do not guarantee that there is no error in this manual. As this manual is used as product series manual, however, the configuration and function of different products may be different, about the specific specification and function, the technic requirements when you purchasing is the only reference.
- Page 4 MENU Instruction Before Use ................1 Main Configuration ................1 Button and Port ..................2 Application .................... 4 After-service..................4 Warning ....................4 1 Brief Introduction..................5 1.1 Parameters ..................5 2 Operation Steps ................... 7 2.1 Take out the instrument.............. 7 2.2 Boot preparation................
- Page 5 3.5 Playback ..................11 3.6 Measuring function(optional, not standard configuration) ..11 3.7 Zoom in/out .................. 11 3.8 Language setting ................ 12 3.9 Date&Time setting..............12 3.10 Auto shut off ................12 3.11 Date Stamp................12 3.12 Formatting ................. 13 3.13 Factory reset ................13 3.14 Firmware update...............13 4 Solution to Common Problems...........
- Page 6 Instruction Before Use Main Configuration Instrument Case Micro USB/ charger Videoscope TF card reader Base(optional) For the specific configuration, please refers to the packing list. Name Specs Note Case 432*386*163 mm Videoscope 324.3*161.3*91.2mm Base 215*84*36mm Optional TF card reader Rechargeable Battery φ18mm×65mm Micro USB Line Charger...
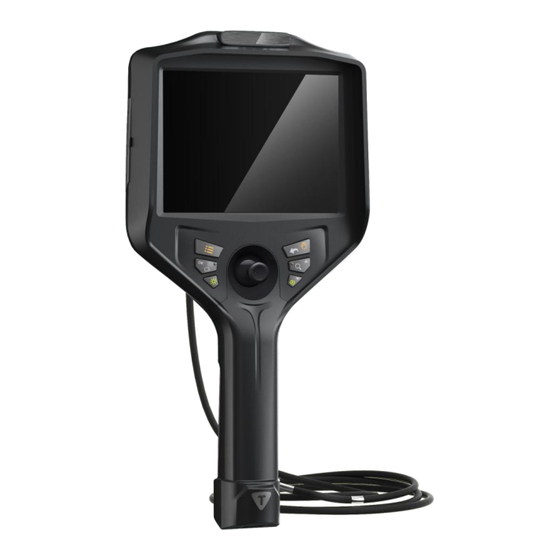
- Page 7 Button and Port working indicator ⑷ return ⑸ playback menu ⑴ ⑵ ok/function switch ⑹ up ⑺ down ⑶ brightness control ⑽ resetting ⑾ HDMI ⑻ front view/side view switch ⑿ TF card ⒀ Micro USB ⒁charging port ⑼ photo/video ⒂...
- Page 8 (1) Menu: function setting including language setting/ time setting /firmware update. (2) Ok: in menu setting mode, it serves as a validation button; in preview mode, press ok button, it serves as function switch button. (3) Brightness control: control the light from 0-9 levels. (4)...
- Page 9 current power of the two batteries will be indicated separately, orange light shows the power of inner battery, white light shows the current power of outer battery. When the product is charging, the indicator will flash. When the product is turned on, the indicator will show the current power all the time. Application This product is only applied in the real-time detection and analysis for industrial equipment and automobile production and maintenance.
- Page 10 1 Brief Introduction 1.1 Parameters Probe Diameter(mm) Φ8/Φ6/Φ3.9/Φ2.8/Φ2.2/Φ1.8 Camera Pixels 1,000,000 /300,000/160,000 10mm-100mm 120° Viewing Direction 0° front view (optional: 90°sideview) Illuminance Maximum:50000lx Tube Material Tungsten braided Tube Length 1.5m (customized for other length) Protecting Device of buffer protection device between the host and Durability wear-resistant tube Articulation...
- Page 11 Water/Dust Proof probe/tube: IP67 Monitor Structure one hand-held monitor Memory standard TF card 16G, maximum: 32G Data Port HDMI port/Micro USB port Working Time ≥4H, built-in batteries:8H detachable lithium batteries (optional: built-in Batteries lithium batteries) Battery Capacity 3.7V,3200mAh*2pcs Power Consumption Power Charge DC5V, maximum current:1A Weight...
- Page 12 2 Operation Steps Take out the instrument Open the instrument case, while taking out the instrument host, set aside and pay close attention to the probe; avoid colliding the probe and scratching probe lens. 2.2 Boot preparation Check whether the insert tube is well connection with the monitor, the TF card and batteries are installed (one battery also works normally).
- Page 13 * Connect the monitor with the tube system; * Make sure the monitor contacting with the upper of the handle tightly; * Lock the button on the back of the monitor; * Install the TF card. 2.3 Operation It supports for 10 levels of brightness adjustment. Press the light control button to suitable brightness.
- Page 14 2.4 Probe articulation control According to the testing need, operate the joystick to control probe articulation, in order to observe. The bending motion of the front probe is controlled by rotating the joystick. During the operation, if the joystick suddenly meets larger resistance, or there is any abnormity, please immediately stop using.
- Page 15 3 Image Capture and Operation 3.1 Photo/Video Short press “(9) photo/video button”; The image will freeze a frame, indicating a photo has been captured and saved automatically. The saved file is named in the form of Date+No. Such as: 20170725 001.JPEG Long press “(9) photo/video button”...
- Page 16 3.3 Image special effects In preview mode, press “(2) OK” button, select , which stands for standard color mode. Press “(6) up” button or “(7) down” button, it changes to negative film mode or black&white mode, in cyclic switch. 3.4 Exposure control Press “(2) OK”...
- Page 17 3.7 Zoom in/out In preview mode, press “(2) OK” button, select , which stands for zoom in/out mode. Press “(6) up” button or “(7) down” button to adjust magnification levels, including x1、x2、x4、x8 and two modes: full screen and full image, in cyclic switch.
- Page 18 3.12 Formatting In preview mode, press “(1) menu” button to enter menu dialog box. Select “Format” menu by pressing “(6) up” or “(7) down” button. Then press “(2) OK” button to pop up format option box, press “(6) up” or “(7) down” again to confirm whether format the files in the TF card.
Need help?
Do you have a question about the T51X Series and is the answer not in the manual?
Questions and answers