Page 1
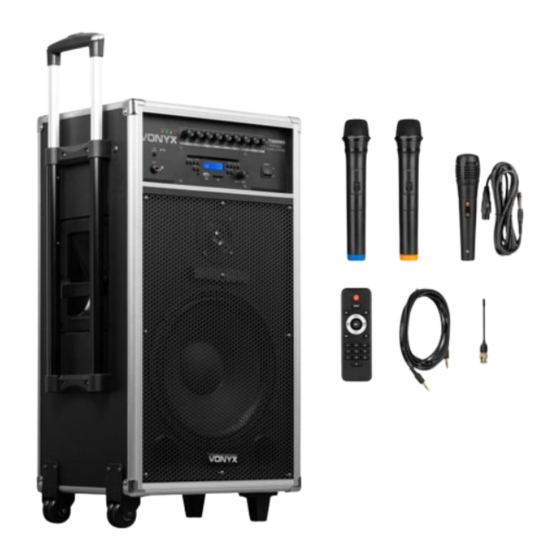
ST180MKII Portable Sound System Ref. nr.: 170.013 INSTRUCTION MANUAL GEBRUIKSAANWIJZING GEBRAUCHSANLEITUNG MANUAL DE INSTRUCCIONES MANUEL D'INSTRUCTIONS INSTRUKCJA OBSŁUGI NÁVOD K POUŽITÍ V3.0...
Page 2
ENGLISH Congratulations to the purchase of this Vonyx product. Please read this manual thoroughly prior to using the product in order to benefit fully from all features. Read the manual prior to using the product. Follow the instructions in order not to invalidate the warranty. Take all precautions to avoid fire and/or electrical shock.
Page 3
FRONTPANEL MIC - 6.3mm (1/4”) jack for connecting microphone Line Input - 3.5mm jack for connecting units with line level (e.g. CD/MP3/DVD player, hi-fi system, PC) LED - Indicator for battery low, charge, microphone and power. Master - Determines the overall level of the portable sound system Line - Volume control line-input Treble/Bass - Adjust tone control for treble and bass Delay - Adjust the delay time of the echo effect...
Page 4
BACKPANEL Antenna - Connect wireless microphone antenna (good position is at an angle of 45°) AC input - Connect the supplied mains cable here. 230Volt/50Hz External battery - Connect external power supply/battery DC 12Volt. Fuse - External battery fuse holder. Line output - For passing on the mixed signal, e.g.
Page 5
NEDERLANDS Hartelijk dank voor de aanschaf van dit Vonyx product. Neemt u a.u.b. een paar momenten de tijd om deze handleiding zorgvuldig te lezen, aangezien wij graag willen dat u onze producten snel en volledig gebruikt. Lees deze handleiding eerst door alvorens het product te gebruiken. Volg de instructies op anders zou de garantie wel eens kunnen vervallen.
Page 6
VOORPANEEL MIC - 6.3mm jack connector voor het aansluiting van een microfoon Line Input - 3.5mm jack connector voor het aansluiten van apparatuur met line-signaal (o.a. CD/MP3/Dvd-speler) LED - Indicatie voor lage batterij spanning, batterij laden, microfoon en aan/uit. Master - Instellen van algemeen geluidsniveau van dit draagbare geluidssysteem. Line - Volume instellingen van de line-ingang Treble/Bass - Instellen van toonregeling treble en bass Delay - Instellen van vetragingstijd van echo effect...
Page 7
ACHTERPANEEL Antenna - Monteer de antenne voor draadloze microfoon (beste positie is onder hoek van 45°) AC ingang- Sluit de meegeleverde netsnoer hier aan 230Volt/50Hz External battery - Aansluiting voor externe voeding/batterij DC 12Volt. Fuse - Zekering houder voor externe batterij aansluiting. Line output - Aansluiting voor het doorgeven van het audiosignaal, b.v.
Page 8
DEUTSCH Vielen Dank für den Kauf dieses Vonyx gerat. Nehmen Sie sich einen Augenblick Zeit, um diese Anleitung sorgfältig durchzulesen, damit sie die Möglichkeiten, die unser Produkt bietet, sofort voll ausnutzen können. Lesen Sie erst die Anleitung vollständig vor der ersten Inbetriebnahme durch. Befolgen Sie die Anweisung, da sonst jeglicher Garantieanspruch verfällt.
Page 9
FRONTSEITE 1. MIC - 6,3 mm Klinkenbuchse für den Anschluss von Mikrofone 2. Line Input - 3.5mm Klinkenbusche für Audiogeräte mit Linepegel (z.B. CD/MP3/DVD-Player) 3. LED - Anzeige für schwache Batterie, Ladebatterie, Mikrofon und ein / aus. 4. Master - Bestimmt die Gesamtlautstärke der Portable Sound Sytem. 5.
Page 10
RÜCKSEITE Antenna - Montieren Sie die Antenne für die drahtlose Mikrofon (beste Position ist in einem Winkel von 45°) AC IN-Buchse - Stecken Sie hier die mitgelieferte Netzleitung ein 230Volt/50Hz External battery - Anschluss für externe Stromversorgung / Batterie DC 12Volt. Fuse - Sicherungshalter für externe Batterieanschluss .
Page 11
Esta garantía no es aplicable en caso de accidente o daños ocasionados por uso indebido del aparato o mal uso del mismo. Vonyx no se hace responsable de daños personales causados por el no seguimiento de las normas e instrucciones...
Page 12
PANEL FRONTAL 1. MIC - 6.3mm (1/4”) jack para conectar el micrófono 2. Line Input - 3.5mm jack para conectar unidades por linea ( CD/MP3/DVD/ PC) 3. LED - Indicador de baja batería, carga, micrófono y power. 4. Master - Determina el volúmen general del sistema de altavoces activo 5.
Page 13
PANEL TRASERO Antena - Conecte la antena del micrófono inalámbrico (buen ángulo de posición de 45 °) Entrada AC - Conecte el cable de alimentación suministrado aquí. 230Volt/50Hz External battery - Conecte la fuente de alimentación externa / batería DC 12Volt. Fuse - Fusible de la batería externa.
Page 14
La garantie deviendrait également caduque en cas d’accidents ou dommages causes par une utilisation inappropriée de l’appareil ou un non respect des consignes présentes dans cette notice. Vonyx ne pourrait être tenu responsable en cas de dommages matériels ou corporels causés par un non respect...
Page 15
FACE AVANT MIC - Prise jack 6,35 (1/4”) pour brancher un microphone Line Input - Prise jack 3,5 pour brancher des appareils à niveau ligne (par exemple lecteur CD/MP3/DVD, système Hi- Fi, PC) LED - Témoin pour batterie faible, charge, microphone et alimentation. Master - Définit le niveau général de l'enceinte active Line - Réglage volume ligne - entrée Treble/Bass - Réglage tonalité...
Page 16
FACE ARRIERE Antenne - Branchez une antenne pour microphone sans fil (angle correct de positionnement : 45°) Entrée AC - Prise secteur pour brancher le cordon secteur 230 V/~50 Hz. Batterie externe - Branchez une alimentation externe 12 VDC. Fusible - Fusible batterie externe. Sortie ligne - Pour diriger le signal mixé, par exemple vers un enregistreur ou une autre enceinte active.
Page 17
POLSKI Gratulujemy zakupu urządzenia marki Vonyx. Proszę o przeczytanie instrukcji przed użyciem urządzenia, aby jak najlepiej móc wykorzystać jego możliwości. Przeczytaj tę instrukcję przed pierwszym użyciem urządzenia. Postępuj zgodnie z instrukcją, aby nie utracić gwarancji. Zwróć uwagę na wszystkie ostrzeżenia, aby uniknąć pożaru lub/oraz porażenia prądem. Naprawy mogą być przeprowadzane jedynie przez autoryzowany serwis.
Page 18
PRZEDNI MIC – Wejście mikrofonowe Jack 6.3mm (1/4”). Line Input – Wejście liniowe mini Jack 3.5mm służące do podłączenia dźwięku o poziomie liniowym (np. Odtwarzacz CD/MP3/DVD, zestaw hi-fi, PC). LED – Wskaźnik słabej baterii, ładowania, mikrofonu bezprzewodowego oraz zasilania. Master – Pokrętło głośności całego zestawu nagłośnieniowego. Line –...
Page 19
PANEL TYLNY Antenna - Złącze na antenę dla mikrofonów bezprzewodowych (ustaw ją pod kątem ok. 45 stopni). AC input - Gniazdo zasilania 230V/50Hz. External battery – Gniazdo zasilania z zewnętrznego źródła 12V DC. Fuse - Bezpiecznik. Line output – Wyjście liniowe służące do przesyłu zmiksowanego dźwięku do urządzenia nagrywającego lub innego zestawu nagłośnieniowego.
Page 20
ČESKY Gratulujeme ke koupi tohoto produktu Power Dynamics. Před použitím výrobku si pečlivě přečtěte tento návod, abyste mohli plně využívat všechny jeho funkce. Před použitím přístroje si přečtěte tuto příručku. Postupujte podle pokynů, aby nedošlo ke zneplatnění záruky. Přijměte veškerá preventivní...
Page 21
PŘEDNÍ PANEL 1. MIC - 6,3mm (1/4") jack pro připojení mikrofonu 2. Linkový vstup - 3,5mm jack pro připojení jednotek s linkovou úrovní (např. CD/MP3/DVD přehrávač, hi-fi systém, PC). 3. LED - Indikátor vybití baterie, nabíjení, mikrofonu a napájení. 4. Master - Určuje celkovou úroveň přenosného zvukového systému. 5.
Page 22
ZADNI PANEL 1. Anténa - Připojte anténu bezdrátového mikrofonu (vhodná poloha je pod úhlem 45°). 2. Vstup střídavého proudu - Zde připojte dodaný síťový kabel. 230 Volt/50 Hz 3. Externí baterie - Připojte externí napájecí zdroj/baterii DC 12Volt. 4. Pojistka - Držák pojistky externí baterie. 5.
Page 23
The products referred to in this manual conform to the European Community Directives to which they are subject: European Union United Kingdom Tronios B.V., Tronios Ltd., Bedrijvenpark Twente Noord 18, 130 Harley Street, 7602KR Almelo, The Netherlands London W1G 7JU, United Kingdom 2014/35/EU S.I.
Need help?
Do you have a question about the 170.013 and is the answer not in the manual?
Questions and answers