
Related Manuals for AHG AHG-2285

Summary of Contents for AHG AHG-2285
- Page 1 Blood Glucose Monitoring System AHG�2285 Instruction Manual Number: 1205249101 Effective Date: 2024�04�26...
-
Page 2: Blood Glucose Monitoring System
Blood Glucose Monitoring System The AHG blood glucose monitoring system is designed for easy testing of blood glucose and helps you to keep your blood glucose under control. The AHG system is fully compliant with the new EN ISO 15197�2015 International Standard. -
Page 3: Table Of Contents
Table of Contents Understanding Your Testing Tools ................... Your Meter System Overview ......................4 Your Meter Display ............................ 4 Important Safety Information ......................7 Setting Up Your System ........................8 Set the Time and Date ........................... 8 Set the Audio Feature .......................... -
Page 4: Understanding Your Testing Tools
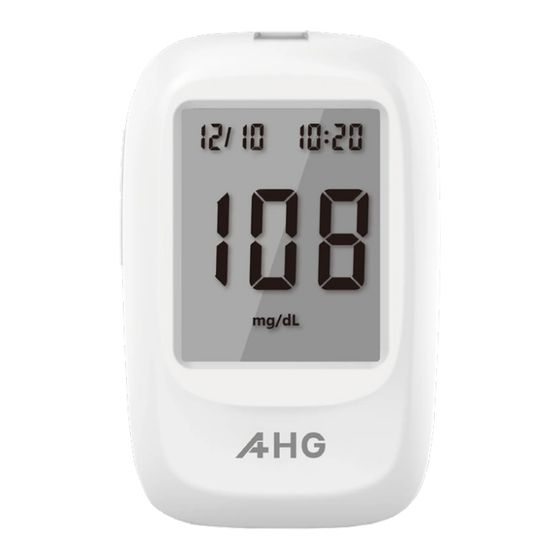
CHAPTER 1� UNDERSTANDING YOUR TESTING TOOLS Your Meter System Overview The AHG Blood Glucose Meter and AHG Blood Glucose Test Strip. Electrode end: Sample tip: This end is inserted into the where the blood is test strip port on the meter drawn in. - Page 5 CHAPTER 1� UNDERSTANDING YOUR TESTING TOOLS Icon What it Means The top left area on the screen indicates the date. The top right area on the screen indicates the time. Date, month format. The meter failed to sync with the Smartphone. Memory.
- Page 6 CHAPTER 1� UNDERSTANDING YOUR TESTING TOOLS Notes: Your AHG meter is pre-set with a beep sound function, the meter will beep when: turn on the meter. • insert the test strip and it is ready for blood or control solution to be applied.
-
Page 7: Important Safety Information
• Check the expiry dates and discard dates on your test strips vial label and control solution bottle label. • Use only AHG test strips with your AHG system. • Use only AHG control solution with your AHG system. • Following a self-test always consult your diabetes health care professional before making any adjustments to your medication, diet or activity routines. -
Page 8: Setting Up Your System
CHAPTER 2� SETTING UP YOUR SYSTEM Before you use your meter for the first time or if you change your meter battery, you must check and update your meter settings. Set the Time and Date 1� Enter the setting mode and set the clock When the meter is off, press the ▼... - Page 9 CHAPTER 2� SETTING UP YOUR SYSTEM 3. Set the Date The year will appear at the top of the display. Press the ▲ button until the correct year is displayed. Once you have selected the correct year, press the ▼ button to save your choice and start setting the month.
-
Page 10: Set The Audio Feature
CHAPTER 2� SETTING UP YOUR SYSTEM 5. Set the Audio Feature After setting the time, the bEEP will now flash. Press the ▲ button to set ON or OFF, press ▼ button to save the audio setting. 6. Set the Test Alarm Your meter is pre-set with the test alarm function to “OFF”. - Page 11 CHAPTER 2� SETTING UP YOUR SYSTEM The minute flashes, press ▲ button to select 00, 15, 30, or 45. These are the only choices. Press ▼ button to set minutes. The next alarm “A2” flashes on the display with and “OFF” You can set a second alarm by pressing ▲...
-
Page 12: Set The Hypoglycaemia �Hypo) Warning
CHAPTER 2� SETTING UP YOUR SYSTEM 8. Set the Hypoglycemia �Hypo) Warning After setting the meal marker, the flashes on the display along with “On” on the display. Press ▲ button to turning the Hypo alarm function on or off, press ▼... -
Page 13: Taking A Test
CHAPTER 3� TAKING A TEST Set up your meter correctly and have all the materials you will need ready before you begin the testing. This including your AHG meter, the AHG test strips and AHG lancing device with AHG lancets. -
Page 14: Preparing The Lancing Device
It is recommended you start at the minimum depth (fig. 3�. PREPARING TO TAKE THE SAMPLE Hold the main body of AHG lancing device with one hand and the device sleeve with the other and pull the two apart until you hear a click. This primes the device ready for use (fig. -
Page 15: Getting A Blood Drop And Testing
CHAPTER 3� TAKING A TEST COVERING THE NEEDLE TIP Twist off the depth adjuster assembly to remove it from the AHG lancing device. Push the lancet until needle tip is totally covered by protective cap. Don’t touch the exposed lancet needle (fig .6�... -
Page 16: Marking Blood Glucose Results
CHAPTER 3� TAKING A TEST Note: If the blood sample does not fill the check window, do not add a second drop. Discard the test strip and start over with a new test strip. 3. The meter counts down 5 seconds and your result appears on the display after a beep. -
Page 17: Discard The Used Test Strip
• If you test result is above 250 mg/dL �13.9 mmol/L� or you see HI (greater than 600 mg/dL �33.3 mmol/L�� on the meter display, contact your health health care professional as soon as possible. � Do not change your medication therapy based on AHG test result before consult your health care professional. -
Page 18: Alternative Site Testing
CHAPTER 3� TAKING A TEST Questionable or Inconsistent Results: If your blood glucose result does not match how you feel, please: � Check the expiration date and the discard date of the test strip. Make sure that the test strip vial has not been opened for more than 6 months. �... - Page 19 CHAPTER 3� TAKING A TEST Note: if you use a lancing device with clear cap, please follow the manufacturer’s instructions. 1. Insert a new lancet into the lancet holder and push down firmly until it is fully inserted. Remove the protective cap by twisting it away from the body of the lancet. 2.
-
Page 20: Testing With Control Solution
• If your test result does not match with how you fee About the Control Solutions • Only use AHG Control Solutions �Low, Normal or High) to practice on the system. • Your meter automatically recognises the control solution. • The control solution results are not included in the average value calculation. - Page 21 CHAPTER 3� TAKING A TEST 3. The meter turns on after a beep. An image of a test strip with a flashing blood drop will appear letting you know the meter is ready to test. 4. Shake the control solution bottle thoroughly. Squeeze the control solution bottle gently and discard the first drop.
- Page 22 � Make sure the test strip was used immediately after removing it from the test strip vial. � Make sure the control solution was mixed well. � Confirm that you are using AHG brand control solution. � Make sure that you followed the test procedure correctly.
-
Page 23: Using The Meter Memory
CHAPTER 3� TAKING A TEST After checking all of the conditions listed above, repeat the control solution test with a new test strip. If your results still fall out of the range indicated on the test strip vial label, your meter or test strips may not be working properly. DO NOT use the system to test blood. -
Page 24: Chapter 4: Maintenance And Troubleshooting
CHAPTER 4: MAINTENANCE AND TROUBLESHOOTING Proper maintenance is recommended for best results. Changing the Batteries Batteries should be replaced when the meter continually displays or the meter shows then turns off. 1. Turn off your meter before changing the batteries. 2. -
Page 25: Caring For Your Glucose Monitoring System
Caring for Your Glucose Monitoring System Blood Glucose Meter Your AHG Blood Glucose Meter does not require special maintenance or cleaning. A damp cloth and a mild detergent solution can be used to wipe the outside of the meter. Take care to avoid getting liquids, dirt, blood or control solution into the meter through the strip or data ports. -
Page 26: Troubleshooting Guide
Discard the test strip and repeat the test with a new Incorrect test strip. test strip. Make sure that you are using an AHG test strip. Discard the test strip and repeat the test with a new Incorrect sample. -
Page 27: Symptoms Of High Or Low Blood Glucose
CHAPTER 4: MAINTENANCE AND TROUBLESHOOTING Symptoms of High or Low Blood Glucose You can better understand your test results by being aware of the symptoms of high or low blood glucose. According to the American Diabetes Association, some of the most common symptoms are: Low blood glucose �Hypoglycaemia): High blood glucose �Hyperglycaemia): •... -
Page 28: Limitations
• The AHG Blood Glucose Monitoring System has been tested and shown to work properly up to 10,000ft �3,048 meters). • Severely ill persons should not run the glucose test with the AHG Blood Glucose Monitoring System. • Patients using oxygen therapy are not recommended for testing with AHG Blood Glucose Monitoring System. -
Page 29: Technical Information
CHAPTER 5: Technical information System Specifications: Feature Specification Measurement range 10 to 600 mg/dL �0.6�33.3 mmol/L� Test Measurement Plasma-equivalent Sample Fresh capillary whole blood Sample volume About 0.5 µL Test time 5 seconds Power source Two AAA LR03 1.5V batteries Battery life 12 months or approximately 1,000 tests The meter is pre-set to either millimoles per litre (mmol/L�... -
Page 30: Index Of Symbols
CHAPTER 5: Technical information Index of Symbols These symbols may appear on the packaging and in the instructions for the AHG system. Symbols Explanation Consult instructions for use For in vitro diagnostic use only Manufacturer Temperature limitations Contains sufficient for <n> tests... -
Page 31: Warranty
� Damage to the outside shield; � Damage that has occurred during shipping; � Serial number/QC seal removed, defaced or altered; AHG SHALL NOT BE LIABLE FOR LOSS OF USE OR ANY OTHER INCIDENTAL, CONSEQUENTIAL OR INDIRECT COSTS, EXPENSES OR DAMAGES. - Page 32 Head office: American Health Gate LLC 2815 Elliott Avenue, Seattle, Washington 98121 USA www.americanhealthgate.com...
Need help?
Do you have a question about the AHG-2285 and is the answer not in the manual?
Questions and answers