Advertisement
Quick Links
Fire Tango
Fire Tango, the trademark is registered and
Owned by CSPS industries Inc.
USER'S/ASSEMBLY MANUAL
*
Always read and understand the WARNINGS and SAFETY INSTRUCTIONS that are
contained in this Manual before attempting to use your grill to prevent the risk of burn
hazard or other bodily injury.
NOTICE TO INSTALLER:
THIS GRILL IS FOR OUTDOOR USE ONLY
®
For Model CPBI Series,
Barbecue Gas Grill
This manual must be left with owner and shall be kept in or
near the grill for convenient future reference.
CPBI2BAX1C
CPBI3BAX1C
CPBI4BAX1C
CPBI2BXSJX1
CPBI3BXSJX1
CPBI4BXSJX1
Advertisement

Related Manuals for CSPS FireTango CPBI Series

Summary of Contents for CSPS FireTango CPBI Series
- Page 1 CPBI3BAX1C ® Fire Tango CPBI4BAX1C Fire Tango, the trademark is registered and CPBI2BXSJX1 Owned by CSPS industries Inc. CPBI3BXSJX1 CPBI4BXSJX1 USER’S/ASSEMBLY MANUAL For Model CPBI Series, Barbecue Gas Grill Always read and understand the WARNINGS and SAFETY INSTRUCTIONS that are contained in this Manual before attempting to use your grill to prevent the risk of burn hazard or other bodily injury.
- Page 2 Table of Contents Important Warnings…………………………………………………. Page 1 Safety Instructions…………………………………………………… Page 2 Installation Instructions…………………………………………….… Page 4 BBQ Grill Assembly………………………………………… Page 4 LP Gas Supply Connection…………………………………… Page 7 Natural Gas Supply Conversion……………………..……… Page 8 Leakage test…………………………………………………… Page 9 Operating Instructions……………………………………….………… Page 10 Lighting Instructions…………………………………..……….
- Page 3 DANGER If you smell gas: * Shut off gas to the appliance. * Extinguish any open flame. * Open lid. * If odor continues, keep away from the appliance and immediately call your gas supplier or the fire department. WARNING * Do not store or use gasoline or other flammable liquids or vapors in the vicinity of this or any other appliance.
- Page 4 Safety Instructions: Read this manual thoroughly and understand that your gas grill is properly assembled and installed by a qualified technician. Failure to follow these instructions could result in a burn hazard or bodily injury and/or property damage. All installations must conform by the local codes. In the absence of local codes, this gas grill should be installed in accordance with the National Fuel Gas Code, ANSI Z223.1- 2018 and the National Electrical Code, ANSI/NFPA 70-2018 edition, or National Gas Installation Code, CAN/CGA-B149.1, or Propane Installation Code, CAN/CGA-B149.2,...
- Page 5 ALWAYS avoid clothing, pot holders or other fabric materials coming in contact with or too close to any grate, burner or hot surface. Some synthetic fabrics are highly flammable that may ignite and can cause injury. For personal safety, wear proper apparel. Use caution when operating this grill.
- Page 6 Installation Instructions: BBQ Grill Assembly: Install four casters onto the bottom panel of the cart first by using four washers (CC) and bolts (DD) by wrench for each caster. Assemble two side panels and the back panel on the cart by using fourteen screws (BB). Install tank holder ring on the cart by using nine screws (AA).
- Page 7 Put the main BBQ grill on the cart and use two screws (BB) for each side to fasten it. Attach the drip tray holder to the grill by using two nuts (EE) for each side. Insert the drip pan into the holder. Install the doors to the cart by pressing down the spring hinge.
- Page 8 Installation Instructions (continued): LP Gas Cylinder Requirements (20 lb. Cylinder): The 20 lb. Cylinder must be provided with a shut off valve terminating in an LP gas supply cylinder valve outlet specified, as applicable, for connection type is the standard type for compresses gas cylinder valve outlet and inlet connection, in accordance with the ANSI/CGA-V-1.
- Page 9 Gas Hook Up: The pressure regulator and gas hose assembly supplied with this outdoor cooking gas appliance must be used. Replacement pressure regulators and hose assemblies must be those specified by the outdoor cooking gas appliance manufacturer. Never connect the appliance to an unregulated gas supply line. Use only the regulator and hose assembly, supplied with the appliance.
- Page 10 Disconnect from the LP gas cylinder: Turn all the burner valves to OFF position. Turn the tank valve OFF (Turn CLOCKWISE to stop). Detach the regulator assembly from the tank valve (Turn coupling nut COUNTERCLOCKWISE). Conversion to the Natural Gas line (Optional) : This appliance can be connected to Natural Gas supply by means of a flexible hose connector complying with the current Standard, Elastomeric Composite Hose and Couplings for Conducting Propane and Natural Gas, CAN/CGA-8.1, or with the current...
- Page 11 Leakage Test: Although all gas connections have been checked for leakage at the factory prior to shipment, a complete gas tightness check must be performed at the installation location due to possible mishandling in shipment. DO NOT ignite burners when leak checking. You should check for gas leaks every time you disconnect and reconnect a gas fitting.
- Page 12 Operating Instructions: First Use/Long Period of No Use: Read Safety, Lighting Instructions and Operating Instructions carefully. Check gas valve orifices, burner tubes and burner ports for any obstructions. Check that the burner tube is properly located over the valve orifice. Check the gas supply cylinder tank is filled.
- Page 13 Lighting Main Burner with a Match: The appliance is equipped with an extension lighter rod attached with the chain and can be found inside the left door compartment. The hole for match lighting is located at the left side of the grill body. Steps: Open the grill hood.
- Page 14 Care and Maintenance: Stainless Steel Body and Cart Assembly: Proper care and maintenance will keep your BBQ grill in a good condition and prolong lifetime usage of the grill. The grill is made from corrosion resistant, Stainless Steel type materials. Always use the mildest stainless steel cleaner scrubbing in the direction of the grain of the steel.
- Page 15 Troubleshooting Guide: PROBLEM POTENTIAL CAUSE ACTION REQUIRED Burner goes out Turn all gas valves off. Open the lid and wait 5 minutes before attempting to light. Use the lighting instructions to light the burner. To check if Gas supply is Burner fails to light If yes, turn the gas supply ON.
- Page 16 Troubleshooting Guide: PROBLEM POTENTIAL CAUSE ACTION REQUIRED Turn all gas valve knobs to OFF position. Turn the gas supply OFF. Wait until the grill is cool. Noisy, hard blue Excessive combustion flame Adjust the air shutter at the front of the venturi to decrease amount of air into the burner tube, just enough to achieve the desired soft, blue flame.
- Page 17 Page.15...
- Page 18 Page.16...
- Page 19 Page.17...
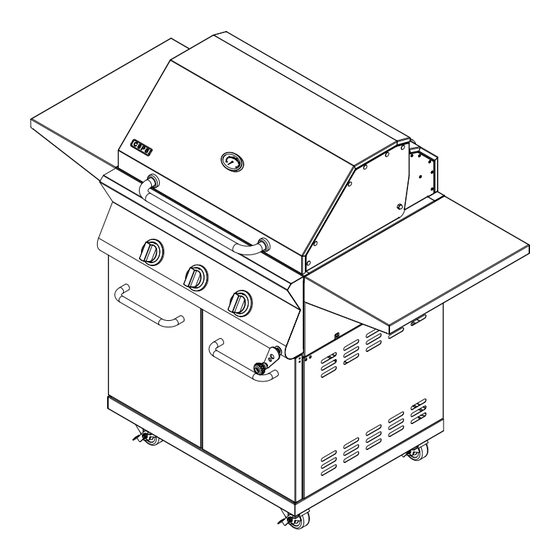
- Page 20 CPBI2B DESCRIPTION Q'TY DESCRIPTION Q'TY Temperature Scale Cooking Grid Main Burner Handle Grill Control Valve Knob Swivel with Brake Caster Door Handle Warming Rack Lifting Rotary handle Cooking Grid Lighting Rod Page.18...
- Page 21 CPBI3B DESCRIPTION Q'TY DESCRIPTION Q'TY Temperature Scale Main Burner Handle Grill Control Valve Knob Door Handle Swivel with Brake Caster Lifting Rotary handle Warming Rack Lighting Rod Cooking Grid Page.19...
- Page 22 CPBI4B DESCRIPTION Q'TY DESCRIPTION Q'TY Temperature Scale Cooking Grid Main Burner Handle Grill Control Valve Knob Swivel with Brake Caster Door Handle Warming Rack Lifting Rotary handle Cooking Grid Lighting Rod Page.20...
- Page 23 Warranty CSPS warrants the product to be free from defects in materials and workmanship for a period of five (5) years from date of purchase when assembled and operated in accordance with the accompanying Owner’s Manual, normal wear and tear excluded.
Need help?
Do you have a question about the FireTango CPBI Series and is the answer not in the manual?
Questions and answers