
Summary of Contents for maturo MCU
- Page 1 Manual for the Multiple Control Unit MCU In combination with Turntable TT, (Turn Device TD) and Antenna Mast AM...
-
Page 2: Table Of Contents
Index 1) General Instructions and Precautions Page 3 2) Technical Data of Controller MCU Page 4 3) Connecting devices to MCU with fibre optic cables Page 5 4) Menu of MCU Page 6 5) Moving a Turntable (Turn Device) Page 7... -
Page 3: General Instructions And Precautions
Only qualified personnel are allowed to operate or service this equipment. Before making service, contact maturo GmbH Service or modifications of the device by yourself may void your warranty. If you attempt to service the unit by yourself, disconnect all electrical power before starting. -
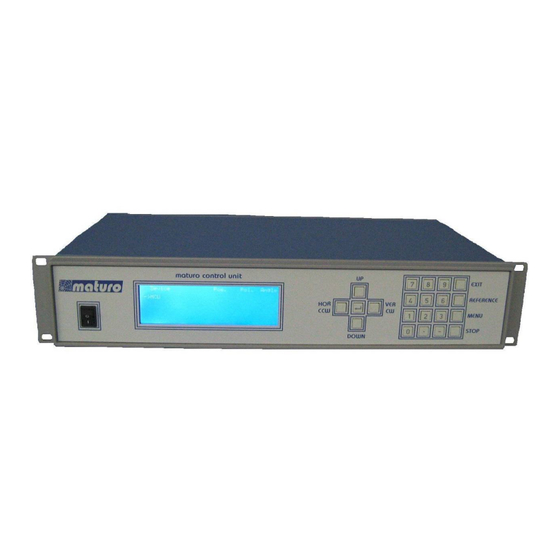
Page 4: Technical Data Of Controller Mcu
2) Technical Data of Controller MCU The new developed Multiple Control Unit MCU is suited for the operation of up to four devices with multiple axis of motion. Those devices can be any combinations of antenna masts, turntables, cable guide rails or any other positioning equipment. -
Page 5: Connecting Devices To Mcu With Fibre Optic Cables
3) Connecting devices to MCU with fibre optic cables 1. Connect “IN” at MCU with “OUT” of first device, prefer the red line. Connect “OUT” at MCU with “IN” of first device, prefer the black line. If your device is prepared for a HCU (Hand Control Unit), you have to connect the MCU to the port named “MCU”. -
Page 6: Menu Of Mcu
4) Menu of MCU 1. Navigate the arrow “->” to the MCU and press “ENTER”. Now there is a double arrow “=>” in front of the MCU. The double arrow “=>” always marks the chosen device / MCU. 2. Press “MENU”. The menu screen opens. -
Page 7: Moving A Turntable (Turn Device)
5) Moving a Turntable (Turn Device) 1. Navigate the arrow in the MAINSCREEN with “UP” or “DOWN” to the Turntable (Turn Device) and press “ENTER”. The double arrow marks him now as chosen device. 2. Press “REFERENCE”, Then “ENTER”. The Turntable (Turn Device) is now slowly moving to his reference point, normally +90°. - Page 8 Input the new position And press “ENTER” again. The Turntable (Turn Device) will move to his new position. 6. With pressing, “STOP” while the Turntable (Turn Device) is moving he will brake and stop then.
-
Page 9: Menu Of Turntable (Turn Device)
6) Menu of Turntable (Turn Device) 1. When a Turntable (Turn Device) is chosen (double arrow =>) by pressing “MENU” you will enter the Turntable (Turn Device) menu. With “UP” and “DOWN” you can navigate to the individual points. 2. Navigate to “information” and press “ENTER”. The device type, the serial number and the firmware version is shown. - Page 10 You can type in user limits and confirm with “ENTER”. With “UP” and “DOWN” you can navigate between user limit maximum and minimum. 5. To delete a user limit navigate to the according, input a higher (or lower) limit and confirm with “ENTER”.
-
Page 11: Moving An Antenna Mast
7) Moving an Antenna Mast 1. Navigate the arrow in the MAINSCREEN with “UP” or “DOWN” to the Antenna Mast and press “ENTER”. The double arrow marks him now as chosen device. 2. Press “REFERENCE”, Then “ENTER”. The Antenna Mast is now slowly moving to his reference points, 1.00 m and vertical. 3. - Page 12 4. By pressing “HOR” or VER” you can change the polarization. 5. Press “UP” and hold it, the Antenna Mast will move up, but only up to his maximum limit, for example 4.00m. Press “DOWN” and hold it, the Antenna Mast will move down, but only to his minimum limit 1.00m.
- Page 13 7. With pressing, “STOP” while the Antenna Mast is changing his height he will brake and stop then.
-
Page 14: Menu Of Antenna Mast
8) Menu of Antenna Mast 1. When an Antenna Mast is chosen (double arrow =>) by pressing “MENU” you will enter the Antenna Mast menu. With “UP” and “DOWN” you can navigate to the individual points. 2. Navigate to “information” and press “ENTER”. The device type, the serial number and the firmware version is shown. - Page 15 6. Repeat point 8.1 and 8.3; navigate to “height upper limit” and press, “ENTER”. Here you can set a user limit absolute and one for vertical. See point G5 how to set or delete user limits 7. Repeat point 8.1, navigate to “positioning speed” and confirm with “ENTER”. You will see the possible minimal and maximal speed.
-
Page 16: Trouble Shooting For Controller
Update of software interface to software • • Malfunction at the connector Change of IEEE-connector Please contact our service department by: Phone: +49 9606 9239130 Or by Email: service@maturo-gmbh.de When contacting maturo, please always provide the serial number of the products. -
Page 17: Warranty Statement
The customer must, however, prepay inbound shipping costs and any duties or taxes. Maturo will pay outbound shipping cost for a carrier of maturo’s choice, exclusive of any duties or taxes. If maturo determines that warranty service can only be performed at the customer’s location, the customer will not be charged for maturo’s travel related costs. -
Page 18: Declaration Of Conformity
MCU/xxx/xxxxxxx Serial number: Baujahr: 2015 Year: Hersteller: maturo GmbH, Am Kalvarienberg 24, 92536 Pfreimd Manufacturer: mit den Vorschriften folgender Europäischer Richtlinien übereinstimmt: has been manufactured according to the regulations of the following European directives: - 2004/108/EG Elektromagnetische Verträglichkeit – EMV-Richtlinie - 2004/108/EC Electromagnetic compatibility –... -
Page 19: Gpib-Bus Commands
GPIB commands for the Multiple Control Unit MCU Antenna Mast Turntable TT &Turn Devices TD... - Page 20 GPIB-Bus Commands for Turntables & Turn Devices Page 23 Chapter 3: Error Messages Page 25 Chapter 4: General programming of the GPIB-Bus at MCU Page 26 Addressing to multiple devices Page 26 Speed setting Page 26 Go to new position...
-
Page 21: Chapter 1: Gpib-Bus Commands For Antenna Masts
Chapter 1: GPIB-Bus commands for Antenna Masts General information All outputs through the GPIB-Bus are five characters long, followed by Line Feed (0AH). Missing positions are filled with blanks (20H). All values are transferred in CM. Negative values are not allowed. The commands, values and units must be transferred in capital letters and separated by blanks. - Page 22 The BU register indicates if the motor and thereby also the mast is currently moving. For mechanical reasons, the motor cannot start immediately after the receipt of a start command. Therefore it is necessary to wait until the mast moves (BU = 1), before it is possible to enquire with BU whether the previous command has been completed.
-
Page 23: Chapter 2: Gpib-Bus Commands For Turntables & Turn Devices
Chapter 2: GPIB-Bus commands for Turntables & Turn Devices General information All outputs through the GPIB-Bus are five characters long, followed by Line Feed (0AH). Missing positions are filled with blanks (20H). All values are transferred in DG. The commands, values and units must be transferred in capital letters and separated by blanks. - Page 24 The BU register indicates if the motor and thereby also the turntable or turn device are currently moving. For mechanical reasons, the motor cannot start immediately after the receipt of a start command. Therefore it is necessary to wait until the turntable moves (BU = 1), before it is possible to enquire with BU whether the previous command has been completed.
-
Page 25: Chapter 3: Error Messages
Chapter 3: Error Messages E – P Power is sent after a loss of mains power E – S Syntax is sent when an invalid command is received E – V Value is sent when a value does not lie within the valid limits E –... -
Page 26: Chapter 4: General Programming Of The Gpib-Bus At Mcu
Chapter 4: General programming of the GPIB-BUS at MCU Addressing the several devices If several devices are connected to the MCU, the controllable device needs to be addressed. For example (One Antenna Mast and one Turntable) "LD 0 DV" for the Antenna Mast "LD 1 DV"... -
Page 27: Readout Of Current Position
Readout the actual position of the device: Select the device by writing "LD x DV". (x = 0 => Antenna Mast and x = 1 => Turntable) Write "CP" (set the Pointer to the CP-Register) Readout of six Bytes (applies to antenna mast and turntable) For polarization readout select the antenna mast Write "P?"... - Page 28 GmbH Am Kalvarienberg 24 92536 Pfreimd Germany Web: www.maturo-gmbh.de Notes maturo GmbH...
Need help?
Do you have a question about the MCU and is the answer not in the manual?
Questions and answers