Nakamichi DRAGON Manual
- Service manual (59 pages) ,
- Owner's manual (43 pages) ,
- Owner's manual (88 pages)
Advertisement
- 1 MEET YOUR PRODUCT
- 2 SET UP AND PAIRING
- 3 OPTIMIZE PERFORMANCE
- 4 PRODUCT INFORMATION
- 5 WARRANTY INFORMATION
- 6 HELP AND TROUBLESHOOTING
- 7 SUPPORT
- 8 IMPORTANT SAFETY INSTRUCTIONS
- 9 Documents / Resources
MEET YOUR PRODUCT
Package Contents

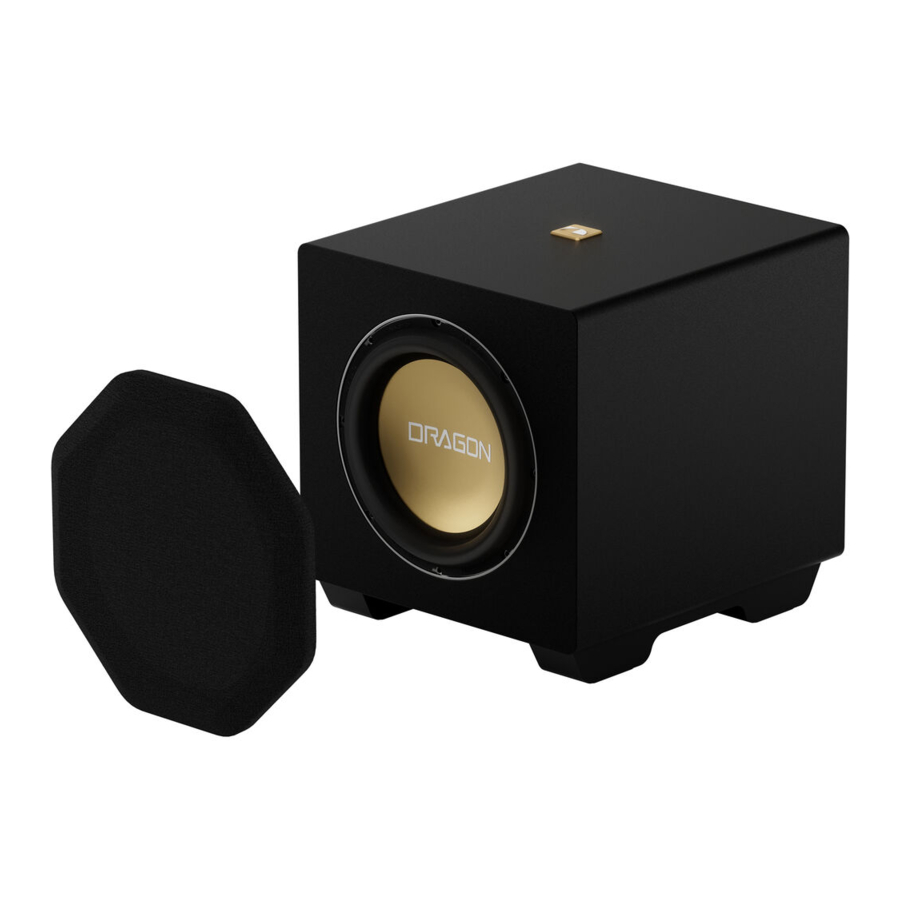
Features and Connections

- Removable Subwoofer Grille
The grille is held in place by magnets. To remove it, gently pull it away from the unit with your fingers.
 Do not use sharp objects to detach the grille.
- 12" Carbon Fiber-Reinforced Aluminum Subwoofer Driver
- 12" Carbon Passive Radiator

- Power Switch
- Power Port
- Pairing Status Indicator
Indicates the number assigned to your subwoofer (See "Identify Your Subwoofer") - Pairing Button
- Voltage Selector Switch

Residing Outside the USA?
Before connecting subwoofer to power, slide the voltage selector to the correct setting for your country.
United States: 115V (DEFAULT)
Europe / United Kingdom: 230V (Countries with 220-240V AC)
Damage resulting from incorrect voltage selection will not be covered by warranty.
SET UP AND PAIRING
Recommended Placement
For optimal bass, place 12" subwoofers in the front or back corners of the room.

Existing Configuration: DRAGON System With Original 8" Subwoofers x 2
Avoid placing items on the subwoofer to prevent them from falling due to vibrations.

Existing Configuration: DRAGON System with 12" Subwoofers x 2
Avoid placing items on the subwoofer to prevent them from falling due to vibrations.
Upgrade System Firmware
Use the included USB drive to update your DRAGON. You must upgrade your firmware to FW 3.0 or above to add support for 12" subwoofers and pair up to 4 subwoofer cabinets.
Check Firmware Version
- Press "
![]() HOME" on your remote to show the On-Screen Display (OSD) on TV.
HOME" on your remote to show the On-Screen Display (OSD) on TV. - Navigate to the System tab.
- The current firmware version is shown under 'Firmware Upgrade'.
 HOME" on your remote to show the On-Screen Display (OSD) on TV.
Upgrade the Product
 Before initiating the upgrade, capture a photo of your calibration and favorite settings from the On-Screen Display (OSD). All room calibration and memory settings will be erased as part of the upgrade process.
Ensure your surround speakers, subwoofers, and Bluetooth remote control are powered on and connected before running a firmware upgrade, as they can be upgraded wirelessly. During the update, watch for flashing pairing lights on DRAGON's components.
DO NOT TURN OFF any DRAGON components or press remote control buttons during the upgrade process, even if the LED display shows no progress. This could damage the unit, which is not covered by warranty. The upgrading process can take up to 30 minutes.
- Power on DRAGON. Using the remote, press USB to switch to USB mode.
- Plug in the USB drive to the back of DRAGON main unit.
- The main unit's LCD display will show a prompt.
![]()
- Press ENTER to begin the upgrade.
![]()


After the firmware upgrade has finished, the main unit will reboot automatically.
If the firmware upgrade prompt does not appear, press HOME to open the OSD. Navigate to System > 'Firmware Upgrade'. Press to select 'Upgrade'. Then, press ENTER to start the upgrade.
Perform a Full Factory Reset
- While DRAGON is powered on, tap and hold
![]() on the main unit until "FACTORY RESET" appears. The system will power off.
on the main unit until "FACTORY RESET" appears. The system will power off. - Wait for a few seconds. Press
![]() to turn DRAGON on.
to turn DRAGON on. - Firmware upgrade complete!
 on the main unit until "FACTORY RESET" appears. The system will power off.
 Check that all original subwoofers are connected. If any are disconnected, re-pair them. View pairing steps here.

Pair Your 12-inch Subwoofer

- Connect the 12" subwoofer to power. Toggle the switch to "ON".
- Press and hold the pairing button behind the subwoofer until the blue LEDs blink rapidly.
The subwoofer will stay in pairing mode for 120 seconds. Complete the remaining steps within this timeframe.
- Press and hold
![]() on top of the main unit for 8 seconds while system is on.
on top of the main unit for 8 seconds while system is on.
The main unit will display![]() , followed by
, followed by ![]() .
.

- LED will display these options:
![]()
![]() : For a system with a mix of cabinet types.
: For a system with a mix of cabinet types.![]() : For a system with 12" subwoofers only.
: For a system with 12" subwoofers only.![]() : For a system with dual-opposing 8" subwoofers only.
: For a system with dual-opposing 8" subwoofers only. ![]() : For re-pairing surround speakers only.
: For re-pairing surround speakers only.
 on top of the main unit for 8 seconds while system is on.
 , followed by
  .
.

 : For a system with a mix of cabinet types.
 : For a system with 12" subwoofers only.
 : For a system with dual-opposing 8" subwoofers only.
  : For re-pairing surround speakers only.
Press  on your remote to select your desired pairing option. Then, press ENTER.
- The main unit will search for a subwoofer. Once paired, the display will show:


LS and RS represent Left and Right Surround Speakers.
W1234 represents the number of SubWoofers connected to your system.
The system must be on FW 3.0 or above. If not, the 12" subwoofer will not pair and main unit display won't show the text above.
A solid blue LED on the subwoofer indicates successful pairing with the main unit.
- To pair another subwoofer, repeat the steps above. Up to 4 subwoofer cabinets can be paired.
- If any 12" subwoofer fails to pair, the total number of subwoofers shown may not match. Alternatively, you might see this on the main unit display:
![]()

Only the Left / Right Surround (LS, RS), and
Left / Right original 8" subWoofers (LW/RW) are connected.
If the above steps do not result in successful pairing:
- Ensure the correct subwoofer configuration has been selected in step 4.
- Adjust the wireless frequency or increase frequency strength. See "Help and Troubleshooting" section. Then, retry steps 2-5.
- Temporarily move the unpaired subwoofer closer to the main unit. Retry steps 2-5.
Prefer to use the OSD?

Under the System Tab, select 'Subwoofers Manual Pairing'. Use ![]() to select your desired subwoofer configuration. Then, follow on-screen instructions to pair your 12" subwoofer.
to select your desired subwoofer configuration. Then, follow on-screen instructions to pair your 12" subwoofer.
(Options: 8" + 12" Subs, 12" Subs Only, 8" Subs Only)
Disclaimer: Diagrams included in the manual are for illustration purposes only. Actual image and text may vary.
Identify Your Subwoofer
Method 1: Check LED Lights on the Back of the Subwoofer
The LED indicators on the 12" subwoofer show its assigned number:

- When 12" subwoofer(s) are added to a system with a pair of original 8" subwoofers:
- The original 8" subwoofers will always be assigned as subwoofer 3 or 4.
- The 12" subwoofer(s) will always be assigned as subwoofer 1 or 2.
- If the system only has 12" subwoofers connected (or in other circumstances), the number assigned to each subwoofer will be random and may not be in numerical sequence. This is normal and will not affect system performance.
Method 2: Via the On-Screen Display (OSD)
- Press the "
![]() HOME" button to display OSD on TV.
HOME" button to display OSD on TV. - Navigate to System > 'Subwoofers Manual Pairing'. Press ENTER.

 HOME" button to display OSD on TV.
Disclaimer: Diagrams included in the manual are for illustration purposes only. Actual image and text may vary.
For DRAGON Owners with the original 8" subwoofers x 2:
- If only one 12" subwoofer has ever been connected, subwoofer 2's pairing status will show "N/A".
- If two 12" subwoofers have been connected previously, but only one is currently connected, subwoofer 2's pairing status will show "Disconnected".
When using DRAGON's HDMI inputs, you can also check the number of subwoofers connected. To do so, press the INFO button to call up the popup OSD.
OPTIMIZE PERFORMANCE
Placement Tips
Use Corner Placement for Maximum Bass Presence
Corner placement optimizes subwoofer performance by minimizing acoustic cancellation points (dead spots), ensuring effective bass production below 40Hz.
Prioritize placing your 12" subwoofer(s) at the corners of your room.
Refer to the "Recommended Placement" section for suggested placement layouts.
Fine-Tune Corner Placement
Play music with a familiar bassline on loop. Move your 12" subwoofer diagonally from the corner, equidistant from both side and rear walls.
Listen to the bass response. Adjust the subwoofer position incrementally until you find one that offers lower and louder bass. Settle on the optimal placement.
Typically, the subwoofer will be a few inches away from the walls of your room.
Alternative Placements
Every room responds differently to subwoofer placements. If corner placement doesn't provide optimal bass response or isn't feasible, perform a subwoofer crawl to find alternative positions:
- Place the subwoofer at your listening position.
- Play music with a repeating bass line on loop.
- Evaluate bass quality at each potential location by squatting and keeping your head near knee level while listening.
- Place your subwoofer in locations in the room that provided the most accurate sounding bass to your ears.
Once you have found the best subwoofer location in the room, try shifting your listening position a few inches closer or away from the wall. Small changes in the seating location can further optimize the perceived bass response.
On-Screen Display Calibration Settings
The Calibration tab provides the option to customize DRAGON's playback to better suit your listening environment.
Easy Sound Setup
Easy sound setup customizes and delivers instant room calibration for most rooms.
- Press the "
![]() HOME" button to display OSD on TV.
HOME" button to display OSD on TV. - Use the navigation keys to access the Calibration tab.
- In 'Easy Sound Setup', use
![]() to select the option closest to your room size for the average subwoofer distance (see diagrams below).
to select the option closest to your room size for the average subwoofer distance (see diagrams below).


- Press ENTER to apply.
 to select the option closest to your room size for the average subwoofer distance (see diagrams below).


Room Size Calibration
Under 'Advanced Sound Setup', advanced users can access a wide range of calibration options to optimize DRAGON's output to their listening environment.
This sub-category allows you to manually input the distances based on your room environment.
Configure your setup
- Use
![]() to enter your room size.
to enter your room size.
Save your setup
- Scroll down 'Save Custom Room Size'. Scroll
![]() to select 'Yes'.
to select 'Yes'. - Press ENTER to save your custom room size configuration.
- When 12" subwoofer(s) are added to a system with a pair of original 8" subwoofers:
- The original 8" subwoofers will always be assigned as subwoofer 3 or 4.
- The 12" subwoofer(s) will always be assigned as subwoofer 1 or 2.
- If the system only has 12" subwoofers connected (or in other circumstances), the number assigned to each subwoofer will be random and may not be in numerical sequence. This is normal and will not affect system performance.
| Speaker Unit | Distance to | Range / Placement |
| Main Unit | Listening Area | 5.0 - 25.0 ft+ |
| Side Wall (Left / Right) | 1.0 - 15.0 ft+ | |
| Ceiling | 2.0 - 20.0 ft+ | |
| Surround Speakers | 5.0 - 30.0 ft+ | |
| Subwoofers | Listening Area (Sub 1) | 2.0 - 25.0 ft+ |
| Listening Area (Sub 2) | 2.0 - 25.0 ft+ | |
| Listening Area (Sub 3) | 2.0 - 25.0 ft+ | |
| Listening Area (Sub 4) | 2.0 - 25.0 ft+ | |
| Surround Speakers | Listening Area (Left) | 2.0 - 15.0 ft+ |
| Listening Area (Right) | 2.0 - 15.0 ft+ |
Precision: 0.1ft
You can also adjust using metric units (meters). Go to the System tab to change measurement units.
You can also restore default room size settings (last option in this sub-menu). When this option is selected, the distances appropriate for a medium room will be applied.
Volume Level Calibration

In the Calibration tab under 'Advanced Sound Setup', select 'Volume Level Calibration' to further adjust the volume of each subwoofer type.
The subwoofer volume level operates independently from the bass level on your remote.
Default volume level for each subwoofer type when a 12" subwoofer is connected: 7
Press "  HOME" to exit the OSD.
Disclaimer: Diagrams included in the manual are for illustration purposes only. Actual image and text may vary.
On-Screen Display Audio Settings
Utilize a combination of these settings to fine-tune the bass response of DRAGON.
Subwoofer Crossover
- Under the Audio tab, select 'Advanced Audio Settings'.
- The 'Subwoofer Crossover' adjusts the highest bass frequencies that the subwoofer(s) will play.
(Options: 120 - 200Hz, in 10Hz increments)
Subwoofers Setup
- In the OSD Audio tab,
- Go to 'Audio Setup'. Press ENTER.
- Select 'Subwoofers Setup'. Press ENTER.
- These settings allow you to adjust the number of active subwoofers.
Use the 'Low-Frequency Effect' adjustment to decrease low-frequency effects volume (Default = 0dB).
If the bass feels too overpowering, adjust by 1-3 dB. Test with low-frequency content to fine-tune subwoofer and EQ controls to achieve your preferred bass response.


Disclaimer: Diagrams included in the manual are for illustration purposes only. Actual screen text may vary.
Care and Maintenance
Clean the 12" subwoofer with a microfiber cloth only. Avoid abrasive cleaners, harsh detergents, and water.
PRODUCT INFORMATION
Specifications
| Subwoofer Driver and Power | |
| Subwoofer | 12" Carbon Fiber-Reinforced Aluminum Subwoofer Driver 12" Carbon Passive Radiator |
| Frequency Response | 19Hz - 200Hz |
| Peak Power | 750W |
| Miscellaneous | |
| Display Functionality | Pairing LEDs that indicate the assigned subwoofer number |
| Power Input | 110 - 120V, 50/60Hz (Default) 220 - 240V, 50/60Hz (Check voltage selector switch before use. See "Features and Connections".) |
| Dimensions and Weight | 20.1 x 16.9 x 18.1 inch / 80lbs |
Glossary
On-Screen Display (OSD)
An OSD allows you to control the surround system with ease, displaying all settings on a user-friendly interface. DRAGON's OSD includes helpful visuals to aid with each adjustment option.
Passive Radiator
Converts the air pressure changes caused by a subwoofer driver in the same cabinet into additional low-frequency output, just like a subwoofer port.
Room Calibration
Calibration optimizes the level and timing of different sonic frequency ranges to your room placement. Easy sound setup is recommended for basic users. Advanced room calibration is available for prosumers.
Subwoofer Crossover Frequency
Adjusting the subwoofer crossover directs bass frequencies to the subwoofer, blending seamlessly with main speakers and optimizing sound balance.
Volume Level Calibration
Volume Level Calibration allows advanced users to use a sound pressure level meter at their primary listening position to calibrate each speaker to their room for theater-like sound.
WARRANTY INFORMATION
LIMITED WARRANTY (U.S. Only)
If you have any questions or comments, you may reach us at the following:
Visit our website at www.dragon.nakamichi-usa.com
Email us at dragonvip@nakamichi-usa.com
Phone Support: +1 (415) 888 9626 (Weekdays 10am - 6:45pm PST; Saturday 10am - 4:45pm PST)
HELP AND TROUBLESHOOTING
-
I cannot pair the 12-inch subwoofer with my product
- Upgrade the firmware of your DRAGON to FW3.0 or later. Then, perform a factory reset. See "Upgrade System Firmware".
- Temporarily move the 12" subwoofer closer to the main unit and deactivate nearby routers or wireless transmitters using the 5.2 / 5.8 GHz bandwidth. Retry pairing the subwoofers.
-
No sound from the subwoofer
- Ensure power is connected
- Check that the power cord is securely plugged into the subwoofer's sockets and AC outlet.
- Ensure the subwoofer(s) power switch is set to "ON" before powering on the main unit.
- Check wireless connection
- With the main unit on, ensure all subwoofer LEDs show solid blue lights.
- If the back panel's LED is not solid, follow pairing steps in sections "Upgrade System Firmware" and "Pair Your 12-inch Subwoofer".
- If a sub does not power on or connect, disconnect its power for 5 minutes and retry.
- Soundcheck
- If all wireless components show solid blue lights when DRAGON is on, press DEMO button on the main unit to perform a soundcheck.
- Ensure power is connected
As part of the soundcheck, all connected subwoofers will play the Dolby Atmos Amaze and 747 surround soundtrack, as well as the "ALL SUBWOOFERS" diagnostic test track.
-
Subwoofer sound abnormalities
Cut out / crackling / popping / distortion: When there is a 5.8Ghz wireless device in close range to DRAGON that is using the same frequency (e.g. Home Wi-Fi router), the main unit's wireless connection to the subwoofer and surround speakers may be affected. This can be resolved by adjusting the following settings:
- Remove any obstructions or potential sources of interference
- Remove any obstacles between the main unit and the affected wireless component.
- Other devices sending radio frequency signals in proximity may interrupt the connection. Where possible, keep your speakers away from such devices.
- Bring the subwoofers closer to the main unit. See "Recommended Placement" for recommended placement.
- Change DRAGON's wireless channel
- Press the "
![]() HOME" button on your remote. Navigate to the System tab.
HOME" button on your remote. Navigate to the System tab. - Go to 'Subs + Surr Wireless Freq' and change to either of the following:
- Press the "
 HOME" button on your remote. Navigate to the System tab.
 | Selection | Wireless Frequency (GHz) | Frequencies Occupied3 |
| Default | 5.8 GHz | Channels 149 - 163 |
| Auto 1 | 5.2 GHz | Channels 32 - 50 |
Notes:
- The default channel is optimized for avoiding wireless interference from external devices. If there is no audio popping / crackling / cut out from subwoofer(s) or surround speakers, it is recommended to keep using the default channel.
- Changing the radio frequency channel and strength may affect the performance of other near wireless devices (e.g. wireless LAN) using the same frequency bandwidth.
- DRAGON's wireless transmission will automatically analyze and use smaller range of frequency channels mentioned for the best wireless performance.
- Adjust your home's wireless router
Visit our Support Page to view recommended settings for your Wi-Fi router and optimize the performance of DRAGON's wireless communication. Scan the QR code below.

Wi-Fi optimization guide
- Change DRAGON's wireless strength
- Press the "
![]() HOME" button on your remote. Navigate to the System tab.
HOME" button on your remote. Navigate to the System tab. - Go to "Wireless Freq Strength", change '2: Default' to '3' or '3+'.
- Play content. Audio playback from subwoofer and surround speakers should be optimized now.
- Press the "
- How can I find my 12" subwoofer(s) assigned number in OSD?
- Check the pairing LEDs on the rear backplate to find the assigned number.
- When 12" subwoofer(s) are added to a system with a pair of original 8" subwoofers:
- The original 8" subwoofers will always be assigned as subwoofer 3 or 4.
- The 12" subwoofer(s) will always be assigned as subwoofer 1 or 2.
- If the system only has 12" subwoofers connected, the number assigned to each subwoofer will be random and may not be in numerical sequence. This is normal and will not affect system performance.
- The firmware upgrade could not be completed / The main unit displays "FAIL 558XXXXX" during the firmware upgrade process.
- Your USB drive may be incompatible or contain an incomplete firmware file. Try using a different USB drive (USB 3.0, less than 128GB, formatted in exFAT).
- Download a fresh copy of the firmware from our website (support.nakamichi-usa.com/dragon/firmware-upgrade). Delete any previously downloaded firmware file from your USB drive and replace with this copy.
- Turn off DRAGON, unplug the AC power supply, insert the replacement USB drive, reconnect the power, and turn DRAGON back on to resume the upgrade.
- Once firmware upgrade is complete, reset the system (See "Upgrade System Firmware" section).
SUPPORT
Subwoofer Optimization Tips
Room acoustics greatly affect your overall experience. Try these tips to maximize subwoofer performance.
| Symptom | Remedy |
| Bass too overpowering | Adjust Volume
Adjust Bass Tone
Optimize Room Placement
Tip: Use a combination of these settings to suit your listening preferences. |
| Insufficient Bass | Use Corner Placement Check for Acoustic Cancellation If the bass improves, adjust their placement. See "Recommended Placement" for placement ideas and "Placement Tips" for further tips. |
 on your remote to decrease the volume of each connected subwoofer type. (Default: 7).
Share Your Experience
Need More Assistance?
The DRAGON Concierge can assist with pairing subwoofer(s) to your system and optimizing their performance.
Should you need any assistance, please contact us.
Tel: +1 (415) 888 9626
Email: dragonvip@nakamichi-usa.com
Operating Hours
- 10AM to 6:45PM PST Weekdays
- 10AM to 4:45PM PST Saturday

WhatsApp DRAGON Concierge

DRAGON Support
Join the Facebook Group
Join fellow owners for placement and specific device recommendations.


bit.ly/Nakamichi-FB

Leave a Review!
If you've been enjoying your DRAGON system with 12" subwoofers, help others make an informed decision by leaving a review!
Your thoughts will go a long way in supporting our mission of redefining audio expectations.

bit.ly/DRAGON-modular12-review
IMPORTANT SAFETY INSTRUCTIONS


DRAGON is designed and manufactured to operate within defined design limits, and misuse may result in electric shock or fire. To prevent DRAGON from being damaged, the following rules should be observed for its installation, use and maintenance. Please read the following safety instructions before operating DRAGON. Keep these instructions in a safe place for future reference.
- Read, keep and follow all instructions.
- Heed all warnings.
- Do not use DRAGON near water.
- Clean only with a dry cloth.
- Do not block any ventilation openings. Install in accordance with the manufacturer's instructions.
- Do not install near any heat sources such as radiators, heat registers, stoves, or other apparatus (including amplifiers) that produce heat.
- Do not defeat the safety purpose of the polarized or grounding-type plug. A polarized plug has two blades with one wider than the other. A grounding type plug has two blades and a third grounding prong. The wide blade or the third prong is provided for your safety. If the provided plug does not fit into your outlet, consult an electrician for replacement of the obsolete outlet.
- Protect the power cord from being walked on or pinched, particularly at plugs, convenience receptacles, and the point where they exit from DRAGON.
- Only use attachments / accessories specified by the manufacturer.
- Use only with the cart, stand, tripod, bracket, or table specified by the manufacturer, or sold with DRAGON. When a cart is used, use caution when moving the cart / DRAGON combination to avoid injury from tipover.
- Unplug DRAGON during lightning storms or when unused for long periods of time.
- Refer all servicing to qualified service personnel. Servicing is required when DRAGON has been damaged in any way, such as when the power supply cord or plug is damaged, liquid has been spilled or objects have fallen into DRAGON, DRAGON has been exposed to rain or moisture, does not operate normally, or has been dropped.
![shock hazard]() To reduce the risk of electric shock or component damage, switch off the power before connecting other components to DRAGON.
To reduce the risk of electric shock or component damage, switch off the power before connecting other components to DRAGON.- Unplug the power cord before cleaning DRAGON. A damp cloth is sufficient for cleaning. Do not use a liquid or a spray cleaner on DRAGON. Do not use abrasive cleaners.
- Always use the accessories recommended by the manufacturer to ensure compatibility.
![burn hazard]()
![shock hazard]()
When moving DRAGON from an area of low temperature to an area of high temperature, condensation may form in the housing. Wait before turning on DRAGON to avoid causing fire, electric shock, or component damage.- Slots and openings in the back and bottom of the cabinet are provided for ventilation. To ensure reliable operation of DRAGON and to protect it from overheating, be sure these openings are not blocked or covered. Do not place DRAGON in a bookcase or cabinet unless proper ventilation is provided.
![burn hazard]()
![shock hazard]()
Never push any objects into the slots and openings on DRAGON's enclosure. Do not place any objects on the top of DRAGON. Doing so could short circuit parts causing a fire or electric shock. Never spill liquids on DRAGON.- When connected to a power outlet, power is always flowing into DRAGON. To totally disconnect power, unplug the power cord.
![burn hazard]()
![shock hazard]()
Do not overload power strips and extension cords. Overloading can result in fire or electric shock.![burn hazard]()
![shock hazard]()
For 12" subwoofer(s): Do not set the voltage selector switch to the wrong voltage. Doing so will result in damage not covered by warranty and could result in fire or electric shock.- The wall socket should be located near DRAGON and be easily accessible.
![burn hazard]()
![shock hazard]()
Keep DRAGON away from moisture. Do not expose DRAGON to rain or moisture. If water penetrates into DRAGON, unplug the power cord and contact your dealer. Continuous use in this case may result in fire or electric shock.- Do not use DRAGON if an abnormality occurs. If any smoke or odor becomes apparent, unplug the power cord and contact your dealer immediately. Do not try to repair DRAGON yourself.
- Avoid using dropped or damaged appliances. If DRAGON is dropped and the housing is damaged, the internal components may not function normally. Unplug the power cord immediately and contact your dealer for repair.
![burn hazard]()
![shock hazard]()
Continued use of DRAGON after an abnormality occurs or if the housing is damaged may cause fire or electric shock.![burn hazard]()
![shock hazard]()
Do not install DRAGON in an area with heavy dust or high humidity. Operating DRAGON in environments with heavy dust or high humidity may cause fire or electric shock.- Ensure that the power cord and any other cables are unplugged before moving DRAGON.
![burn hazard]()
![shock hazard]()
When unplugging DRAGON, hold the power plug, not the cord. Pulling on the power cord may damage the wires inside the cord and cause fire or electric shock. When DRAGON will not be used for an extended period of time, unplug the power cord.![shock hazard]() To reduce risk of electric shock, do not touch the connector with wet hands.
To reduce risk of electric shock, do not touch the connector with wet hands. - Insert the remote control batteries in accordance with instructions. Incorrect polarity may cause the battery to leak which can damage the remote control or injure the operator.
- The marking label of the subwoofer is located on the external bottom enclosure of the product.
- The equipment shall be used at maximum 95°F ambient temperature.
- See the important note and rating located on the back of the unit.
![]()
This equipment is not waterproof. To prevent a fire or shock hazard, do not place any container filled with liquid near the equipment (such as a vase or flower pot) or expose it to dripping, splashing, rain or moisture.- To prevent injury, DRAGON must be securely attached to the floor / wall in accordance with the installation instructions.
![]()
Danger of explosion or fire if batteries are mistreated. Replace only with the same or specified type.- Do not leave the batteries exposed to direct sunlight for a long period of time with doors and windows closed. Do not disassemble the batteries or dispose of them in fire.
Where the MAINS plug or appliance coupler is used as the disconnect device, the disconnect device shall remain readily operable.


To reduce the risk of fire or electric shock, do not expose DRAGON to rain or moisture.

RISK OF ELECTRIC SHOCK
DO NOT OPEN
There are no user serviceable parts inside the subwoofer. Never attempt to service the subwoofer or disassemble the backplate.
This lightning flash with arrowhead symbol within an equilateral triangle is intended to alert user to the presence of not isolated dangerous voltage within the product that may be of sufficient magnitude to constitute a risk of shock to persons.
 The exclamation point within the equilateral triangle is to alert the user to the presence of important operating and servicing instructions in the literature accompanying the appliance.

This equipment is a Class II or double insulated electrical appliance. It has been designed in such a way that it does not require a safety connection to electrical earth.

HELPDESK
bit.ly/dragon-helpdesk

SPEAK TO OUR DRAGON CONCIERGE BASED IN CALIFORNIA
Email: dragonvip@nakamichi-usa.com
Tel: (415) 888 9626

(Weekdays 10am - 6:45pm PST; Saturday 10am - 4:45pm PST)
Documents / Resources
References
![www.dragon.nakamichi-usa.com]() Nakamichi DRAGON | Quad Subs | Omni-Motion Surrounds
Nakamichi DRAGON | Quad Subs | Omni-Motion Surrounds![support.nakamichi-usa.com]() Firmware Upgrade | DRAGON | Nakamichi Support
Firmware Upgrade | DRAGON | Nakamichi Support![bit.ly]() Instagram
Instagram
Download manual
Here you can download full pdf version of manual, it may contain additional safety instructions, warranty information, FCC rules, etc.
Advertisement


Need help?
Do you have a question about the DRAGON and is the answer not in the manual?
Questions and answers