Advertisement
BOX CONTENTS
- PICS 2 SD
- USB cable
- USB power adapter
- Slide holder
- Film holder
- Photo holders (3)
- Quickstart Guide
- Safety Instructions & Warranty Information Booklet
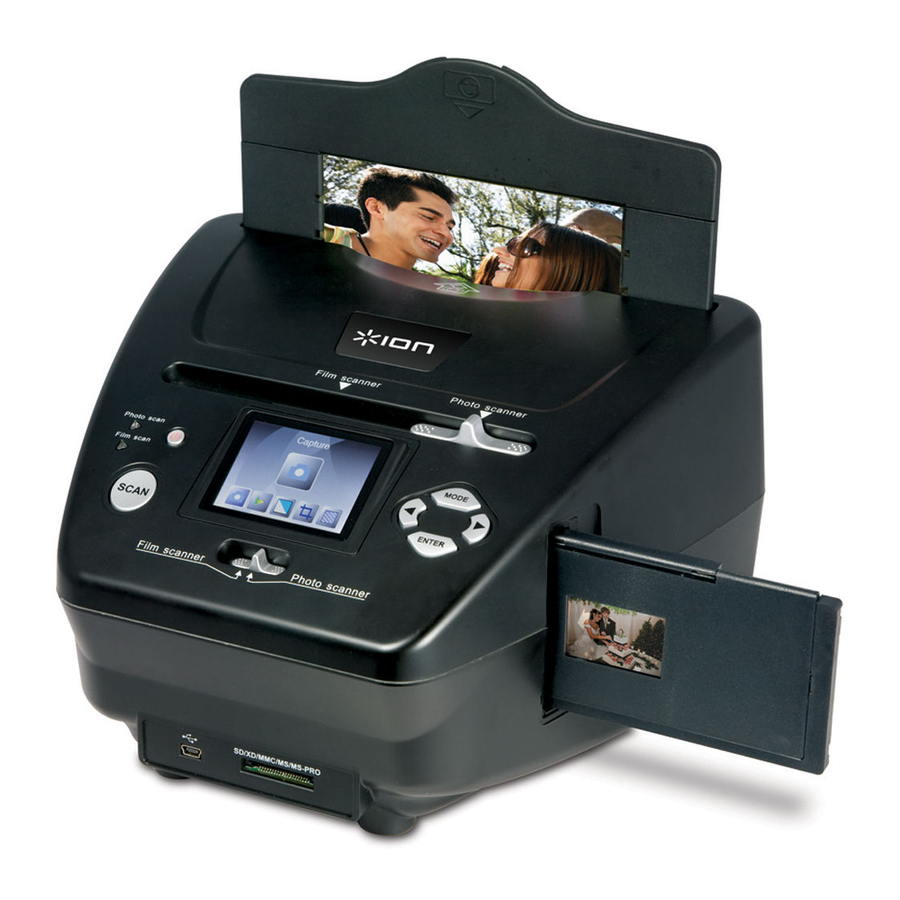
PICS 2 SD FEATURES

- POWER BUTTON
- DISPLAY
- SCAN BUTTON
- SCANNER MODE SWITCH
- LEFT / RIGHT BUTTONS
- MODE BUTTON
- ENTER BUTTON
- FILM / SLIDE HOLDER SLOT
- PHOTO HOLDER SLOT
- USB PORT
- SD CARD SLOT
- USB CABLE
- USB POWER ADAPTER
- SLIDE HOLDER
- FILM HOLDER
- PHOTO HOLDERS
3.5" x 5"
4" x 6"
5" x 7"
 Note: Please make sure your film negatives/ mounted slides and cover trays are clean before inserting into the copier. Dust or dirt will affect the quality of your scanned images.
USING THE INCLUDED HOLDERS
SLIDE & NEGATIVE HOLDERS
- Open the holder.
![]()
- Put the slides / film into the holder.
![]()
- Close the holder and please make sure the holder closes properly.
![]()


PHOTO HOLDERS
- Slide your photo into the top slot of the appropriate holder (3.5" x 5", 4" x 6" or 5" x 7").
![]()
- To remove the photo, simply turn the holder upside-down and let it slide out.
![]()


SCANNING IMAGES WITH PICS 2 SD
When scanning your slides, negatives or photos with PICS 2 SD, you can save your scanned images to an optional SD card or you can save it to PICS 2 SD's internal memory (up to 14MB). To scan and save your images, follow these steps:
- With the included USB cable, connect PICS 2 SD either to your computer (if it is on) or to wall power using the included USB power adapter.
- Press the POWER BUTTON to turn PICS 2 SD on.
- Insert your slide, negative, or photo into the appropriate holder. (See USING THE INCLUDED HOLDERS for more information.)
- Insert the holder into PICS 2 SD. If using a slide or negative holder, insert it into the slot on the right side. If using a photo holder, insert it into the slot on the top.
- Move the two switches to the appropriate position: "Film Scanner" (for slides and negatives) or "Photo Scanner" (for photos).
- Before scanning, you will see the main menu. You can adjust your settings here.
![]()
Use the LEFT / RIGHT BUTTONS to navigate the available options and the press the ENTER BUTTON to select one. You can also press the MODE BUTTON to return to the main menu:

- If you are scanning a slide or negative, select "Film" to choose between "Negatives," "Slides," or "B&W" (black and white negatives).
- If you are scanning a photo, select "Effect" to choose between "Multicolor" (color photos) and "B&W" (black and white photos).
- If you are scanning a photo, select "Crop" and select the measurements of your photo: 5" x 7", 4" x 6" and 3" x 5" (3.5" x 5").
- Select "Resolution" to choose between 5M and 10M (megapixels). The larger the resolution, the better quality your scanned image will be.
- When you have adjusted your settings and are ready to scan your image(s), select "Capture" on the main screen. The image you are about to scan will appear in the DISPLAY. You can adjust the image in the following ways:
![]()

- You can adjust the exposure by pressing the ENTER BUTTON when your image is shown on the DISPLAY. Use the LEFT / RIGHT BUTTONS to adjust the EV (exposure value) and press the ENTER BUTTON to select it.
- You can change the orientation of the image by pressing the LEFT / RIGHT BUTTONS. The RIGHT BUTTON will flip the image vertically, and the LEFT BUTTON will flip the image horizontally.
Note:When scanning photos, if you selected 3" x 5" (3.5" x 5") or 4" x 6", you will see the border of the photo holder, but the software will automatically crop this out when you scan it (if you selected the proper Crop settings as described above).
- To scan the image, press PICS 2 SD's SCAN BUTTON.
- After the scan is complete, use the LEFT / RIGHT BUTTONS to select "Save" to save your scan, "Cancel" to delete your scan and try again or "Home" to return to the main menu.
![]()
- When you are done scanning your image(s), you can transfer your images to your computer. See TRANSFERRING IMAGES FROM PICS 2 SD for more information.

VIEWING & EDITING IMAGES
- Press the MODE BUTTON to enter the main menu.
- Use the LEFT / RIGHT BUTTONS to select "Playback" and press the ENTER BUTTON. You will see a slideshow of the images you have scanned.
- When you see an image you want to edit, press the ENTER BUTTON. The slideshow will pause.
- Press the ENTER BUTTON again. You will see several icons on the sides of the DISPLAY. Use the LEFT / RIGHT BUTTONS to navigate these and press the ENTER BUTTON to select it, if desired.
![]()

- Rotate +90°: Rotates the image 90 degrees clockwise.
- Rotate -90°: Rotates the image 90 degrees counterclockwise.
- Delete: Deletes the image.
- Exit: Returns to the slideshow.
- Save: Saves the image after you make any changes. (If you do not save the image, your changes will be lost if you return to the slideshow.)
- Home: Returns to the main menu.
TRANSFERRING IMAGES FROM PICS 2 SD

- Connect PICS 2 SD to your computer with the included USB cable.
- Press the MODE BUTTON to enter the main menu.
- Use the LEFT / RIGHT BUTTONS to select "USB MSDC" and press the ENTER BUTTON. A USB symbol will appear on the DISPLAY, meaning PICS 2 SD is functioning as a remote USB device to be read by your computer.
- You can now view or transfer your scanned images to your computer (just as you would from a remote USB drive or an SD card reader).
- Press the MODE BUTTON to return to the main menu.
SPECIFICATIONS
| Image Sensor | 5.1 megapixel CMOS sensor |
| Lens Specification | F= 4.83 |
| Color Balance | Automatic |
| Exposure Control | Automatic |
| PC interface | USB 2.0 |
| Scan High Resolution | 2500 DPI interpolation resolution |
| Light Source Back Light | 3 white LED |
| Photo Holders | 3.5" x 5" / 4" x 6" / 5" x 7" |
| System Requirements | Windows® XP / Windows Vista™ (32-bit or 64-bit) / Windows 7 |
| Power | From USB port |
| Dimensions | 8.7" x 8.2" x 5.8" |
Specifications are subject to change without prior notice.
TROUBLESHOOTING
| ISSUE | POSSIBLE CAUSE | RESOLUTION |
| My computer does not recognize the PICS 2 SD. I get a Windows message that reads "device not recognized" | PICS 2 SD not plugged into a high-speed USB port. | Your computer must have a USB 2.0 to communicate with your PICS 2 SD. Check to see if USB 2.0 is installed on your computer. If you do not have a USB 2.0 installed on your computer you can upgrade your USB ports. This hardware is available at most electronic stores. |
| I have a USB 2.0 port on my computer, but my computer still won't recognize PICS 2 SD. | All ports on your computer may not be high speed. | Even though you may have USB 2.0 installed, all of your USB ports may not be USB 2.0 compatible. Check all your USB ports to find the 2.0 compatible ports. |
| Warning from Windows that device "has not passed Microsoft logo testing". | This is normal. OK to continue. | Choose "Continue anyway". PICS 2 SD will not harm your computer. (Windows certification is in process for this software) |
| My PICS 2 SD is working but some of my slides, negatives or photos look overexposed. | Time for auto exposure varies according to your computer configuration. | The image copier self adjusts to your slide, negative or photo exposure. Wait for the live view window to stop adjusting for exposure and then press the Scan button. Check your slides, negatives or photos to see if they may have been overexposed when originally developed. Several photo adjusting software applications are available to "cleanup" your newly digitized picture. |
PRECAUTIONS
Before using PICS 2 SD, please ensure that you read and understand the safety precautions described below. Always ensure that the PICS 2 SD is operated correctly:
- Never operate PICS 2 SD inside of an aircraft or anywhere else where operation of such devices is restricted. Improper use creates the risk of serious accident.
- Do not try to open the case of PICS 2 SD or attempt to modify PICS 2 SD in any way. High-voltage internal components create the risk of electric shock when exposed. Maintenance and repairs should be performed only by authorized service providers.
- Keep PICS 2 SD away from water and other liquids. Do not use PICS 2 SD with wet hands. Never use PICS 2 SD in the rain or snow. Moisture creates the danger of fire and electric shock.
- Keep PICS 2 SD and its accessories out of the reach of children and animals to prevent accidents or damage to the image copier.
- If you notice smoke or a strange odor coming from PICS 2 SD, turn the power off immediately. Take PICS 2 SD to the nearest authorized service center for repair. Never attempt to repair PICS 2 SD on your own.
- Use only the recommended power accessories. Use of power sources not expressly recommended for PICS 2 SD may lead to overheating, distortion of the equipment, fire, electrical shock or other hazards.
- PICS 2 SD may become slightly warm during use. This does not indicate malfunction.
- If the exterior of PICS 2 SD needs cleaning, wipe it with a soft, dry cloth.
Documents / ResourcesDownload manual
Here you can download full pdf version of manual, it may contain additional safety instructions, warranty information, FCC rules, etc.
Advertisement


Need help?
Do you have a question about the PICS 2 SD and is the answer not in the manual?
Questions and answers