Advertisement
Introduction
Introducing the Sega Toys Homestar Flux
This product aims to bring the enjoyment of entire, realistic night skies to you in your home. It was developed in collaboration with Takayuki Ohira, creator of the world's most advanced planetarium projector, Megastar II Cosmos, which has been recognized by the Guinness Book of Records.
In modern metropolitan areas, the use of excessive neon and night time illumination has led to increased brightness in the night sky and stars can no longer been seen. "Light pollution" is spreading and stars are becoming harder to see everywhere. Sega Toys Homestar Flux was developed to allow people to experience the real beauty of the disappearing night skies easily, in their own homes.
The main purpose for developing this product is so that people can enjoy the stars in their own homes. For this reason, the range of suns, moons, stars and the planets is not the same as a commercial planetarium. It will however create a deep interest in the stars and other heavenly bodies. We hope it inspires you to visit other planetariums and experience the wonders of the skies.
Introducing the Collaborator Takayuki Ohira
Born in Kawasaki city in Kanagawa Prefecture in 1970, Takayuki Ohira made his first planetarium projector at elementary school. While a university student in 1991 he developed a previously deemed impossible lens type planetarium, the Astroliner.
In 1998, he developed a portable 1.7 million star planetarium which weighed a mere 30 kg. By 2003 the projection capacity reached 4.1 million when he produced the Megastar II. This was first presented to the public at the closing ceremony of the Shibuya Tokyu Bunka Kaikan.
In April 2004, the Megastar II Model No. 1 went on public display in the Kawasaki Municipal Science Museum for Youth. At the same time the Cosmos Model No. 3, with a 5 million star projection capacity, went on permanent display at the National Museum of Emerging Science and Innovation. In December 2004, Megastar II Cosmos was recognized as the world's most advanced planetarium projector by the Guinness Book of Records. At Expo 2005 in Aichi Model No. 4 Titan was revealed at the De La Fantasia satellite project site in Sasashima.
The Sega Toys Homestar
Accessories
If parts are damaged or missing on opening the box, please contact our the retail outlet where the product was purchased and do not attempt to use the product. Please note that the shape of some parts that appear in the illustrations of this text may differ slightly from those included with the product.
- Projector 1
- Interchangeable discs 2
- AC adaptor 1
- 1 USB cable
- 1 Instruction manual
- 1 Star poster
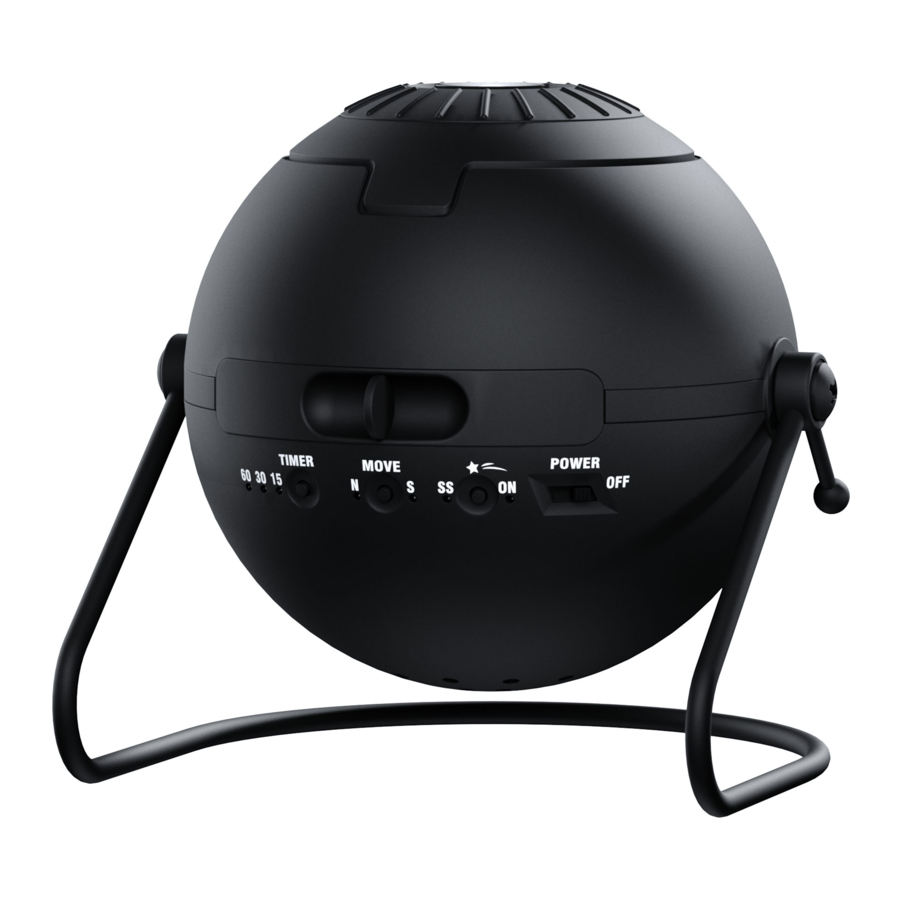
Part Names and Functions

- Focus dial.
Used to adjust the focus. - Disc tray.
Used when inserting and removing the interchangeable discs. - Projector angle adjustment button.
Used to alter the angle of the projector. - ON/OFF switch.
- ON/OFF display lamp.
Shows if the projector is on or off. - Shooting star switch.
Used to switch the shooting star function on and off. - Diurnal motion switch.
Used to switch the diurnal motion function on and off. - Timer switch.
To set and turn off the timer. When the timer is off, the projector will automatically switch off after about 3 hours. - Electric plug holes.
For plugging the AC adaptor into.
Product Specifications
| Exterior dimensions | (167 mm × 159 mm × 151 mm) 6.5 in × 6.3 in × 5.9 in |
| Weight | 800 g (1.76 lbs) |
| AC adaptor input | AC 100 V to 240 V, 50 Hz to 60 Hz |
| AC adaptor output | DC 5 V, 2 A |
| Power Consumption | 5 W |
Instructions
Points for Effective Use
- When using the product and in order to fully enjoy the images projected, ensure that the room is dark and the targeted ceiling or walls are not lit. The darker the surface and environs, the clearer the stars will be.
- When entering a darkened room from a bright area, it may take from 5 to 10 minutes for your eyes to adjust to the darkness. Individuals may vary. Fix your eyes on the middle of the projected image and wait for them to focus. Once your eyes have adjusted, you will see the stars clearly.
- The projected images can be seen most effectively on a white or light coloured ceiling or walls.
- A projection distance of 1.2 to 2.9 m (4.0 to 9.5 ft) is possible. Too close or too far and the projected images will not be clear.
- Depending on which way the disc is inserted the visible portion of the milky way will differ. To see the centre of the milky way. without removing the disc switch on the diurnal motion function and rotate the sky. This can be switched off at the desired point.
- Shooting stars appear approximately once every 30 seconds. The timing of them is random and they appear in one place.
- To clean the projector or the discs dust gently with a soft cloth. Thinners, benzine or other chemicals must not be used.
Operating Instructions

Place the projector on a stable, flat, horizontal surface, like a table. A projection distance of 1.2 to 2.9 m (4.0 to 9.5 ft) is possible.

Plug the AC adaptor into the wall socket and connect it to the projector using the USB cable.

With the knob, pull open the disc tray, put in the disc in the way that the writing is not the wrong way around, place in the tray and close manually.

Switch on the projector. The ON/OFF display lamp will light up. If you darken the room the projected stars will be visible.
How to Focus

If the centre of the projected image is blurred, rotate the focus dial on the projector and adjust the focus. The stars on the perimeter of the image may appear slightly fuzzy or blurred compared to the centre. This is due to the features of the lens and is not a malfunction.
Adjusting the Projection Angle

Loosen the screws on both sides of the projector.

Hold the main body of the projector and adjust the projection angle.

To fix the desired angle, tighten the screws on both sides.
The knobs on both sides of the projector are in fact screws for holding the angle of the projector in place. Moving the projector by holding the screws, trying to change the angle without loosening them or twisting them too hard may cause them to break.
Inserting the Discs

Switch off the projector with the ON/OFF switch.

Pull open the disc tray and remove the disc.

Insert the new disc and push the tray closed.

Switch the projector on and the image will be projected.
Changing the discs while the projector is switched on could cause injury to the eyes. To prevent this the projector will automatically switch off. Please ensure that you do not attempt this. By switching off the projector in a darkened room it will become pitch black and accidents could occur. For your own safety, please insert and remove the disc in a well lit room.
Using the Shooting Star Function
Please note that shooting stars appear approximately once every 30 seconds. The timing of them is random and they appear in one place.

Switch on the shooting star button on the front of the projector. The shooting star lamp will light up.

Next, push the diurnal motion switch to ON. If the diurnal motion switch is off, the shooting star function will not operate.

Shooting stars will appear as the sky's image rotates. Pushing the shooting star switch again will turn off the function and the shooting star lamp will go out.
Using the Diurnal Motion Function
The stars can rotate both clockwise and anticlockwise. There is only one rotation speed.

Push the diurnal motion switch to ON.

Push it once and it will rotate anticlockwise, showing the movement of the stars in the northern hemisphere. Push it again and it will rotate clockwise, showing the movement of the stars in the southern hemisphere. The N lamp lights up for anticlockwise movement and the S lamp for clockwise movement.

Push the switch one more time and the diurnal motion function will go off and the stars will cease to rotate. When off, both the N and S lamps will go out.
Using the Timer Function
With a convenient automatic switch off function when resting.

Push the timer switch on the front of the projector to switch on the timer. Push it once to set the time for 15 minutes, twice for 30 minutes and three times for approximately 60 minutes. At the end of the selected period the projector will automatically switch off. By pushing the switch once again, the timer function is stopped.
The projector will automatically stop after about three hours if the timing switch function is not used. When the set time ends or the timer function is not used after about three hours and the projector automatically switches off, it is necessary to switch on the projector again to continue using it.
Troubleshooting Questions and Answers
I cannot see the stars clearly
- Ensure that the focus is on the middle of the stars.
- Give your eyes time to adjust to the darkness of the room.
- Ensure that the room or the projection target area, the ceiling or walls is not lit up.
- Ensure that no objects are blocking the light from the projector.
- Ensure the projection distance is not too great, 1.2 to 2.9 m (4.0 to 9.5 ft) is possible.
I can only see the edge of the milky way and it is not clear.
- Depending on the direction that the disc has been inserted, the visual parts of the milky way will differ. If one can see the edge of the milky way and wants to move to the centre, do not remove the disc. Switch on the diurnal motion function and wait until the area of the milky way you wish to see comes into view. Then turn off the diurnal motion function and the image will stop moving.
The power suddenly cuts out
- If the timer is ON, the projector will switch off once the chosen time has elapsed. In this case, restart the projector.
- If the timer switch is OFF, after about three hours the projector will switch off. In this case, restart the projector.
The projector does not work
- Ensure that the electric cord is correctly inserted.
The shooting stars do not appear
- Ensure the shooting star switch is ON.
- Turn on the diurnal motion function.
The stars do not rotate
- Switch on the diurnal motion function.
- Ensure that the disc and the disc tray is correctly placed.
Important Safety Instructions

Operating environment temperature: 5◦C to 40◦C (41◦F to 104◦F).
This product is for indoor use only.
The light source of this luminaire is not replaceable. When the light source reaches its end of life, the whole luminaire shall be replaced.

TO REDUCE THE RISK OF ELECTRIC SHOCK, DO NOT REMOVE COVER (OR BACK). NO USER-SERVICEABLE PARTS INSIDE. REFER SERVICING TO QUALIFIED SERVICE PERSONNEL.

TO REDUCE THE RISK OF FIRE OR ELECTRIC SHOCK, DO NOT EXPOSE THIS APPLIANCE TO RAIN OR MOISTURE.
RISK OF ELECTRIC SHOCK DO NOT OPEN
 The lightning flash with arrowhead symbol, within an equilateral triangle, is intended to alert the user to the presence of uninsulated "dangerous voltage" within the product's enclosure that may be of sufficient magnitude to constitute a risk of electric shock to persons.
 The exclamation point within an equilateral triangle is intended to alert the user to the presence of important operating and maintenance (servicing) instructions in the literature accompanying the appliance.
- Suggested for 12 years and up only.
- Read and follow these instructions carefully.
- Keep these instructions and heed all warnings.
- Do not use this apparatus near water.
- Clean only with dry cloth. For stubborn stains, use a soft cloth dampened with aweak solution of mild detergent and water. Dry the apparatus immediately afterwards with a clean cloth. Do not use abrasive cloths, thinners, alcohol, or other chemical solvents, because they may damage the finish or remove the panel lettering.
- Do not block any ventilation openings. Install in accordance with the manufacture's instructions.
- Do not install near any heat sources such as radiators, heat registers, stoves, or otherapparatus (including amplifiers) that produce heat.
- Protect the power cord from being walked on or pinched particularly at the plugs, convenience receptacles, and at the point where they exit from the apparatus.
- Only use attachments/accessories specified by the manufacturer.
- Use only with the cart, stand, tripod, bracket, or table specified by the manufacturer, or sold with the apparatus. When a cart or rack is used, use caution when moving the cart/apparatus combination to avoid injury from tip-over.
- Unplug the apparatus during lightning storms.
- When not in use, unplug the apparatus.
- Refer all servicing to qualified personnel. Servicing is required when the apparatushas been damaged in any way.
- Unplug the product from the wall outlet and refer servicing to qualified servicepersonnel under the following conditions:
- When the power-supply cord or plug is damaged.
- If liquid has been spilled or objects have fallen into the product.
- If the product has been exposed to rain or water.
- If the product does not operate normally by following the operating instruc-tions. (Adjust only those controls that are covered by the operating instructions, as an adjustment of other controls may result in damage and will require extensive work by a qualified technician to restore the product to its normal operation.)
- If the product has been dropped or damaged in any way.
- When the product exhibits a distinct change in performance - this indicates aneed for service.
For the AC adapter, please keep observed safety notes before use:
- For indoor use only.
- The apparatus shall not be exposed to dripping or splashing and no objects filledwith liquids, such as vases, shall be placed on the apparatus.
- This appliance is not intended for use by persons (including children) with reducedphysical, sensory or mental capabilities or lack of experience and knowledge, unless they have been given supervision or instruction concerning use of the appliance by a person responsible for their safety.
- Children should be supervised to ensure that they do no play with the appliance.
- The external flexible cable or cord of this transformer cannot be replaced. If thecord is damaged, the transformer shall be scrapped.
- The disconnection from line voltage is made by pulling the mains plug.
- The socket outlet must be located close to the machine and be easily accessible.
- For connection to a supply not in North America, use an attachment plug adapterof the proper configuration for the outlet if need.

If these warnings are not adhered to, fire, electrocution and other life threatening accidents may occur.
- For safety please follow these points.
- Please read the instruction manual before use.
- If damaged, discontinue use. If the functions alter or the product has been damaged in any way, please contact the retail outlet where the product was purchased.
- If the products emits smoke, strange sounds or other anomalies, under no cicumstances attempt to repair it yourself. Switch it off and contact the retail outlet where the product was purchased.
- Keep out of reach of children.
- While in use, the product may heat up a little. Prolonged contact with the product may result in low temperature burns. If the product becomes very hot, stop using it immediately.
- Dismantling or repairs must not be attempted at any time. Electrocution, fire and damage may occur.
- Do not insert metal or flammable objects into the projector and do not drop it.
Electrocution or fire could occur. In homes with small children, take particular care. - If the electric cord becomes damaged (if the connection is poor or it breaks), immediately stop using the product. Electrocution or fire could occur.
- Do not twist, pull or squeeze the electric cord. If the cord is damaged it could cause electrocution or fire.
- Do not leave in direct sunlight. The lens could cause fire.
- Do not attach to a direct current (DC). Electrocution or fire could occur.
- Do not use more than the specified power voltage. It could cause electrocution or fire.
- Do not place heavy objects on the cord. If the cord is damaged it could cause electrocution or fire.
- Do not use any AC adaptor other than the one included. Doing so could cause electrocution or fire.
- When removing the AC adaptor, do not pull on the cord. Hold the adaptor and then remove it. If the cord is damaged it could cause electrocution or fire.
- Do not place the cord near a heating device. If the cord cover melts, electrocution or fire may occur.
- Do not do the following to the product nor use the product in the following ways which could cause damage, battery fluid leakage and fire:
- Do not leave in a car with closed windows, in direct sunlight or other places of extreme heat.
- Do not store below 5◦C (41◦F).
- Do not store near stoves, humidifiers or where there is steam and smoke.
- Do not store in damp or dusty places.
- Do not store where it can be knocked or on an unstable surface.
- If there is smoke, an unusual smell or strange sounds, continued use of the product could cause electrocution or fire. Immediately switch off the projector, remove the AC adaptor from the product and remove the AC adaptor from the wall socket.
- If water or small particles get into the product, immediately switch off the projector, remove the AC adaptor from the product and remove the AC adaptor from the wall socket. Continued use of the product could cause electrocution or fire.
- If the product is dropped and damaged, immediately switch off the projector, remove the AC adaptor from the product and remove the AC adaptor from the wall socket. Continued use of the product could cause electrocution or fire.
- If not using the product for a prolonged period, disconnect the AC adaptor from the projector. Unplug the AC adaptor from the wall socket.
- Do not touch the projector or AC adaptor with wet hands. Electrocution or fire may occur.
- Do not use in the bath. Electrocution or fire may occur.
- Do not wet or immerse the projector or AC adaptor in water. Electrocution or fire may occur.
- During electrical storms, do not touch the AC adaptor or electric cord. Electrocution may occur.

If these warnings are not adhered to, electrocution or other injuries to your person and damage to your possessions may occur.
- Ensure the projector is set up on a stable surface. Setting it on an unstable surface could result in it falling and causing injury.
- Do not look into the lens or point the lens towards ones face while the projector is switched on. Eye injury may occur.
- Do not place vases or other containers holding water, cosmetics or other chemical products near the projector. If the product gets wet, it may be damaged.
- Do not drop, bump or use the projector in a rough manner. It may cause damage.
- Do not attempt to move the projector, insert or remove the disc in a dark room. Accidents may occur.
- Ensure the room is well lit before commencing any changes.
- When moving the product from a cold to a warm room, the sudden change in temperature may cause the lens to cloud. If this happens, leave the projector in the warmer room until the condensation evaporates.
- If not using the product for a prolonged period, make sure the disc is removed.
Leaving it in may cause damage.
Documents / ResourcesDownload manual
Here you can download full pdf version of manual, it may contain additional safety instructions, warranty information, FCC rules, etc.
Advertisement


Need help?
Do you have a question about the Homestar Flux and is the answer not in the manual?
Questions and answers