Advertisement
- 1 Product Overview
- 2 Accessories
- 3 Components Details
- 4 Installation Guide
- 5 Product Activation
- 6 Operating and Interface Introduction
- 7 Setting up the Dash Cam
- 8 System Settings
- 9 Device Setup
- 10 Function Description
- 11 Optional Accessories
- 12 CHIGEE GO APP
- 13 Maintenance and Care
- 14 Technical Specifications
- 15 Documents / Resources
Product Overview
Introduction
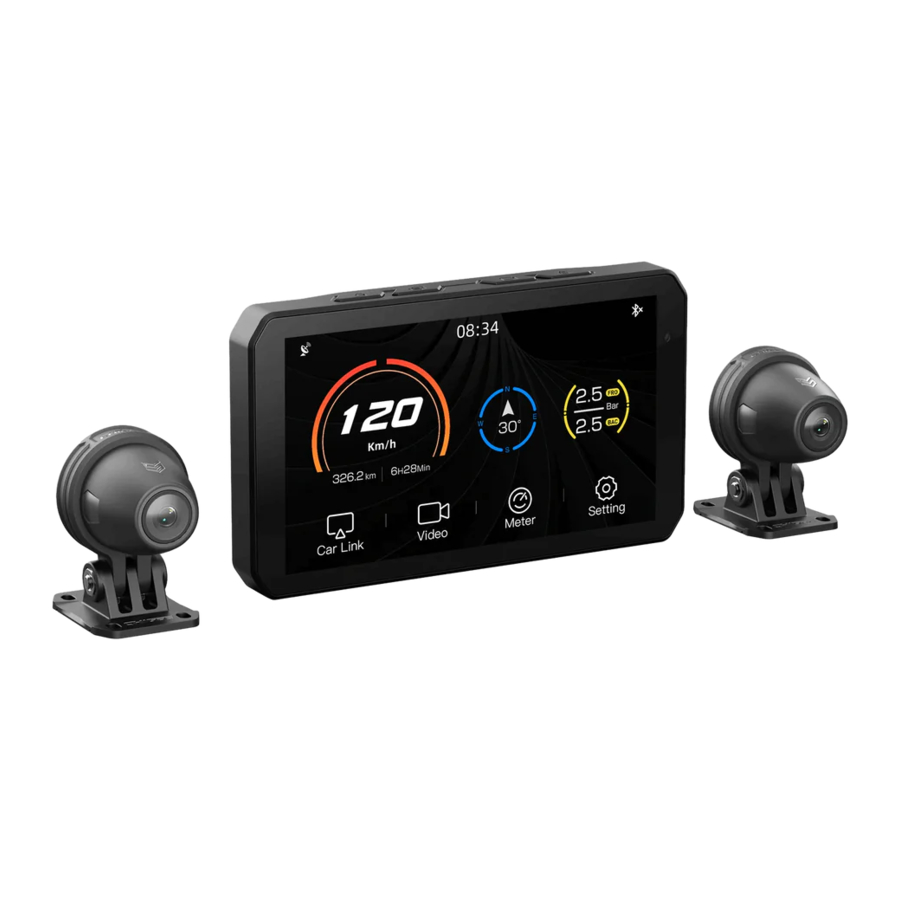
Enjoy a safe ride with intelligent escort: CHIGEE AIO-5 Lite Motorcycle Smart Car, equipped with front and rear 1080P dual cameras, high-quality imaging capability, record riding road conditions videos at any time, relying on powerful main control computing power to develop intelligent functions such as mobile wireless projection, online navigation, BSD blind zone monitoring, etc. to make your ride safer and more convenient. 5-inch high-brightness display, dual Bluetooth module to meet the motorcycle audio interactive scene and 10hz high-precision satellite positioning function, to provide you with a cutting-edge riding experience. AIO-5 Lite host supports IP67 dust and water resistance to easily cope with harsh environments. At the same time, it can be matched with a variety of optional accessories to customize a personalized riding experience, so that you can travel safely and enjoy a unique motorcycle intelligent journey.
Body

Accessories

Components Details

![]() Home Key
Home Key![]() Switch Key
Switch Key![]() Record Key
Record Key![]() Lock Key
Lock Key![]() Record Indicator Light
Record Indicator Light![]() Light Sensor
Light Sensor
 Home Key
 Switch Key
 Record Key
 Lock Key
 Record Indicator Light
 Light Sensor
Installation Guide
SD Card Installation


Please use a microSD card with a U3 rating for transmission speed to ensure stable video recording, otherwise there may be risks of video stuttering and loss. (SD card needs to be purchased separately)
Image Storage Logic
The AIO-5 lite comes with an internal 32GB storage space (approximately 29GB available) that can store photos and videos directly. When a microSD card is inserted, photos and videos will be stored on the microSD card.
- Collision Lock Files will not be overwritten in a loop. Please follow the host's prompts to delete the lock files, or format the storage space.
 Suggestion
Regularly format the SD card to keep it in good condition.
This will erase all media files.
- Enter Settings
- Click "Storage" > "Format"
After installing the microSD card, please press the waterproof plug flush with the body, otherwise it will affect the waterproof performance.

Device Mounting
Choose the appropriate size reducer ring according to the diameter of the handlebar, and use PVC gasket to avoid scratching the handlebar when the handlebar diameter is 32MM.

Camera Installation

Installation Prompts
- By loosening the screws, the camera can be rotated 360°.
![]()
Please adjust the camera label to face straight up. - Use 3M VHB double-sided adhesive tape to stick to the desired position. Please wipe the surface of the object being stuck. When sticking, press with full force for more than ten seconds and wait for 30 minutes to ensure the best sticking effect.

BSD Camera Installation Location
- The recommended mounting height of the rear camera should be within 60-90CM from the ground.

- Enter the BSD settings to turn on the calibration line and adjust the camera tilt angle so that the red marking line is at a distance of 8 meters from the rear of the motorcycle.


Wiring Diagram

- Connect the GPS module
- Distinguish between the front and rear cameras according to the label
![]() Front Camera
Front Camera
![]() Rear Camera
Rear Camera - When wiring, match the connectors with the same
![]() color to the arrow label Insert and tighten the nut
color to the arrow label Insert and tighten the nut
![]()
- Fuse box (3A)
- Red line connected to the positive pole of the vehicle battery
- Black line connected to the negative pole of the vehicle battery
- Yellow line connected to the vehicle ACC


ACC Power Definition:

When the motorcycle ignition is in the OFF position, the voltage is 0V, and when in the ON position, the voltage of 11-14.4V can be recognized as the ACC state power supply.
GPS installation location and requirements

Recommended to install in the shell reverse sticker (3m adhesive sticker on top side of the sky air adhesive)
Take note of
- Cannot be mounted under carbon fiber.
- Cannot be blocked by metal.
- Keep away from the camera and camera cable and the main unit as far as possible.
- TOP faces the sky.
Product Activation
Activation Steps
- Download the CHIGEE GO App
![]()
- Turn on your phone's Bluetooth and Wi-Fi
![]()
- Click "Connect Device"
![]()
- Click on the AIO-5 lite host to confirm that the connection device has been successfully activated.
![]()
Interface Introduction


Operating and Interface Introduction
Power Button

| 1 | Home Key | The "Home Key" can be clicked to return to the home page in any interface. |
| 2 | Switch Key | The "Switch Key" can be clicked to switch between the projection page and the dashboard page. |
| 3 | Record Key | The "Record Key" can be clicked to enter the recorder preview page. |
| 4 | Lock Key | The "Lock Key" can be short-pressed to turn off the screen, and long-pressed for 2 seconds to lock the touch screen (suitable for rainy and snowy weather), and long-pressed for 6 seconds to forcibly restart. |
Interface Introduction
Homepage

- Screen Mirroring
Choose a Screen Mirroring Device Type - Dash Cam
Real-time Preview of Dash Cam footage - Dashboard
View Real-Time
Vehicle Data - Settings
Access the Dash Cam settings page - Speedometer
Display current speed and cumulative mileage\ - Direction
Vehicle's current direction - Tire Pressure Monitoring
Real-time display of current vehicle tire pressure data
Live View

- Shoot
Take photos - Files
Click to enter the video file library - Start/End
Start recording video /End recording - Lock
Add a lock marker to the video - Settings
Enter the recorder settings page - Camera Switch
Switch the image preview screen
Setting up the Dash Cam

Resolution Setting
1080P/30FPS | 720P/30FPS
Fusion Output
Turn on this feature and the front and rear cameras will be saved as a single video file, with the images presented in a large-small format.
Recording Time
Set the recording duration of each video clip for the Motorcycle Dash Cam, available options: 1 minute, 2 minutes, 3 minutes.
Data overlay
Choose the data you need to overlay to the video files, options include: time, speed, and latitude/longitude. For more data, overlay in the CHIGG GO APP.
Mirror Preview
Set the mirror correction to preview the inverted image, or set the rear camera mirror as a rearview mirror.
Collision Lock
Once activated, if the vehicle has an impact, the video of that time period will be marked as locked and will not be overwritten by the loop recording. Sensitivity options: High, Medium, Low.
Parking Monitoring
When the vehicle is in a parked state and is subjected to vibration, the device will silently record a 30-second video file, and the sensitivity can be set. Sensitivity options: High, Medium, Low.
Voice Recording
Microphone Volume Settings.
System Settings

Display and Volume 
Adjust the screen brightness and speaker volume, and enable the auto brightness mode.
Storage 
Check the remaining capacity of the built-in storage and TF card, and format the operation. Please back up important video files before formatting.
Device 
Customize the settings or view the features, available options: Tire Pressure Sensor, Bluetooth Headset, Remote Control, GPS, OBD, Blind Spot Monitoring.
Language 
Set the display language. Options available: Simplified Chinese, Traditional Chinese, English, Japanese.
Time 
Set the time and date.
Reset 
Restore factory settings, all presets will be changed to default.
About 
Display device SN code, version number, and Bluetooth name.
Video Download 
Enter this page to enable the host's WiFi hotspot, and you can download videos by connecting the phone to WiFi.
Device Setup

Tire Pressure
By installing a tire pressure monitoring sensor, you can read the real-time tire pressure and pop up a warning window when it reaches the alarm preset value, while issuing an alarm sound. The pressure data can be synchronized to the recording file in real time through data superposition.
Remote Control
By installing CGRC PRO remote control, you can lock the video, switch the interface, take photos, answer the phone and other operations.
GPS
View GPS signal strength.
OBD
Equip with a wireless Bluetooth OBD module to read engine real-time data, and the OBD data will be synchronized to the video file in real-time through data overlaying.
Blind Spot Detection
BSD Blind Spot Detection System, when a vehicle approaches from the rear side blind spot, the device will issue an audible and visual alarm.
BSD Disclaimer
Although the BSD Blind Spot Monitoring System is a useful auxiliary tool, drivers should always remain vigilant and not rely too heavily on the system. The system may have false alarms or missed alarms, so drivers should always keep a comprehensive view of their surroundings, using the BSD system as an aid rather than relying on it completely. This includes but is not limited to observing the rearview mirror, turning to confirm blind spot conditions, using turn signals and adjusting speed reasonably.
Function Description
Wireless Mirroring


Connect your iOS device to the Bluetooth device (CHIGEE-XXXX) to enable Apple CarPlay.

Connect your phone to the device Bluetooth (CHIGEE-XXXX) to control music and answer calls.
Professional Dashboard

- Speed
- Direction
- Time
- * RPM/GPS Speed
- * Tire Pressure
- Voltage
- Trip Elevation Difference
- Start-up Time
- Engine Water Temperature
- Subtotal Mileage
- * Throttle Opening
Note: Data with * is optional equipment. Optional functional expansion parts can be displayed.
Optional Accessories
Tire Pressure Monitoring
Equip the Motorcycle Dash Cam with a Tire Pressure Monitoring Sensor to read the real-time tire pressure and alert you with a pop-up warning and an alarm sound when it reaches the preset value. The pressure data can be overlaid with the video file in real time.

External Tire Pressure Sensor

Battery life: 1year
battery replacement: BR1225
size parameters: 18.2x14.8mm
measurement accuracy: 0.01Bar
pressure measurement range: 0-8Bar
OBD
By installing the wireless Bluetooth OBD module, you can read real -time engine data. OBD data can be overlaid and synchronized in real-time to the recording file, helping you more effectively analyze the vehicle's driving status

Data Types Available
 Wheel Speed
 Engine RPM
 Coolant Temperature
 Throttle Position
 Intake Air Temperature
Remote Controller Pro
With the CG Remote Pro installed, you can switch interfaces, select apps, and answer calls.

Mirroring mode
Short press:" " or "
 " Move left or right
" " OK,Long press return.
Bluetooth mode
Short press:" " or "" Switch songs
" " Pause/Play.
All Pages
Long press: " " or ""switch apps
""Return.
Video preview interface
Short press:" " Switch camera
" " Lock Video
" " take a picture
CG RC Original Wonderwheel Remote Control
After the CG RC module is connected to the AIO-5 Lite infotainment system via Bluetooth, it enables BMW's original car knob switch, allowing directly control of the AIO-5 Lite and various operations.

CHIGEE GO APP
First connection
- Download the CHIGEE GO APP from the app store.
![www.apple.com]()
![play.google.com]()
![]()
Scan and Download Now
- Follow the instructions in the app to operate and connect the AIO-5 lite.


Enter the Homepage after running CHIGEE GO
Connect the AIO-5 lite to download video files and adjust recording parameters.


Connect Devices
Visit the Motorcycle Dash Cam Album or the local album. Select the clips you need to download, and once the clips are downloaded, users can superimpose data and edit the video themselves.

 Album
Album
Access the latest version of the User Manual, Troubleshooting Guide, and view the device code.

 My
My
Album

- Local Album: Downloaded Video Clips
- Recorder Album: View Videos and Photos Recorded on the Host
- "
![]() " Multi-Select: Multiple Clips Can Be Deleted or Downloaded
" Multi-Select: Multiple Clips Can Be Deleted or Downloaded - "
![]() " All: All Videos and Photos
" All: All Videos and Photos ![]() " Videos: View Video Clips Only
" Videos: View Video Clips Only- "
![]() " Photos: View Photos Only
" Photos: View Photos Only
 " Multi-Select: Multiple Clips Can Be Deleted or Downloaded
 " All: All Videos and Photos
 " Videos: View Video Clips Only
 " Photos: View Photos Only
Camera

![]() Exit
Exit![]() Preview Switch
Preview Switch![]() Resolution Setting
Resolution Setting![]() Album
Album![]() Recording Switch
Recording Switch![]() Dash Cam Settings
Dash Cam Settings


Video Editing
Downloaded video clips can be used to view real-time tracks or to overlay data.

Maintenance and Care
Firmware Upgrade
AIO-5 LITE will perform system updates from time to time to add new product features, please follow the instructions below to perform the firmware level. (Please insert the SD card and format it in the device before upgrading)

- Go to AIO-5 lite 【Settings】-【Functions】 -【System Update】and click Check for updates.

- Check to the new firmware version, click "Update Now", AIO-5 lite starts to download the firmware. Once the download is complete, the upgrade will automatically reboot, please make sure the device is not powered off.

Reminder
Firmware upgrade failure:
If there is an accidental power failure etc. that causes the device upgrade to fail and the device cannot be turned on again, please Contact customer service to get the SD card upgrade file.
Cleaning and Care Instructions
- Ensure the lens glass is clean, foreign objects may scratch the lens, it is recommended to use a soft dry cloth to clean the lens.
- During the use of AIO-5 lite, sand and dust may block the lens, please use water to flush.
- All components should avoid using oil detergents and other organic solvents for cleaning, which may cause corrosion, loss of waterproof performance, and failure of protective coating.


Technical Specifications
The AIO-5 Lite Parameters
| Host | |
| Size: 137x79x27mm | Weight: 320g |
| Display: 5 inch 1280x720 IPS | Processor: Dual Core A53 |
| Rated Input Voltage: 12-18V | RAM: 4Gb |
| Low Voltage Protection Voltage: 12V | Internal Storage: 32GB |
| Bluetooth: 5.0 | TF Card Expansion: 256GB MAX |
| Positioning: GPS+Beidou | Operating System: CGOS |
| Sensor: Light Sensing, Accelerometer, Microphone | WLAN: 5G |
| Waterproof Rating: IP67 | Speaker: Supported |
| Remote Control: Optional | Tire Pressure Monitoring: Optional |
| OBD (On-Board Diagnostics): Optional | |
| Video | |
| Image Sensor: SONY IMX307 | Video Format: MP4 |
| Lens Composition: 2G+4P | Resolution: 1920*1080P/1280*720P 30FPS |
Documents / Resources
References
Download manual
Here you can download full pdf version of manual, it may contain additional safety instructions, warranty information, FCC rules, etc.
Advertisement
Need help?
Do you have a question about the AIO-5 Lite and is the answer not in the manual?
Questions and answers