Advertisement
- 1 Introduction
- 2 Overview
- 3 Getting started
- 4 How to take your first photo
- 5 Connecting to the app
- 6 Menu Navigation
- 7 Displays
- 8 Focus Distance
- 9 Focus Exposure Lock
- 10 Subject Framing
- 11 Focus distance and Exposure lock
- 12 Setting Exposure Value (EV)
- 13 Using the flash
- 14 Errors
- 15 Charging
- 16 Cleaning
- 17 Customer Support
- 18 Technical Specifications
- 19 Safety information
- 20 Documents / Resources
Introduction
The expertly engineered Polaroid I-2 camera is the ultimate instant craft tool for those who are passionate about photography. Equipped with built-in manual controls and the sharpest lens ever in a Polaroid camera, the I-2 takes incredible pictures without compromising the unique Polaroid instant aesthetic.
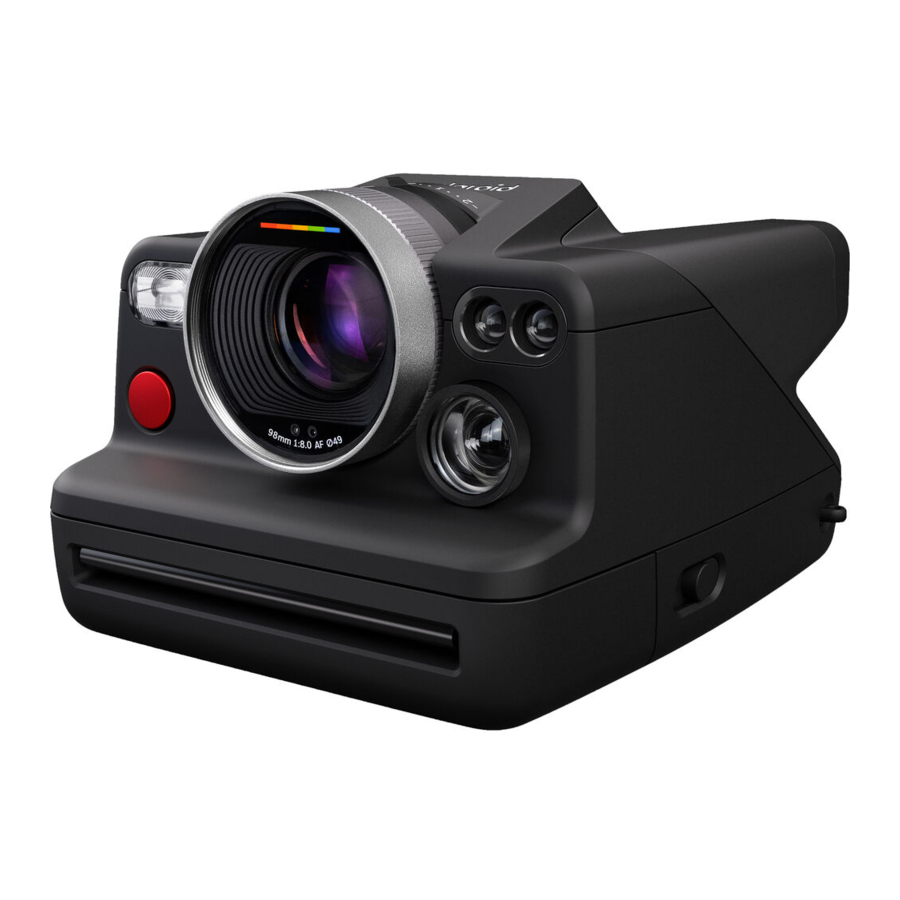
Overview

- Flash
- Shutter Button
- Film Shield
- Camera Lens
- LIDAR Ranging
- Viewfinder Front
- Film Door Latch
- Film Door
- Tripod Mount
- Selection Dial
- EV Dial
- Outer Display
- Mode-OK Button
- ON/OFF Button
- Flash Button
- Strap Mount
- USB-C Charging Port
- 2.5mm Flash Sync
- Viewfinder
Getting started

- Open the box and check that you have the following items:
![]()

- Polaroid I-2 Instant Camera
- USB-c charging cable
- Quick Start Guide
- Tips sheet
- Handle
- Safety & Compliance booklet
- Charge the camera
For safe transportation, the Polaroid I-2 camera won't be fully charged upon receiving. To charge it, plug the USB-c end of the charging cable into the back of the camera (Q), and the other side into a USB wall charger (5V/1A). We don't recommend charging via a laptop or computer. The battery level indicator on the screen will show the camera is plugged in and will display the charge level until it is fully charged. A full charge through a wall socket takes about 2 hours, which is enough power to shoot approximately 10 packs of film, depending on usage. Remember to turn off the camera when you're not using it to save battery life.
![]()
- Attach the handle

How to take your first photo

- Turn on the Polaroid I-2 camera
Press the ON | OFF button (N) until the outer display (L) lights up. Please select the preferred language by turning around the selection dial (J). Click on OK with the mode-OK button (M). Download the Polaroid mobile app and connect to the camera. The camera will not appear in your phone's Bluetooth® devicelist as the app connects automatically.
![]()
![www.apple.com]()
![play.google.com]()
- Insert the film pack
Move the film door latch (G) and pull the door open. Hold the film with the darkslide facing up. Slide the thin end of the cassette into the camera, with the tab facing towards you. Push it all the way into the camera until it clicks. Leave the pull tab on, as you will need that later to remove the empty film pack. Close the film door until it clicks. The darkslide covered by the film shield will eject soon after. Please note: do not pull on the film shield. Remove the darkslide and allow the film shield to roll back in. This retractable shield is designed to protect photos from light as they develop. If the darkslide has not ejected, remove the film and reinsert it.
To ensure the camera displays the correct number of photos, always finish the film before inserting a fresh pack. If you decide to switch the film pack anyway, be aware that this will expose all the photos to light, and they will be unusable. You're now ready to take your first photo.


- Aim the camera at your subject
Make sure you are at least 40cm (1.3 feet) away from your subject. The Polaroid I-2 uses a viewfinder located on the left side of the lens barrel. To aim at your subject, align your eye with the viewfinder barrel and use the image you see to help compose your shot. Be aware that your photo will not exactly reflect what you see through the viewfinder. Adjust your aim slightly depending on the sort of picture you want to take:
It's possible to focus on your subject, and then recompose your frame. To do this, half-press the shutter button to lock focus and exposure. Adjust your composition, and then fully press the shutter button to take the photo.
![]()

Be careful not to cover the flash or photo eject slot with your fingers.
- Press the shutter button
After shooting, the photo will eject from the slot at the front of the camera. You will see that the photo is covered with a film shield to protect it from light. Please don't pull on the film shield. - Remove the photo
Leave your photo under the film shield for about 5 seconds. Gently lift the film shield so it rolls back into the camera. Remove the photo and place it face down to continue shielding it from light as it further develops. And no matter what that song says, don't shake the photo! Check the back of the film packaging for the correct developing times. - Turn the camera off
Press the ON | OFF button to turn off the Polaroid I-2 Camera.
Connecting to the app
With the Polaroid I-2 camera, you can unlock extra creative tools inside the Polaroid mobile app. Download the app on your mobile phone from the Apple App Store or Google Play Store.
While the Polaroid I-2 works as a standalone instant camera, you can download the Polaroid App to access more features and gain even greater control over your photography.


Menu Navigation

The Polaroid I-2 has different built-in shooting modes. Go to the camera's menu and navigate multiple possibilities depending on the picture you want to take. When clicking on the mode-OK button (M) you can go from auto mode to self-timer mode (each click indicates a new mode). Choose your preferred mode and wait 3 seconds for the camera to set up the right functions. Within the mode you have chosen, you can further finetune your preferences by using the selection dial (J). Each mode will be explained in the section Different modes explained.
Displays

- Mode
- Selection Dial Indicator
- Aperture
- Shutter Speed
- Exposure Meter
- Battery Level
- Film Count
- Focus Distance
- Auto Exposure-Focus Lock
- Flash On|off
- App Connected
- Tripod Recommended
Open the app and tap 'I- 2' from the menu. A permission message will pop up. Tap 'OK' to confirm. The Bluetooth® connection is made automatically through the app, so there's no need to pair the camera with your phone. Please note: this means the Polaroid I-2 camera will not appear in your phone's list of Bluetooth devices.
There are 2 displays on the Polaroid I-2: the inner display/viewfinder (S) and outer display (L). The combination of the two displays will tell your more about your settings, but also about the object's distance and light metering.
Outer display
The outer display will guide you through the settings of the camera. You can select different modes and change settings before making the picture. The outer display will tell you which mode (1) you're in, the values of your aperture (3) and the shutter speed (4), the exposure meter values (5), the battery level (6) and the film count (7). When halfpressing the shutter button (B), the camera will also show you the subject's distance.
Inner display
The inner display (S) is displayed below the viewfinder. When half-pressing the shutter button (B), the camera will lock exposure and focus on the subject. The camera will give you all the necessary information on both the outer display and the inner display, so you don't have to look up when taking a photo. When you half-press the shutter button (B), all locked values will show up in the display. Please validate the correct values before taking the picture. Some questions you can ask yourself:
Focus distance (8)
Is the object I want to have focussed on my picture really 1 meter (3.3 feet) away from me? If not – please reframe and auto-lock the values again. Your object might not be sharp on the picture, because the ranging meter caught something else in the frame.
Aperture (3)
What aperture value does my scene need? The lowest aperture value is f8, which means the aperture is the widest open as possible (which lets more light in). The lower the f number, the less depth of field you are creating in your picture. This is perfect for a portrait (with a more blurry background), but if you want the background to be more in focus (like in a landscape), it's better to use a bigger f number.
Shutter speed (4)
What shutter speed does my scene need? If you want to take a picture of a moving object, and don't want to show the movement, it needs a faster shutter speed (fastest is 1/250).
Exposure meter (5)
What light conditions does my scene need? Adapt the settings accordingly if you think you're picture will be too overexposed or underexoposed.
Tripod recommended (12)
Can I keep the camera stable enough myself or do I need a tripod? The handshake on the screen indicates you need to use a tripod for the settings you want to catch. Please use a tripod if you see this.
Flash (10)
Does my scene really need flash or not?
Focus Distance
Aim the center of the autofocus frame at your subject. When you falf-press the shutter button, the focus/subject distance is shown on the inner and outer displays.

Focus Exposure Lock

Half-pressing the shutter button will also lock exposure and focus on the subject.

For an in-focus, off-center subject: keep the button half-pressed, re-aim the autofocus frame, and shoot.
Subject Framing

The whole viewfinder represents a photo framed at ∞. When a subject is closer than 8m, you may want to ensure your subject is centered within the frame by 1. locking focus and 2. adjusting your framing.

Focus distance and Exposure lock
The Polaroid I-2 camera locks exposure when half-pressing the shutter button. Aim the center of the autofocus frame at your subject. When you half-press the shutter button, the focus distance is shown on the inner and outer displays. Always make sure your subject is at least a distance of 0.4m away. If the subject is closer than this, the inner display will show a symbol with exclamation mark. The focus distance can go up to infinity. The whole viewfinder area represents a photo framed at inifinity.
For portrait shots frame your subject within this area of the viewfinder.

For landscape shots frame your subject within the whole viewfinder.

When your subject is closer than 8m, and especially for closer up subjects, you may want to ensure your subject is centered in the frame by referring to the framing brackets in the viewfinder.

For an in-focus, off-center subject: keep the shutter button half-pressed, re-aim the autofocus frame, and shoot.
Setting Exposure Value (EV)
 - Part 1")
In all modes, the exposure meter will show the exposure on both the inner display and the outer display when half-pressing the shutter button. If the meter points to the right, your photo will be overexposed. Try a faster shutter speed or a higher f number. If the meter points to the left, your photo will be underexposed. Try a slower shutter speed or a lower f number. Make sure you don't see the handshake symbol. Using a tripod will help keep the camera stationary while taking a photo. In all modes except for manual mode, the camera will try to automatically select the correct exposure (O). However, if you have used the EV dial (K) to compensate the exposure, the displays will reflect this. Please make sure the dial is on zero if this is the case (unless you want to overwrite the EV settings in that mode). When you turn on the camera, the outer display will indicate if the EV dial is not on 0 and corrections in the exposure settings are needed.
 - Part 2")
Using the flash
In any situation where you are not shooting in bright, direct sunlight, we recommend using the flash to get the best Polaroid pictures. Clicking on the flash button (O) will trigger the flash on or off. The light turns on (O) when the flash is on. You will also see the flash symbol in the viewfinder when the camera is on.
Using external flash
Plug a 2.5mm mono cable for the external flash into the external flash socket of the camera (R). The external flash is ready to be used.
Different modes explained
The Polaroid I-2 has different built-in shooting modes. Go to the camera's menu and navigate multiple possibilities depending on the picture you want to take. When clicking on the mode-OK button (M) you can go from auto mode to self-timer mode (each click indicates a new mode). Choose your prefered mode and wait 3 seconds for the camera to set up the right functions. Within the mode you have chosen, you can further finetune your preferences by using the selection dial (J).
Auto mode
Shutter speed and aperture are determined by the camera. The values change automatically as the scene changes. This is displayed on the inside and outside display. When turning the selection dial (J), you have the possibility to change the aperture value. The camera will adapt the other settings based on the aperture value you're choosing. When half- pressing the shutter button, it locks the values of the scene determined by the camera.
Aperture priority
Turning the selection dial (J) sets the aperture value (possible apertures: f8, f11, f16, f22, f32, f45, f64). The appropriate shutter speed is determined by the camera when aiming at your object. The value can be locked by half-pressing the shutter button. The chosen aperture is a fixed value. If no appropriate shutter speed is available for the scene, the image will be under/over-exposed and the exposure meter in the displays will show the deviation from the correct exposure. Correct any exposure deviation by changing the fixed aperture setting.
Shutter priority
Turning the selection dial (J) sets the shutter speed (possible shutter speed values: from 1/250 to 30 seconds on the camera. The appropriate aperture is determined by the camera when aiming at your object. The value can be locked by half-pressing the shutter button.
The chosen shutter speed is a fixed value. If no appropriate aperture value is available for the scene, the image will be under/ over-exposed and the exposure meter in the displays will show the deviation from the correct exposure. Correct any exposure deviation by changing the fixed shutter speed setting.
Manual mode
Turning the selection dial (J) sets the aperture value first. The camera indicates it's on selecting the aperture with (< >) next to the f number. Clicking the mode-OK button (M) changes the selection indicator (< >) between aperture and shutter speed (you can always move back to aperture selection by clicking the button again). The shutter speed value can be selected by turning the selection dial (J) again. To leave the Manual mode and switch to the next mode, press the mode-OK button (M). All settings can be set manually in this mode. Correct your settings accordingly to make sure your picture is not under-/overexposed.
Multiple exposure
Turning the selection dial (J) sets the number of images combined for one multi-exposure. The camera can set exposures from 2 to 4. The camera calculates the correct exposure for the given number of exposures and indicates the values when half-pressing the shutter button. Please note: once the number of exposures is determined and the first shot is taken, the number of exposures cannot be changed anymore. Only when the multi-exposure picture is fully taken and the film ejects, the film count decreases. On the camera itself, it is only possible to use the automatic mode with multiple exposure. Use the Polaroid mobile app for more creative freedom and to change the different settings in the multiple exposure mode.
Timer
Turning the selection dial (J) sets the delay for the self-timer. The camera can set up self-timer values of 3, 6, 9 and 12 seconds. When you half-press the shutter button, the screen shows the aperture and shutter speed values. On the camera itself, it is only possible to use the automatic mode with self-timer. Use the Polaroid mobile app for creative freedom and to use the self-timer with all different modes. When pressing the shutter button to shoot, the self-timer is activated. When pressing the shutter again, you can cancel the self-timer that has started.
Errors
The camera will show different symbols for different errors that might occur. If you see a certain error notification showing on the outer display, follow the instructions below in order to solve the error. The notification will only disappear from the display when the error is solved.
Critical errors that will block the usage of the camera
Battery critical
Before using the camera, please charge your camera with the delivered USB-c cable.
Film jam
The film is jammed inside the camera and will not eject when you press the shutter button. Please visit support.polaroid.com for help on how to resolve film issues.
Film door open
Please make sure the film door is closed correctly by closing it with a click. To change film type, while the film door is open, press the mode-OK button, then use the selection dial to scroll between compatible film types (I- type, SX-70, 600), and press mode-OK to select the desired film type.
Overheat
Your camera can be overheated. Turn off the camera and wait a while to have it cool down. Turn the camera on again after 5 minutes and see if itis cooled down enough.
Errors that will still let you use the camera when you press OK
Lens cap
The camera thinks your lens cap is still on or the camera detects a very dark scene.
Please check if your lens cap is still on or, in case of very dark scenes, if you're sure about taking the picture. If the latter is the case, please press OK by clicking the mode-OK button.
No film
Your film pack may be empty. Please refill it by opening a new film pack.
Low battery
You can still use your camera, but the battery is almost empty. Make sure to charge the camera immediately or as soon as possible after shooting your photo.
Charging
On the outer display a battery symbol indicates the battery level. To check the battery level, turn the camera on, and look at the symbol. The camera will indicate when the battery is low with below indicator. To charge the camera, plug the USB-c end of the charging cable into the side of the camera, and the other side into a USB-c wall charger (5V/1A). We don't recommend charging via a laptop or computer. A full charge through a wall socket takes about 2 hours. The battery level indicator will show when it is fully charged.
Cleaning
When you take a Polaroid photograph, the photo is pushed through two metal rollers. This is where the developer paste is spread between the negative and positive components of the photograph. If these rollers are dirty, the chemistry will not spread evenly, and can cause small marks on your developed photo. When your camera has no film, turn it off and open the film door. Look for these two metal rollers near the film eject slot. Position a soft, damp cloth over the rollers. Rotate the rollers by turning the black plastic gear. Wipe the cloth across the rollers as they move. Be careful that the cloth doesn't cause a jam. Make sure the rollers are dry before you use your camera again. We recommend checking the rollers between every pack of film, and to clean them every 2-3 packs. To clean the lens, use a microfiber cloth. This will avoid scratches and material particles that may impact the quality of your photos.
Customer Support
We're here to help. Get in touch using the details below.
USA/Canada
usa@polaroid.com +1 212 219 3254
Europe/Rest of World
service@polaroid.com 00 800 577 01500
Polaroid International B.V.
1013AP Amsterdam The Netherlands
For more detailed and up-to-date information, visit polaroid.com/help.
Technical Specifications
General
Dimensions 149.9mm (L) x 119.3mm (W) x 91.2mm (H)
Weight 563 grams (without film pack)
Operating Temperature 40–108°F / 4–42°C, 5–90% relative humidity
Compatible Film Polaroid i-Type, 600, SX-70 Film
Battery Lithium-Ion Polymer Soft- Pack Battery 950maH, 3.7V
Materials Outer Shell ABS, PC, PMMA, Aluminum Alloy, Stainless Steel
Optical System Shutter System 1/250 - 30s, and Bulb mode (up to 99hrs.)
Aperture f8-f64
Lens 3-element lens with continuous autofocus system capable of f8 aperture across 0.4m (1.3') ~ ∞ range controlled via stepping motor
Effective Focal Length 98mm
Field of View 44° vertical, 43° horizontal Center weighted single zone metering (60% metering coverage of optical FOV)
Flash System Vacuum discharge tube strobe range 2.5m @f8 / 8.2' @f8
App Enabled Fully control your camera remotely For iOS & Android
Device Interface Ports USB Type-C charging input 2.5mm external flash sync. port
Display Outer display and VF display for aperture, shutter speed, modes, film count, battery level, function display etc.
Outer: White(16 grayscale) Inner ViewFinder: Mono LCM, yellow display with black background
Other Tripod mount Built in 49mm lens filter thread mount
Safety information

Risk of electric shock — Do not open/Disassemble the motorized roller system
- Do not disassemble the device. Incorrect reassembly can cause electrical shock if the device is used again
- Do not immerse the device in water or other fluids.
- Do not operate the device in a high humidity environment or very dusty environments.
- Do not attempt to tamper with, adjust or remove the battery and/or the electronics located below the rollers behind the device's film door.
- Do not attempt to remove the door itself as it is connected electronically to the body of the device. Doing so is unsafe, will likely damage your device, and will void your warranty.
- Do not insert metal objects into the device.
- Do not insert any objects into the rollers or gears.
- Keep small children and infants away from device to avoid them being injured by the device's moving parts.
- Do not use or store the device near any heat source or any type of equipment that generates heat, including stereo amplifiers.
- Do not use the device near flammable or explosive gases.
- Do not charge the device if you notice any unusual odours, noise or smoke.
- Do not attempt to disassemble the film's battery or modify it in any way (if using 600type film). If battery fluid gets in your eyes, immediately rinse your eyes with fresh, cold running water and seek medical attention immediately
- Do not cover the flash.
Battery and Charger
- This device uses a custom lithium-ion battery that is non-removable and mounted inside the camera body. No other type of battery can be used. Battery replacement can only be done by authorized service centres. The battery will provide many years of service if properly used.
- Power consumption varies depending on the environment the device is used in and how the device has been stored. Used immediately after full charge, the battery energy will power the processing of up to 10 film packs.
- Once the battery energy falls below a certain level, the device will no longer process film. The display will show ‚Battery Critical' and the front LED will turn red when it needs to be recharged. This is to avoid a photo getting stuck as it being processed through the roller system.
- The rechargeable battery is not fully charged at the time of purchase. Charge the battery fully with the USB charging cable (provided). This usually takes 1-2 hours (can vary depending on usage).
- Charge the battery within an ambient temperature range of 0-45 C +- 5C / 32-113F +- 41F.
- The supplied battery charging cable has been tested to work with the Apple iPhone power adaptors. While it can be sued in other USB ports e.g. computer, USB power adaptors, TVs, cars etc., correct operation cannot be guaranteed.
Usage Environment
- To protect the high-precision technology contained in this device, never leave the camera in the following environments for extended periods of time: high temperature (42C / 108F), high humidity, places with extreme changes in temperature (hot and cold), direct sunlight, sandy or dusty environments such as beaches, damp places, or places with strong vibrations.
- Do not drop the device or subject it to severe shocks or vibrations
- Do not push, pull or press on the lens surface.
Documents / Resources
References
Download manual
Here you can download full pdf version of manual, it may contain additional safety instructions, warranty information, FCC rules, etc.
Advertisement


Need help?
Do you have a question about the I-2 and is the answer not in the manual?
Questions and answers