Table of Contents
Advertisement
Quick Links
Instructions
Controller Integration Kit
Diaphragm-Jet
Installed kit enables an existing automation system to control and operate the
Advanjet HV-2000 Jet for non-contact dispensing of viscous material in industrial
environments.
Model K0-9102
For professional use only.
Important Safety Instructions
Read all warnings and instructions in this manual and
all related manuals before using this equipment. Save
these instructions.
™
Technology
PROVEN QUALITY. LEADING TECHNOLOGY.
3A5911B
EN
Advertisement
Table of Contents

Summary of Contents for Advanjet Diaphragm-Jet K0-9102
- Page 1 3A5911B ™ Diaphragm-Jet Technology Installed kit enables an existing automation system to control and operate the Advanjet HV-2000 Jet for non-contact dispensing of viscous material in industrial environments. Model K0-9102 For professional use only. Important Safety Instructions Read all warnings and instructions in this manual and all related manuals before using this equipment.
-
Page 2: Table Of Contents
Contents RELATED MANUALS ....................3 WARNINGS ........................4 SPECIFICATIONS ....................5 Advanjet Controller Integration Kit Overview ..........5 Controller Integration Kit Parts List ............5 Technical Specifications ................5 Integration Kit Base Dimensions ..............6 Temperature Controller Panel Cutout Dimensions ........7 Temperature Controller External Dimensions .......... -
Page 3: Related Manuals
HV-2000C Jet Controller Setup and Operation 3A5855 HV-2000 Jet Setup and Operation 3A5937 Jet Dispensing Parameters Supplement 3A5908 Advanjet Jet Maintenance Tool Kit (JKT-2000) 3A5909 HV-2000 Maintenance and Repair 3A5912 Temperature Controller for HV-2000C, HV-2100C, and HM-2600C 3A5911B Advanjet Controller Integration Kit... -
Page 4: Warnings
Route hoses and cables away from traffic areas, sharp edges, moving parts, and hot surfaces. Do not kink or over bend hoses or use hoses to pull equipment. Keep children and animals away from work area. Comply with all applicable safety regulations. Page 4 of 32 Advanjet Controller Integration Kit 3A5911B... -
Page 5: Specifications
Specifications Advanjet Controller Integration Kit Overview In lieu of using an Advanjet HV-2000C Controller, the Advanjet Controller Integration Kit (P/N K0-9102) is installed into an existing automation system to provide electrical resources and timing signals for operating the Advanjet HV-2000 Diaphragm Jet. The installed Controller Integration Kit: ... -
Page 6: Integration Kit Base Dimensions
Integration Kit Base Dimensions Note: Dimensions are shown in inches [millimeters]. 6.70 [170.18] 6.50 [165.10] Page 6 of 32 Advanjet Controller Integration Kit 3A5911B... -
Page 7: Temperature Controller Panel Cutout Dimensions
Temperature Controller Panel Cutout Dimensions Note: Dimensions are shown in millimeters [inches] 45.0 [1.77] Temperature Controller External Dimensions Note: Dimensions are shown in millimeters [inches] 3A5911B Advanjet Controller Integration Kit Page 7 of 32... -
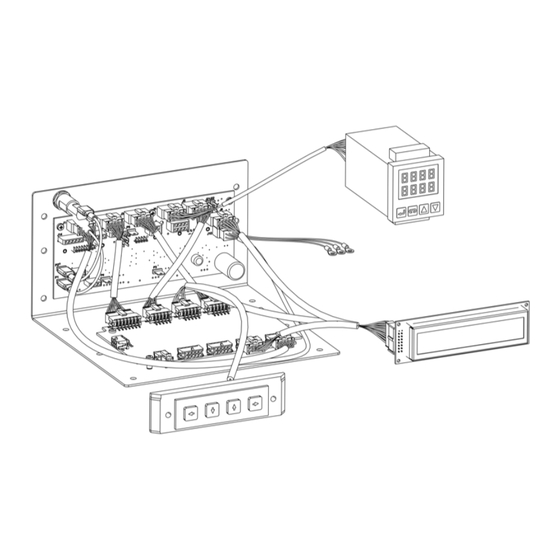
Page 8: Connections
Figure 1: Electrical Connections for the Controller Integration Kit Base Connect the controller board to an external power supply using the wire colors and power requirements specified in the “Harness 06-1021-00 Power Supply Connections” chart in Figure 1. Page 8 of 32 Advanjet Controller Integration Kit 3A5911B... -
Page 9: Temperature Controller Electrical Connections
Figure 2: Electrical Connections for the Temperature Controller FROM J4 HARNESS 06-1004-00 TO 60-2257 PIN NO. WIRE COLOR PIN NO. BROWN ORANGE YELLOW GREEN BLUE VIOLET GRAY WHITE BLACK 3A5911B Advanjet Controller Integration Kit Page 9 of 32... -
Page 10: Pneumatic Connections
If the air is not clean and dry, serious damage can occur to the air solenoid valves. When installed in an automation system, the Controller Integration Kit provides the electrical resources and timing signals necessary to operate the Advanjet HV-2000 jet. Specific pneumatic components are also required, as indicated by the dashed box in Figure 3. -
Page 11: Cable Interface Connections
RS-232C: The Advanjet software communicates with the controller board using RS-232C communication. An RS-232C cable is not included with the Controller Integration Kit and must be supplied by the user. If the PC running the Advanjet Software does not have an RS-232C port, use a USB-to-RS232C converter cable with the drivers that come with the cable. -
Page 12: Temperature Controller
Use the keys to increase/decrease the value. For example, to change SV from 20 to 45 degrees, use the key to increase the SV value to 45, and then press to save the change. Page 12 of 32 Advanjet Controller Integration Kit 3A5911B... -
Page 13: Temperature Controller Factory Settings
Temperature Controller Factory Settings The temperature controller is preset with Advanjet settings for optimal operation with the HV-2000 Jet. The Advanjet settings are shown below. Use the keys to adjust values. Press once to save changes, and then press again to return to the previous menu. -
Page 14: Appendix 1: Using The Lcd Display And Selection Keys
Appendix 1: Using the LCD Display and Selection Keys The Controller Integration Kit includes an LCD display and input keypad for programming and operating the HV-2000 jet in a manner similar to the Advanjet HV-2000C Controller. Figure 5: LCD Display and Keypad on the HV-2000C Controller The following section provides a brief overview;... - Page 15 1. To dispense 10 drops per trigger signal, enter 10. Note: If the Advanjet software is being used and values are changed using the keypad and LCD display, the changes will not be transferred to the Advanjet software. Also, the keypad/display values can be overwritten each time the Advanjet software program is started.
-
Page 16: Appendix 1-2: Special Front Panel Key Sequences
RS-232C interface settings, simultaneously press and hold the LEFT and RIGHT keys. The LCD display will return to the main menu. Note: When the Advanjet Software is used, always use the factory default RS-232C settings. Using other settings will disable communication between the software and the controller board. -
Page 17: Appendix 2: Input/Output Interface
Recipe 5 (Input) Recipe 6 (Input) Busy Flag (Output) External Interrupt (Input) 10-13 NOT AVAILABLE 15-17 NO CONNECTION Heater Alarm Common (Output) 19-24 NOT AVAILABLE Heater Alarm 1 (Output) Heater Alarm 2 (Output) 3A5911B Advanjet Controller Integration Kit Page 17 of 32... - Page 18 Input is normally high. Assert by pulling low. Refer to Schematic 1: Configurable I/O DIO0-DIO31 and Schematic 2: Digital Input Circuitry for I/O Pins 1, 2, 3, 4, 5, 6, 8. Page 18 of 32 Advanjet Controller Integration Kit 3A5911B...
-
Page 19: Appendix 2-1: I/O Pins 1-8
Appendix 2-1: I/O Pins 1–8, continued Schematic 1: Configurable I/O DIO0-DIO31 3A5911B Advanjet Controller Integration Kit Page 19 of 32... - Page 20 configured as sinking digital outputs The voltage “24V” may be any voltage (D-OUT) up to 36 V, 200 mA each. between 5 and 36 VDC. Page 20 of 32 Advanjet Controller Integration Kit 3A5911B...
-
Page 21: Appendix 2-2: I/O Pins 9-26
Heater Alarm 1 or 2. That common lead is connected to pin 18, Heater Alarm Common. Refer to Schematic 4: Heater Alarm Output Circuitry for J7, pins 18, 25, 26 3A5911B Advanjet Controller Integration Kit Page 21 of 32... - Page 22 It has a low degree of material migration under DC loads. It is useful where very high inrush currents occur, such as lamp loads including fluorescent. Page 22 of 32 Advanjet Controller Integration Kit 3A5911B...
-
Page 23: Appendix 3: Rs-232C Interface
The following table shows the appropriate RS-232C cable pin-outs. RS232C PIN ASSIGNMENTS COMPUTER ADVANJET FUNCTION Rx Tx Tx Rx DTR DSR DSR DTR RTS CTS CTS RTS 3A5911B Advanjet Controller Integration Kit Page 23 of 32... -
Page 24: Appendix 4: Advanjet Controller Commands (Acc)
Appendix 4: Advanjet Controller Commands (ACC) The Advanjet Controller Commands ACC are a simple set of commands for jet operation, timing values, and dispensing recipe settings. A host computer is connected to the integration kit controller board using an RS232C cable. The host/automation system sends ACC to the controller board in ASCII format. -
Page 25: Appendix 4-1: Command Format
Dwell Time is 15 msec The Refill Time plus the Dwell Time set the single drop cycle time to 20msec (5+15) resulting in a drop frequency of 50 drops per second 3A5911B Advanjet Controller Integration Kit Page 25 of 32... -
Page 26: Appendix 4-3: Jetting Commands
The number of drops will depend on the duration of the LEVEL signal (low) from Recipe #2 Trigger and the single drop cycle time defined by the ST command. The drop count value of 5 is ignored. Appendix 4-3: Jetting Commands Page 26 of 32 Advanjet Controller Integration Kit 3A5911B... - Page 27 Recipe#0. If the host decides to dispense 2 drops at the new location, it should send an SM 1; command to select Recipe#1 before issuing a SG; command. 3A5911B Advanjet Controller Integration Kit Page 27 of 32...
- Page 28 Reset Internal Drop Counter to 0 #nDropcnt; This command is used to reset the internal drop counter to zero #nDropcnt Resets the internal drop counter. Example: SD 0; resets the internal drop counter to 0. Page 28 of 32 Advanjet Controller Integration Kit 3A5911B...
-
Page 29: Appendix 4-4: Heater Commands
Example: The following commands will set the heater temperature to 50 °C (122 °F), the idle time to 5 minutes and turn on the heater. SH 50; HF 5; SO 1; 3A5911B Advanjet Controller Integration Kit Page 29 of 32... -
Page 30: Appendix 4-5: Output Commands
Note: The controller board might not be able to respond to the output commands when it is busy dispensing a long series of drops. In this case, the host should try again after a short wait. Page 30 of 32 Advanjet Controller Integration Kit 3A5911B... -
Page 31: Appendix 5: Firmware Reset Process
RAM memory on the main board. Depress and hold the right arrow key. Cycle the power on and off while holding the right arrow key down for ten seconds. 3A5911B Advanjet Controller Integration Kit Page 31 of 32... -
Page 32: Graco Standard Warranty
Anglais, ainsi que tous documents, avis et procédures judiciaires exécutés, donnés ou intentés, à la suite de ou en rapport, directement ou indirectement, avec les procédures concernées. Graco Information For the latest information about Advanjet products, visit www.advanjet.com. For patent information, see www.graco.com/patents.
Need help?
Do you have a question about the Diaphragm-Jet K0-9102 and is the answer not in the manual?
Questions and answers