
Summary of Contents for Etec Pro XL
- Page 1 V. 1.0 for v. 1.0 of the Pro XL Control Software Pro XL Operations & Maintenance Guide October 2023 Rev01 for V1.0 of the Pro XL Control Software...
-
Page 2: Table Of Contents
Pro XL Operations and Maintenance Guide Table of Contents Identification ....................... 5 Legal Notice ......................... 5 History of Changes ......................5 User Information ....................6 Purpose of the Document ....................6 Target Group ......................... 6 Operator’s Perspective ....................6 Technical Data ...................... 7 Mechanical Data ...................... - Page 3 Load Job via FTP ......................46 Load Job from USB Drive ..................... 46 Load Job from Envision One RP ................... 48 Verify Pro XL Is Ready to Print ..................49 Start Print ........................50 Stop Job ........................52 Abort Job ........................53 Delete Job ........................
- Page 4 Pro XL Operations and Maintenance Guide Detach Parts from Build Platform ................. 55 Reset Printer After Printing ..................56 Clean Printed Parts ..................... 57 Post-Cure Printed Parts ....................57 Finish Post-Processing of Printed Parts ............... 57 Service and Maintenance ................... 58 Customer Service .......................
-
Page 5: Identification
Desktop Metal, the DM Logo, Bound Metal Deposition, BMD, Live Sinter, Studio System, Shop System, Fabricate, Fiber, Production System, Desktop Health, Desktop University, Flexcera, Einstein and ETEC are trademarks of Desktop Metal, Inc. EnvisionTEC, Envision One, cDLM, Vida, Perfactory, D4K, Hyperprint and Xtreme 8K are trademarks of EnvisionTEC GmbH and its affiliates. -
Page 6: User Information
Pro XL Operations and Maintenance Guide User Information Purpose of the Document This instruction manual: • describes the working principle, operation, and maintenance of the printer, and • provides important information on safe and efficient handling of the printer. Note: The operation of the Envision One RP Software is described in the... -
Page 7: Technical Data
1. Do not plug any additional equipment into the power circuit. 2. The Pro XL requires 100-250V AC, 6.3A, 50Hz/60Hz 3. The Pro XL does not require a dedicated server. It can be connected wirelessly, hard-wired into the network, or directly connected to a computer. -
Page 8: Network Requirements
VNC server for printer remote control (see section Connect to the Printer via VNC Clients) • 2504 port: is used for connection between the Pro XL Control Software and Envision One RP. • 22 (ssh) (https): are used for getting the software update. Radio Equipment Radio equipment contained in this product operates at the following frequencies: •... -
Page 9: Printer Delivery
Unbox Printer Your Pro XL printer arrives in a wooden crate with a series of accessories boxes. The crate and boxes are on top of a pallet. Use a forklift or pallet jack to take them to the site. You can also remove the crate and accessories boxes from the pallet and use a dolly to move them. - Page 10 Pro XL Operations and Maintenance Guide Allen keys, 2mm, 2.5 mm Required for printer calibration and to assist with technical support cases. It is not required for day-to-day operation. Crossover network cable, 5 mm, colored plug This cable connects the printer to the operating computer, as needed. The cable inserts into the I/O panel behind the printer.
-
Page 11: Printer Components
Pro XL Operations and Maintenance Guide Printer Components Functional Description During the build process, the model is built layer by layer. A mechanical system moves the build platform up so that the cured material sticks to the build platform or to the previous layer. -
Page 12: Back View
Pro XL Operations and Maintenance Guide Back View Figure 3: Back view of the printer Page 12 of 67 www.etec.desktopmetal.com... -
Page 13: Side View
Pro XL Operations and Maintenance Guide Side View Figure 4: Side view of the printer Page 13 of 67 www.etec.desktopmetal.com... -
Page 14: Main Printer Components
Pro XL Operations and Maintenance Guide Main Printer Components Hood Risk of injury: The hood must always be closed, except when removing models from the printer. After the models are removed, close the hood on the printer. CAUTION The orange hood protects the printer and the operator. It protects: •... -
Page 15: Build Platform
Pro XL Operations and Maintenance Guide Build Platform The build platform is an assembly comprised of: A large, flat platform • A handle • A connection cavity • The flat area of the build platform is where cured material will adhere during the printing process. -
Page 16: Z-Axis
Pro XL Operations and Maintenance Guide Z-axis The build platform moves up and down along the Z-axis. Figure 9: Z-axis Emergency Stopping Devices The printer is equipped with an emergency stopping device: a red emergency stop button. Figure 10: Emergency stopping device To stop the printer in an emergency, push the emergency stop button. -
Page 17: Hardware Setup
Pro XL Operations and Maintenance Guide Hardware Setup Install Hood Counterweight Note: The counterweight of the hood is protected by the transportation lock. 1. With your left hand, pull the hood lock on the rear side of the printer and then lift... -
Page 18: Turn Printer On
To discard the update message, select Cancel. Connect Parts Washing Apparatus The PWA 2000 and Desktop Orbital Shaker are recommended washing units for the Pro XL. The recommended post washing unit is based on the material(s) and material workflow(s) you are following. To set up the PWA 2000 Parts Washing Unit, see the ETEC Knowledge Base. -
Page 19: Install Build Platform
Pro XL Operations and Maintenance Guide Install Build Platform 1. Open the printer’s hood. 2. Turn the build platform knob on the top of the printer a couple times to loosen it. 3. Slide the build platform into the build platform housing at the top of the Z-axis tower. -
Page 20: Add Material
Pro XL Operations and Maintenance Guide Figure 14: Material tray installation 4. Make sure the material tray is secured. Add Material See the corresponding Material Best Practices Guide. Be sure to properly prepare your specific material before each use. Always observe the... -
Page 21: Set Ethernet
4. Mix the material thoroughly with a supplied material mixing card. Close the hood to protect the material from ambient light. Set Ethernet Note: The Pro XL is compatible with both ethernet and Wi-Fi connections. 1. Plug the Ethernet cable into the network connector located on the back of the printer. -
Page 22: Connect To Printer Via Vnc Clients
Pro XL Operations and Maintenance Guide 4. In the Password field, type a password for the selected Wi-Fi. 5. Select OK. Connect to Printer via VNC Clients VNC Clients allows the printer operator to view printer status from a computer, remotely control the printer within reason, and provide remote access to the printer during a Technical Support Case. -
Page 23: Supported Clients For Linux
Pro XL Operations and Maintenance Guide UltraVNC Viewer Step-by-step: 1. Download UltraVNC Viewer and open the program. 2. Type the IP address into the VNC Server box. Select Connect. Supported Clients for Linux VNC-Viewer Step-by-step: 1. Download VNC Viewer and open the program. -
Page 24: Software Presentation
Pro XL Operations and Maintenance Guide Software Presentation Pro XL Control Software In the Control Software, there are two main menus: Settings Menu and Job List Menu. Settings Menu Settings Menu: • allows you to change settings of the printer build parameter or the printer itself. -
Page 25: Ethernet
Pro XL Operations and Maintenance Guide Ethernet This tab lets you set the network on the printer. Select Settings > Network Settings > Ethernet to open the tab, see section Set Ethernet Material Info Material Info tab provides information about: •... -
Page 26: Printer Name
Pro XL Operations and Maintenance Guide Printer Name This option lets you change the name of a printer. Select Settings > Printer Settings > Printer Name. 2. Enter the required name of the printer into the corresponding field using the keyboard on the screen. -
Page 27: About Printer
Pro XL Operations and Maintenance Guide 2. Select Inches Millimeters by selecting the corresponding field. Select Settings > Printer Settings > Units > Temperature. 4. Select Fahrenheit Celsius by selecting the corresponding field. → The units of measurement are changed. -
Page 28: Software Update
Pro XL Operations and Maintenance Guide Software Update Select Settings > Printer Settings > Software Update on the printer screen to check the software version installed on the printer. If the latest version of software is installed on the printer, the ChangeLog button displays. -
Page 29: Software Recovery
Pro XL Operations and Maintenance Guide 3. To reboot the printer manually, select Reboot. If not, it will start rebooting automatically in 30 seconds. Software Recovery Software Recovery tab lets you recover the previous version of software. 1. Select Settings > Printer Settings > Software Recovery to open the tab. -
Page 30: Printing Statistics
Pro XL Operations and Maintenance Guide Printing Statistics This tab provides the printer usage data for the last 7 days, last 30 days or all operations data. Select Settings > Printer Settings > Printing Statistics. → The following screen appears. -
Page 31: Job Settings
Pro XL Operations and Maintenance Guide 2. Set the required heating temperature for the material tray using the plus minus buttons. 3. Select Start Heating. → The material tray starts heating. Job Settings This tab lets you check or change the printer settings. -
Page 32: Support
Pro XL Operations and Maintenance Guide Support This tab lets you download the log report from the printer, provide remote access to the printer, and open a support case right from the printer. For more detailed information, see Service and Maintenance. -
Page 33: Service Mode
All files to be printed must pass through Envision One RP model processing software before transferring to the Pro XL printer. Once the models are loaded, automatically fixed, oriented, and supported in Envision One RP, they may be transferred to the printer as a folder containing a series of images and files. -
Page 34: Calibration
Pro XL Operations and Maintenance Guide Calibration The printer is calibrated and tested during fabrication. However, calibration may be needed to guarantee accurate build results. Home Position Calibration Home position is the lowest point of the build platform along Z-axis, it is the start position of the build platform for printing. - Page 35 Pro XL Operations and Maintenance Guide 3. Import the .stl file into the Envision One RP software. 4. Print the Home Position Calibration Cubes.stl file, see Start Job for details. 5. Once the print has completed, check if there are nine cubes on the platform.
-
Page 36: Calibrate Home Position
Pro XL Operations and Maintenance Guide a) If all the calibration cubes are within +/- 100 microns, then the printer is paralleled, and no further actions need to be taken at this time. b) If all the calibration cubes are within 4.85 and 5.0 mm, then the printer’s home position is correct, and no further actions need to be taken. - Page 37 Pro XL Operations and Maintenance Guide 6. Set a motion distance of the platform by pressing the - and icons of Motion Distance. This is the total distance the platform moves. Note: The positive values move the platform up; the negative values move the platform down.
-
Page 38: Mask Generation
Pro XL Operations and Maintenance Guide b) Find the serial number on the front of your material tray and enter it into the field on the screen that appears. c) Select OK. → The material tray is added to the list. - Page 39 Pro XL Operations and Maintenance Guide 2. On the main screen of the Pro XL Control Software, select Settings > Move & Calibration > Mask Generation. → The following message appears. 3. Connect your USB Light Sensor to the printer via USB cable.
-
Page 40: Use Grey Mask
→ The newly generated mask has been saved. Use Grey Mask Set in the factory, the Grey Mask is the Compensation Mask for the Pro XL printer. To enable the Grey Mask on your printer, proceed as follows: 1. Select Settings >... -
Page 41: Quick Calibration
Pro XL Operations and Maintenance Guide Quick Calibration The printer calibration allows you to set up compensation coefficients to tune the accuracy of your printer. 1. Print the L-shaped job. 2. After the L-shaped job is printed, clean it well and post-cure the model as required for the material in use. -
Page 42: Start Print
Pro XL Operations and Maintenance Guide Start Print Risk of injury from crushing caused by moving printer parts: Printer may only be operated by instructed and specially trained personnel. The printer may only be operated if the protecting devices are working CAUTION properly. -
Page 43: Load Job File
Pro XL Operations and Maintenance Guide Load Job File To load a job to the printer: 1. Enter into the Windows search field or use <Windows> + <R> hotkey on your computer keyboard. → The window opens. 2. Enter the IP address of the printer, e. g.: \\10.0.0.24. - Page 44 Pro XL Operations and Maintenance Guide → The following screen appears. 4. In the Drive drop-down list, select a drive letter (you can select any available letter). 5. In the Folder field, type the path of the folder or computer, or select Browse find the folder or computer.
-
Page 45: Create Shortcut
Pro XL Operations and Maintenance Guide 4. In the Drive drop-down list, select a drive letter (you can select any available letter). 5. In the Folder field, type the path of the folder or computer, or select Browse find the folder or computer. To connect each time you sign in to your PC, check Reconnect at sign-in checkbox. -
Page 46: Load Job Via Ftp
Pro XL Operations and Maintenance Guide 5. Type in the address, FTP site, or network location, then select Next. 6. In the screen that appears, type a name for the network and select Next. 7. Select Finish on the Add Network Location Wizard screen. - Page 47 Pro XL Operations and Maintenance Guide → The following window appears. 6. Select Save job. → The folder selection dialog box appears. Select the USB drive folder you want to save a job to and press Select Folder. → The job folder with all the required data is saved to the selected USB drive.
-
Page 48: Load Job From Envision One Rp
Pro XL Operations and Maintenance Guide Load Job from Envision One RP 1. Open the Envision One RP. 2. Upload your model and prepare it for printing, see Software Operations. 3. Click on the printer image in the top right corner. -
Page 49: Verify Pro Xl Is Ready To Print
Send job to printer. → The job is sent to the selected printer. Verify Pro XL Is Ready to Print Checking the printer ensures the highest quality of printed models and NOTICE minimizes the risk of errors or printer malfunctioning. -
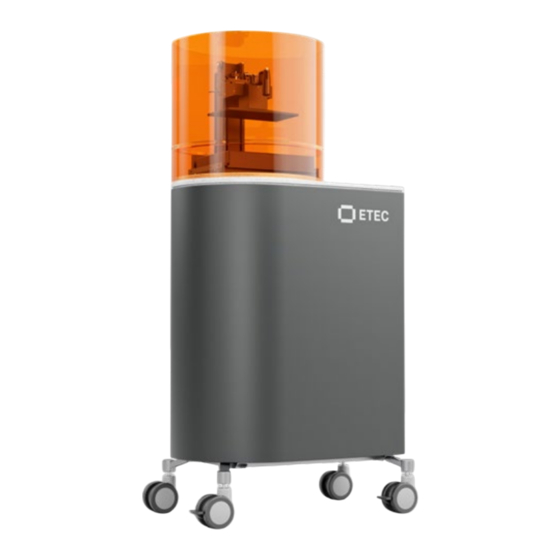
Page 50: Start Print
Pro XL Operations and Maintenance Guide Figure 18: The Pro XL Printer Start Print Make sure the build platform is clean and the material tray is in place and has material in it before starting a print. NOTICE Failure to do so will result in failed builds and damage to the equipment. - Page 51 Pro XL Operations and Maintenance Guide To start a job: 1. From the Home screen, select List: 2. Select the job folder from the Job List. 3. Select the Play button to start a job. → The system checks if the printer is ready to start a print.
-
Page 52: Stop Job
Pro XL Operations and Maintenance Guide To delay your job print, select Start Later. Note: The minimum delay time is 15 minutes. The maximum delay time is 999 h 45 min. → The following window appears. 5. Set the required delay time using the plus and minus icons in the... -
Page 53: Abort Job
Pro XL Operations and Maintenance Guide Abort Job The job can be aborted by selecting the icon in the job printing window. → The following window appears. 1. In the confirmation window, select Yes. → The job has been aborted. -
Page 54: Delete Job
Pro XL Operations and Maintenance Guide Delete Job To delete the job from the Job list: 1. Select Job List on the main screen. 2. Select the job you want to delete from the list of jobs. → The following screen appears. -
Page 55: Post-Process
Pro XL Operations and Maintenance Guide Post-Process Post-Cleaning Supplies and Post-Curing Equipment Recommended list of cleaning supplies: • Spray bottle (optional). • Plastic containers with lid for holding the isopropyl alcohol. • Isopropyl alcohol (99%) for cleaning uncured material on the surface of printed models. -
Page 56: Reset Printer After Printing
3. Install the build platform on the printer and tighten the build platform torque knob. 4. Close the hood. → The Pro XL can now begin printing the next loaded print job. Page 56 of 67 www.etec.desktopmetal.com... -
Page 57: Clean Printed Parts
Pro XL Operations and Maintenance Guide Clean Printed Parts The PWA 2000 and Desktop Orbital Shaker are recommended washing units for the Pro XL. The recommended post washing unit is based on the material(s) and material workflow(s) you are following. -
Page 58: Service And Maintenance
Pro XL Operations and Maintenance Guide Service and Maintenance Risk of injury: crushing caused by automatically moving printer parts. Body parts may be crushed by movements of the build platform. The printer may only be operated if the protecting devices are working CAUTION properly. -
Page 59: Download Log Report
Pro XL Operations and Maintenance Guide Download Log Report The log report contains printer information and statistics which can be analyzed by Service and Support. 1. Connect the USB drive to the printer. 2. On the home screen of the printer, select Settings >... -
Page 60: Request Support
Pro XL Operations and Maintenance Guide → The following screen appears. 2. Provide the 5-digit support key to your support representative via email support@envisiontec.de with the subject "Remote Assist Code for Support". → The remote session starts. 3. To terminate the remote session, select Disable Remote Access. - Page 61 Pro XL Operations and Maintenance Guide 3. Press the Select your phone number to select the number if you added it before. Otherwise, press Select your phone number > Add new phone number to add the needed number and confirm with OK.
-
Page 62: Operational Maintenance
Pro XL Operations and Maintenance Guide Operational Maintenance Complete maintenance tasks according to the table below and the NOTICE intervals specified therein. Note: Maintenance activities, including date and performing operator, should be documented due to traceability. Operational maintenance helps ensure a smooth and efficient production process. The operating personnel can carry out these tasks after being trained accordingly. -
Page 63: Clean Material Tray
Pro XL Operations and Maintenance Guide The build platform should remain as clean as possible between print jobs to keep your printer in optimal printing condition. It is recommended to clean the build platform under any of the following conditions: •... -
Page 64: Clean Printer Casing
Maintenance frequency: By-weekly The Pro XL projector receives build job information from the internal computer, based on which it projects a clear image onto the material tray layer by layer. The projector lens must remain clean and free of dust/debris. -
Page 65: Clean Hard Drive Space
Maintenance frequency: Weekly The Pro XL has an internal PC that can store a limited amount of data. It is a good practice to remove print job folders from the printer to free up space. When most of the hard drive space has been used, the printer may show error messages or respond slowly to touchscreen commands. -
Page 66: Power Cycle
Pro XL Operations and Maintenance Guide Dust may accumulate on, near, or inside of the Pro XL. High levels of dust accumulation can cause the printer to overheat. Note: To protect the internal hardware, the printer automatically shuts down if it reaches the maximum internal temperature of 49 C/120 F. - Page 67 Pro XL Operations and Maintenance Guide ExOne KK Desktop Metal, Inc. 161-5 Haneo Desktop Metal Operating, Inc. Odawara-shi, Kanagawa Desktop Health Japan 256-0804 63 3 Ave. Burlington, MA 01803 Adaptive3D LLC https://www.desktopmetal.com/ 1122 Alma Road, Suite 100 https://health.desktopmetal.com/ Richardson, TX 75081 https://adaptive3d.desktopmetal.com...
Need help?
Do you have a question about the Pro XL and is the answer not in the manual?
Questions and answers