
Related Manuals for Design WELLNESS 52345-BLK

Summary of Contents for Design WELLNESS 52345-BLK
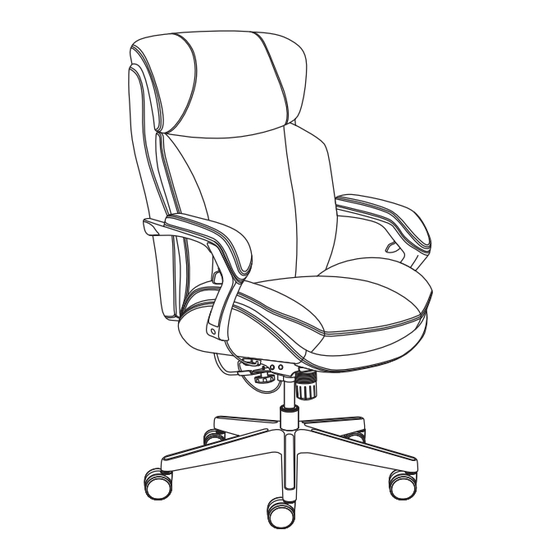
- Page 1 Keep the original sales receipt as proof of purchase for warranty coverage. Big & Tall Executive Chair Assembly Instructions Model: 52345-BLK 52345-GRY 52345-BRN...
- Page 2 Chair Assembly Instructions Carefully unpack all parts and identify them against the parts list before attempting to assemble. To avoid scratching the components, assemble the chair on a protected surface. Note: The casters sold with this chair are intended for use on carpet and not recommended for use on tile or hard wood floors. Using these casters on tile or wood flooring may cause floor surface damage, so please consider purchasing a chairmat to protect your floor surfaces.
- Page 3 PARTS Casters Star Base Gas Lift Seat Plate Quantity: 5 Quantity:1 Quantity: 1 Quantity: 1 Right Arm Left Arm Seat Cushion Back Cushion Quantity: 1 Quantity: 1 Quantity:1 Quantity: 1 1” Screws 1-1/4” Screws 2” Screws with 5/8” Knob Spring Washers Quantity: 2 Quantity: 6 Quantity: 1...
- Page 4 Step 1 Select a smooth surface in order not to scratch the parts. Turn the Star Base (B) upside down. Press the Casters (A) into holes at the end of each leg. Turn the Star Base (B) upright and insert Gas Lift (C) into the central hole of Star Base (B).
-
Page 5: Tension Knob
Step 2 Attach Seat Plate (D) to the bottom of the Seat Cushion (F), with the front of the seat plate facing the front of seat cushion. (For reference, the large tension knob is near the front of the seat plate.) Attach by using 1-1/4” Screws (I) for the front holes of the Seat Plate (D) and 1”... - Page 6 Step 3 Align the Back Cushion (G) with the Seat Cushion (F) by positioning the back support plate over the Seat Plate (D) with 1-1/4” Screws (I). Important: Do not completely tighten the screws until both arms are attached to the cushions. Once all screws are attached, you can then completely tighten.
- Page 7 Step 4 Insert 2” Screws with Spring Washers (J) into arm holes, attaching Arms (E1 & E2) (with the front of arms facing the front of seat cushion) to sides of Seat Cushion (F) and Back Cushion (G). Note: Tighten all the screws completely. Remember to tighten the back support plate screws.
- Page 8 Step 5 Attention: Please keep levers on Arms (E1 & E2) to the down position for easy assembly. Lift the lids of the EZ cable connectors attached to Seat Plate (D) as shown. Insert the ends of the arm cables into the grooves of the EZ cable connectors, pull tightly and snap them into place as shown.
- Page 9 Step 6 Pull down the metal plate of Back Cushion (G) and attach it over to the Seat Plate (D) by using 5/8” Knob (K). Note: Tighten the knob completely.
- Page 10 Step 7 Insert the Gas Lift (C) into the center hole on the Seat Plate (D) located behind the tension knob. Turn the assembled chair upright and push down rmly over the Gas Lift (C) until it is securely connected. Tension knob Center hole...
- Page 11 Step 8 Place the Arm Inserts (L1 & L2) into arm grooves and place Plastic Caps (M) into armrest holes to cover screws once all screws have been tightened.
-
Page 12: Troubleshooting
Troubleshooting Chair does not recline when you release the tilt lock out feature. Follow these instructions to correct the tilt-lock out function. Push the lever on the left arm to the down position. Remove the connector from the Velcro strap on the bottom of the seat cushion. - Page 13 Lift the lid of the EZ cable connector, then remove the end of the arm cable from the groove of the EZ cable connector. Use pliers to hold the lock-nut as the photo and turn the EZ connector counter-clockwise for 5 to 6 turns to expose the threads between the EZ connector and the lock-nut.
- Page 14 Insert the cable-end into the receiver, then pull tightly and snap the plastic cable housing into place as shown. Then close the lid. Fix the connector to the Velcro on the bottom of the seat cushion and sit on the chair and try the function again.
-
Page 15: Function Instruction
Operating Instructions Function Instruction - 1 To Adjust Seat Height: While seated, reach under the right side of the arm to find the lever. Lift the lever and raise your body up slightly to allow the chair to rise to the desired height. Once desired height is reached, release lever to lock chair at desired height. To lower the seat, lift the lever while seated. - Page 16 Function Instruction - 2 To Operate Tilt Lockout: While seated, reach under the left side of the arm to find the lever. Pull up the lever and lean back to allow the chair to tilt backwards. To lock the chair in the upright position, sit upright and push the lever to the down position.
- Page 17 Function Instruction - 3 To Adjust Tension on the Tilt: While seated, reach under the front center of chair seat and grasp the tension knob. To loosen the tilt mechanism, turn the knob clockwise. This lessens the effort required to rock back and forth. Rotate the knob until desired resistance is reached.
- Page 18 Function Instruction - 4 Featuring Active Lumbar™ Technology: Patented technology allows the lumbar zone to ex, changing from full support to relaxed as you shift your sitting position from upright to reclined. The chair can be locked in the upright position using the tilt lockout for constant lumbar support while in a work posture.
- Page 19 Function Instruction - 5 360˚ Swivel: 360˚ seat swivel.
- Page 20 Limited Warranty Huali Trading seating products are warranted against defects in material and workmanship while owned by the “Original Purchaser”. The term “Original Purchaser” is de ned as that party or entity which purchases Huali Trading furniture from an authorized Huali Trading retailer as shown by the original sales receipt.
Need help?
Do you have a question about the WELLNESS 52345-BLK and is the answer not in the manual?
Questions and answers