Electrolux TC2 Service Manual
Hide thumbs
Also See for TC2:
- Service manual (78 pages) ,
- Service manual (57 pages) ,
- Service manual (43 pages)
Table of Contents
Advertisement
Quick Links
Advertisement
Table of Contents

Subscribe to Our Youtube Channel
Related Manuals for Electrolux TC2


Summary of Contents for Electrolux TC2
- Page 1 SERVICE MANUAL WASHING MACHINE STEAM PROGRAMME ON TOP LOADING WASHING © ELECTROLUX ZANUSSI S.p.A. MACHINE Publication Spares Operations Italy number Corso Lino Zanussi, 30 ENV 06 I - 33080 PORCIA /PN (ITALY) 599 72 81-38 Styling TC2 – TC3 Fax: + 39 0434 394096...
-
Page 3: Table Of Contents
2.1.1 LCD version TC3 high ........................5 Version TC2 ............................6 2.2.1 LCD version TC2 ........................... 6 Principle of Steam Function operation ....................... 7 Steam programmes ............................ 8 Cotton programme..........................8 ... -
Page 4: Purpose Of The Manual
1 Purpose of the manual This part of the manual is separate from the main booklet, and deals with the steam generator system and everything else that varies with respect to a washing machine that does not present this new function. For further information on other washing machine components, please see the SERVICE MANUAL. -
Page 5: Control Panel
2 Control panel 2.1 Version TC3 A. Programme selector. F. Delay start. B. Washing temperature. G. LCD C. Spin speed. H. Start / Pause D. Pre-wash. Time manager. E. Extra rinse. 2.1.1 LCD version TC3 high P. Drain. L. Washing level Q. -
Page 6: Version Tc2
2.2 Version TC2 A. Programme selector. F. Delay start. B. Washing temperature. G. LCD C. Spin speed. H. Start / Pause D. Pre-wash. Time manager. E. Extra rinse. 2.2.1 LCD version TC2 T. Temperature. L. Delay start. U. Spin speed M. -
Page 7: Principle Of Steam Function Operation
3 Principle of Steam Function operation In order to use the steam programmes it has been necessary to modify the tub so that the tray containing the heating element is a little deeper and there is a new inlet specifically made for the water required to create the steam. -
Page 8: Steam Programmes
4 Steam programmes The three programmes that use the steam generator are marked by the symbol, and they are: cotton items synthetic items refresh 4.1 Cotton programme The COTTON programme runs for 30 minutes. 4.2 Synthetics programme The SYNTHETICS programme runs for 20 minutes. -
Page 9: Electric Components
5 Electric components 5.1 Solenoid group The solenoid group is made up of 3 solenoids, a Wash pre-wash solenoid, a wash solenoid and specific low capacity solenoid required for the steam Pre-wash programmes. Steam Water pressures higher than 1 bar are limited by water the pressure regulator to 5.5 l/min. -
Page 10: Heating Element
5.2 Heating element The heating element is directly powered by the control electronics using a low power relay. For safety reasons 2 of the pressure switch electric contacts are connected in series. The contact positions are controlled by two cables from the control electronics. -
Page 11: Service Programme
6 Service programme This mode allows to check appliance operations and to read alarms. 6.1 Accessing the programme • The appliance must be turned off. • Turn the appliance on, turning the programme selector by one position in a clockwise direction. •... - Page 12 Position 1 User interface test Purpose of the test: to test operation of all the LEDs and switches. Components activated: all LEDs and the LCD. Behaviour All LEDs turn on in sequence. When any button is pressed the corresponding icon lights up. The code is shown on the LCD and a beep sounds.
- Page 13 Position 5 Steam water solenoid Purpose of the test: test operation of steam programme water inlet solenoid. Components activated: door fastening device. Steam programme water solenoid. Behaviour: the water level is displayed on the LCD. Working conditions: door closed. Water level below the overflow. Maximum time 5 min.
- Page 14 Position 8 Water drain pump Purpose of the test: to test operation of the water drain pump and operation of the motor at maximum speed. Spin Components activated: door fastening device. Drain pump. Motor at maximum spin speed. (*) Behaviour: a water drain phase is activated and continues throughout the test.
-
Page 15: Wiring Diagram
7 Wiring diagram EWM 2100 2010-03 ADL 15/19 599 72 81-38... -
Page 16: Ewm 2500
EWM 2500 2010-03 ADL 16/19 599 72 81-38... -
Page 17: Access To Components
8 Access to components Solenoid group • Unscrew the flexible water inlet pipe. • Disconnect the control panel on one side, using a screwdriver as a lever. • Lift it up slightly. • Repeat the operation on the other side. •... - Page 18 • Use a screwdriver to loosen the fixing clamps that fasten the pre-wash, wash and air break water inlet pipes. • Slightly lower the clip fixing the solenoid power connectors, and remove them. WARNING Take note of the positions of connectors to ensure you reassemble them properly.
-
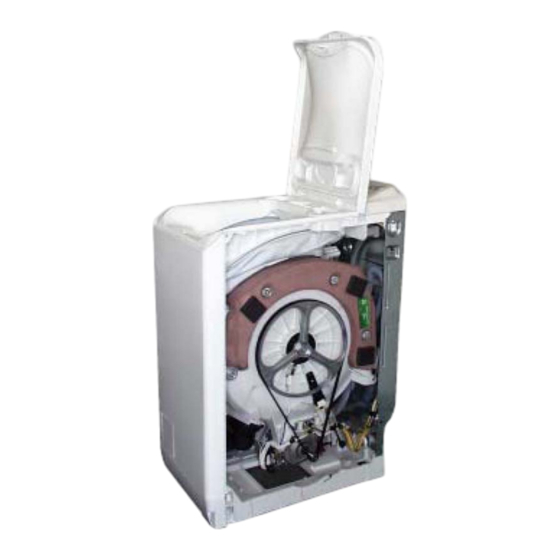
Page 19: Heating Element
Heating element • Unfasten the 4 screws fixing the right side panel to the back. • Move the panel towards the back of the machine and remove it. • Disconnect the power cables, the earth cable and disconnect the NTC probe. •...
Need help?
Do you have a question about the TC2 and is the answer not in the manual?
Questions and answers