
Related Manuals for senelux GPH-20EA


Summary of Contents for senelux GPH-20EA
- Page 1 INSTRUCTION MANUAL Electric Glass Panel Heater with WiFi control Model: GPH-20EA ENGLISH...
-
Page 2: Table Of Contents
TABLE OF CONTENTS Installation Instructions Using The Heater iii. Connecting The Wi-Fi Specifications Cleaning And Care Advice On Disposal vii. Warranty viii. Information... -
Page 3: Safety Precautions
1. SAFETY PRECAUTIONS Before Using the Heater: • Always read this manual before operating the heater. • Keep this manual with the heater. If you transfer ownership, ensure the manual accompanies the heater. • Inspect the heater and all its accessories to ensure they are complete and intact. - Page 4 Child Safety: • Children under 3 years of age must be kept away from the appliance unless they are under continuous supervision. • Children aged 3 to 8 should not operate the appliance, even if it is properly installed. They must be supervised or have received instruction on safe usage.
-
Page 5: Installation Instructions
• Unauthorised dismantling of the heater is forbidden. 2. INSTALLATION INSTRUCTIONS Package Contents 1 x Senelux Glass Panel Heater 2 x Plastic Feet Bases 4 x Castor Wheels 8 x Small Screws (A) 6 x Long Screws (B) 6 x Wall Plugs 4 x Metal Wall Plates 1 x Remote Control... -
Page 6: Wall Mounted Installation
WALL MOUNTED INSTALLATION • Using 4 Hook-Type Wall Brackets Retrieve the 4 brackets, 6 expansion screws, and 6 long screws from the box. Determine the appropriate distance on the wall for the brackets using the distances between the bracket holes. Refer to the illustration below for guidance. - Page 7 Grip the sides of the product and align the wall hole of the rear cover with the mounted brackets. vii. Slide the product downwards until it locks into place on the bracket. viii. Once secured, your wall installation is complete. Refer to the illustration below for visual guidance.
-
Page 8: Using The Heater
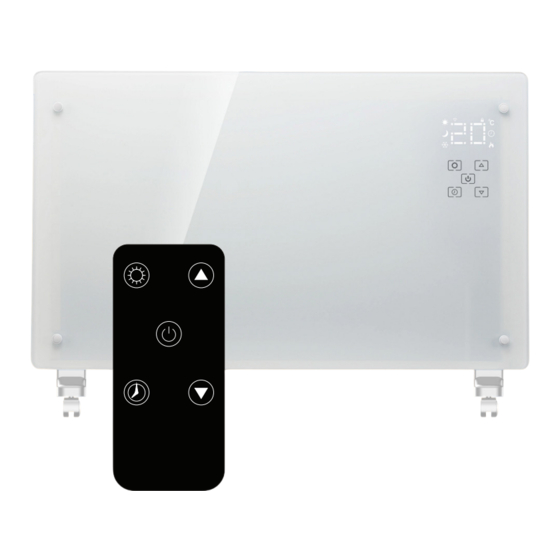
3. USING THE HEATER Digital Display WiFi Icon Lock Icon Comfort Icon Tempreture Icon ECO Icon Timer Icon Anti-Frost Icon Heating Icon Setting Button Up Button On/Off Button On/Off Button Timer Button Down Button 1. After powering on, the product is in standby mode, and the buzzer emits a “beep”... - Page 9 3. Temperature Setting: i. Adjustment: • Use the touch up button or down button to modify the temperature within the range of 5-50°C. • During adjustment, the digital display and the temperature icon will flash to indicate the change. ii. Mode-specific Temperature Ranges: •...
- Page 10 iii. Heating Icon Indicator : • The heating icon will illuminate when the product is actively heating. • The icon will be off when the heater is not producing heat. 5. Timer Setting: i. Entering Timer Mode: to initiate the timer setting. The •...
- Page 11 6. Child Lock Setting: i. Activating/Deactivating: Press and hold the up button for 3 seconds to toggle the child lock function on and off. ii. Indicator & Functionality: When the child lock is activated: • The lock icon will illuminate. •...
-
Page 12: Connecting The Wi-Fi
4. CONNECTING THE WI-FI DOWNLOAD THE SMART LIFE APP To connect your heater to Wi-Fi, the first step is downloading the Smart Life app onto your smartphone or tablet. You can find the app by scanning the QR code below or searching “Smart Life” in the Google Play or Apple app store. - Page 13 Once the icon flashes, go to the app and press “Add a Device”. Select the device type (Small Appliances > Heater) and confirm that the indicator is flashing. You will then be prompted to enter your Wi-Fi password. This allows the app to find your heater using your Wi-Fi.
-
Page 14: Using The Smart Life App
The heater will beep and display a solid icon when the device is connected. The app will confirm that the heater has been added. You can now name the device, share it with family members, or proceed to schedule your heating. USING THE SMART LIFE APP You can use the app to control multiple devices. - Page 15 CONTROLLING THE HEATER Temperature Adjust Temperature Programming ON/OFF Select Model Timer/child lock You can change the heater’s current mode by tapping the mode buttons. You can adjust the mode’s temperature using the + and – buttons when you’re in that mode.
- Page 16 SCHEDULING YOUR HEATING You can program your heating by creating a schedule of “events” where the heater switches on or off. These events can be temporary, like setting a timer, or recurring schedule. Hence, the heater switches on at the same time every week. You can set unlimited events, switching the heater on and off across the week.
- Page 17 On/Off State: Decide whether you’d like the heater to switch on or off during this event. Confirmation: Confirm your settings at each stage of the setup. Save: Press the ‘Save’ button to finalise and store the event in the app. Managing Your Schedule •...
-
Page 18: Smart Features
SMART FEATURES The “Smart” section of the SmartLife app allows you to add functions that make your heating more straightforward and intuitive to control. The Smart section can be reached by pressing the Smart icon at the bottom of the app. •... - Page 19 Automation allows you to set up actions that are triggered by external events. Triggers include the weather, temperature, humidity, sunset, sunrise and your location. You can add multiple actions and multiple triggers for each + automation event, so you could, for example, set all your heaters to come on at 21 °C if you arrive home when it’s snowing! To create new scenarios, press the button while on the Scenario screen.
-
Page 20: Specifications
5. SPECIFICATIONS Type GPH-20EA Voltage AC 220V-240V Frequency 50Hz Power Comfort mode: 2000W (about) ECO mode: 1000W (about) Category Net Weight 7.5kg Gross Weight 8.7kg Size 770x240x510mm (Except the wheel) Packing Size 815x120x530mm The product is for household use only. -
Page 21: Advice On Disposal
WARNING To mitigate the risk of overheating, never cover the heater. The heater must not be positioned immediately below or in front of an electrical socket outlet. Avoid placing the appliance near curtains or other flammable mate- rials. This heater should only be used on a horizontal and stable surface, or affixed to the wall, depending on its design, and intended use. -
Page 22: Warranty
Do not disassemble the appliance to fix it yourself; doing so will invalidate warranties. 8. WARRANTY All Senelux products are covered from the original purchase date by a standard 2-year warranty. To register your warranty, please visit www. senelux.co.uk. If, in the unlikely event that your product has any manufacturing defect, please get in touch with our customer service team at support@senelux.co.uk. - Page 23 Senelux Ltd Unit 5-6 105 Boundary Street Liverpool L5 9YJ United Kingdom Email – info@senelux.co.uk Website – www.senelux.co.uk Be sure to tag us in your photos on social media using #seneluxathome to be featured @Senelux Thank you very much for using our products.
Need help?
Do you have a question about the GPH-20EA and is the answer not in the manual?
Questions and answers