
Summary of Contents for Lemco PRO PLC-200
- Page 1 PRO Line Headend Series PLC-200/201/202/ 300/301/302 Operation Manual www.lemco.gr v1.0...
-
Page 2: Table Of Contents
Operation Manual PRO Line Headend Series Contents 1. IMPORTANT SAFETY PRECAUTIONS INFORMATION 2. INTRO 3. INSTRUCTIONS 4. INSTALLATION 5. TECHNICAL SPECIFICATIONS 6. DIMENSIONS 7. LEMCO LIMITED WARRANTY 8. WARNINGS... -
Page 3: Important Safety Precautions Information
• Refrain from stepping on or placing heavy objects on the unit. Gently handle all buttons, connectors, and switches to avoid Lemco PLC-2xx/3xx series manual v1.0... - Page 4 Proper grounding is essential for the safe and effective opera- tion of your device and the overall DTV headend system. By taking these additional safety precautions into consideration, you can further ensure the safe and proper use of your device. Lemco PLC-2xx/3xx series manual v1.0...
-
Page 5: Intro
(PLC-2xx series) The 2xx series headend from Lemco’s Pro Line series is an advanced and powerful all-in-one device series, designed to meet diverse broadcasting requirements. It consists of the following part numbers: PLC-200 is capable of receiving up to 16x independent satellite (DVB-S/S2), terrestrial (DVB-T/T2), or cable (DVB-C) signals, it converts them into 1xGbit IPTV streaming as well as IP reception (extra license is required). - Page 6 This cutting-edge system enables you to distribute content through both traditional coaxial infrastructure (RF) and modern internet protocol television (IPTV) networks, providing unparalleled flexibility and efficiency in content delivery. 3.2.5 – Dual Power supplies Lemco PLC-2xx/3xx series manual v1.0...
-
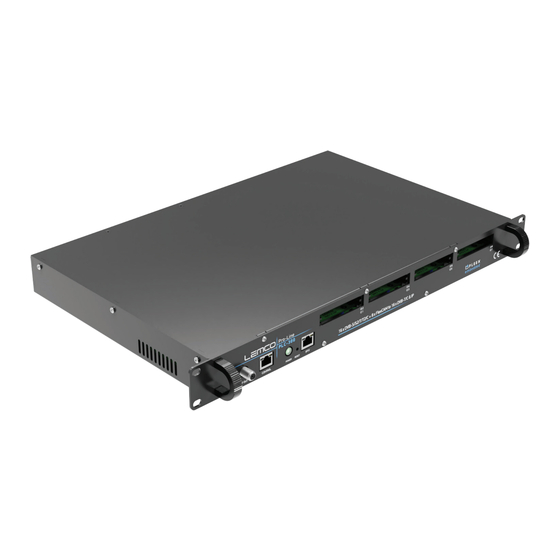
Page 7: Product Views
3. Power ON/OFF button 4. Reset button 5. Status indicator 6. IP IN/OUT port 7. Common Interfaces (CI) 3.3.2 – Back panel view PLC-200/300 1. Dual power supplies 2. DVB-S/S2 RF input 3. DVB-T/T2/C RF input Lemco PLC-2xx/3xx series manual v1.0... - Page 8 1. Dual power supplies 2. DVB-S/S2/S2X RF input 3. SAT RF LOOP-THROUGH PLC-202/302 1. Dual power supplies 2. DVB-S/S2/S2X RF input (No9…No16) 3. SAT RF LOOP-THROUGH (No9…No16) 4. DVB-S/S2 RF input (No1…No8) 5. DVB-T/T2/C RF input (No1…No8) Lemco PLC-2xx/3xx series manual v1.0...
-
Page 9: Installation
2. System date and time: Verify the accuracy of the device’s internal clock for proper scheduling and event handling. 3. Application: Monitor the overall health and functionality of the device’s primary software such multiplexers, modulators condition etc… Lemco PLC-2xx/3xx series manual v1.0... - Page 10 Operation Manual PRO Line Headend Series Lemco PLC-2xx/3xx series manual v1.0...
- Page 11 Running: The application is running properly o Initializing: The application initializes the headend device o Stopped: The application has stopped working • System’s current date and time • System’s up time • CPU and Memory usage by % Lemco PLC-2xx/3xx series manual v1.0...
- Page 12 Operation Manual PRO Line Headend Series Setup 4.2.2 - “RF Input” page In the “RF Input” page, users have the ability to select the working mode for each RF input: Lemco PLC-2xx/3xx series manual v1.0...
- Page 13 4. Frequency – Insert the input cable frequency 5. Symbol rate – Insert the symbol rate 6. Constellation – Insert constellation Once all settings are being written for both tuners, the user must click the “Lock” button to begin the lock process. Lemco PLC-2xx/3xx series manual v1.0...
- Page 14 From the “IP Input” page the user is able to setup all the parameters regarding the IP reception option of the device. Both IP receiver and IP streamer share the same LAN interface which is the “TS OUT” RJ45 port. Lemco PLC-2xx/3xx series manual v1.0...
- Page 15 (2) programs from Input No2 can be combined in one TS multiplexer’s output and then pass through the CAM 1. In this case the CAM 1 will descramble programs coming from both Input No 1 and No2. Lemco PLC-2xx/3xx series manual v1.0...
- Page 16 CI interface between 47.6MHz or 76.9MHz. Speed grade selects the clock working speed of the CAM. 4.2.5 - “Program Selection” page At the “Program Selection” page the user is able manage all the available TV programs of the device as follow: Lemco PLC-2xx/3xx series manual v1.0...
- Page 17 • Port – Set the port of the current TV/Radio program for IPTV streaming • Protocol – Select between UDP/RTP IPTV streaming protocol for the current TV/Radio * Most of the fields provide Sorting options by using the UP/DOWN arrows Lemco PLC-2xx/3xx series manual v1.0...
- Page 18 IP address choose the “Increment by one” option. 5. From the “Start from row” and “Rows to change” fields define from which specific rows the automatic procedure will begin and it will end. 6. And click the “Apply” button. Lemco PLC-2xx/3xx series manual v1.0...
- Page 19 We will have a total output bitrate of 31.67Mbps/ RF OUT. That means that we can select as many programs as the user wants but their total bitrate must not exceed the 31.67Mbps, otherwise artifacts may occur. Lemco PLC-2xx/3xx series manual v1.0...
- Page 20 (according to the selected programs) comparing it to the max. output payload. It is recommended that the user must not exceed the 85% from each output, since all the bitrates are variable according to their specific content. Lemco PLC-2xx/3xx series manual v1.0...
- Page 21 • Red – Overflow occurred. The user must decrease the input bitrate 4.2.6 - “Output” page On the “RF Output” page, the user can configure the RF output settings for the device as shown below: Lemco PLC-2xx/3xx series manual v1.0...
- Page 22 RF output level of all outputs of the headend at the same time. Modulator Settings All the RF output channels from the device are working in adjacent frequencies based on the DVB standard as follows: Lemco PLC-2xx/3xx series manual v1.0...
- Page 23 E.g. If the user sets the CH21 in UHF band on modulator No1 the other three modulators will be automatically set to CH22, CH23 and CH24, respectively. Lemco PLC-2xx/3xx series manual v1.0...
- Page 24 Network Name: Which is the network name of the specific multiplex NIT: Choose from Default, Global and Custom NIT version: From 1 to 31 SDT: Select Default or Custom LCN provider: Choose the appropriate LCN provider (EACEM, ITC, Nordig, APN) Lemco PLC-2xx/3xx series manual v1.0...
- Page 25 In this section the user is able to create custom NIT table for each of the sixteen outputs of the device as shown below: For more information on how to create a custom NIT/SDT table please refer to “Lemco custom NIT/SDT guideline.pdf” docu- ment in Lemco’s website.
- Page 26 Operation Manual PRO Line Headend Series For more information on how to create a custom NIT/SDT table please refer to “Lemco custom NIT/SDT guideline.pdf” docu- ment in Lemco’s website. Settings 4.2.10 - “Event log” page In “Event log” page the system logs all the last one thousand (1000) events occurs in the device during its operation. These logs are divided in three different categories based on their priority as follow: •...
- Page 27 • Primary DNS: Set the IP address of the primary DNS • Secondary DNS: Set the IP address of the secondary DNS • Port: Assign the control port • MAC address: Depicts the MAC address of the LAN control Lemco PLC-2xx/3xx series manual v1.0...
- Page 28 On “User profile” section the user is able to do the following: • From the “Select Language” field to select the language of the interface • From the “Appearance” field to select the Light of dark mode theme. The device supports several user profiles as follow: Lemco PLC-2xx/3xx series manual v1.0...
- Page 29 • Cold – The device will power OFF and after 10 seconds will power ON automatically. Factory Defaults By clicking on the “Load factory defaults” button the device will restore to factory defaults supporting the following options: Lemco PLC-2xx/3xx series manual v1.0...
- Page 30 At the same time, device offers offline firmware update by uploading a firmware update .bin file manually. 4.2.15 - “Date & Time” page On “Date & Time” section the user is able to select the time zone for the device by using the “Timezone” drop down menu: Lemco PLC-2xx/3xx series manual v1.0...
- Page 31 • To use the SNMP client feature of the device a SNMP manager software is required • To export the .MIB file of the device the user must click the Download button from MIB file section. 4.2.17- “Info” page The “Info” page provides several information of the device as follow: Lemco PLC-2xx/3xx series manual v1.0...
- Page 32 To enable the Fleex Embedded on the specific device the user has to enter the license in the following field and click the “Apply” button: *More information regarding Fleex Embedded can be found here: www.fleex.gr Lemco PLC-2xx/3xx series manual v1.0...
- Page 33 To enable the IP receiver option on the specific device the user has to enter the license in the following field and click the “Ap- ply” button: *To obtain any of the above license please contact us at: info@lemco.gr Lemco...
-
Page 34: Technical Specifications
Operation Manual PRO Line Headend Series TECHNICAL SPECIFICATIONS Lemco PLC-2xx/3xx series manual v1.0... - Page 35 Operation Manual PRO Line Headend Series Lemco PLC-2xx/3xx series manual v1.0...
- Page 36 Operation Manual PRO Line Headend Series Lemco PLC-2xx/3xx series manual v1.0...
- Page 37 Operation Manual PRO Line Headend Series Lemco PLC-2xx/3xx series manual v1.0...
- Page 38 Operation Manual PRO Line Headend Series Lemco PLC-2xx/3xx series manual v1.0...
- Page 39 Operation Manual PRO Line Headend Series Lemco PLC-2xx/3xx series manual v1.0...
- Page 40 Operation Manual PRO Line Headend Series Lemco PLC-2xx/3xx series manual v1.0...
-
Page 41: Dimensions
Operation Manual PRO Line Headend Series DIMENSIONS 434,00 Lemco PLC-2xx/3xx series manual v1.0... -
Page 42: Lemco Limited Warranty
Operation Manual PRO Line Headend Series LEMCO LIMITED WARRANTY This device is subject to Lemco Warranty Terms & Conditions that can be downloaded from Lemco’s website www.lemco.gr WARNINGS Content warning This document contains preliminary information about a product of Lemco company. Lemco reserves the right to make any changes or modifications at any time without prior notice. - Page 43 Operation Manual PRO Line Headend Series NOTES Lemco PLC-2xx/3xx series manual v1.0...
- Page 44 Latheas 46, 13678, Acharnes, Athens, Greece www.lemco.gr Tel: +30 210 2811401 FAX: +30 210 2825755 E-mail: info@lemco.gr...
Need help?
Do you have a question about the PRO PLC-200 and is the answer not in the manual?
Questions and answers