Advertisement
Quick Links
GUIDA PER IL CLIENTE FINALE
END USER GUIDE
ENDE BENUTZERHANDBUCH
UTILISATEUR FINAL
GUÍA DEL USUARIO FINAL
ARIA CONTROL
SMART CRYSTAL
SMART CRYSTAL SERIES:
SMCRYBL5 – SMCRYWH5
Telecomando a infrarossi
e predisposizione alla WiFi
Infrared handset remote
control with WiFi
predisposition
In frarot-Fernbedienung
mit WiFi-Vorbereitung
Télécommande infrarouge
avec prédisposition WiFi
Mando a distancia
por infrarrojos con
predisposición WiFi
1
Advertisement

Summary of Contents for Accorroni SMART CRYSTAL SMCRYBL5
- Page 1 GUIDA PER IL CLIENTE FINALE END USER GUIDE ENDE BENUTZERHANDBUCH UTILISATEUR FINAL GUÍA DEL USUARIO FINAL ARIA CONTROL SMART CRYSTAL SMART CRYSTAL SERIES: SMCRYBL5 – SMCRYWH5 Telecomando a infrarossi e predisposizione alla WiFi Infrared handset remote control with WiFi predisposition In frarot-Fernbedienung mit WiFi-Vorbereitung Télécommande infrarouge...
-
Page 2: Indice - Index
INDEX INDEX INDICE – – INHALTSVERZEICHNIS – - INDICE 1. Premessa – Introduction – Einführung – Introduction –Introducción. SMART CRYSTAL Wall or on board mounting Termostati a parete o a bordo macchina serie SMART CRYSTAL – thermostat SMART CRYSTAL série de thermostats series –... - Page 3 Nota importante: il termostato permette di controllare l’unità in tre diversi modi Tramite TouchScreen essendo davanti allo stesso termostato Tramite APP gratuita e la WiFI presente nel edifico (vedere manuale relativo ai controlli) Tramite il ModBus (vedere manuale relativo ai controlli) Una volta eseguite tutte le connessioni elettriche come indicato nelle pagine successive e nel caso le unità...
- Page 4 SMART CRYSTAL Wall 2. Termostati a parete o a bordo macchina serie SMART CRYSTAL – or on board mounting thermostat series – SMART CRYSTAL Wand-oder Bordthermostat- SMART CRYSTAL série de thermostats muraux ou intégré Serie – – SMART CRYSTAL Serie de termostato de montaje en pared o a bordo Compatible with 5G Compatible avec la 5G...
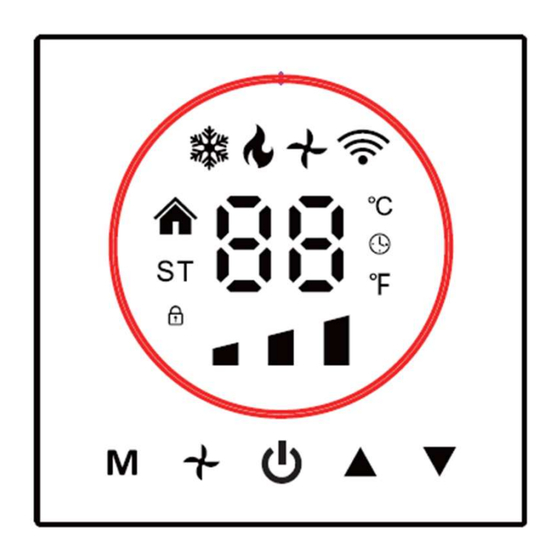
- Page 5 Special function and settings - Fonction Funzioni e settaggi speciali - - Sonderfunktion und Einstellungen spéciale et paramèt res - Funciones especiales y ajustes. tenere premuto il tasto , fino a che l’ora indicata lampeggerà. Premere nuovamente per impostare minuti, Per cambiare l’ora indicata, ore e giorni usando le frecce.
- Page 6 Per altre funzioni speciali, far riferimento alla documentazione fornita con lo stesso termostato. For other special functions, refer to the documentation supplied with the same thermostat. Weitere Sonderfunktionen finden Sie in der Dokumentation zum selben Thermostat. Pour d'autres fonctions spéciales, reportez-vous à la documentation fournie avec le même thermostat. Para otras funciones especiales, consulte la documentación suministrada con el mismo termostato.
- Page 7 WiFi predisposition Prédisposition WiFi Predisposizione WiFi – - WiFi-Veranlagung - - Predisposición WiFi Per la connessione alla Wifi, il termostato deve essere spento da almeno 5 secondi, prima di procedere con le operazioni sotto indicate To connect to Wifi, the thermostat must be turned off for at least 5 seconds, before proceeding with the operations indicated below Um eine WLAN-Verbindung herzustellen, muss der Thermostat mindestens 5 Sekunden lang ausgeschaltet sein, bevor mit den unten aufgeführten Vorgängen fortgefahren werden kann...
- Page 8 Insbesondere ist eine Anmeldung unter Angabe Ihrer E-Mail-Adresse erforderlich. Während der Installationsvorgänge muss das SmartPhone mit dem heimischen WLAN verbunden und BlueTooth aktiviert sein. Halten Sie einen Abstand von nicht mehr als einem Meter zum Thermostat ein, wenn dieser mit Strom versorgt und ausgeschaltet ist. Sie müssen den Thermostat zunächst mit dem WLAN verbinden, indem Sie die „Pfeil-nach-unten“-Taste (Bild 1 unten) 5 Sekunden lang gedrückt halten, bis Das WLAN-Symbol beginnt auf dem Display zu blinken (Bild 2).
- Page 9 Installazione - Installation - Installation - Installation – Instalación Il termostato va posizionato al muro usando una scatola elettrica rotonda 65x38mm (non fornita dall’azienda). Possibile soluzioni sono: scatola tonda da incasso quali GW240209 della Gewiss, FAFG10235 della Sovaterm o similari Scatola quadrata: Bticino 502E Thermostat must be positioned on the wall using 65x38mm round box (not supplied by the factory) Possible solutions are: GW240209 produced by Gewiss, FAFG10235 produced by Sovaterm o similar.
- Page 10 Per le connessioni elettriche, usare cavi di 1mmq per i cavi di segnale e cavi di sezione 2mmq per l’alimentazione dell’unità e per le parti di potenza. For the electric connection, use 1mmq wires for the signal cables and 2mmq for powering suppling the unit. Verwenden Sie für den elektrischen Anschluss 1-mmq-Drähte für die Signalkabel und 2-mmq-Drähte für die Stromversorgung des Geräts.
- Page 11 Connessioni BMS (Building management system), Sistema con protocollo ModBus BMS (Building management system), Modbus Protocol system BMS (Building management system), Modbus-Protokollsystem BMS (Building management system), système de protocole Modbus BMS (Building management system), sistema de protocolo Modbus Per le connessioni ModBus, i fili da prendere in considerazione sono i due che escono dalla parte posteriore del termostato, quello rosso (A, + ) e quello bianco (B, -).
- Page 12 Consigli per l’uso dell’applicazione ModScan. Avviare il programma come “Amministratore”, selezionare la corretta porta del PC e verificare che questa sia stata attivata. Sotto un esempio della schermata e di alcune impostazioni. Useful notes for using the ModScan application. Start the program as "Administrator", select the correct PC port and check that this has been activated.
- Page 14 Protocollo interfaccia termostato V1.0 Questa documentazione prende come riferimento lo standard Modbus, principalmente da utilizzare per la comunicazione tra termostato e computer (PC). Questa documentazione non ha lo scopo di descrivere il funzionamento di un sistema completo in Modbus. Per informazioni su Modbus fare riferimento ai relativi documenti esistenti.
- Page 15 Come leggere il formato delle informazioni dal termostato How to read the thermostat frame format So lesen Sie das Thermostatrahmenformat Comment lire le format du cadre du thermostat Cómo leer el formato del marco del termostato Byte Byte Byte Byte Byte Byte Byte...
- Page 16 Come dare un comando al termostato How to set the thermostat frame format So stellen Sie das Thermostatrahmenformat ein Comment définir le format du cadre du thermostat Cómo configurar el formato del marco del termostato Byte Byte Byte Byte Byte Byte Byte Byte...
- Page 17 Remark Remarque Osservazione – - Anmerkung - - Observación Data Format Format des données 1. Formato di dati. - - Datei Format - - Formato de datos Quando il termostato invia i dati di temperatura raccolti al computer PC, il valore della temperatura raccolta è stato moltiplicato per 10.
- Page 18 Infrared remote handset 3.Telecomando a infrarossi – control - Infrarot-Fernbedienung - Auto Télécommande infrarouge - Control remoto por infrarrojos Condizionamento / Cooling / Refroidissement / Kühlung Enfriamiento Deumidificazione / Trocken Sèche / Seca / Ventilazione / seul nur Lüfter / ventilateur / solo fan Heating...
- Page 19 Funzione Celsius/Fahrenheit “℃/℉”: Premere il bottone “℃/℉” per passare da “Celsuis” a “Fahrenheit”. Timer ON/OFF: Dopo aver premuto i pulsanti "TIMER ON" o "TIMER OFF", viene visualizzato l'indicatore del timer e l'aria condizionata è in modalità timer. Blocco per I bambini: Lock: Premere i bottoni “...
- Page 20 Celsius/Fahrenheit-Funktion „℃/℉“ : Drücken Sie die Taste „℃/℉“, um zwischen „Celsuis“ und „Fahrenheit“ umzuschalten. Timer EIN/AUS: Nach dem Drücken der Tasten „TIMER ON“ oder „TIMER OFF“ wird die Timer-Anzeige angezeigt und die Klimaanlage befindet sich nun im Timer-Zustand. Sperren: Drücken Sie gleichzeitig die Tasten „ “...
- Page 21 L'horloge: Appuyez et maintenez enfoncés les boutons " " et "MODE" en même temps et la télécommande entrera en mode horloge, les chiffres des heures correspondants commençant à clignoter. Appuyez sur le bouton « TEMP » (TEMP ) pour augmenter (diminuer) 1 heure à chaque pression. Maintenez pendant 2 secondes pour augmenter ou diminuer en continu.
- Page 22 Istruzioni per la connessione alla WiFi e utilizzo del APP TUYA gratuita. Instructions for WiFi connection and free TUYA APP using. Anleitung zur WiFi-Verbindung und zur kostenlosen TUYA-App . Instructions pour la connexion WiFi et l'application TUYA gratuite à l'aide . Instrucciones para la conexión WiFi y uso de la APP TUYA gratuita .
- Page 23 Led receiver indications Led indications du Indicazioni led ricevitore – - LED-Empfängeranzeigen - récepteur - Indicaciones del receptor led. E3 Alarm Fan motor failure Panne du moteur du Allarme E3 – – E3 Alarm Motore bruciato – - Ausfall des Lüftermotors - ventilateur Alarme E3 - Falla del motor del ventilador...
- Page 24 E’ possibile usare una sonda NTC come accessorio da posizionare nel pacco allettato della batteria, in corrispondenza dell’ingresso della stessa batteria con funzione di termostato di minima e di massima. In questo modo, in riscaldamento il ventilatore partirà solo se la temperatura dell’acqua salirà sopra i 35°C e si fermerà quando la temperatura dell’acqua scenderà...
- Page 25 GENERAL WIRING DIAGRAMS. SCHEMI ELETTRICI FUNZIONALI. ALLGEMEINE SCHALTPLÄNE. SCHÉMAS GÉNÉRAUX DE CÂBLAGE. DIAGRAMAS DE CONEXIONES GENERALES. CLOSE HEA T VALVE OPEN CLOSE COOL VALVE OPEN HIGH A C220V-N A C220V-L HEATER FILTER PUMP HEA TING C OOLING 230V-50 Hz STEP1 COM1 ROOM W ATER...
- Page 26 PUMP HEATER FILTER HEATING COOLING 230V-50 Hz STEP1 COM1 ROOM WATER...
- Page 27 CLOSE HEAT VALVE OPEN CLOSE COOL VALVE OPEN HIGH AC220V-N AC220V-L HEATER FILTER PUMP HEATING COOLING 230V-50 Hz STEP1 COM1 ROOM WATER...
- Page 29 CLOSE H EAT VA LVE OPEN CLOSE C OO L VA LV E OPEN HIGH AC220V-N AC220V-L HEATER FILTER PUMP H EA TING C OOLING 230V-50 Hz STEP1 COM1 ROOM W ATER...
- Page 30 HEATER FILTER PUMP HEATING COOLING 230V-50 Hz STEP1 COM1 ROOM WATER...
- Page 31 CLOSE HEAT VALVE OPEN CLOSE COOL VALVE OPEN HIGH AC220V-N AC220V-L HEATER FILTER PUMP HEATING COOLING 230V-50 Hz STEP1 COM1 ROOM WATER...
- Page 33 CL OSE O PEN CL OSE O PEN L OW M ED HIGH A C220V-N A C220V-L H EATER FIL TER P UMP HEA TING COO LING 230V-50 Hz STEP1 C OM1 ROOM W ATER...
- Page 34 CL O SE O PEN CL O SE O PEN L OW M ED HIGH A C220V-N A C220V-L H EATER FILTER P UMP H EA TING C OO LING 2 30V- 50 Hz STEP1 C OM1 ROOM WAT ER...
- Page 36 A2B Accorroni E.G. s.r.l. Via d’Ancona, 37 - 60027 Osimo (An) - Tel. 071.723991 web site: www.accorroni.it - e-mail: a2b@accorroni.it...
Need help?
Do you have a question about the SMART CRYSTAL SMCRYBL5 and is the answer not in the manual?
Questions and answers