Advertisement
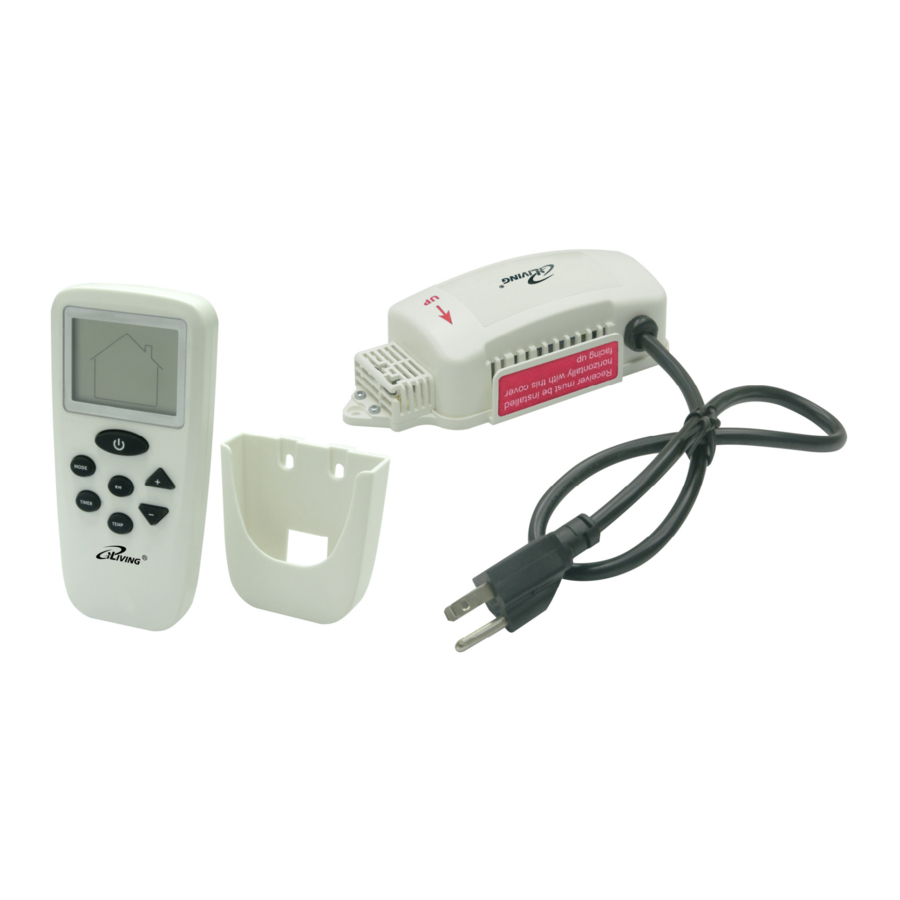
What's in the Box
This Remote Control Kit contains the following:
- Control Box with Power Cord
- Power Cord (6 ft) for Hardwiring to the Fan
- Remote Control
- Remote Control Holder
- Screws
- Plastic Anchors
- Wire Connectors
Installation
- Turn power off at circuit breaker panel or fuse box.
- Connect the power cord of control kit to a 120V/60Hz wall socket.
![]()
- Then mount the control kit to the wall by two screws HORIZONTALLY.
![]()
make sure the control kit is mounted horizontally with rain shield wall on top to protect against rain. It may become hazardous to the consumer if water gets into the control kit. Mounting the control kit horizontally allows the control kit to vent property. - Hardwire a power cord to the fan (included in the kit). Plug the power cord of fan into the socket of control kit to get power.


- When any solid state speed controller is used, a humming noise will be present in the fan on low speed. This hum in no way affects the operation of the fan and is acceptable in most commercial/industrial installations.
Remote Control Descriptions
Name and Function

- LCD display
- Power button
- Mode button
- Timer Button
- + Button
- - Button
- RH Button
- Temp Button
Remote Control LCD Display Icons and indication

- Fan mark for fan is running
- Timer marks and setting
- Attic and Room
- RH (Relative Humidity) marks and setting
- Auto and Manual
- Fan speed setting bars
- Room Temperature
- Set Temperature
Operation Instruction
Turn ON the fan:
Power button
Press Power button on the remote control to turn the Fan ON and OFF. The display will show the set temperature and Attic Temperature and mode. The default mode is Auto and temperature is 80ºF. If the remote only displays the SET temperature, which means the remote is on sleep mode (to extend battery life). To wake up the remote, press the Power button once.
Operation Modes
Press MODE button to set the fan to Auto mode or Manual mode to set High, Medium and Low speed. The modes toggle from Auto to Manual High, Manual Medium and Manual Low and back to Auto.
Auto Mode
Automatically controls the fan speed using the temperature only or both temperature and humidity setting. The control algorithm is as follows:
- When Attic temperature is greater than the set temperature, the fan will turn on.
- If the Attic temperature is 4 degree higher than set temperature, the fan will run on HIGH.
- When the Attic temperature is equal to or lower than the set temperature, fan will be off.
- When RH is enabled, the controller will regulate the environment until both the set temperature and humidity are equal or below the set values.
Manual Mode
Fan speed can set to High, Medium, and Low by pressing the MODE button.
Fan will continue to run at the set speed and it will disregard the set temperature and humidity setting. Fan can be turned off by pressing the POWER button.
Set Timer
Timer feature is enabled only when you press the TIMER button. Press TIMER button to turn the timer ON. The default timer is 3 hours. You can adjust the timer from 0 to 24 hour by pressing the + and - button. When the timer feature is enabled, the fan will run as Manual run at the previously set Mode until the timer expires.
Timer will execute after the timer stops flashing and turn the Fan Off when timer reach the timer settings. Press and hold TIMER button for 3 seconds can turn the timer Off directly.
Set RH (Relative humidity):
Press RH button to turn on humidity control. The display will show the default RH value - it is 70%. After turning on humidity control, RH displays and set value will flash for 5 seconds. While RH is flashing, press + button to increase and — button to decrease RH set point.
RH is part of the Auto Mode, it will begin Auto control after the RH stop flashing. Press and hold RH button for 3 seconds turns the humidity control Off. RH display will dim.
+1- button
The +/- button is used to set control temperature, humidity, and timer. Anytime you press + or - button, it will adjust the set temperature and go directly into auto mode. When setting Timer or RH mode, +/- button will be used to adjust the set value.
Temp Button
This remote is capable of reading two location temperatures. One is the control box location, which is the Attic. The other is the Room temperature, where the remote is located at.
If the remote only displays the set temperature, press the POWER button to wake up the remote. Press TEMP button to switch the reading from the two locations. ATTIC means the temperature at the location where the control box is mounted (make sure control kit is plugged into a power source). ROOM means the room temperature at the location of the remote control. Pressing and holding the TEMP button to switch from Celsius to Fahrenheit.
How to Pair the remote and the control box
 If the Remote and Control box is properly connected and you are unable to control the fan or Remote appears not working, please follow the instruction below to pair the Remote and the Control box or contact our service center at 1-800-317-1688.
Scan QR code for YouTube video instruction.

OR
Search YouTube for: "iLiving - How to pair Remote Control"
During the pairing process, it is necessary to confirm that only one control box is powered!
The pairing steps are as follows:
- Press and hold the Power button and load two AAA batteries.
- Release the Power button and wait for the LCD to appear full (about 5 ~ 20 sec).
- Press and hold the Power button to make the full screen reset (about 2 ~ 3 sec).
- Pairing process has been completed.
Warranty Information
This product comes with a ONE-YEAR LIMITED COMPONENT WARRANTY.
If your unit does not appear to be working properly, please contact our service center by calling 1-800-317-1688.
Prior to your call, we encourage you to visit our service related website www.ilivingusa.com for troubleshooting tips and service instructions if needed.
Register your product at our website:

Register
Or visit iLivingUSA.com/register-product
Feedback
Love it? Help us make the product more for you.

Rate us
Let us know with a customer review.
Please visit: https://www.amazon.com/review/review-your-purchases#
IMPORTANT INSTRUCTIONS
- Disconnect power supply before connections are made to prevent possible electric shock and/or damage to equipment.
- Read and follow instructions carefully. Failure to comply with instructions could result in fire, electric shock, injury to persons, and/or damage to equipment.
- To reduce the risk of overheating and possible damage to other equipment, this speed controller is only intended for use with the iLiving Variable Speed Shutter Exhaust Fans (ILG8SF7V, ILG8SFIOV, ILG8SF12V, ILG8SF16V, ILG8SF18V, ILG8SF20V, and ILG8SF24V). Do not install this remote control kit on any other fan or appliance.
- All wiring should conform to the United States National Electrical Code and all applicable local/state regulations.
- Do not mount the control kit in an area which will likely expose the control kit to moisture.
- Make certain the entire installation is grounded as a precaution against possible electrical shock.
- Do not exceed maximum amperage rating of the control kit as overloading can result in damage to the shutter exhaust fan and control kit.
- When wiring an electrical appliance or device follow all electrical and safety codes, as well as the most recent United States National Electrical Code (NEC) and the Occupational Safety and Health Act (OSHA).
- Install control kit in a well-ventilated area.

TO REDUCE THE RISK OF FIRE OR ELECTRIC SHOCK, DO NOT USE THIS CONTROL KIT IN AN INSULATED WALL
Tel: 1-800-317-1688
Email: service@ilivingusa.com
Documents / Resources
References

Download manual
Here you can download full pdf version of manual, it may contain additional safety instructions, warranty information, FCC rules, etc.
Advertisement

Need help?
Do you have a question about the ILG8SFRC and is the answer not in the manual?
Questions and answers