Zojirushi Gourmet Sizzler EA-DCC10 Manual
- Operating instructions manual (12 pages) ,
- Operating instructions manual (11 pages)
Advertisement
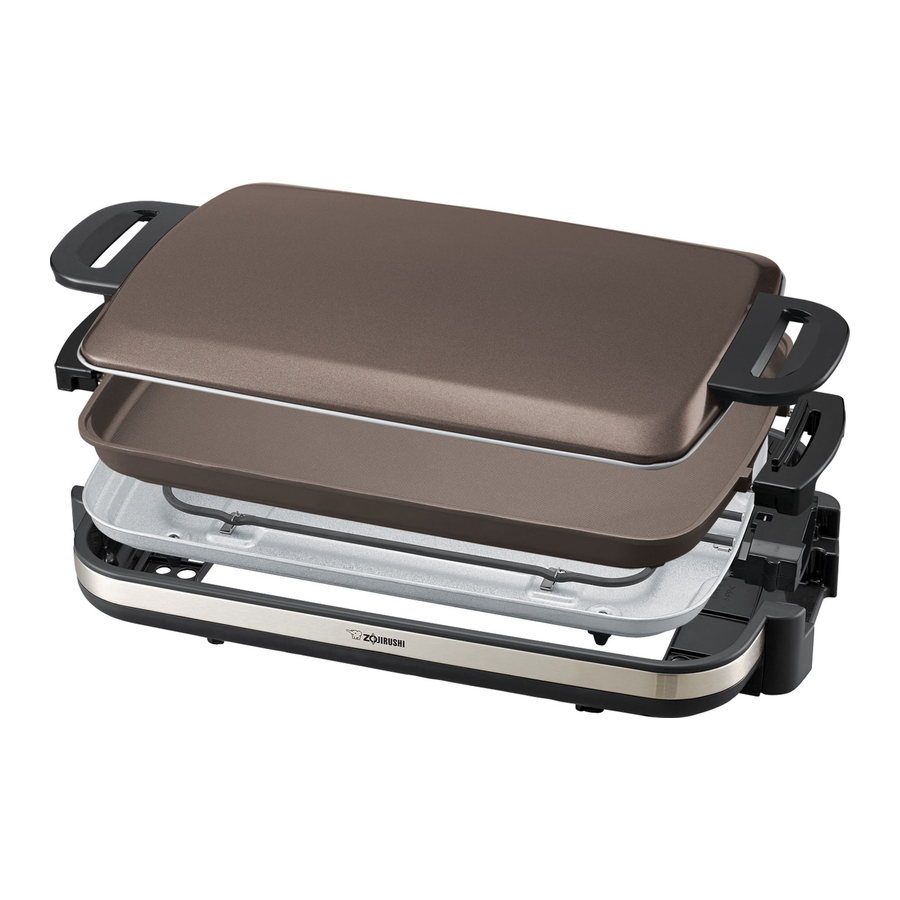
PARTS NAMES
- Do not bang or drop the Plate or handle roughly.

HOW TO USE
Preparation

- Place the Heater Set in the Main Body Guard.
- Set up the Plate.
![]()
Set up in the right order; otherwise it may cause burns, injury or malfunction.
![]()
-
![]()
Do not use the product without the Main Body Guard. Doing so may cause burns, injury or malfunction.

Insert the Temperature Control Plug
- Firmly insert the Temperature Control Plug to the Heater Set.
- Plug in the Power Plug to an electrical outlet.
- Make sure OFF aligns with the Operation Light.
- Do not use other Temperature Control Plugs than the one provided. Do not use the Temperature Control Plug for other products.
- Insert the Temperature Control Plug completely until the white crescent marks on both Release Buttons are completely visible. The Plate may not heat up properly if the Temperature Control Plug is not inserted completely. Incorrectly inserting the Temperature Control Plug may also cause accidents or malfunctions due to abnormal heat generation.
![]()
- To remove the Temperature Control Plug, pinch both Release Buttons and pull the Plug away.

SAFETY MECHANISM
This product is equipped with the following safety features:
- The Temperature Control Plug cannot be inserted if the Plate is not properly set up.
- The Plate cannot be removed from the Heater Set while the Temperature Control Plug is inserted.
Never force the Temperature Control Plug in or remove the Plate forcefully as doing so may cause malfunction.
- This product is for grilling and steaming foods. Do not use for other than intended purposes.
- Wipe the Plate and Lid clean before use.
Preheat and Cook
- Begin preheating by aligning the appropriate preheat temperature with the Operation Light. The Operation Light turns on and the Plate will begin to heat up.
- Do not cover the Lid while preheating.
- Do not preheat at a temperature higher than the Preheat Temperature.
Approximate time for preheating... 8 min.
- When preheating completes in about 8 minutes, turn the Temperature Control Dial to the desired cooking temperature and begin cooking.
![]()

| ESTIMATED COOKING TEMPERATUREia | ||
| Dial | Menu | |
| Preheat Temp. | Cook Temp. | |
| 400 | 425 | Yakiniku, steak and fried noodles etc. |
| 400 | Okonomiyaki and gyoza etc. | |
| 350 | 350 | Burgers and pancakes etc. |
| 300 | 300 | Crepe and thin-fried eggs etc. |
| — | KEEP WARM | Keep Warm |
- The temperature is the estimated surface temperature of the Plate without the Lid.
- Cooking results may vary depending on size, room temperature and voltage. Use the chart as a guideline to achieve your preferred result.
- Use hot water to steam gyoza.
- To keep food warm, set the dial to Keep Warm.
- The product may make a creaking sound, but this is normal and does not indicate a malfunction.
- The Operation Light will turn on and off during cooking. This indicates that the temperature is being controlled and is not a malfunction.
- There may be some smoke or odor the first time the product is used, which is normal.
TIPS FOR USING THE LID
The surface temperature of the Plate increases by 86 to 104°F (30 to 40°C) when the Lid is used.
Using the Lid will help speed up the cooking process.
WHEN REMOVING THE LID
![]()
The Lid Handles will become hot while cooking. Take precautions to prevent burns.![]()
Beware of steam or oil splattering from the gap between the Plate and the Lid to prevent burns.
NOTE
- Do not cover the Lid while preheating.
![]()
Place the Lid on the Lid Holder of the Plate properly. If the Lid sits on the Main Body Guard, it may cause malfunction, deformation or burns.
After Use
- Turn the Temperature Control Dial to OFF (align with the Operation Light), then unplug the Power Plug from the electrical outlet.
![]()
- Wipe off burnt on foods with a soft paper or cloth while the Plate is warm.
- Allow the Plate to cool (at least 30 minutes after use), then remove the Temperature Control Plug from the Heater Set and clean.

![]()
The Lid, Plate, Heater Set (Heater, Heater Shield Plate, Receptacle) and the Temperature Control Plug's Probe will be hot for a while after use. Please take caution to prevent burns.- Do not attempt to remove the Plate while the Temperature Control Plug is still inserted. Doing so may cause malfunction or damage.
- Do not hold the Heater Set by the Receptacle. Doing so may cause malfunction or damage.
RECIPES
NOTE
The measurements used in these Recipes:
1 Cup= 8 oz. (240 ml)
1 Tbsp.= 0.5 oz. (15 ml)
1 tsp.= 0.2 oz. (5 ml)
- Take extra care while cooking as oil may splatter.
Pork Chop
Ingredients (4 servings)
4 boneless pork chops,
1/2 inch thick
1/2 tsp. salt for seasoning meat
1/2 tsp. freshly ground black pepper for seasoning meat
1-1/2 Tbsp. olive oil
2 shallots, thinly sliced
4 oz. (113 g) Baby Bella mushrooms, stemmed, thinly sliced
1/3 cup Italian parsley, chopped
1/2 cup white wine
1-1/2 cups heavy cream
A pinch of freshly ground black pepper for sauce
2 Tbsp. capers, drained, chopped
*Serving Suggestion
| Preheat Temperature | 400 |
| Cook Temperature | 425 • 400 · 300 |
How to cook
- Pat the pork chops dry with paper towels to remove any moisture. Season pork chops on both sides with salt and black pepper for seasoning meat.
- Turn the Temperature Control Dial to 400. When preheating completes in about 8 minutes, turn the Temperature Control Dial to 425. Heat 1 Tbsp. olive oil and sear pork chops until brown on both sides - about 5 minutes for each side. Transfer seared pork chops onto a warmed plate and keep warm.
- Turn the Temperature Control Dial to 400. Add remaining oil, sliced shallots and mushroom on the Plate and saute until mushrooms are browned - about 2 minutes. Add chopped parsley and white wine and cook until the liquid is mostly evaporated - about 1 minute.
- Turn the Temperature Control Dial to 300. Add heavy cream and mix well.
- Add cooked pork chops from step
![]() back onto the Plate and let them submerge in the sauce. Cover with the Lid and cook until the pork chops are done - about 4-5 minutes.
back onto the Plate and let them submerge in the sauce. Cover with the Lid and cook until the pork chops are done - about 4-5 minutes. - When pork chops are done, season with black pepper for sauce, add chopped capers and stir to combine.
- Place pork chops onto warm plates and spoon over sauce.
 back onto the Plate and let them submerge in the sauce. Cover with the Lid and cook until the pork chops are done - about 4-5 minutes.
 Blueberry Whole Wheat Pancakes
Ingredients (12 pancakes)
- 1 cup (120 g) whole wheat pastry flour
1 cup (130 g) all purpose flour
3 Tbsp. sugar
1/2 tsp. salt
1 tsp. baking powder
1/2 tsp. baking soda - 1-1/4 cups milk
2 large eggs, lightly beaten
1 Tbsp. unsalt butter, melted
2 tsp. vegetable oil
4 oz. (113 g) blueberries, fresh or frozen
Topping:
Maple syrup, to taste
Butter, to taste
Fresh blueberries, to taste
How to cook
- ln a large bowl, combine ingredients from
![]() using a whisk.
using a whisk. - Add
![]() , whisk gently until just combined (do not over-mix).
, whisk gently until just combined (do not over-mix). - Turn the Temperature Control Dial to 350. Preheat the plate, about 8 minutes.
- When preheating completes, turn the Temperature Control Dial to 300. Brush the Plate with 1/2 tsp. vegetable oil. Pour about 1/4 cup batter from step
![]() per pancake onto the Plate. (Make 3 pancakes at once.)
per pancake onto the Plate. (Make 3 pancakes at once.) - Top each pancake with about 1 Tbsp. of blueberries.
- Cook until the edges are set and bubbles form on the surface - about 2 minutes. Flip the pancakes and cook for 3-4 minutes, or until cooked through.
- Dish the pancakes onto plates and serve with your favorite toppings.
- When making the 9 remaining pancakes consecutively, follow steps
![]() after preheating for 5 minutes at 350.
after preheating for 5 minutes at 350.
 using a whisk.
 , whisk gently until just combined (do not over-mix).
 after preheating for 5 minutes at 350.
| Preheat Temperature | 350 |
| Cook Temperature | 300 |
CLEANING AND MAINTENANCE
Be sure to clean thoroughly after every use. Leaving burnt foods on the Plate may cause scorching, and will become difficult to remove.
Clean the product after it has cooled down completely except for the Plate.
| Heat Shield Plate (Heater Set) |
| 
|
| Main Body Guard Lid Stainless Steel Spatula |
| |
| Temperature Control Plug Heater • Receptacle (Heater Set) | Wipe down with a soft dry cloth. | |
| Plate |
|

REPLACEMENT PARTS
- Replacement parts may be available for an additional charge. Please replace damaged parts only with new parts.
- When replacing parts, please record the model number and part name beforehand. Then contact either the store where you purchased the product or Zojirushi Customer Service.
Zojirushi Customer Service
1-800-733-6270
www.zojirushi.com
| Parts Names | Parts Number |
| Plate | BG 197810GC-00 |
| Stainless Steel Spatula | 717011-00 |
| Temperature Control Plug | BX145801 A-00 |
TROUBLESHOOTING GUIDE
Please check the following points before calling for service.
| Problems | Cause | Remedy |
Temperature Control Plug will not plug in |
| Please set them correctly. |
The Plate does not heat up |
| Insert the Power Plug securely. |
| Insert the Temperature Control Plug completely until the white marks on the Release Buttons (located at 2 positions) are fully visible. (See "Insert the Temperature Control Plug") | |
The food does not cook well |
| Start cooking after preheating completes. (See "Preheat and Cook") |
Food is scorched |
| Perform Cleaning and Maintenance. (See "Cleaning and Maintenance") |
Plate cannot be removed |
| Remove the Temperature Control Plug. |
SPECIFICATIONS
| Model No. | EA-DCC10 | |
| Rating | AC 120 V 60 Hz | |
| Electric Consumption | 1350W | |
| Length of the Power Cord | 6' 6" (2.0 m) | |
| External Dimensions | (approx. inches) | 23-5/8 (W) X 15 (D) X 4-3/8 (H) |
| (approx. cm) | 60 (W) X 38 (D) X 11 (H) | |
| Weight | approx. 12 lbs. (5.5 kg) | |
| Temperature Control | Keep Warm ~ 425°F (220°C) | |
IMPORTANT SAFEGUARDS
BASIC SAFETY PRECAUTIONS SHOULD ALWAYS BE FOLLOWED WHEN USING ELECTRICAL APPLIANCES, INCLUDING THE FOLLOWING:
- Read all instructions thoroughly and keep these instructions for future use.
- Avoid touching hot surfaces. The handles and knobs are provided for your safety and protection.
![shock hazard]() To prevent hazardous operation or electric shock, do not immerse the temperature control plug, power cord, power plug or heater set in water or other liquids.
To prevent hazardous operation or electric shock, do not immerse the temperature control plug, power cord, power plug or heater set in water or other liquids.- Close supervision is necessary when the appliance is used by or near children.
- Unplug from outlet when not in use and before cleaning. Allow the appliance to cool before adding or removing parts and before cleaning.
- Do not leave the appliance unattended when in use.
- Do not use or operate the appliance with a damaged cord or plug. If the appliance malfunctions or has been damaged in any manner, unplug the appliance and return it to the nearest authorized service facility or dealer for examination, repair or adjustment.
- Do not use outdoors.
- The use of accessories or attachments not recommended by the appliance manufacturer may be hazardous or may cause injuries.
- Keep the power cord away from hot surfaces and do not let the cord hang over the edge of tables or counters.
- Do not place the appliance on or near a heated surface such as a gas or electric stove, or in a heated oven.
- Always use the appliance on a dry, level surface.
- Always use extreme caution when moving appliances containing hot oil or liquids.
- The plug to the appliance should be attached first before plugging the cord into a wall outlet. To disconnect, turn the power control to OFF. Then remove the plug from wall outlet.
- To use, plug power cord into an electrical outlet. To disconnect, grasp the power plug and remove from outlet.
- Do not use the appliance for other than intended or specified purposes.
- Do not operate in the presence of explosive and/or flammable fumes.
- This appliance is intended for household/domestic use only and not for commercial or industrial use.
![burn hazard]() To reduce the risk of fire, cook only with plate and guard properly in place.
To reduce the risk of fire, cook only with plate and guard properly in place.- Make sure the detachable plate, heater unit and guard are assembled and fastened properly according to the "HOW TO USE" section of this instruction before cooking. Only use temperature control plug for Model No. EA-DCC10.
- This appliance is not intended for deep frying foods.
SAVE THESE INSTRUCTIONS
THIS APPLIANCE IS FOR HOUSEHOLD USE ONLY.
This appliance is supplied with a short power cord to reduce the risk of becoming entangled in or tripping over. Extension cords may be used if care is exercised in their use. If an extension cord is used, the marked electrical rating of the cord should be at least as great as the electrical rating of the appliance, and a longer cord should be arranged so that it will not drape over the countertop or tabletop where it can be pulled on by children or tripped over unintentionally.
 This appliance has a polarized plug (one bade is wider than the other). To reduce the risk of electric shock, this plug was designed to fit into a polarized outlet in only one direction. If the plug does not fit fully into the outlet, do not attempt to force it or modify it in any way. Simply reverse the plug and insert. If it still does not fit, contact a qualified electrician.
To avoid circuit overload, do not operate another high wattage appliance on the same circuit.
These WARNINGS and CAUTIONS are intended to prevent property damage or personal injury to you and others.
- The degree of danger or damage by the misuse of this product is indicated as follows:

Indicates risk of serious injury or death.
Indicates risk of injury, household or property damage if mishandled
- Prohibited or required actions are indicated as follows:
![]() Indicates a prohibited operation
Indicates a prohibited operation
![]() Indicates a requirement or instruction that must be followed.
Indicates a requirement or instruction that must be followed.
 Indicates a prohibited operation
 WARNINGS WARNINGS | |||
 |  Do not modify the product. Only a repair technician may disassemble or repair this unit. Attempting to do so may cause fire, electric shock or injury. Make any repair inquiries to Zojirushi Customer Service. |  | Do not damage the Power Cord. Do not bend, pull, twist, fold, or attempt to modify the Power Cord. Do not place it on or near high temperature surfaces or appliances, under heavy items or between objects. A damaged Power Cord can cause fire or electric shock. |
 | Do not plug or unplug the Power Plug if your hands are wet. Doing so may cause electric shock or injury. |  |
If any of the above occurs, unplug the product immediately and return to the store where you purchased it for check-ups and/or repairs. This product is not intended for use by persons (including children) with reduced physical, sensory or mental capabilities, or lack of experience and knowledge, unless they have been given supervision or instruction concerning use of the product by a person supervised to ensure that thev do not olav with the oroduct. |
 | Do not immerse the product in water or splash it with water. Doing so may cause short circuit or electric shock. | ||
|
| ||
 CAUTIONS CAUTIONS | |||
|
| | Do not use the product near walls or furniture. Steam or heat may damage, discolor or deform walls or furniture. |
 |  Do not touch hot surfaces during or immediately after use. Touching hot surfaces may cause burns. | | During preheating or cooking, move birds and small animals that may be sensitive to smoke or smells to other rooms, and open windows or turn on exhaust fans.
If the Temperature Control Plug is damaged, it must be replaced by an appropriate cord or assembly made available by the manufacturer or its service agent. |
 | Unplug the Power Plug from the outlet when the product is not in use. Leaving the Power Plug in an outlet may cause the insulation to become damaged, resulting in electric shock, short circuit or fire. | ||
- The illustrations used in this Operating Instructions may vary from the actual product you have

- Plate and its Nonstick Coating
Please follow these instructions to ensure extended use of the Plate and for the protection of the nonstick coating:- Do not use sharp-edged metal spatulas found in stores.
![]()
- Do not scrape hard with the edge or corners of a spatula. Do not scrape the corners of the Plate.
![]()
- Do not scratch the Plate with sharp objects such as knives or forks.
- Do not cover the Lid while preheating, or preheat for an extended period of time. Do not place the Plate directly on the stovetop.
- Do not use abrasive cleansers, scouring powders, nylon brushes, metal brushes or eraser pads.
- Do not leave the surface or bottom of the Plate soiled. Acid (vinegar) and salt contents (sauce, soy sauce and salt) may cause corrosion. Foods left on the surface may also cause uneven cooking. Be sure to keep the product clean.
- Do not use detergents other than mild kitchen detergents such as chlorine based alkaline detergents or those containing acidic ingredients. Doing so may cause corrosion.
- Do not use sharp-edged metal spatulas found in stores.


REMARKS: The nonstick coating may wear out with use.
The nonstick coating may eventually discolor or peel off. This will not affect the cooking performance or sanitary properties, and is harmless to your health. If concerned with the peeling of the nonstick coating, please replace the Plate by purchasing a new one.
- Temperature Control Plug
![]()
- Only use the Temperature Control Plug provided.
- Never disassemble the Temperature Control Plug.
- Always clean the Probe and Power Plug of dust, soil or foods.
- Do not bang, drop or handle the Temperature Control Plug roughly. Do not move the Temperature Control Plug up and down when plugging in or unplugging.
- Always remove the Temperature Control Plug from the Heater Set after use.
- Clean any grease from the Release Buttons after use.
- Use and Care
- Do not use the product for other than grilling or steaming foods.
- Handle the product gently; otherwise it may cause malfunction or breakdown.
- Do not use the Plate on a gas or electric stovetop burner. Doing so may cause the nonstick coating to peel off, corrode, or cause the Plate to deform or discolor.
- Do not use with a soiled Heat Shield Plate. Doing so may cause malfunction or deformation.
![burn hazard]() Do not splash the Heat Shield Plate with water or soak in water. Do not use a metal brush to clean. If the surface becomes rusted or discolored, it may not shield heat properly, and cause fire, the Main Body Guard deform, or the surface of the tabletop to become hot.
Do not splash the Heat Shield Plate with water or soak in water. Do not use a metal brush to clean. If the surface becomes rusted or discolored, it may not shield heat properly, and cause fire, the Main Body Guard deform, or the surface of the tabletop to become hot.![]()
Do not use on top of items such as newspapers that may obstruct the Air Holes beneath the Main Body Guard. Do not use on surfaces that are vulnerable to heat such as carpets, cushions, tatami mats or tablecloths. Doing so may cause fire, deform the Main Body Guard, or burn the surface.
![]()
- Do not use on top of glass surfaces such as a glass table. Doing so may cause the glass to break from the heat.


Documents / Resources
References
Download manual
Here you can download full pdf version of manual, it may contain additional safety instructions, warranty information, FCC rules, etc.
Advertisement


Need help?
Do you have a question about the Gourmet Sizzler EA-DCC10 and is the answer not in the manual?
Questions and answers