Table of Contents
Advertisement
Available languages
Available languages
Quick Links
Advertisement
Chapters
Table of Contents

Related Manuals for DragonTouch L01

Summary of Contents for DragonTouch L01
- Page 1 Wireless Movie Projector L 0 1 V1.0...
-
Page 2: Table Of Contents
Contents Warnings and Safety Precautions ------------------------------------------------------------ 02 Package List ------------------------------------------------------------------------------------------- 02 Product Overview----------------------------------------------------------------------------------- 03 Remote Control -------------------------------------------------------------------------------------- 03 English 01 - 08 Getting Started--------------------------------------------------------------------------------------- 04 Overview of the Projector Menu-------------------------------------------------------------- 04 Powering on ---------------------------------------------------------------------------------------- 04 Deutsch 09 - 16 1. Media ---------------------------------------------------------------------------------------------- 04 2. -
Page 3: Warnings And Safety Precautions
Warnings and Safety Precautions Package List Please read all instructions before using this device. Do not make any modifications or adjust settings that are not described in this manual. The warranty will not cover physical damage or data loss resulting from failure to follow these instructions. 1. -
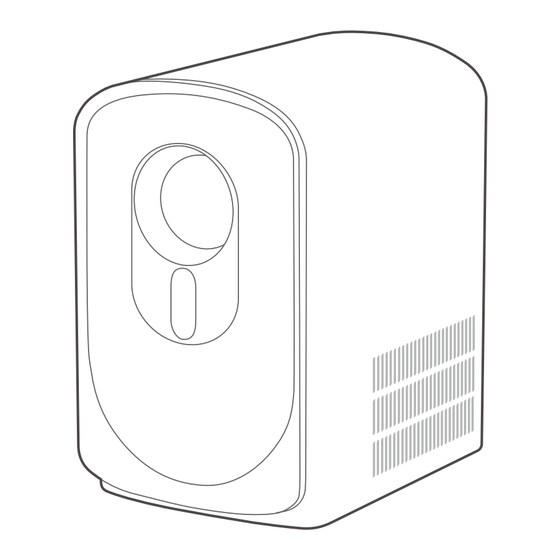
Page 4: Product Overview
Product Overview Remote Control USB Input Power Button Power Switch Home IR Receiver HDMI Input 3.5mm Stereo Jack Volume + Volume - Power Socket Mute Right Left IR Receiver Down Switch Signal Tips: 1. If the image appears blurry, go to Setting - Keystone, configure the settings of Menu Return manual keystone correction or enable Automatic Trapezoidal to correct the... -
Page 5: Getting Started
Getting Started Overview of the Projector Menu Powering on Connect the power cable to the projector and plug it into an outlet. Then press the power button or remote control to turn it on. The boot-up screen as illustrated will appear. -
Page 6: Wifi
➁ If switching to a new device, please disconnect or delete the previous connection 2. Wifi before pairing. Wifi switch: Turn Wifi on and off. Search: Scan for nearby network signals, and the detected signals will be displayed under Nearby Wifi. 4. -
Page 7: Wireless Screen
5.2 Wireless Screen Mirroring for Android Device screen mirroring. (1) Swipe down on your Android phone and tap “Cast screen”, then select "L01-xxxx" ➂ For certain Android phone models, make sure to select the “Transfer Files” from the search results to connect. -
Page 8: Setting
7. Setting 7.3 Keystone Correction Select “Setting” to enter the projector's settings screen, and select the last option to 7.1 Display Settings configure the following settings for better image clarity: Flip, Vertical Keystone, To adjust the display settings, select "Setting" from the main interface to access the Trapezoidal Reset, Window Zoom, Zoom Screen Reset, and Automatic Trapezoidal. -
Page 9: Q & A
1) Check if there are any obstacles around the ventilation. 2) Check if there are big voltage fluctuations. (888)811-1140(US) cs@dragontouch.com www.dragontouch.com 3) Check the overheating protection system. For any inquiries about DragonTouch products, please feel free to contact us. We will respond within 24 hours. -
Page 10: Sicherheitshinweise
Inhalt Sicherheitshinweise Sicherheitshinweise-------------------------------------------------------------------------------- 09 Bitte lesen Sie alle Anweisungen, bevor Sie dieses Gerät verwenden. Nehmen Sie keine Änderungen vor oder passen Sie keine Einstellungen an, die nicht in diesem Paketliste----------------------------------------------------------------------------------------------- 10 Handbuch beschrieben sind. Die Garantie deckt keine physischen Schäden oder Produktübersicht ----------------------------------------------------------------------------------- 10 Datenverluste ab, die durch das Nichteinhalten dieser Anweisungen entstehen. -
Page 11: Paketliste
Paketliste Produktübersicht USB-Eingang Power-Taste IR-Empfänger HDMI-Eingang 3,5-mm- Stereo-Buchse Netzanschluss- buchse Netzkabel × 1 Projektor × 1 Fernbedienung × 1 (unterstützt nur AAA- Batterien, nicht enthalten) IR-Empfänger Tipps: 1. Wenn das Bild verschwommen erscheint, gehen Sie zu Einstellungen - Trapezkorrektur, konfigurieren Sie die Einstellungen der manuellen Keystone-Kor- rektur oder aktivieren Sie die Automatisch trapezformig, um die verzerrten Bilder zu korrigieren, und drücken Sie die Fokustaste auf der Fernbedienung, um die beste Klarheit zu erzielen. -
Page 12: Fernbedienung
Fernbedienung Erste Schritte Power-Taste Startseite Lautstärke + Lautstärke - Mute Auf-Taste 1. Schließen Sie das Netzkabel an 2. Drücken Sie die Ein-/Aus-Taste am Rechte Linke den Projektor an und stecken Sie Projektor oder auf der Fernbedienung, es in eine Steckdose. um ihn einzuschalten. -
Page 13: Übersicht Des Projektor-Menüs
Übersicht des Projektor-Menüs 2. WLAN WLAN-Schalter: Schalten Sie WLAN ein und aus. Suche: Suchen Sie nach nahegelegenen Netzwerksignalen, und die erkannten Signale Einschalten werden unter In der Nähe von WLAN angezeigt. Netzwerk hinzufügen: Fügen Sie ein verstecktes WLAN hinzu, das nicht durch Schließen Sie das Netzkabel an den Projektor an und stecken Sie es in eine normales Scannen erkannt werden kann. -
Page 14: Kabelgebundene Bildschirm
(1) Wischen Sie auf Ihrem iPhone nach unten und tippen Sie auf „iOS Cast“, wählen 4.2 Kabelgebundene Bildschirmspiegelung fü iOS-Geräte Sie dann „L01-xxxx“ aus den Suchergebnissen, um die Verbindung herzustellen. Schließen Sie Ihr iPhone mit dem USB-Kabel an den Projektor an. Der Bildschirm (2) Die Bildschirmspiegelung zwischen Ihrem iPhone und dem Projektor ist nun wird standardmäßig projiziert (keine APK-Installation erforderlich). -
Page 15: Hdmi
7. Einstellungen (1) Wischen Sie auf Ihrem Android-Telefon nach unten und tippen Sie auf „Bildschirm 7.1 Anzeigeeinstellungen übertragen“, wählen Sie dann „L01-xxxx“ aus den Suchergebnissen, um die Um die Anzeigeeinstellungen anzupassen, wählen Sie „Einstellungen“ aus der Verbindung herzustellen. Hauptoberfläche, um den Einstellungsbildschirm des Projektors aufzurufen, und Hinweis: Der Name für „Bildschirmübertragung“... -
Page 16: Andere Verbindungen
F & A 7.3 Trapezkorrektur Wählen Sie „Einstellungen“, um den Einstellungsbildschirm des Projektors aufzurufen, und wählen Sie die letzte Option, um die folgenden Einstellungen für eine bessere Ich kann Videos in der Netflix-App oder Hulu nicht abspielen. Bildklarheit zu konfigurieren: Projektionsmodus, Vertikale Trapez, Trapez zurücksetzen, Ein TV-Stick oder HDMI-Verbindung wird empfohlen. -
Page 17: Projektor-Größentabelle
2.5m 90" Tabla de tamaños de proyector --------------------------------------------------------------- 23 1.95m 70" 2.77m 100" Contáctenos------------------------------------------------------------------------------------------- 23 2.2m 80" 3.33m 120" Kontaktiere uns cs@dragontouch.com www.dragontouch.com Für alle Anfragen zu DragonTouch-Produkten können Sie uns gerne kontaktieren. Wir werden innerhalb von 24 Stunden antworten. -
Page 18: Instrucciones De Seguridad
Instrucciones de seguridad Lista de bultos Lea todas las instrucciones antes de usar este dispositivo. No realice ninguna modificación ni ajuste configuraciones que no estén descritas en este manual. La garantía no cubrirá daños físicos ni pérdida de datos resultantes del incumplimiento de estas instrucciones. -
Page 19: Resumen
Resumen Control remoto Entrada USB Botón de encendido Botón de encendido Hogar Receptor Entrada HDMI de infrarrojos Conector Volumen + Volumen - estéreo Toma de corriente de 3,5 mm Silenciar Arriba Derecho Izquierdo Receptor de infrarrojos Abajo Cambiar señal Consejos: 1. -
Page 20: Comenzando
Comenzando Resumen del menú del proyector Encendido Conecte el cable de alimentación al proyector y enchúfelo en una toma de corriente. Luego presione el botón de encendido o use el control remoto para encenderlo. Aparecerá la pantalla de inicio ilustrada. 1. -
Page 21: Wifi
➁ Si cambia a un nuevo dispositivo, desconecte o elimine la conexión anterior 2. Wifi antes de emparejar. Interruptor de Wifi: Encienda y apague el Wifi. Buscar: Escanea las señales de red cercanas, y las señales detectadas se mostrarán en Wifi cercano. 4. -
Page 22: Misma Pantalla
(1) Deslice hacia abajo en su teléfono Android y toque "Transmitir pantalla", luego ➂ Para ciertos modelos de teléfonos Android, asegúrese de seleccionar la opción seleccione "L01-xxxx" de los resultados de búsqueda para conectarse. Nota: "Transferir archivos" para habilitar el espejo de pantalla. -
Page 23: Configuración
7. Configuración 7.3 Corrección trapezoidal Seleccione "Configuración" para ingresar a la pantalla de configuración del proyector 7.1 Configuración de pantalla y seleccione la última opción para configurar los siguientes ajustes para una mejor Para ajustar los ajustes de pantalla, seleccione "Configuración" desde la interfaz claridad de imagen: Modo de pantalla de proyecció, Trapecio vertical, Reducción principal para acceder a la pantalla de configuración del proyector y elija la primera trapezoidal, Zoom de la ventana, Reiniciar la pantalla de zoom y Trapecio automático. -
Page 24: P Y R
1) Verifique si hay una barrera alrededor de la ventilación. cs@dragontouch.com www.dragontouch.com 2) Verifique si hay grandes fluctuaciones de voltaje. Para cualquier consulta sobre los productos de DragonTouch, no dude en 3) Verifique el sistema de protección contra el sobrecalentamiento. contactarnos. Responderemos dentro de las 24 horas... -
Page 25: Instructions De Sécurité
Contenu Instructions de sécurité Instructions de sécurité -------------------------------------------------------------------------- 24 Veuillez lire toutes les instructions avant d'utiliser cet appareil. Ne faites aucune modification et ne réglez pas les paramètres qui ne sont pas décrits dans ce manuel. Liste de l'emballage -------------------------------------------------------------------------------- 25 La garantie ne couvrira pas les dommages physiques ou la perte de données résultant Aperçu du produit ---------------------------------------------------------------------------------- 25 du non-respect de ces instructions. -
Page 26: Liste De L'emballage
Liste de l'emballage Aperçu du produit Entrée USB Bouton d'alimentation Récepteur IR Entrée HDMI Prise stéréo 3,5 mm Prise d'alimentation Projecteur Télécommande × 1 Câble d'alimentation × 1 (supporte uniquement les × 1 piles AAA, non incluses) Récepteur IR Conseils : 1. -
Page 27: Télécommande
Télécommande Pour commencer Bouton Accueil d'alimentation Volume + Volume - Mute/Unmute Haut 1. Connectez le câble d'alimentation 2. Appuyez sur le bouton d'alimentation Droit Gauche au projecteur et branchez-le du projecteur ou de la télécommande dans une prise. pour l'allumer.. Signal de commutation Menu... -
Page 28: Aperçu Du Menu Du Projecteur
Aperçu du menu du projecteur 2. Wifi Interrupteur Wifi : Activez et désactivez le Wifi. Recherche : Recherchez les signaux réseau à proximité, et les signaux détectés Mise sous tension seront affichés sous Wifi à proximité. Ajouter un réseau : Ajoutez un réseau Wifi caché qui ne peut pas être détecté par Connectez le câble d'alimentation au projecteur et branchez-le dans une prise. -
Page 29: Écran Câblé
(1) Balayez vers le bas sur votre iPhone et appuyez sur "iOS Cast" , puis choisissez "L01-xxxx" dans les résultats de recherche pour vous connecter. par défaut (aucun téléchargement d'APK nécessaire). ➀ Évitez les branchements et débranchements fréquents pour une... -
Page 30: Hdmi
7. Paramètres (1) Balayez vers le bas sur votre téléphone Android et appuyez sur "Cast screen", 7.1 Paramètres d'affichage puis sélectionnez "L01-xxxx" dans les résultats de recherche pour vous connecter. Pour ajuster les paramètres d'affichage, sélectionnez "Paramètres" depuis l'interface Remarque : Le nom de la "Projection d'écran"... -
Page 31: Autres Connexions
Q & R 7.3 Correction trapézoidale Sélectionnez "Paramètres" pour entrer dans l'écran des paramètres du projecteur et sélectionnez la dernière option pour configurer les réglages suivants pour une Je ne peux pas lire de vidéo avec l'application Netflix ou Hulu. meilleure clarté... -
Page 32: Tableau Des Tailles De Projecteur
2.5m 90" Tabella dimensioni proiettore ----------------------------------------------------------------- 38 1.95m 70" 2.77m 100" Contattaci ---------------------------------------------------------------------------------------------- 38 2.2m 80" 3.33m 120" Nous contacter cs@dragontouch.com www.dragontouch.com Pour tout problème avec les produits DragonTouch, n'hésitez pas à nouscontacter, nous vous répondrons dans les 24 heures. -
Page 33: Istruzioni Per La Sicurezza
Istruzioni per la sicurezza Panoramica Si prega di leggere tutte le istruzioni prima di utilizzare questo dispositivo. Non apportare modifiche né regolare impostazioni che non sono descritte in questo manuale. La garanzia non coprirà danni fisici o perdita di dati risultanti dal mancato rispetto di queste istruzioni. -
Page 34: Panoramica
Panoramica Telecomando Ingresso USB Pulsante di Pulsante di Casa Ricevitore IR accensione accensione Jack stereo Entrada HDMI Volume + da 3,5 mm Volume - Presa di corrente Mute Pulsante su Destro Sinistro Ricevitore IR Interruttore di Pulsante giù segnale Suggerimenti: 1. -
Page 35: Iniziare
Iniziare Panoramica del menu del proiettore Accensione Collegare il cavo di alimentazione al proiettore e collegarlo a una presa elettrica. Quindi premere il pulsante di accensione o utilizzare il telecomando per accenderlo. Apparirà la schermata di avvio come illustrato. 1. Collegare il cavo di alimentazione 2. -
Page 36: Wifi
➁ Se si cambia dispositivo, si prega di disconnettere o eliminare la connessione 2. Wifi precedente prima di accoppiare. Interruttore Wifi: Attiva e disattiva il Wifi. Ricerca: Scansiona i segnali di rete nelle vicinanze e i segnali rilevati verranno 4. Schermo cablato visualizzati sotto Wifi... -
Page 37: Schermo Wireless
(1) Scorri verso il basso sul tuo telefono Android e tocca "Cast screen", quindi ➂ Per determinati modelli di telefoni Android, assicurati di selezionare l'opzione seleziona "L01-xxxx" dai risultati di ricerca per connetterti. "Trasferimento file" per abilitare il mirroring dello schermo. -
Page 38: Impostazioni
7. Impostazioni 7.3 Correzione trapezoidale Seleziona "Impostazioni" per entrare nello schermo delle impostazioni del proiettore 7.1 Impostazioni del display e seleziona l'ultima opzione per configurare i seguenti parametri per una migliore Per regolare le impostazioni di visualizzazione, seleziona "Impostazioni" dall'interfac- chiarezza dell'immagine: Modalità... -
Page 39: Q & A
1) Verificare se c'è una barriera intorno alla ventilazione. 2) Verificare se ci sono grandi fluttuazioni di tensione. cs@dragontouch.com www.dragontouch.com 3) Verificare il sistema di protezione dal surriscaldamento. Per qualsiasi domanda sui prodotti DragonTouch, non esitate a contattarci. Risponderemo entro 24 ore. - Page 40 目次 警告と安全注意事項 警告と安全注意事項 ---------------------------------------------------------------------------- �� このデバイスを使用する前に、 すべての指示をお読みください。 このマニュアルに記載さ 日本語 れていない変更や設定の調整は行わないでください。 これらの指示に従わなかった場 パッケージリスト --------------------------------------------------------------------------------- �� 合、 物理的な損傷やデータの損失は保証の対象外となります。 概要------------------------------------------------------------------------------------------------ �� リモコン ------------------------------------------------------------------------------------------- �� �. このデバイスを過度のほこりや汚れがある場所、 または強い磁場を生成する機器の近 はじめる------------------------------------------------------------------------------------------- �� くに置かないでください。 プロジェクターメニュー概要 ------------------------------------------------------------------- �� �. デバイスを直射日光、 高温、 多湿の環境に長時間さらさないでください。 電源オン ------------------------------------------------------------------------------------------�� �. 感電を避けるため、 プロジェクターに電源コードを接続してからコンセン トに差し込 �.
- Page 41 パッケージリスト 概要 USB入力 日本語 電源ボタン IR受信機 HDMI入力 3.5mmステレオ 電源コンセン ト プロジェクター× � リモコン× � 電源ケーブル× � (4乾電池、 付属しません) IR受信機 ご注意 : �. 画像がぼやけている場合は、 設定 - 台形補正に移動し、 手動キーストーン補正の設定 を構成するか、 自動台形を有効にして歪んだ画像を修正し、 リモコンのフ ォーカスボタ ンを押して最良の明瞭度を得て ください。 �. シングルマウン トホールの二重使用設計を採用しており、 プロジェクターは標準のカ メラ三脚および�/�インチネジのプロジェクタースタンドと互換性があります。 HDMIケーブル× � 取扱説明書×...
- Page 42 リモコン はじめる 電源ボタン ホームページ 日本語 音量+ 音量- 消音 アップ 確認 1. 電源ケーブルをプロジェクターに接 2. プロジェクターまたはリモコンの電 右 左 続し、 コンセントに差し込みます。 源ボタンを押して、 プロジェクター をオンにします。 ダウン 信号切り替え 戻る メニュー HDMIケーブル フ ォーカス+ 3. HDMIケーブルをプロジェクターに接続し、 次にHDMIポートのあるデバイスに接続 フ ォーカス+ します。 ご注意ください : �. リモコンを水に浸さないでください。 �. リモコンを火元の近く や湿気の多い場所、 高温の場所に置かないでください。 �. リモコンに新しい電池と古い電池を同時に使用しないでください。 �.
- Page 43 プロジェクターメニュー概要 検索けんさ く : 近く のネッ トワーク信号を検索し、 信号は接続された無線LANの下に表示 されます。 ネッ トワークの追加: 検索できないWifiまたは非表示のWifiチャネルを追加します。 Wifi 電源オン の名前とパスワードを知っていて、 信号範囲内にある必要があります。 日本語 電源ケーブルをプロジェクターに接続し、 コンセン トに差し込みます。 その後、 電源ボタ ホームページ: メインインターフェイスに戻ります。 ンまたはリモコンを押して電源を入れます。 図のように起動画面が表示されます。 �. Bluetooth �. マルチメディア Bluetoothモ-ド : Bluetooth機能をオンまたはオフにします。 写真の追加 - 映画、 音楽、 写真、 電子書籍 Bluetoothの検索 : 近くのBluetooth信号を検索し、 信号が利用可能なデバイスの下に 説明: USBメモリ内のビデオ、...
- Page 44 �. 有線による画面ミラーリング ください : (�) リモコンを使ってプロジェクターのWifiをオンにします。 有線スクリーンミラーリングを実現するには、 まずメインインターフェースから 「有線同画 面」 オプションを選択して、 図示された画面に入ります。 その後、 以下の手順に従って くだ (�) プロジェクターが接続する家庭のWifiを選択し、 正しいパスワードを入力して 「完了」 さい : をタップして接続します。 接続が確立されるまで約�秒待ちます。 接続が完了すると、 日本語 プロジェクターはWifiパスワードを記憶します。 (�) iOSまたはAndroidデバイスのWifiをオンにし、 プロジェクターと同じ家庭のWifiネッ トワークに接続します。 ヒン ト : ミラーリング中にプロジェクターが 「無線スクリーン」 の画面にあることを確認し て ください。 �.� Android デバイスの有線画面共有 (�) Android携帯をUSBケーブルでプロジェクターに接続します。...
- Page 45 �. HDMI �.� システム設定 「設定」 を選択してプロジェクターの設定画面に入り、 �番目のオプションを選択して言語 、 工場出荷時の設定、 ソフ トウェアのアップグレード、 自動スリープ、 メ二ュ-表示時間、 画 面スケ一ル、 またはバージョン情報を表示する設定を構成します。 日本語 HDMI機能を使用するには、 以下の手順に従って ください : (�) HDMIケーブルをプロジェクターのHDMIポートに挿入し、 デバイスに接続します。 (�) プロジェクターのメインインターフェースから 「HDMI」 を選択し、 リモコンのOKボタン を押します。 �.� 台形補正 (�) デバイスからのコンテンツが画面に成功裏に投影されます。 「設定」 を選択してプロジェクターの設定画面に入り、 最後のオプションを選択して、 より ヒン ト : 接続が失敗した場合は、...
- Page 46 2.77m 100" ➁ HDMI入力ケーブルが正し く接続されているか確認して ください。 2.4m 80" 3.33m 120" ➂ 音量がミュートされているか、 最小に設定されているか確認して ください。 ➃ 入力デバイスのドルビーサウンドエフェク トをオフにして ください。 お問い合わせ プロジェクターが起動後しばらく して自動的にシャ ッ トダウンします。 ➀ 通気口の周りに障害物がないか確認して ください。 cs@dragontouch.com ➁ 大きな電圧変動があるか確認して ください。 www.dragontouch.com ➂ 過熱保護システムを確認して ください。 DragonTouch製品に関するご質問がございましたら、 お気軽にメールでお問い合わせ いただくか、 QRコードをスキャンしてフ ォローして ください。...
Need help?
Do you have a question about the L01 and is the answer not in the manual?
Questions and answers