Table of Contents
Advertisement
Quick Links
Advertisement
Table of Contents

Related Manuals for VOGUE APPLIANCES 310176

Summary of Contents for VOGUE APPLIANCES 310176
- Page 1 VOGUE Freestanding Oven with Induction Cooktop 600mm 310176...
-
Page 2: Table Of Contents
Contents Safety precautions…………........2 ~5 Description of the appliance........5 ●Hob..............5 ●Control panel............6 ●Accessories............7 Installation............8~9 Electrical connection..........10 Using the hob............11 Using the oven............13 ●Prior first use............13 ●Function heating /heating mode......13 ●Timer setting..........14~15 ●Oven cooking suggestion........16 Cleaning and maintenance........17 ●Oven interior /oven door........17 ●Remove the oven door........17 ●Remove the slide-in racks.........18 ●Oven light replacement........18... -
Page 3: Safety Precautions
Safety Precautions Be sure to observe To prevent the bodily injury and property damage, please be sure to observe the following safety precautions. ■The following icons show the extent of damage caused by incorrect operations. Warning: Indicates a potential hazard that, if unavoidable, may result in death or serious injury. Note: Indicates a potential hazard that, if unavoidable, may result in death or moderate injury. - Page 4 Warning ●Do not alter, disassemble or repair the product by yourself. (To avoid causing fire, electric shock or injury.) For repairs, please contact (Company name) Certification Maintenance Store for consultation. ●Do not clean the oven door glass with a rough scrubber or sharp scraper. (In order to avoid scratches on the surface of glass, resulting in glass crushing.) ●Be sure to plug the power plug into the bottom of the socket.
- Page 5 WARNING The appliance and its accessible parts become hot during use. Care should be taken to avoid touching heating elements. Children less than 8 years of age shall be kept away unless continuously supervised. This appliance can be used by children aged from 8 years and above and persons with reduced physical, sensory or mental capabilities or lack of experience and knowledge if they have been given supervision or instruction concerning use of the appliance in a safe way and understand the hazards involved.
-
Page 6: Description Of The Appliance
Use Precautions Focus on product Before the first use, please remove all the protective film on the product (except rating label). ■ (To prevent the protective film from melting due to high temperature and scalding after touching.) ■Before first use, please remove packaging material from the oven and hob. (Grate, cardboard on both sides of the baking tray, cushioning foam in front and rear of the grate and strapping tapes on the slide rail). -
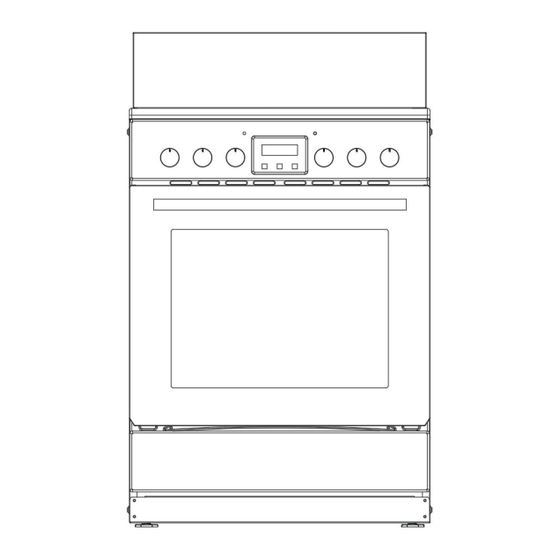
Page 7: Control Panel
Control pannel Power control knob for cooking zone 1 Conventional power control in 9 steps up to 1500 W Power control knob for cooking zone 2 Conventional power control in 9 steps up to 2000 W Oven temperature control knob Oven indicator light Oven main display screen Decrease button... -
Page 8: Accessories
Accessories Wire shelf : For grill, dishes, cake pan with items for roasting and grilling. Slider bracket : For cooking larger size food, these shelf support rails on the right and left sides of the oven can be removed, dishes and tray can be put on the oven floor, using functions as Radiant grilling, Double grilling, Double grill with fan. NOTE: When placing dishes on the oven floor, please DO NOT use functions with bottom heater to prevent heat gathering at bottom. -
Page 9: Installation
Installation The following instructions should be read by a qualified technician to ensure that the appliance is installed, regulated and technically serviced correctly in compliance with current regulations. Important: remember to disconnect the appliance from electricity by turn off the mains before regulating the appliance or carrying out any maintenance work. - Page 10 Leveling Your Appliance Take out of the 4 cooker feet from oven cavity, which be packed together with backing rack, and then screw them into the 4 plinth in lower part of cooker. These feet level off the oven when necessary. The height of the cooker can be adjusted by means of adjustable feet in the plinth.
-
Page 11: Electrical Connection
Electrical connection Warning All electrical work must be carried out by a suitably qualified and authorized electrician. No a terations or willful changes in the electricity supply should be carried out. Before attempting the connection, check whether the voltage indicated on the rating label corresponds to the actual mains voltage. -
Page 12: Operation
Operation Before you start heating, place your food in suitable cookware and place it in the middle of the desired coo-king zone as described before. Make sure that the bottom of the cookware and the cooking surface are clean and dry. The cooking zones have different power levels (see “Description of the appliance“). - Page 13 Heat level selection The heating zones have different levels of heat.The level of heat can be adjusted gradually by turning the appropriate knob to the right. Power levels Power level Suitability Delicate warming of small amounts of food. Melting of chocolate, butter etc. ...
-
Page 14: Using The Oven
Using the oven Prior first use Remove packaging, clean the interior of the oven. Take out and wash the oven fittings with warm water and a little washing-up liquid. Switch on the ventilation in the room or open a window. Heat the oven (to a temperature of 250℃, for approx. -
Page 15: Timer Setting
Timer Setting Clock Setting Used for display the current time on the screen. Clock must be set before use. 1. When the power is turned on, the display screen shows "12.00" and the clock icon flashes. At this time, the oven is not working. - Page 16 Cooking End Time Setting The oven will be shut off automatically when the cooking end time is set. The adjustable range of the end time: the end time ≤ current time + 10 hours, but the maximum end time is not more than 24 hours.
-
Page 17: Oven Cooking Suggestion
Setting the child-proof lock (key lock) Your appliance is equipped with a child lock to prevent the appliance from being switched on accidentally or settings from being changed unintentionally, e.g. by children. When activated, the the control keys are all locked. 1. -
Page 18: Cleaning And Maintenance
Cleaning and Maintenance Oven Interior/Oven Door Oven door ■ Glass door should always be clean, to remove stubborn stains with kitchen absorbent paper, wet sponges and common detergents. •Do not use a steam cleaner to clean the oven. •Do not use detergents or corrosive detergents to clean glass door. •Do not use rough or friction materials or sharp metal scrapers to clean the oven glass door, as they may scratch the surface. -
Page 19: Remove The Slide-In Racks
Remove the Slide-in racks Remove the hanger to facilitate cleaning the side wall of the oven. Note: Operate this process must by hand slightly, or it will damage the enamel. • Remove all accessories such as grate and baking tray. •... -
Page 20: Disposal Of The Appliance
Disposal of the appliance Old appliances should not simply be disposed of with normal household waste, but should be delivered to a collection and recycling centre for electric and electronic equipment. A symbol shown on the product, the instruction manual or the packaging shows that it is suitable for recycling. Materials used inside the appliance are recyclable and are lapelled with information concerning this By recycling materials or other parts from used devices you are making a significant contribution to the protection of our environment. - Page 21 PN.: K407080248...
Need help?
Do you have a question about the 310176 and is the answer not in the manual?
Questions and answers