Aqua OASIS, EDEN, LAGOON, SCANDINAVIAN, BOREAL, VIKING, YUKON Manual
- Owner's manual (16 pages)
Advertisement
- 1 COMPONENTS Basin
- 2 COMPONENTS Technical module
- 3 COMPONENTS Technical module - Pumping system
- 4 COMPONENTS - Technical module – Electronic systems
- 5 COMPONENTS Technical module – Filtration systems
- 6 THE ACCESSORIES Optional
- 7 WATER TREATMENT
- 8 CLOSURE PROCEDURES
- 9 SAFETY INSTRUCTIONS
- 10 Documents / Resources
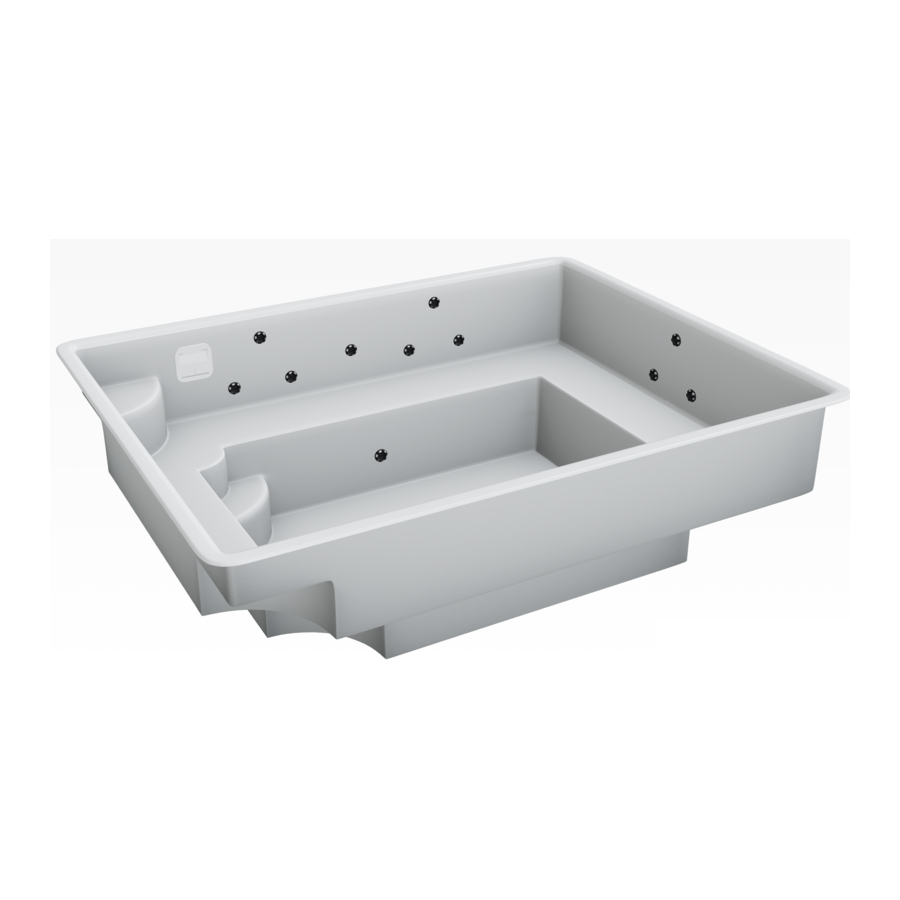
COMPONENTS Basin
FIBERGLASS PONDS
Your pool is made of polymer materials (Gel coat) reinforced with several successive layers of composite materials (fiberglass). In addition to being lightweight, this manufacturing method gives them a glossy finish as well as great resistance.
DIMENSIONS AND CAPACITIES OF SOME MODELS
| SERIES | MODEL | DIMENSIONS |
| NATURE | OASIS | 8' x 10' x 34'' |
| NATURE | EDEN | 9' x 11' x 33'' |
| NATURE | LAGOON | 10' x 16' x 34'' |
| URBAN | SCANDINAVIAN | 7'2'' x 7'2'' x 36'' |
| URBAN | BOREAL | 7'2'' x 9'2'' x 36'' |
| URBAN | VIKING | 7'9'' x 9'10'' x 39'' |
| URBAN | YUKON | 9'4'' x 17'4'' x 44'' |
 Note: Dimensions may differ slightly due to more or less pronounced cuts made at the factory on the fiberglass edges.
CAPABILITIES
| SERIES | MODEL | CAPABILITIES |
| NATURE | OASIS | 1875 liters |
| NATURE | EDEN | 1990 liters |
| NATURE | LAGOON | 5500 liters |
| URBAN | SCANDINAVIAN | 1795 liters |
| URBAN | BOREAL | 1800 liters |
| URBAN | VIKING | 1975 liters |
| URBAN | YUKON | 7620 liters |
Note: The capacities listed in this table are approximate and based on normal filling of the basins.
POND MAINTENANCE
Simply clean the Gel Coat surface with a damp cloth. Never use strong or abrasive products.
 NEVER EMPTY THE BASIN WITHOUT FIRST ENSURING THAT THERE IS NO PRESENCE OF WATER UNDER THE BASIN.
Note that some components may be optional.
THE JETS

The flow rate of each jet can be controlled by turning it to the left (less powerful/closed) or to the right (more powerful/open). The jets can also be removed.
To get there, grab then turn the entire jet to the left; once completely to the left, continue to exert tension towards the left in order to disengage the "screwing" mechanism with which the jet is equipped so that it can remain in place.
JET MAINTENANCE
We recommend cleaning the jets quarterly: Remove the jets then place the jets in a container filled with water to which you have added a small amount of dish soap. Swirl the rotating nozzles in the soapy water solution then rinse them thoroughly.
SKIMMER

The skimmer (type A or B) is placed on the top of the spa wall. It is used to suck up surface water as well as dirt to transport it to the filtration system in the technical block.
Never stand directly in front of it or let any object obstruct its front.
Make sure the water level is always at least halfway up the plastic skimmer plate (ideally the top 2/3).
The bottom drain(s)

Bottom drain
The drain(s) are placed on the bottom of the spa wall (calf height). It is used to suck up bottom water as well as dirt to transport it to the filtration system in the technical block.
Never stand directly in front of it or let any object obstruct its front.
Take care to regularly clean the front(s) of the drain(s) so as not to reduce the flow of water entering it.
COMPONENTS Technical module
Technical modules spas with one or two pumps are delivered on a wooden floor. They must be installed in a dry place and protected from bad weather. The motor/heating/electronic system is delivered on a wooden floor (47-1/2'' L. X 36-1/2'' D. X 30'' H.). Note that some models may be equipped with a sand filter with circulation pump. These 2 components require a space of approximately 47-1/2'' L. X 36-1/2'' D. X 30'' H..
Spa systems with sand filtration require a total space of at least 36'' x 120'' x 48'' H. They must be installed in a dry location, protected from bad weather and frost .

Notes: The components included in your device may vary depending on the model and accessories chosen. The motor and electronic components must be installed in a dry place and sheltered from bad weather, such as in a shed or a box designed for this purpose.
The electronic keyboard does not include a wooden stand. You must plan to integrate it into a decorative element (eg: a stone or a paving stone). However, the back of it must never be submerged in water.
The wire that connects the keyboard to the electronic box measures 25'. If the distance to reach the pool is longer, you must have a remote communication system called IN.Touch 2. See your distributor for more information on this.
COMPONENTS Technical module - Pumping system
PUMP(S) (Motor)
The pump circulates the water, in a closed circuit, between the pool and the technical module so that it is freed of its impurities by the filter and heated by the water heater, before returning to the pool via the jets. 'water.
No special maintenance is necessary. It can remain outside during the winter period, whether it is in use or not.

The only attention to pay to it is to:
- Make sure that the water access valves are all in the "OPEN" or "UP" position before turning on the electrical current.
- Unscrew the strainer cover and add water to it during the initial start-up or the first start of the season.This important operation aims to initiate the pump when starting.
- Follow the recommended steps carefully during the winterizing process if you do not wish to use your spa during the cold season. Refer to the WINTERIZING PROCEDURES chapter for details.
WATER ACCESS VALVES
Water access valves must be in position OPEN AT ALL TIMES when the electric current is energized.
There is an access valve for each of the water inlets and outlets included in the technical module.
The only time it is permitted to put them in position FARM, is during a technical service operation without emptying the spa pool (ex. when cleaning the filtration cartridge or during a repair to the technical module).

COMPONENTS - Technical module – Electronic systems
ELECTRONIC KEYBOARD
The keypad is generally installed near the pool in order to be easily accessible by spa users. It is connected to the electronic box using a 25' cable which must be plugged into a small pipe buried(like all the piping) in the trench which connects the spa to its equipment.Please refer to the appendix on the detailed use of the electronic keyboard.

In.k450 electronic keyboard
Quick description
Keypad in.k450, membrane (9916-101335), 7 buttons: On, Off/Pump 1/ Pump 2/Pump 3/Light/Temperature and other controls +/-Compatible with: System in.xe).
ELECTRONIC CONTROL BOX WITH INTEGRATED WATER HEATER
The electronic box is the main control center of your spa.
It manages the electricity needs of the different components and ensures that you are able to adjust certain operations such as filtration cycles, water temperature, activate the motor(s) and other accessories if available. takes place.
It is also inside this box that the main electrical supply wire connected to the house must be connected (see the appendix to this effect to this document and the chapter on electrical connection included in the manual installation of spas). The electrical connection terminals are accessible through the upper left unscrewable opening of this box and only a qualified and approved electrician must have access to them.
The cables (fitted with end caps called undeceptors) of the different components of the module as well as the accessories, are easily connected according to a color code.
Please refer to the appendix on the detailed use of the In.xe control box.

Control box
electronic model In. Xe with integrated water heater
WATER HEATER
The water heater with a power of 5.5Kw is integrated into the electronic box and can be controlled using the arrows ![]() of the electronic keyboard.
of the electronic keyboard.
Please refer to the appendix on the detailed use of the In. K450 keyboard.
COMPONENTS Technical module – Filtration systems
CARTRIDGE FILTRATION

The filter and its cartridge play a very important role.
A clean cartridge largely contributes to good water quality, adequate suction and propulsion of the pumps as well as the proper functioning of the electronic box and keyboard, that is to say, without the appearance of error codes.
MAINTENANCE OF THE FILTRATION CARTRIDGE
Before cleaning the filtration cartridge, it is essential of:
- Turn off the electrical current to your spa (turn the electrical circuit breaker to position STOP).
- Close the water access valves to the technical module.
Then, by unscrewing the tightening ring (do not forget to raise the lock) then removing the cover of the cylindrical receptacle of your spa's filtration system, you will find a filtration cartridge (also called filter).
This must be removed from its receptacle once every 2 weeks then rinsed vigorously using a garden hose in order to dislodge most of the dirt found there.
A more thorough cleaning should be done once every 1 or 2 months depending on the use of the spa. To do this, you will need to obtain a cartridge cleaning solution which you will mix with water following the proportion instructions indicated on the bottle. Leave to soak for a few hours then rinse thoroughly. It is always best to allow the cartridge to dry completely before putting it back into the filter tank.
It is recommended to have a second replacement cartridge while you are cleaning as you should never leave the spa running without a filter cartridge to avoid major mechanical damage. It is also recommended to replace the cartridge with a new one every 1 or 2 years.
Pay particular attention to putting the cover back in place as well as the seals of the filtration system to avoid significant water loss.
NEVER FORGET TO Raise THE WATER ACCESS VALVES TO THE TECHNICAL MODULE BEFORE RETURNING ON ELECTRICAL POWER.

Cleaning the filtration cartridge
THE ACCESSORIES Optional
RIGID COVER
The rigid folding cover in three detachable parts is equipped with quick-release straps which must be attached to the exterior edges of the spa using screws or concrete glue. A small plastic part is provided with this clip to lock the strap.
The cover protects your spa against loss (or increase) of temperature as well as debris that may enter it.
It is also mandatory to put it on at all times when the spa is not in use in order to avoid the risk of drowning or it being moved by the action of the wind.

COVER MAINTENANCE
Clean the leatherette of the lid cover only with a damp cloth. It security is advisable to take the styrofoams out of the cover from time to time to let them dry.
All styrofoams absorb water more or less quickly. It is normal for them to become heavy and this will be a sign that you need to take them out and dry them or simply change them. Open the zippers of the vinyl cover and take out the styrofoams to air dry regularly. The covers are subject to frequent handling and great pressure; it is therefore possible to have to replace them regularly.
Always use the handles to handle the cover as this may cause scratches, tears and damage to the seams. These breakages are not covered by the cover manufacturer's warranty.


SOFT CANVAS
Some stores sell flexible solar shades to limit water evaporation.
It is imperative to keep in mind that these should never be considered secure. If you want to use a flexible canvas without adding the rigid cover, you must then enclose your entire spa in order to completely block access, like a swimming pool.
LEAF NETS

Several types of nets can be used over the spa to prevent leaves or other twigs from getting in, depending on the size of the mesh of the nets.
WATER CASCADE (Standard and LED Light)
The water cascade mechanism is essentially the same and installs just as easily whether you have opted for the standard model or the LED light model, both of which are available as an option.
All you need to do is integrate them into a rock or wall sufficiently close to the pool and strictly follow the recommendations in the spa installation document to ensure that ALL the water from the waterfall returns to the pool, thus preventing premature loss of water from your spa.
The light cascade system must have access on the sides to possibly change the light strip located inside the system.
To activate the water cascade, you just need to turn the valve, generally red or blue in color. located near the waterfall.

Waterfall mechanisms should NEVER be left operating during the winter period due to the risk of freezing.
Refer to the Shutdown Procedures chapter for the steps to follow to winterize the waterfall system.
NEVER leave the waterfall running during the winter or when the cover is installed on the spa.

SEALING CAPS (Closing the spa)

Sealing caps must be used if the spa is not used during the cold period. They will be placed in position in place of the jets during the spa closing procedures. Refer to the chapter on closing procedures to find out the steps to follow to close the spa.
SPA SWEEPERS

There are different types of spa sweepers. Some use batteries while others are simply manual action. Each vary in price and effectiveness. Ask your retailer to find out the ranges available.
BLOWER

Wind tunnel
The blower is an air pump that can be added to your mechanical system in order to increase the supply of air into the water jets, which in turn increases the propulsion effect.
This device does not require any special maintenance.
IN.TOUCH 2 (Wireless communication system)

Select your spa's functions from your iPad, iPhone, iPod touch or Android. With the In.touch app, you have relaxation at your fingertips.
The in.touch application is available in two versions. The version In.touch home allows you to control your spa using the local network.In.touch world allows you to use the Internet anywhere in the world to control your spa
NOTE: This device is necessary when there is more than 25' distance between your spa pool and the technical module.
Information: http://www.geckoalliance.com/ns/conso/Products/ProductInfo/31/in.touch
COVERED

All blankets become heavy, because all styrofoam absorbs water. When this happens, be sure to secure accessibility to your spa, remove the Styrofoams from the cover and allow them to dry. Additionally, Styrofoam quickly becomes contaminated with bacteria. However, we suggest that you purchasenew styrofoams as soon as they become heavier and change them.
IN.CLEAR (Water treatment system)

This device is an effective sanitation system. Spas that use the In. Clear system require very little maintenance, and In. Clear can easily be installed on new or existing spas.
Information: http://www.geckoalliance.com/ns/conso/Products/ProductInfo/4/in.clear
WATER TREATMENT
Properly maintaining the water in your spa is the only way to give yourself peace of mind and later avoid problems related to your health as well as damage to the various components of your spa.
BROME and chlorine are the only approved and preferred products for treating your spa water.
Salt water treatment systems are not recommended for your spa. The corrosion and general degradation that these systems cause is clearly visible in just a few weeks!
It is recommended to analyze the water balance of your spa from time to time. Ph and alkalinity must be balanced for chemicals to work properly.
Note
As your spa skimmer does not offer access to a basket, you will need to use a floating dispenser if you wish to treat the spa water with bromine or chlorine tablets and above all, ALWAYS REMEMBER THE DISPENSER WHEN SWIMMING.
For either product, follow the directions for use on their respective labels. For the quantities to use, refer to the water capacity table for your spa included at the beginning of this guide.
Always keep chemicals in a safe place, out of reach of children and pets.
Chemicals should never be mixed with each other. They must be separately added directly to the spa water, respecting the waiting times recommended on the labels.
Take care to store your chemicals in a dry, cool place.
CLOSURE PROCEDURES
Your spa can be used during the cold period provided you pay constant attention to it so as not to risk stopping the technical module. This would result in a risk of freezing of the mechanical/electronic system and possible significant damage to certain components.
If you choose to close the spa,you must first of all:
Carefully check that there is no presence of groundwater under the basin, which would cause the latter to rise and move. For this step, insert a wooden stick inside the drying well located right next to the spa pool. If water is present, use a small submersible pump to remove it. You can then empty the spa.
Procedure for the spa pool
Be sure to turn off the electrical power (Turn off the circuit breaker).
After ensuring that there is no groundwater present, empty the spa basin completely using a small submersible pump.
In the spa basin, remove all the jets, unscrew then remove the skimmer plate as well as the bottom drain(s) grid. Store them together in a safe place.

Unscrew the PVC unions located at the outlet of the technical module box connecting the water pipes to the spa pool. The unions are generally identified by red and blue colored ribbons in numbers of 1 or 2 unions for each ribbon color, depending on the number of pump(s) included in the system.
Use a wet/dry vacuum cleaner such as Shop Vac.
Vacuum then push air from the pipe unions until all the water in the plumbing is drained. Repeat this operation but this time from the jet locations in the spa pool.
Vacuum the water from the skimmer hole and also from the bottom drain hole(s).
It is recommended to put antifreeze in the jet holes, bottom drain and skimmer. Approximately 2 gallons will be needed.

Firmly plug the jets orifice using sealing plugs of the necessary size:
#9 for the skimmer, #11 for the jets, and #10 for the bottom drain(s). Note that some older models may require different sizes. Call us for more information.
Perform a basic cleaning of the spa surface. Remove any fallen leaves from the bottom of the pond.
It is recommended to place a plastic sheet covering the entire interior surface of the pool and up to the upper edges. Secure the canvas so that it remains in place throughout the winter.
Return water to the spa basin approximately to the lower level of the skimmer plate. When winter comes, a layer of ice will form on top of the water. To avoid damaging the pool walls, do not drive over the ice block during the winter.
Store the rigid vinyl/styrofoam cover in a dry place.
For the technical module
Using the wet/dry sweeper, you must vacuum up the water trapped in the components of the technical module.
Pump

Unscrew and remove the drain plug on the front of the pump (impeller). Vacuum up any remaining water. Store the cap in a dry place.
Pump strainer

Unscrew and remove:
- the transparent cover
- Cart
- the drainage plug at the bottom of the strainer
Vacuum up any remaining water. Close the strainer cover then store the baskets and caps in a dry place.
Filter

Remove the filtration system cover and cartridge. Clean then store the cartridge in a dry place. Vacuum up any remaining water at the bottom of the filtration cylinder. Close the filter cylinder cover.
Suck up the remaining water through the holes in the pipe unions at the pump inlet and at the filter outlet.
Screw in all pipe joints to prevent rodents from getting in during the winter.
Close the cover of the technical module and place a tarpaulin to protect it from the introduction of water.
ATTENTION
NEVER PUSH OR PROPELL SNOW ONTO OR INTO THE SPA. Regularly and even
During the winter, you must regularly check the draining well if there appears to be an accumulation of water under the pool. In such a case, it is necessary to evacuate the groundwater to avoid the phenomenon of lifting or displacement of the basin.
SAFETY INSTRUCTIONS
Read and follow all instructions that follow.
The physiological response to exposure to hot water is subjective and may vary depending on your age, health and medical history. If you are unsure of your hot water tolerance level, or if you experience headaches, dizziness or nausea while using your spa, leave the spa and cool off. immediately.
Aqua Fiber Innovation spas have been designed to be safe for private residential use. Please contact your representative if the vocation of your unit should change or become a public vocation since specific options and precautions will then have to be part of your unit.
Never make any modifications to your unit. Making a modification could result not only in major damage but also in serious injuries or even death.

- When the spa is not in use, keep the hard cover properly installed and locked at all times.
- Children should never use the spa unless under the watchful supervision of an adult.
- Children should not use a spa where the water temperature is higher than body temperature (37°VS).
- Prolonged immersion in water whose temperature exceeds 38°It may pose health risks.
- It is recommended to set the temperature at a lower level or limit the duration of use for children or people who may be affected by excessively hot temperatures. Always confirm water temperature with an accurate thermometer before entering the spa.
- Do not allow children to submerge their heads.
- Do not allow children to step on the hard cover even if it is properly latched.
- Avoid using the spa if all suction guards, designed to prevent accidental suction of the body and hair, are not in place. Avoid walking or sitting on or in front of the suction devices (skimmer and bottom drain(s). This could interfere with proper water circulation or cause serious injury.
- Avoid operating the spa pump on high setting without all suction and circulation hoses properly in place.
- Persons using medications and/or with an adverse medical history should consult a physician before using a spa.
- Persons suffering from infectious diseases should not use a spa.
- Use caution when entering or leaving a spa. If possible, install a grab bar or ramp. Before entering the spa, turn off the jets so you can better see the steps or entry air.
- To avoid any risk of loss of consciousness or drowning, avoid consuming drugs or alcohol before and while using a spa.
- Pregnant women should consult a doctor before using the spa.
- Avoid using a hot tub after a vigorous exercise session.
- Prohibit the use of electrical appliances (such as lamps, telephones, radios, televisions, etc.) unless 1.5 meters from the spa.
- Test the GFCI monthly.
- Display the telephone numbers of emergency services in your area such as ambulance, police, fire brigade, etc. near the telephone most quickly accessible from the spa.
- Maintain the chemical balance of the water in accordance with the manufacturer's directions.
Documents / ResourcesDownload manual
Here you can download full pdf version of manual, it may contain additional safety instructions, warranty information, FCC rules, etc.
Download Aqua OASIS, EDEN, LAGOON, SCANDINAVIAN, BOREAL, VIKING, YUKON Manual
Advertisement

Need help?
Do you have a question about the OASIS and is the answer not in the manual?
Questions and answers