Crock-Pot HOOK UP SCCPMD1 / SCCPMD2 / SCCPMD3 - Cooking Center Manual
- Owner's manual (29 pages) ,
- Owner's manual (16 pages)
Advertisement
| Nothing creates a stronger connection than socializing with friends and family. With the Crock-Pot® Hook Up™ Connectable Entertaining System, hosting everything from intimate gatherings to large dinner parties (and everything in-between) is easier than ever. You and your guests will be connected in no time! Up to six units can hook up using a single outlet, and you're ready to prepare – and elegantly serve – dips, side dishes, main dishes and desserts for any occasion. |
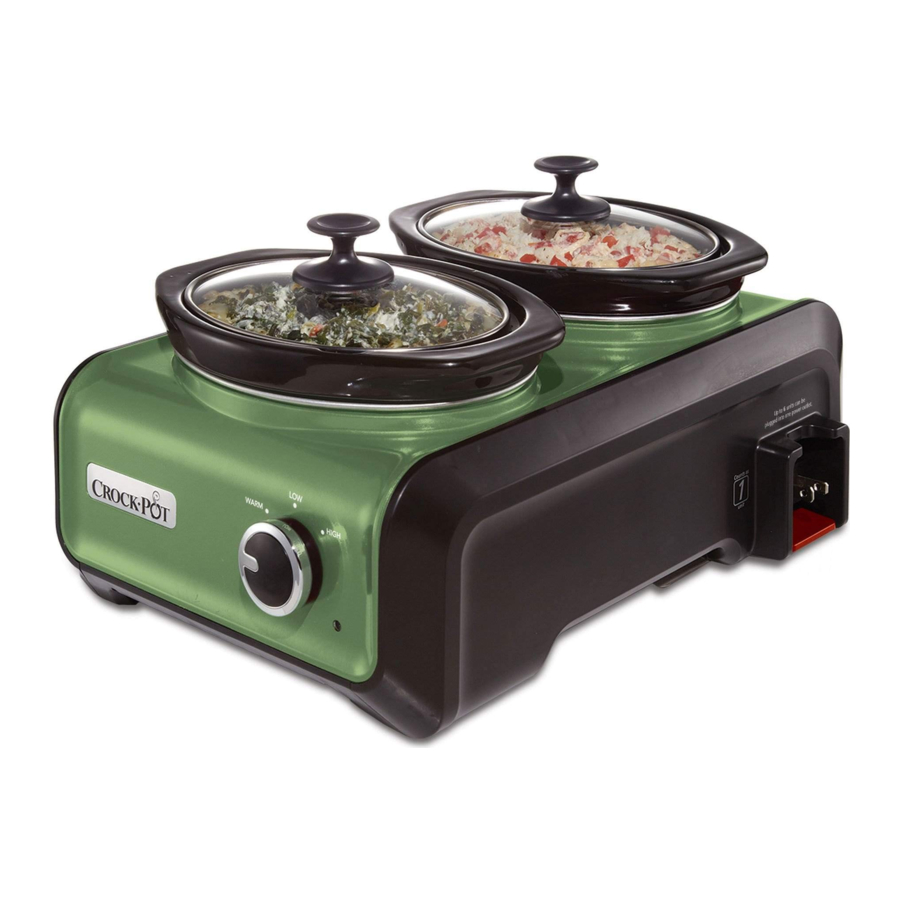
Product Diagram
 NOTE: The instructions in this manual apply to all five models included in the Crock-Pot Up TM Connectable Entertaining System, models SCCPMD1, SCCPMD2, SCCPMD3, SCCPMD4, and SCCPMD5. Please refer to below diagrams for individual unit components.
Unit Components

- Lid Handle
- Removable Glass Lids
- Removable Stoneware
- Heating Base
- Manual Retractable Cord
- Cord Release Latch (See View C)
- Integrated Handle
- Indicator Ligh
- Temperature Control Knob
- Resettable Circuit Breaker (See View A)
- Plug Connection Outlet (See View B)
- Stainless Steel Warming Surface
Resettable Circuit Breaker (View A)

Plug Connection (View B)

Cord Release Latch (View C)

Refer to the icon to the left of the power cord (example shown in View C) to see how many units each unit in your system represents.
Using Your Connectable Entertaining System
Getting Started
Preparing your Crock-Pot® Hook Up™ Connectable Entertaining System for use:
- Before you use your units, remove all packaging components and wash the lid and stoneware or warming tray with warm, soapy water and dry thoroughly.
![information]() NOTE: Do not submerge or let the plug come in contact with water. Do not allow water to spill or seep into the warming tray.
NOTE: Do not submerge or let the plug come in contact with water. Do not allow water to spill or seep into the warming tray. - Check that the Temperature Control Knob is in the OFF position.
- Place the unit(s) in the desired serving area prior to turning the units on. There are integrated handles located on the bottom of both sides of each unit for easy handling.
- Heat the warming tray for approximately 10 minutes before use.
NOTE: Temporary smoking may occur. This is normal during initial use.

Do not attempt to lift multiple units at one time when they are connected together or stacked.
Assembly:
- Place Stoneware into the Heating Base.
- Lower the Glass Lid(s) horizontally down onto the Stoneware.
How to use:
- Place the Removable Stoneware into the Heating Base, add your ingredients, and cover with the Glass Lid(s).
- Plug in your unit and select the temperature setting from the three setting options (Warming Tray is on/off only). Refer to your specific recipe for more precise cook times.
NOTES ABOUT WARMING TRAY: The Crock-Pot® Hook Up™ Warming Tray is designed to keep food warm only for up to 4 hours. This product is not a cooking appliance. Food should be FULLY cooked and already hot (at least 185°F) prior to use with Crock-Pot® Hook Up™ Warming Tray.
The Crock-Pot Hook Up™ Warming tray is not designed to keep large, deep pots full of food or liquid warm.
NOTE: Your unit is equipped with a WARM setting. WARM is only for keeping already-cooked food warm. Do not cook on the WARM setting.
We do not recommend using the WARM setting for more than four (4) hours.
- When heating or cooking is done, unplug your unit and allow it to cool before cleaning.
- Once the unit has cooled, store the cord by slowly feeding the cord back into the base until it clicks into place.
Storing the Cord
To store the cord, start close to the cord pocket. Using your thumb and forefinger, follow the pattern of the cord to guide it back in. If you seem to get stuck, pull the cord completely out and try again.
Usage notes:
- If you suspect that the power has gone out during the day, the food may be unsafe to eat. If you are unaware of how long the power was out, we suggest you discard the food inside.
- To avoid over or under-cooking, always fill the Stoneware ½ to ¾ full to conform to recommended cook times (with the exception of certain cakes and custards, and as guided otherwise in our slow cooker recipes).
- Do not overfill Stoneware. To prevent spillover, do not fill Stoneware higher than ¾ full.
- Always cook, with the Glass Lid(s) on, for the recommended time. Do not remove the lid during the first two hours of cooking.
- Food may be placed directly on Warming Tray surface.
- Warming Tray will accommodate dishes up to 9" x 13".
- For foods containing liquids place food in heat-safe dish before placing on Warming Tray.
- For maximum heat retention, cover food when not serving.
- Always wear oven mitts when handling the Glass Lid(s), Stoneware, or top surface of Warming Tray.
- Unplug when cooking or warming is done and before cleaning.
- Removable Stoneware is ovenproof and microwave-safe. Glass lid/lids are not safe to use in the oven or broiler. Do not use removable stoneware or glass lid/lids on gas or electric burner or under the broiler.
For use as a single unit:
- Press down on the red Cord-Release Latch on the right-hand side of the unit.
- Pull out the Retractable Power Cord and plug the cord into a standard electrical outlet.
- Add your ingredients to the Stoneware and cover with Glass Lid(s) or place food on Warming Tray.
- Select the temperature setting (HIGH, LOW or WARM) based on your recipe. The Indicator Light will illuminate, indicating that your unit is on.
- When finished, turn your unit OFF, then unplug the Power Cord and allow unit to cool down prior to cleaning.
NOTE: WARM is only for keeping already- cooked foods warm.
Do not Cook on the Warm setting.
Connecting Multiple Units
For use with multiple units:
The Crock-Pot® Hook Up™ Connectable Entertaining System has a unique Patent Pending electrical connector that will only allow units in the Hook Up™ system to be able to connect and draw power from each other.
NOTE: To prevent damage or shock hazards, DO NOT alter the units in any way to allow other appliances to be able to connect to it.
- Select the unit you would like to be plugged into the wall outlet (Unit A). Press down on the red Cord-Release Latch on the right-hand side of that unit.
- Pull out the Retractable Power Cord for Unit A and plug the cord into a standard electrical outlet.
- Line up the Plug Connection outlet of Unit A with the Retractable Cord of Unit B, as shown:


NOTE: Recommended maximum number of units to plug into one outlet is six (6) units. This may vary depending on circuit.
NOTE: 5 Quart model SCCPMD5 counts as 2 units.
- Push Unit A and Unit B together until you hear them 'click' into place.
NOTE: When using with multiple units side by side, make sure the plug in Unit A is securely in place prior to connecting units together. To ensure the units are connected properly, you can turn the temperature dial to HIGH, LOW or WARM for each of the units and the LED indicators should illuminate when they are firmly connected.
- Connect other units as needed in any combination up to the recommended total number of six (6) by adding up the "Unit " count (see View C for example). Refer to the icon located to the left of the power cord to determine your unit count. (See Figure A or chart below).
![]()

NOTE: Units do not have to be clicked tightly together to function. As long as the male end is plugged into the female end, the units will be powered on. (See Figure B)

Figure B
Your system was designed to connect only with other Hook Up™ units. Do not attempt to plug in any other appliances other than those that are sold within this system.
- To add additional units, repeat steps 3-5 in the beginning of the chapter.
- Add your ingredients to the Stoneware of each unit and cover with the Glass Lid(s). For Warming Tray, place food or heat-safe dish directly on Warming Tray.
- Select the temperature setting (HIGH, LOW or WARM) for each unit based on your recipe. For Warming Tray, turn dial to ON position. The Indicator Light on each unit will illuminate, indicating that your units are on.
![information]() NOTE: WARM is only for keeping already-cooked food warm. Do not cook on the WARM setting.
NOTE: WARM is only for keeping already-cooked food warm. Do not cook on the WARM setting. - When finished using, turn off and unplug the first unit that is plugged into the electrical outlet and allow units to cool down prior to cleaning.
![]()
Do not attempt to lift multiple units at one time when they are connected together. - Once the units have cooled down, separate and pull the system apart using the integrated handles on the bottom left and right-hand sides of each unit.
- Once the unit has cooled, store the cord by slowly feeding the cord back into the base until it clicks into place.
Storing the Cord
To store the cord, start close to the cord pocket. Using your thumb and forefinger, follow the pattern of the cord to guide it back in. If you seem to get stuck, pull the cord completely out and try again.
If Your Unit Stops Working
NOTE: Recommended maximum number of units to plug in to one outlet is six (6). This may vary depending on circuit.
Fuse/Overload Protection:
Your system is designed to prevent connecting more than the recommended number of units (six) to each other. When using multiple units together, and when necessary, any unit that overloaded the system will turn itself off.
- Depending on the circuit, you may need to remove one or more units from your system so the circuit does not trip again from overload.
- If this happens, simply reset the built in Resettable Circuit Breaker on the unit that is plugged directly into the wall. To reset the unit, push the resettable button with your index finger as shown: Additionally, you may have to reset all the subsequent units that are connected after the tripped unit that overloaded the system.
- You will notice which units have turned themselves off, as theIndicator Light will no longer be illuminated on these units.

- After resetting Circuit Breaker, plug first unit into outlet and reconnect remaining units. Turn on units again as needed.

Storing Your Product
Your system is designed to stack for easier storage.
To stack your system:
- Turn the Glass Lid(s) of each unit in your system upside down and nest it inside the Stoneware (See Figure A).


- Stack each unit on top of one another by placing the base of Unit A on top of the base of Unit B (See Figure B).


NOTE: If the 2 x 1 Qt model/models (model SCCPMD1) are a part of your system, they will always need to be at the bottom or base of the stack. It is recommended to stack no more than 3 units high, and stack Warming Tray (model SCCPMD4) on top to avoid any potential scrapes or scratches (See Figure B for reference to size).
Caring for Your Product
Care and cleaning:
- Always turn your unit(s) off, unplug from the electrical outlet, and allow to cool down prior to cleaning.
- The Glass Lid(s) and Stoneware can be washed in the dishwasher, or with hot, soapy water. Do not use abrasive cleaning compounds or scouring pads. A cloth, sponge or rubber spatula will usually remove residue. To remove water spots and other stains, use a non-abrasive cleaner or vinegar.
- As with any fine ceramic, the Stoneware and Glass Lid(s) will not withstand any sudden temperature changes. Do not wash the Stoneware and Lid(s) with cold water when they are hot.
- The Warming Tray and outside of the Heating Base may be cleaned with a soft, moist cloth. Wipe dry. Do not use abrasive cleaners.
- This appliance has no user serviceable parts. Any servicing beyond that described in the Cleaning Section should be performed by an Authorized Service Representative only. See Warranty Section.

Never immerse the Heating Base in water or other liquids. No other servicing should be performed.
Do not allow water to spill or seep into the Warming Tray.
Safety Chart: Uses

Warming Tray is NOT dishwasher safe. Do not attempt to place any part in the dishwasher.
Frequently Asked Questions (FAQ)
How do I release the cord from the unit?
Press down on the red Cord-Release Latch on the right-hand side of the unit, as shown:

How many units can I hook up together using only one outlet?
The recommended maximum number of units to plug in to one outlet is six (6) units. This may vary depending on the circuit and other appliances drawing current off the circuit.

NOTE: Please make note of the icon on the side of your unit so as to avoid overloading your circuit. Ensure that the total number the icons add up to does not exceed six (6).
NOTE: 5 Qt model SCCPMD5 is rated as two (2) units.
Can I plug other electrical products into the Hook Up™ system?
No. For your satisfaction and safety, only units sold in the Hook Up™ system can be connected together. The plug has a special, Patent Pending design that will not allow other electrical products to be plugged in.

How do I stack my system?
- Turn the Glass Lid(s) of each unit in your system upside down and nest it inside the Stoneware (See Figure A).
![]()
- Stack each unit on top of one another by placing the base of Unit A on top of the base of Unit B (See Figure B). It is recommended to stack no more than 3 units high.
![]()


NOTE: If the 2 x 1 Qt model/models (model SCCPMD1) are a part of your system, they will always need to be at the bottom or base of the stack (See Figure B for reference to size). It is recommended to stack Warming Tray (model SCCPMD4) on top to avoid any potential scrapes or scratches.
- Warming Tray (model SCCPMD4) and 5 Qt (model SCCPMD5) should always be on top as they are the largest width, to ensure stability.
Storing the Cord
To store the cord, start close to the cord pocket. Using your thumb and forefinger, follow the pattern of the cord to guide it back in. If you seem to get stuck, pull the cord completely out and try again.
Troubleshooting
- Unit isn't turning on.
- Make sure unit is plugged into power outlet.
- Make sure Control Knob is turned to any position other than Off.
- If both items above are met, press the Reset button and turn the unit on.


- When connecting multiple units, the entire system shut Off and stopped working.
- There are too many units connected together in one outlet. Make sure you haven't exceeded the recommended maximum number of connected units to use in one outlet (6). Remove one or more units from the system as necessary. Once the unit(s) have been removed, reset the first unit that is plugged directly into the wall by pushing the Resettable Circuit Breaker button shown below. You may also need to reset each unit that is connected to the first unit if the indicator light does not illuminate.
![]()
- There are too many units connected together in one outlet. Make sure you haven't exceeded the recommended maximum number of connected units to use in one outlet (6). Remove one or more units from the system as necessary. Once the unit(s) have been removed, reset the first unit that is plugged directly into the wall by pushing the Resettable Circuit Breaker button shown below. You may also need to reset each unit that is connected to the first unit if the indicator light does not illuminate.

IMPORTANT SAFEGUARDS
When using electrical appliances, basic safety precautions should always be followed to reduce the risk of fire, electric shock, and/or injury to persons including the following:
- Read all instructions before using this product.
- This appliance generates heat during use. Do not touch hot surfaces. Use handles or knobs.
- To protect against electric shock, do not place or immerse cord, plugs, or appliance in water or other liquid.
- This appliance is not to be used by children or by persons with reduced physical, sensory or mental capabilities.
- Close supervision is necessary when any appliance is used near children. Children should not play with the appliance.
- Unplug from outlet when not in use, before putting on or taking off parts and before cleaning. Allow to cool before putting on or taking off parts, and before cleaning. To disconnect, turn any control to OFF, then unplug power cord from outlet. Do not disconnect by pulling on cord.
- Do not operate any appliance with a damaged cord or plug or after the appliance malfunctions, or has been damaged in any manner. Do not attempt to replace or splice a damaged cord. Return appliance to the manufacturer (see warranty) for examination, repair or adjustment.
- The use of accessory attachments not recommended by the appliance manufacturer may cause injuries.
- Do not use outdoors or for commercial purposes.
- Do not let cord hang over edge of table or counter, or touch hot surfaces.
- Do not place on or near wet surfaces, or heat sources such as a hot gas or electric burner, or in a heated oven.
- Extreme caution must be used when moving an appliance containing hot oil or other hot liquids.
- The heating base is subject to residual heat from cooking cycle. Do not touch heating base immediately after removing stoneware. Allow to cool before handling.
- Use caution when opening the lid during or after a cooking cycle. Escaping steam can cause burns.
- Do not use appliance for other than intended use. Misuse can cause injuries.
- Intended for household countertop use only. Keep 6 inches (152 mm) clear from the wall and on all sides. Always use appliance on a dry, stable, level surface.
- Avoid sudden temperature changes, such as adding refrigerated foods or cold liquids into a heated pot.
- The slow cooker lid is made of tempered glass. Always inspect the lid for chips, cracks or any other damage. Do not use the glass lid if it is damaged, as it may shatter during use.
![]()
To protect again electrical shock and product damage, do not cook directly in the heating base. Cook only in the stoneware provided.![]()
Spilled food can cause serious burns. Keep appliance and cord away from children. Never drape cord over edge of counter, never use outlet below counter, and never use with an extension cord.
For appliances with locking lids:
- Never attempt to lift or carry this appliance by the lid handle. Always use the handles located at each side on the base of the appliance.
- Do not lock the lid while cooking. Locking the glass lid while cooking may lead to glass breakage, which can cause injuries.
SAVE THESE INSTRUCTIONS
HOUSEHOLD USE ONLY
NORTH AMERICAN MODELS WITH POLARIZED PLUGS:
POLARIZED PLUG

This appliance has a polarized plug (one blade is wider than the other). To reduce the risk of electric shock, this plug is intended to fit into a polarized outlet only one way. If the plug does not fit fully into the outlet, reverse the plug. If it still does not fit, contact a qualified electrician. Do not attempt to modify the plug in any way. If the plug fits loosely into the AC outlet or if the AC outlet feels warm do not use that outlet.
POWER CORD INSTRUCTIONS:
A short power-supply cord is used to reduce the risk resulting from it being grabbed by children, becoming entangled in, or tripping over a longer cord.
NOTICES:
- Some countertop and table surfaces are not designed to withstand the prolonged heat generated by certain appliances. Do not set the heated unit on a finished wood table. We recommend placing a hot pad or trivet under your slow cooker to prevent possible damage to the surface.
- During initial use of this appliance, some slight smoke and/or odor may be detected. This is normal with many heating appliances and will not recur after a few uses.
- Please use caution when placing your stoneware on a ceramic or smooth glass cook top stove, countertop, table or other surface. Due to the nature of the stoneware, its rough bottom may scratch some surfaces if caution is not used. Always place heat resistant protective padding under the stoneware before setting on a table, countertop or other surface.
How to Obtain Warranty Service
In the U.S.A.
If you have any questions regarding this warranty or would like to obtain warranty service, please call 1-800-881-6802 and a convenient service center address will be provided to you.
In Canada
If you have any questions regarding this warranty or would like to obtain warranty service, please call 1-800-881-6802 and a convenient service center address will be provided to you.
In the U.S.A., this warranty is offered by Sunbeam Products, Inc. doing business as Jarden Consumer Solutions located in Boca Raton, Florida 33431. In Canada, this warranty is offered by Sunbeam Corporation (Canada) Limited doing business as Jarden Consumer Solutions, located at 20 B Hereford Street, Brampton, Ontario L6Y 0M1. If you have any other problem or claim in connection with this product, please write our Consumer Service Department.
PLEASE DO NOT RETURN THIS PRODUCT TO ANY OF THESE ADDRESSES OR TO THE PLACE OF PURCHASE.
To register your product, please visit us online at www.crockpot.com.
Website: www.crockpot.com.
Documents / ResourcesDownload manual
Here you can download full pdf version of manual, it may contain additional safety instructions, warranty information, FCC rules, etc.
Download Crock-Pot HOOK UP SCCPMD1 / SCCPMD2 / SCCPMD3 - Cooking Center Manual
Advertisement


Need help?
Do you have a question about the HOOK UP SCCPMD1 and is the answer not in the manual?
Questions and answers