Advertisement
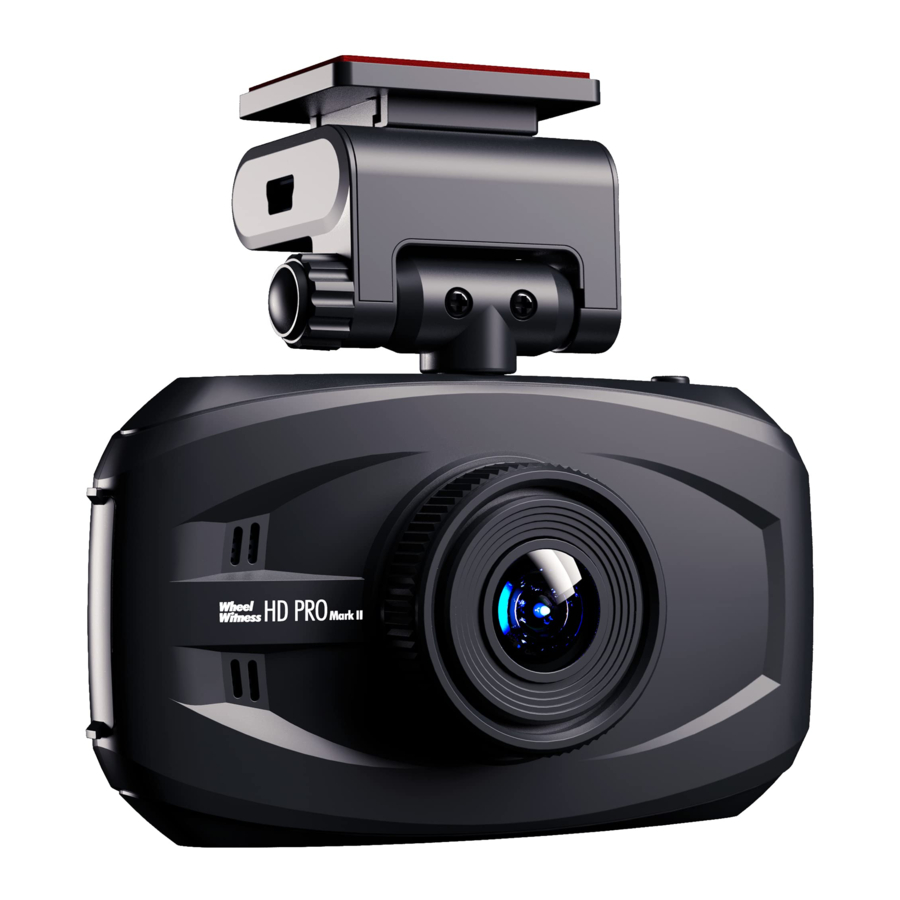
About the Product
The HD PRO is designed to automatically turn ON when it receives power to the DC IN port. It also automatically shuts down and records for a few extra seconds using the internal battery when the power is shut off (to avoid any sudden power cuts and possibly corrupting data). Under default settings the camera always cycles or "loops" the memory c ard so you will always be recording and never run out of space.
 The Motion Sensor function should remain OFF under normal operating conditions. It is intended to be used ONLY when the vehicle is stationary and would interfere with normal camera operation while driving. Please only change the settings as required! The G sensor function can be used to protect files in the event of an incident, however if you have too many falsepositives, or the camera freezes, please make sure to turn it off!
If you have any questions, please contact us!
Setting Up for First Time Use
- Remove the protection tape from the Fixed Plate and install the Plate on the Windshield Glass.
(We recommend cleaning the installation area with rubbing a lcohol).
![]()
- Install memory Card into the card slot. (If you have trouble use a penny to push it in.)
![]()
- Slide the camera to the fixed plate and adjust the vertical and horizontal positions.

- Connect the power cord into the cigarette lighter socket in your car.
![]()
- Connect the power cord to the DC IN Camera power socket.
![]()


Product Layout

- Menu Button
- OK / Manual Record Button
- Mode / Down Button
- EV / Up Button
- Memory Card Slot
- System Reset Button
- GPS Port (optional)
- Red Light Indicator - Power / Charging
- Blue Light Indicator ‐ Recording
- Green Light Indicator ‐ GPS (optional)
- Microphone
- Wide Angle Lens
- DC IN - Power Port
- HDMI Port (Cable doesn't included)
- USB Port
- Manual Power Button
Display Icons
![]()
- Mode: Video / Photo / Playback
- External Power connection / Battery
- Memory Card (x – no card, or defective card)
- G- Sensor Status (recommended mode – OFF as shown on the picture)
- Video file lock ( "EVENT" function), icon will be active when EVENT is triggered
- Recording
- Recording time
- Microphone OFF/ON
- GPS Status (turns green with optional G PS M odule o nly)
- ADAS: Advanced Driver Assistance System
- Speed Limit: Preset speed limit (with optional GPS Module only)
- EV: Exposure Value, "+" brighter, "- " dimmer
- Video Resolution
- Length of Video file – 2 /5/10 minutes each file
- Current date / time / speed (speed with optional GPS Module only)
Event Triggering
In case of emergency or for some other reason when you want to save the recorded moment, simply press the "MENU" button (#1) while camera is recording. The camera displays the "!" symbol on the LCD Display and it will save the previous 10 seconds before the press and 20 seconds after. You will find this file in a separate folder in the SD card.
You can also turn the G sensor to ON while driving. If there is an "event" that it senses, it will automatically save that file accordingly as well. Please keep in mind, if the camera has too many falsepositive or it starts to freeze, set the G sensor to OFF.

FORMATTING THE Memory CARD WILL ERASE ALL THE INFORMATION INCLUDING "READ ONLY" FILES.
Menu Operation

The HD PRO has two menus; Video Setup Menu and General Setup Menu.
Press "MENU" button in STOP position (no red recording symbol on the display) to activate the Menu.
Press "MENU" button again for switch between Video and General Setup MENU.
Use "UP" and "DOWN" button to highlight the desired line and then press "OK" button to enter sub‐menu.
Confirm the selection by using the UP and DOWN button to select the item and press "OK" to confirm setting.
Video Setup Menu


Resolution

Video resolution can be selected up to 2304 x 1296P. Higher resolution produces a higher quality image. The higher the resolution, the higher the file size.
A standard 32GB microSD card will hold approximately 8 hours at the highest resolution mode available.
[Video Resolution]
[2560x1080 30P 21:9] / [2304 x 1296 30P] / [HDR 1920 x 1080 30P] / [1920 x 1080 30P] / [1280 x 720 60P] / [1280 x 720 30P]
Image Quality

Higher Quality – Larger File Size.
[S.Fine] / [ Fine] / [ Normal]
Metering Mode Setting

Metering Mode refers to the way in which camera determines the exposure.
[Average] / [Center] / [Spot]
Light Frequency

Light Frequency (anti flickering)
[Auto] / [60Hz] – USA Standard / [50Hz] – European Standard
Date Stamp
You can select to have the Date & Time "stamped" into the video.
[Date stamp] [ON] / [OFF]
Current speed is stamped in [ON] mode when optional GPS Module is present.
Advanced Driver Assistance System
[ON] / [OFF]
Lane Departure Warning:
If a lane change occurs, a warning picture will warn the driver and the camera will beep.

Low Light Warning System:
Under low- ‐light conditions the camera will remind you to turn on your headlights.

Driver Fatigue Warning System:
The camera device will display a warning picture and warning tone when you have been continuously driving for more than four hours, followed by the same warning every two hours.

Record Time / Loop Setting
Using the Record Time function you can have the camera split the video files into either 2, 5 or 10 minute files. The recording is continuous, but the files are split into smaller chunks so they are easier to work with.
[Loop Setting] [2min] / [5min] / [10 min]
Speed Setting
[unit: M/H] / [unit: KM/H]
Time Zone
Time Zone [ ‐12] / [ ‐11] /..../ [+11] / [+12]
Using the "UP" and " DOWN" buttons ( #4 and # 5) set proper time zone for your region (ex: New York - 5). Press "OK" ( #2) button to confirm. Press "MENU" button to exit menu mode.
Setting the correct time zone is very important for the GPS to identify the correct location on the MAP!
AE Bias

Automatic Exposure
Exposure Value, "+" brighter, " ‐" dimmer.
Speed Warning Setting
(works with GPS module only)
[OFF] / [55M/H] / [65M/H] / [75M/H] / [80KM/H] / [120KM/H]
LED Setting
You can turn off the LED backlight for the buttons. [LED] [On] / [Off].
Gravity Sensor
(Set to OFF under normal operation)
The G- Sensor is used when the vehicle is stationary or under special application options. When there is a collision or a sudden change in XYZ axis, the G-Sensor determines the direction of the collision and records the event. It creates a separate EVENT folder and stores the files there. These files are saved and are not overwritten when the camera files loop.
Adjust the sensitivity parameter of the sensor so that the camera does not automatically lock all the recorded videos.
[G- Sensor] [High] / [Medium] / [Low] / [Off]
Motion Sensor
(Set to OFF under normal operation)
Like the G-Sensor, the motion detection function is used when the vehicle is stationary or under special application options. If you have the camera hardwired, you can set the motion detector to ON, and when a motion is visible in the field of view, the camera records the set time. It creates a separate EVENT folder and stores the files there. These files are saved and are not overwritten when the camera files loop.
This function should be turned OFF under normal operation (when driving)!
[Motion detect] [Off] / [On]
General Setup Menu


Language
Use this setting to adjust the menu to your preferred language.
[Language] [English]... [foreign language] Press "OK" Button to process.
System Mode
This setting can be adjusted when you use the AV cable or HDMI cable to connect the camera to your TV (AV and HDMI cables are not included.) (You can use the playback feature to display it on your TV). For USA use NTSC.
[NTSC] / [PAL]
Driver ID / License Plate Setting
You can provide your license plate number or Driver ID here. This number will be stamped into the video at the bottom right corner along with the time and date.
Push "OK" button and use the "UP" and "DOWN" buttons to select the appropriate first letter or digit. Then press "MENU" to go to the next letter or digit. After you setup your plate press "OK" to save your plate number.
[Ok] [Mode] [Down]
Time Setup

Adjust the current date and time.
[Time Setup] select Year, Month, Day, Hour, Minute - Press [OK] to save.
Select year using the MENU button and set the year using the UP and DOWN button. Then select the month using the MENU button and set the current month using the UP and DOWN buttons. Follow the above steps to set the day, hour, and minute and press OK.
Format
This function deletes all data on the memory card including protected data.
[No] / [Yes]. Press [Ok] button to format.
Default Setting
This function resets all settings to Factory Defaults.
[No] / [ Yes]
BackLight Off Setting
[Off] / [1 min] / [3 min] / [5 min]
Beep Sound Setting
ON/OFF function for Power- ON/OFF chime and "beep" with each key press.
[On] / [ Off]
Version Info
Current firmware version.
Playback

Press MODE Button to select playback mode and Thumbnail View

Press DOWN to select video files. OK Button – play Video
Press MENU button – delete file
Connecting to PC
Connect the USB Cable to the USB port of the camera on the side (#15) (NOT DC- IN) and connect the other end of the USB cable to the USB port in your PC/Mac. The red LED on the camera will turn on.
Press Power button (#16) on the recorder – the screen on the will turn blue.
The computer will now show a removable drive that you can browse, just like a flash drive.
Alternatively, you can use the included memory card to USB adapter separately to view/copy the files from the card.
Microphone
You can turn the microphone ON/OFF by holding the OK button while the camera is recording. You should see the icon change on the display.
Hardwiring
Depending on your vehicle and where your cigarette lighter is located, you can choose to use the included power adapter, or opt for our "hardwire" stealth kit.
Some vehicles have a switched cigarette lighter output, so if you connect it here, the camera always turns on and off with the cars. Other vehicles, such as older German cars have an always- on outlet, so you either have to manually connect/disconnect the camera or you can hardwire it.

The included power adapter is approximately 12 feet and can be routed around your windshield and down the pillar, under you glove box and to the cigarette lighter outlet for a clean install.
Stealth Hardwiring
If you would like a stealth install that you never have to worry about, we sell a hardwire kit. You can use it to tap into your "Accessory" wire and the camera turns on and off with the vehicle. You never have to remember to turn it on. Using a hardwire kit requires some basic technical skills. Depending on your vehicle, you can route the wires to the back of your cigarette lighter or fuse panel. If wiring to a fuse panel, please use a multi- ‐meter or a test light to find a fuse that is ON when vehicle is in Accessory/Ignition and is off when vehicle is off.
http://www.amazon.com/dp/B00TGQ1Y3Q/
Amazon: WheelWitness Hardwire Installation Kit
Contact Us
If you have any questions or comments, please feel free to contact us!
www.wheelwitness.com/support
WheelWitness Inc
www.wheelwitness.com
Documents / Resources
References
Amazon.com: WheelWitness HD PRO : Electronics
![www.wheelwitness.com]() Frequently Asked Questions - WheelWitness
Frequently Asked Questions - WheelWitness![www.wheelwitness.com]() The HD PRO - Premier Super HD Dash Cam from - WheelWitness
The HD PRO - Premier Super HD Dash Cam from - WheelWitness

Download manual
Here you can download full pdf version of manual, it may contain additional safety instructions, warranty information, FCC rules, etc.
Advertisement

Need help?
Do you have a question about the HD PRO and is the answer not in the manual?
Questions and answers