Advertisement
WARNING
- Before beginning this or any exercise program, consult a physician or health professional, who can assist you in planning a program appropriate for your age and physical condition. This is especially important if you are over age 65 or have pre-existing health problems. We assume no responsibility for personal injury or property damage sustained by or through the use of this product.
- Use the equipment on a solid, flat level surface with a protective cover for your floor or carpet. For safety, the equipment should have at least 0.6 meter / 2ft working space, free of other objects. See diagram below.
![]()
- 1t is important to keep children, pets, furniture and other objects away from this equipment during its use.
- Check your equipment before each use to ensure that all parts are assembled, and all nuts, bolts, knobs, pins are tightened and in proper place.
- This EQUIPMENT IS NOT SUITABLE FOR CHILDREN. Do not allow children to play on or around it.
- Always warm up and stretch before each training session. If you feel faint or experience dizziness, nausea, shortness of breath, chest pain, irregular heartbeat, or any other abnormal symptoms, STOP the workout once. CONSULT A PHYSICIAN IMMEDIATELY.
- Do not place your hands or fingers underneath the unit while it is being used. Keep hands away from moving parts.
- Be sure to keep longer hair tied up to avoid getting caught on equipment.
- Always wear proper workout clothing and shoes when using your equipment. Do not wear loose clothing. Do not wear shoes with leather sole or high heels.
- Workout within your recommended exercise level, do not work to exhaustion. If you feel any pain or experience abnormality, stop your workout immediately. Consult your physician immediately.
- This equipment is designed and intended for indoor home and consumer use only, not for commercial use.
- Injuries to health may result from incorrect or excessive training.

 Keep fingers and body parts clear and away from all sheer and pinch points. Injury my occur If fingers become entangled In moving parts.
Knees DO NOT pass the Toes.

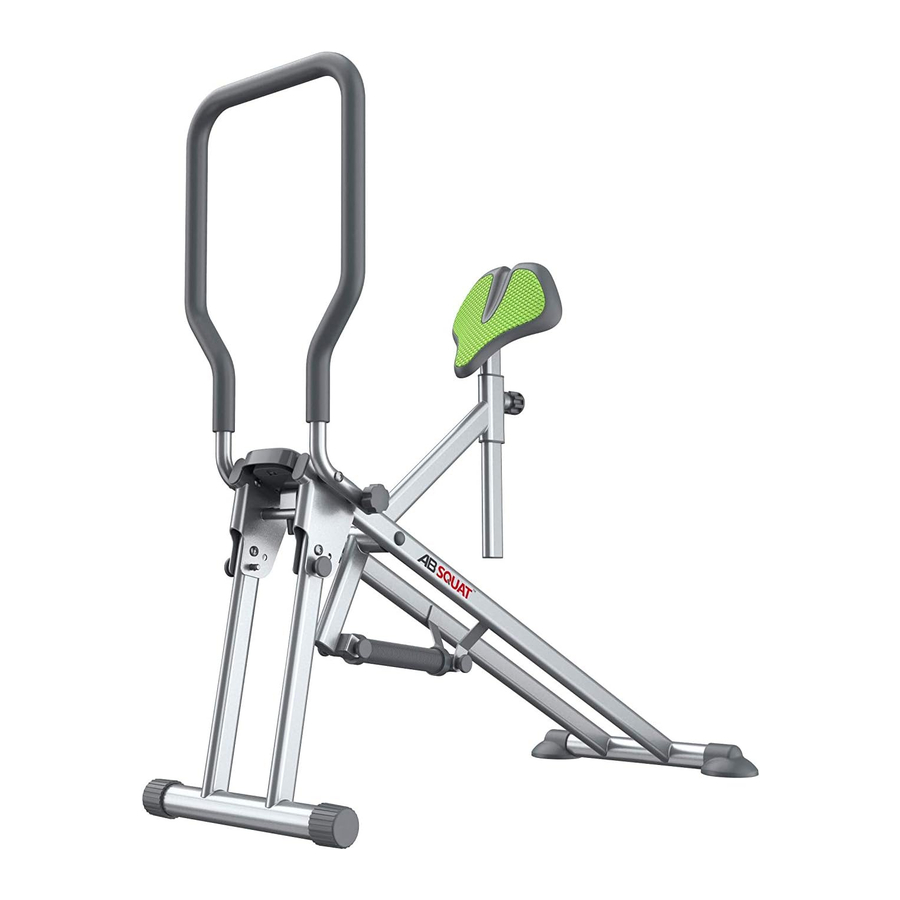
EXPLODED DIAGRAM

| Part No. | Description | Q'ty |
| 1 | Front Main Frame | 1 |
| 2 | Rear Support Tube | 1 |
| 3 | Seat Support Tube | 1 |
| 4 | Handle Bar | 1 |
| 5 | Seat Tube | 1 |
| 6 | Monitor | 1 |
| 7 | Pull Knob | 1 |
| 8 | Hollow Stopper | 2 |
| 9 | Bushing | 1 |
| 10 | Magnet | 1 |
| 11 | End cap for front main frame | 2 |
| 12 | EVA Pad | 2 |
| 13 | End Cap for rear support tube | 2 |
| 14 | Tension Spring | 1 |
| 15 | Handle bar stopper | 2 |
| 16 | Knob | 2 |
| 17 | Seat | 1 |
| 18 | Stopper for front main frame | 2 |
| 19 | Plastic bushing | 2 |
| 20 | Foam | 1 |
| 21 | Pin thread | 2 |
| 22 | Flat head Nut thread | 2 |
| 23 | Cushion | 1 |
| 24 | Bushing for wire | 2 |
| 25 | Lower computer wire | 1 |
| 26 | Flat head pin | 2 |
| 27 | M10x155 Hex Bolt | 1 |
| 28 | Washer 1010.2 | 1 |
| 29 | M10 Nut | 1 |
| 30 | M8x35 Hex Bolt | 2 |
| 31 | M8 Nut | 7 |
| 32 | Washer ID8.2 | 7 |
| 33 | M8x57 Hex Bolt | 2 |
| 34 | M4x15 Phillips Screw | 1 |
| 35 | M8x60 Hex Bolt | 2 |
| 36 | Curve Washer ID8.2 | 2 |
| 37 | Stopper for seat tube | 1 |
ASSEMBLY DIAGRAM
Lay out all the parts as shown on diagram below.

| Part No. | Description | Q'ty |
| 5 | Seat Tube | 1 |
| 6 | Monitor | 1 |
| 11 | End cap for front main frame | 2 |
| 16 | Knob | 2 |
| 21 | Pin thread | 2 |
| 23 | Cushion | 1 |
| 26 | Flat head pln | 2 |
ASSEMBLY
STEP 1

Release the Flat head pin (26) from the machine, bring forward the Rear Support Tube(2) then fasten with the Flat head pin (26).

Please make sure the Flat head pin (26) is tightly fastened.
STEP 2

- Remove the protect cap (39)
- Insert the End cap for front main frame(11) so the machine can be freestanding.
STEP 3

Release the Knob (16) and Bring the Handle Bar(4) up, then reinsert the Knob (16) and tighten.
STEP 4

Release the Pin thread (21) and the Flat head Nut thread (22). Bring the Seat Tube(3) up, then tighten the TensionSpring(14) by inserting the Pin thread (21) and fastening in the Flat head Nut thread (22).
Please make sure the Pin thread (21) and the Flat head Nut thread (22) is tightly fastened.
STEP 5

tighten the Cushion (23).
STEP 6

Connect the Upper computer wire with Lower computer wire, then Slide the Monitor(6) into the machine.
STEP 7


Pull the Pull Knob(7) and insert the Seat Tube(5) into the machine, then tighten the Pull Knob(7).

Now the assembly is completed and ready to use.
Enjoy the easy and fun exercises!
EXERCISE COMPUTER

SPECIFICATIONS
| 1.TIME | 0:00 - 99:59 MIN |
| 2.COUNT | 0 - 9999 TIMES |
| 3.REPS | 0 - 9999 TIMES/MIN |
| 4.CALORlES | 0- 9999 CAL |
KEY FUNCTION
MODE:T his button allows you to cycle through all the monitor functions.
OPERATION PROCEDURES
- AUTO ON/OFF:
The system turns on when the MODE button is pressed or when it senses a signal input from the speed sensor. The system turns off automatically when the speed sensor receives no signal input or no button is pressed for approximately 4 minutes. - RESET :
The unit can be reset by changing battery or holding the MODE button for 3 seconds. - FUNCTION :
COUNT: Total accumulated squats.
SELECT: Use the MODE button to select and lock a function in for the following sequence: TIME → COUNT → CAL → REPS → SCAN
BATTERY: This monitor uses two AM-I.5V battery. Replace batteries through the back of the unit.
STORAGE
STEP 1

Release the Pin thread (21) and the Flat head Nut thread (22). Lay down the Seat Tube(5). Then insert the Pin thread (21) and fasten the Flat head Nut thread (22) to each holes accordingly.
STEP 2

Release the Knob (16), then lay down the Handle Bar (4). Insert the Knob (16) to each holes accordingly.
STEP 3

Release the Flat head pin (26) from the machine, then fold the Rear Support Tube(2) Reinsert and fasten with the Flat head pin (26). Now that the machine is folded up, you can store it in an appropriate space.
CARE AND MAINTENANCE
- Use a dry cloth to clean the product after using.
- Keep away from direct sunshine or environment with high temperature and humidity.
- This equipment is not suitable for children. Do not allow children to play on or around it.
- Do not clean the product by abrasive or corrosive cleaners such as gasoline or acetone.
- Check your equipment before each use to ensure that all parts are assembled, and all nuts, bolts, knobs, pins are tightened and in proper place.
- Before EACH use, visually inspect the equipment. Never use this equipment if it is not working properly or if there are damaged or worn parts. Call our Customer Service Department with any questions.
- The safety level of the equipment can be maintained only if it is examined regularly for damage and wear.
- Replace defective components immediately and/or keep the equipment out of use until repair.
CONSUMABLE

EVA Pad (12) and Tension Spring (14) are consumable, please contact authorized local distributor for purchase. DO NOT use any accessories not recommended by the manufacturer. Be sure to have good understanding of correct use of this machine before using.
SPECIFICATIONS
| Type | BJ-10781 |
| Class | HC |
| Dimension | Use: L99 x W42 x H96cm Storage: L107 x W42 x H38cm Use: L38.9 x W16.5x H37.7in Storage: L42x W16.5 x H14.9in |
| Net Weight | 9 kgs/ 19.81bs |
| Maximum Weight | 100 kgs / 220.461bs |
| Origin | Made in China |
Manufacturer / Customer Service Address
Licence holder: BODY ACTION ENTERPRISE CO., LTD.
Address: No.343, Xishi Rd., Fengyuan Dist., Taichung CiV 42061, Taiwan
WARM-UP
GETTING STARTED
Always warm-up your muscles before exercising, start your exercise program conservatively. Select a goal or pace for each exercise that is easily performed. Alternating your daily workouts every other day reduces lactic acid build up and consequently reduces muscle soreness. Begin and end each exercise session by stretching your muscles for 7-10 minutes.
- Recommended Warm Up Program
A successful exercise program consists of a warm-up, aerobic exercise, and a cool-down. Do the entire program at least two to three times a week, resting for a day between workouts. After several months, you can increase your workouts to four to five times per week. - Warm-up and Cool-down
Warming up is an important part of your workout, and should begin every exercise session. It prepares your body for more strenuous exercise by heating up and stretching out your muscles. Increasing your circulation and head rate, and delivers more oxygen to your muscles. At the end of your workout, repeat these exercises to reduce sore muscle problems. We suggest the following warm-up and cool-down exercises:
HEAD ROLLS
Rotate your head to the right for 1 count, feeling the stretch up the left side of your neck. Next, rotate your head back for one count, stretching your chin to the ceiling and letting your mouth open. Rotate your head to the left for 1 count, and finally, drop your head forward for 1 count, repeat the same movement to the right, again taking 1 count for each position. Then reverse direction and repeat the exercise two more times on the left and right.

SHOULDER LIFTS
Lift your right shoulder up toward your ear for 1 count. Then lift your left shoulder up for 1 count as you lower your right shoulder. Repeat right and left shoulder lifts for a total of 8 counts.

SIDE STRETCHES
Open your arms to the side and continue lifting them until they are over your head. Reach your right arm as far upward toward the ceiling as you can for 1 count. Feel the stretch up your right side. Repeat this action with the left arm. Repeat this entire stretch, reaching right and left for a total of 8 counts.

HAMSTRING STRETCH
Sit with your right leg extended. Reset the sole of your let foot against your right inner thigh. Stretch toward your right toe as far as possible. Hold for 15 then relax. Repeat with the left leg extended.

INNER THIGH STRETCH
Sit with the soles of your feet together, with your knees pointing outward. Pull your feet as close into your groin areas as possible. Gently push your knees towards the floor. Hold for 15 counts. Repeat again.

TOE TOUCH STRETCH
Slowly bend forward from your waist, letting your back and shoulders relax as you stretch toward your toes. Reach down as far as you can and hold for 15 counts. Repeat again.

QUADRICEPS STRETCH
With one hand against the wall for balance, reach behind you and pull your right foot up. Bring your heel as close to your buttocks as possible. Hold for 15 counts and repeat with left foot up. Repeat this entire stretch again.

CALF/ACHILLES STRETCH
Lean against a wall with your hands planted firmly on the wall. Place your left leg in front of your right leg. Keep your right leg straight and left foot on the floor; then bend the left leg and lean forward by moving your hips towards the wall. Hold then repeat on the right side for 15 counts.

EXERCISE GUIDELINES

Max. User's Weight: 100 kgs / 2201bs
Documents / ResourcesDownload manual
Here you can download full pdf version of manual, it may contain additional safety instructions, warranty information, FCC rules, etc.
Advertisement
Need help?
Do you have a question about the AB SQUAT and is the answer not in the manual?
Questions and answers