SSL SX310 - Electronic Crossover Manual
- User manual (12 pages) ,
- User manual (12 pages)
Advertisement
- 1 How the device is used
- 2 Installation
- 3 Electrical and audio connections
- 4 Getting started
- 5 Parallel Input System
- 6 Selectable crossover slopes
- 7 Bass Boost
- 8 Phase Shift Selector
- 9 Independent Channel Output Level Controls
- 10 Controls and features
- 11 Audio connections
- 12 Power and Remote Level Control connections
- 13 Documents / Resources
How the device is used
THe Sound Storm Laboratories SX310 is a high-fidelity signal processor that allows you to divide a stereo audio input signal into three separate channels. The FRONT and REAR controls incorporate high pass crossovers which are intended to be used to create mids or high channels, and the SUB crossover is a low pass filter designed to limit the SUB channel to low frequencies.
All outputs are stereo. For use in systems where there is a single mono subwoofer, the SX310 features a circuit which merges the left and right subwoofer channels so that the signal presented to the left and right subwoofer outputs is mono.
A special feature of this crossover is the Parallel Input System. This capability allows you to create a stereo three-way system with only a L/R stereo input.
For improved time alignment, the subwoofer channel also features a selector for switching the subwoofer output signal phase.
This crossover intended for use in a car audio system which includes amplifiers in the signal path after the head unit.
Installation
Choose a mounting location where the unit will not distract or otherwise interfere with the driver's ability to control the vehicle
Use only the installation parts and hardware provided with the unit to ensure proper installation. Using other parts can cause malfunction and possible damage to your crossover.
Avoid installing the unit in a location which is subject to high temperatures, direct sunlight, hot air from such sources as heaters or exhaust lines, or where it will be subject to contact with dust, dirt, moisture or excessive vibration.
Electrical and audio connections
Using the screw terminals provided connect the following wires:
+12V:
Use a minimum 16GA wire and connect it directly to the vehicle's (+) battery terminal, with a inline 3A fuse within 18 inches of the battery.
GND (Ground):
Use a minimum 16GA wire and connect it to a clean, solid chassis ground point as close to the crossover as possible.
REM (Remote):
Use a minimum 16GA wire and connect it to the Remote Turn-On lead of your head unit.
Audio Cables:
Use high quality RCA cables. Make connections as shown in the diagram shown elsewhere in this manual.
Getting started
Before powering up your system:
- recheck all connections
- set all level controls to the minimum positions
- set all crossover controls and switches to the desired positions.
Power up your system and set the volume control on your head unit to a moderate level (typically this is a level where you can still have a normal conversation and be heard over the audio). You may need to further fine tune the system to suit your taste.
Parallel Input System
A unique feature built into the Sound Storm Laboratories SX310 is a very flexible input selector system called the Parallel Input system.
It is controlled by a selector switch located on the main panel above the FRONT crossover section.
When the switch is in the OUT position, the front stereo input signals are also sent to the REAR crossovers.
In addition, if you set the SUBWOOFER INPUT MODE SELECTOR switch to the ON position, the front stereo input will also be delivered to the SUB crossover.
By using this feature cleverly, you can create a very sophisticated 3-way audio system with only a pair of stereo inputs from your head unit.
Selectable crossover slopes
The crossovers for both the front and rear channels feature selectable crossover slopes. The slope of a crossover describes how steep the sound level dropoff is surrounding the crossover frequency you select.
The SX310 gives you a choice of 6dB or 12dB per octave dropoff. An octave change in frequency is defined as a doubling of frequency.
For example, if your high pass (front) crossover slope is set to 6dB and the crossover frequency is set to 1kHz, you can expect that the level of audio output at 500Hz would be 6dB less than at 1kHz. Similarly, at 250Hz you would expect it to be 12dB less, and so on.
Being able to choose the slope can be useful. If your speaker elements all have somewhat narrow, but overlapping frequency response ranges, you may be able to use a steep slope setting, like 12dB per octave. This way you can choose the same crossover frequency for your highs and mids and not worry about the audio portions outside the range of your speakers adding distortion.
Conversely, if your speaker elements have wide areas of overlapping frequency response ranges, you can use a shallow slope like 6dB/octave and attain a very smooth transition between all speakers in your system.
Bass Boost
Bass Boost is a popular feature for car audio systems. Sound Storm Laboratories take it to the next level by allowing you to custom-tune the center frequency for the boost.
When you set the center frequency for Bass Boost, you are directing the crossover to focus the boost at that frequency, at the dB level you set for the Bass Boost.
By setting the frequency at the center of the frequency response range of your woofer, you know that the boost will hit hardest at the right frequency with the least amount of distortion.
Phase Shift Selector
Depending on the physical nature of your subwoofer, the type of enclosure (if any), and how far it is located from the other speakers, it is possible that the sound from the subwoofer is "out of phase" with the other speakers.
This means that the sound waves are overlapping in such a manner as to cause some cancellation which can compromise the sound quality.
Also, if your vehicle is large and there is a lot of distance between the subs and the other speakers, the audio from the subs might be arriving a little bit "late", which can affect the "spatial imaging" of the music.
To help with this, Sound Storm included a Phase Shift selector. If you suspect that your speaker system is out of phase, just flip this switch and the problem will probably go away.
Independent Channel Output Level Controls
The SX310's independent output level controls for the three channels gives you the ability to really improve the spatiality of the system by getting just the right sound levels in each range of the frequency spectrum.
Of course, when you need to add some punch to the bass, you don't need to open the trunk and change the setting - just use the Remote Subwoofer Control for doing it on the fly. are
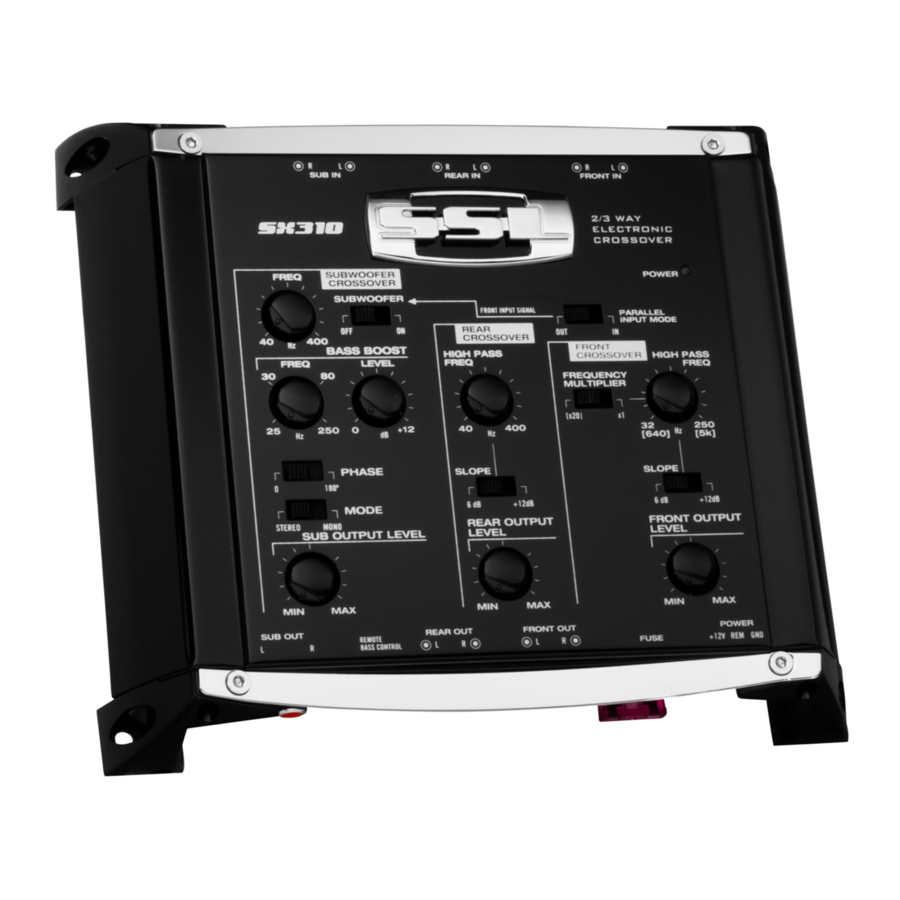
Controls and features

- L/R SUB AUDIO INPUTS
- L/R REAR AUDIO INPUTS
- L/R FRONT AUDIO INPUTS
- SUBWOOFER CROSSOVER FREQUENCY CONTROL
Use this to select the frequency range sent to the subwoofer outputs. The selected frequency is the highest frequency which will be reproduced by the subwoofer(s). - SUB INPUT SOURCE SELECTOR
If there is no dedicated subwoofer channel input available from your head unit, put this switch in the ON position to deliver the signal on the front inputs to the sub channel path. - BASS BOOST FREQUENCY
Use this control to set the center frequency for the Sub channel bass boost feature. - BASS BOOST CONTROL
This control allows you to increase the level of the bass up to +12dB./ - PHASE SELECTOR
Select the phase of the subwoofer output channel(s) for best time alignment and imaging. - SUB STEREO/MONO SELECTOR
For systems where you need stereo subwoofer outputs, choose STEREO. For all others choose MONO. - SUBWOOFER OUTPUT LEVEL
Use to independently increase or decrease output gain for this channel. - L/R SUB AUDIO OUTPUTS
- REMOTE SUBWOOFER LEVEL CONTROL JACK
- L/R REAR AUDIO INPUTS
- L/R FRONT AUDIO INPUTS
- FUSE
Power Connections:
- +12V
- REMOTE
- GROUND
- PARALLEL INPUT MODE SELECTOR
If you only have a stereo input signal, putting this switch in the OUT position sends a copy of the front input signal to the rear crossover path. If a dedicated rear signal input is connected, be sure to put this in the IN position. - POWER INDICATOR
- HIGH PASS CROSSOVER FREQUENCY MULTIPLAYER SWITCH
This switch raises the frequency range available for the high pass crossover from 32-250Hz to 650-5kHz. - FRONT HIGH PASS CROSSOVER FREQUENCY CONTROL
Sets the crossover frequency for the front (high pass) crossover. - REAR HIGH PASS CROSSOVER FREQUENCY CONTROL
Sets the crossover frequency for the rear (high pass) crossover. - SLOPE SELECTORS
These selectors permit you to choose the slope of the filter effect at the frequencies you have selected (+6dB or +12dB/octave). - FRONT OUTPUT LEVEL
Use to independently increase or decrease output gain for this channel. - REAR OUTPUT LEVEL
Use to independently increase or decrease output gain for this channel.
Audio connections
2-Channel Stereo System
In this system, the head unit is providing a stereo channel pair.

4-Channel Stereo Front/Rear System
In this system, the head unit is providing independent Front and Rear Channel signals.

6-Channel Stereo Front/Rear/Sub System
In this system, the head unit is providing independent Front, Rear and Subwoofer Channel signals.

Power and Remote Level Control connections
Please note that this crossover contains an internal ON/OFF switch, which is activated when the head unit is turned on. For this reason, in order to use this crossover, your head unit must have a remote-turn on lead.

| SX310 2/3 Way Electronic Crossover with Remote Subwoofer Level Control | ||
| Front channel: | ||
| High pass crossover frequency | Range 1 (multiplier setting = 1x) | 32Hz-250Hz |
| Range 2 (multiplier setting = 20x) | 640Hz-5kHz | |
| Crossover slope | selectable: 6dB or 12dB/octave | |
| Rear channel | ||
| High pass crossover frequency range | 40Hz-400Hz | |
| Crossover slope | selectable: 6dB or 12dB/octave | |
| Subwoofer channel | ||
| Low pass crossover frequency range | 40Hz-400Hz | |
| Bass Boost frequency range | 25Hz-250Hz | |
| Bass Boost level | +12dB | |
| Signal-to-noise ratio | 110dB | |
| THD | less than 0.01% | |
| Channel separation | 80dB | |
| Power supply (DC-to-DC switching type) | 10-16V negative ground | |
| Output voltage | 8V max | |
| Input impedance | 20k Ohms | |
| Output impedance | 100 Ohms | |
| Output gain | 1:2 (+6dB) | |
| Dimensions (W x D x H) | 8.5" x 7.38" x 1.63" | |
All specifications subject to change without notice.
Documents / ResourcesDownload manual
Here you can download full pdf version of manual, it may contain additional safety instructions, warranty information, FCC rules, etc.
Advertisement


Need help?
Do you have a question about the SX310 and is the answer not in the manual?
Questions and answers