Advertisement
- 1 STOP! READ ME
- 2 The Kit Contains
- 3 Step 1: Get Ready
- 4 Step 2: Make the Saline
- 5 Step 3: Prepare the Electrodes
- 6 Step 4: Place the Electrodes
- 7 Step 5: Select a Session
- 8 Step 6: Run a Session
- 9 Step 7: Try the Meter
- 10 Step 8: Choose a Montage
- 11 Step 9: Explore the Technology
- 12 Documents / Resources
STOP! READ ME
 NEUROMYST
- Is a very low power device
- Applies tDCS or tACS
- Is used for general wellness
- Is researched but experimental
 NEUROMYST
- Is NOT a medical device
- Is NOT intended to treat, cure or diagnose any medical condition
SIDE EFFECTS
Common
- Mild skin sensations
- Light flashes
- Mild skin redness
Less Common
- Mild sleepiness
- Sleeplessness
- Headache
- Metal taste
Health effects will vary by individual
PRECAUTIONS
- Consult a doctor if you are pregnant
- Stop stimulation if you have any non-mild reactions
- Do not put electrodes on the chest
- Do not put electrodes on wounded skin
- Start with an intensity of 1mA or less
 DO NOT USE IF YOU HAVE...
- An electronic medical implant
- A history of seizures
- A history of headache or migraine
- A neurological impairment
- A blood or heart disease, or take anticoagulant medication
Watch Me!

Point your phone camera at the tiny dots and click the yellow link.
The Kit Contains
Electronics

Connectors

Sponge Electrodes

Other Accessories

Step 1: Get Ready
- Fresh start (optional)
Hold down the red button until the screen flashes for a software restart.
")
- Charge the device

- Unplug the device
The device must be unplugged to turn on.

- Turn on the device

")


Need Help?

Point your phone camera at the tiny dots and click the yellow link.
Step 2: Make the Saline
- Get salt and water
Salt, 3/4 teaspoon (Half a dinner spoon)
![]()
Water, 1/2 Liter (16.9oz bottled water)
![]()
- Make the saline
First, heat the water.
Second, stir in the salt. Third, cool the water.
![]()
- Soak the sponges
![]()
- Squeeze the sponges
![]()
(gently squeeze)


Tips and Maintenance

- Sponges can last for months.
- Rinse sponges in water after use.
- Microwave sponges in water once a week for 30−60s.
- Keep sponges dry after use.
Step 3: Prepare the Electrodes
Get the parts
2x sponges

2x electrodes

2x cases

Assemble electrodes

- Soak each sponge with saline
- Place one sponge on top of each electrode
- Place each electrode into a plastic case
Find pin connector

Turn the sponge electrode on its back side. There is a small pinhole connector. See the orange square.
Connect electrodes

The L-shaped plug connects to the device's top.
Step 4: Place the Electrodes
Try a test montage

A Montage tells you where the electrodes are placed on the scalp.
Secure electrodes

Use the headband to hold the electrodes against your head.
For tDCS Mode
The electrode with the red pin is placed at the red circle

The electrode with the black pin is placed at the black circle
The pin color matters!
For tACS Mode
The electrode with the red pin can go in either green circle

The electrode with the black pin can go in either green circle
The pin color does not matter.
NOTE. The electrodes are not actually red, black, or green. These colors are only used to show how to connect the pins and where to place the electrodes.
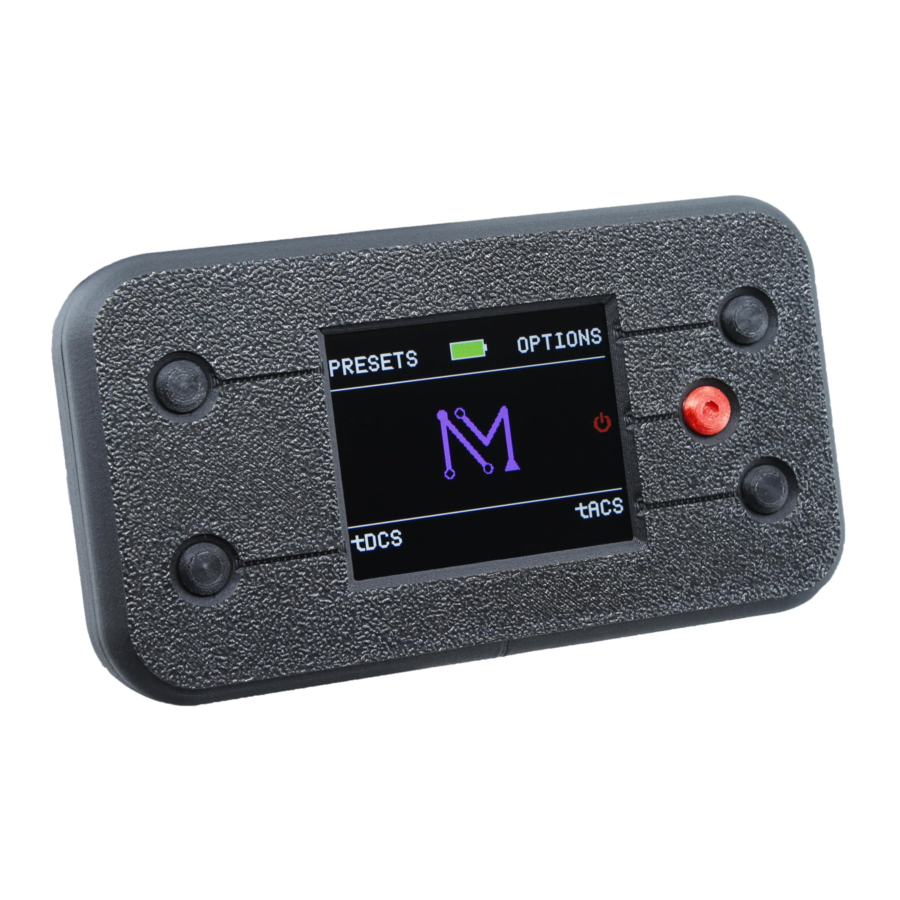
Step 5: Select a Session
Meter (optional)
Press the top right button to access the optional session meter. The meter is off by default.
")
Preset Session
Press the top left button to access presets. There are 3 preset tDCS sessions and 3 preset tACS sessions.

tDCS Session

Press the bottom left button for tDCS. This uses steady current to enhance or calm brain activity.

tACS Session

Press the bottom right button for tACS.
tACS uses oscillating current to promote brain rhythms.

Note 1. Presets let you quickly start a tDCS or tACS session.
Note 2. Full tDCS and tACS modes let you customize the session time and intensity. tACS mode also lets you customize frequency.
Step 6: Run a Session
Adjust and begin
Adjust the settings with the left and bottom buttons (black dots). Press the red button to start.

Gradual start
Sessions begin (end) with a 30s ramp up (down). Only the top right button is enabled during ramps.

Output intensity
After the ramp up, you control the intensity using the bottom buttons.

Pause or stop
Pause / resume with the red button.
Stop immediately with the top right button. Otherwise, the session ends when the timer runs out.

Note. The session meter is off by default. Go to Options in the home screen to turn the meter on or off.
Step 7: Try the Meter
Turn the meter on
The meter is off by default

Start any session

Improve the connection

Pro Tip. Try testing the meter first with only the electrodes. Have the electrodes touch sponge to sponge.

Step 8: Choose a Montage
tDCS
Smile

Researched for improving mood
Caffeine

Researched for staying alert
Focus

Researched for improving focus
tACS
Positive

Researched for improving mood
Awake

Researched for staying alert
Snooze

Researched for improving sleep
Off-Head Electrodes
✔ Yes, on neck or upper back.
X No, on chest or wounded skin.

(Secure with a tight wrap or clothing)
More Montages

Point your phone camera at the tiny dots and click the yellow link.
Step 9: Explore the Technology
tDCS = transcranial direct current stimulation

Current flows from red to black

anode: positive (+) electrode where current enters the head.
cathode: negative (−) electrode where current exits the head.
tACS = transcranial alternating current stimulation

Current oscillates back and forth

electrodes: the current flips between + and − over time.
frequency: how many cycles per second (Hertz = Hz).
Resistance: how hard it is to push current between electrodes
Learn More

Point your phone camera at either dot code and click the yellow link.
Documents / ResourcesDownload manual
Here you can download full pdf version of manual, it may contain additional safety instructions, warranty information, FCC rules, etc.
Advertisement

Need help?
Do you have a question about the Pro and is the answer not in the manual?
Questions and answers