Lenovo Legion Go, 8APU1, 83E1 - Video Game Console Manual
- User manual (42 pages) ,
- Reviewer's manual (13 pages) ,
- Hardware maintenance manual (58 pages)
Advertisement
- 1 About this guide
- 2 Meet your Legion Go
- 3 Set your Legion Go
- 4 Enjoy your Legion Go
- 5 Frequently asked questions
- 6 Troubleshooting
- 7 Documents / Resources
About this guide
Before using this documentation and the product it supports, ensure that you read and understand the following:
- Generic Safety and Compliance Notices
- Safety and Warranty Guide
- Setup Guide
This guide applies to Lenovo product model(s) listed below. Illustrations in this guide may look slightly different from your product model.
| Model name | Machine type (MT) |
| Legion Go 8APU1 | 83E1 |
- For further compliance information, refer to the Generic Safety and Compliance Notices at https://pcsupport.lenovo.com/docs/generic_notices.
- This guide may contain information about accessories, features, and software that are not available on all models.
- This guide contains instructions that are based on the Windows operating system. These instructions are not applicable if you install and use other operating systems.
- Microsoft® makes periodic feature changes to the Windows® operating system through Windows Update. As a result, the operating system related instructions may become outdated. Refer to Microsoft resources for the latest information.
- The content of the guide is subject to change without notice. To obtain the latest version, go to https://support.lenovo.com.
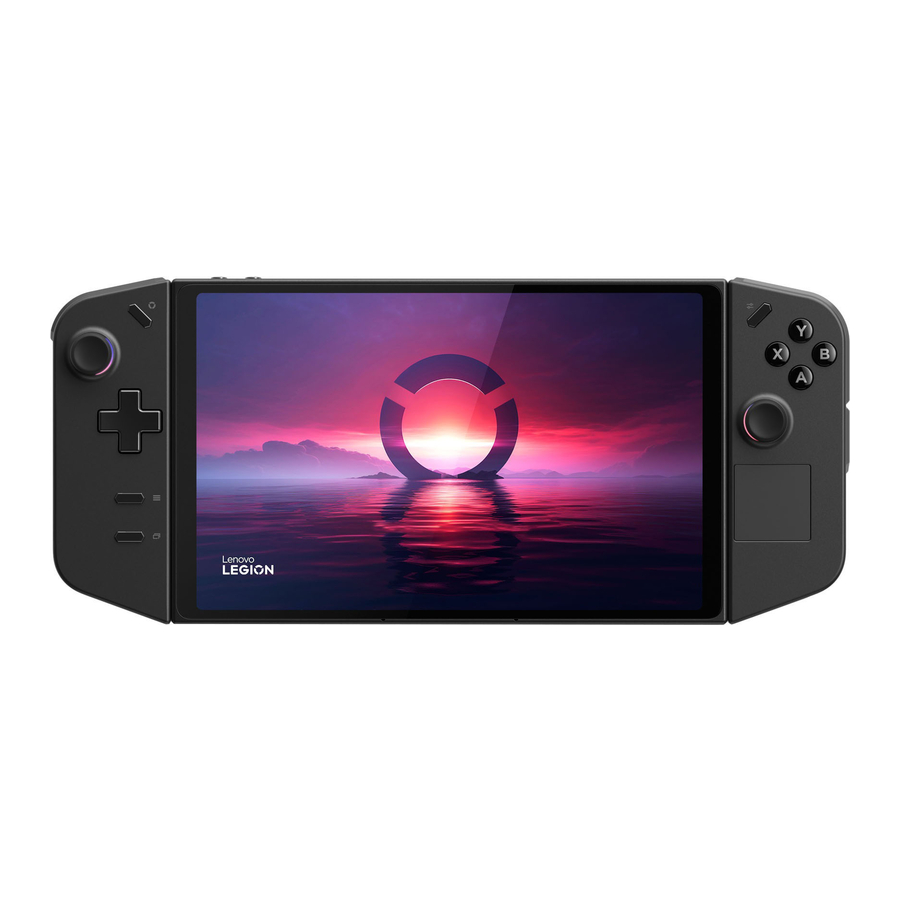
Meet your Legion Go
What is Legion Go
Legion Go is the first console developed by Lenovo. You can use it for study, work, or entertainment.
Legion Go in this User Guide refers to the combination of the tablet and two controllers.

| No. | Description |
| 1 | Left controller |
| 2 | Tablet |
| 3 | Right controller |
Front view

| No. | Description |
| 1 | Select button |
| 2 | L button |
| 3 | Left joystick |
| 4 | D-pad |
| 5 | Function buttons |
| 6 | Menu button |
| 7 | R button |
| 8 | ABXY buttons |
| 9 | Right joystick |
| 10 | R button 2 |
| 11 | Trackpad |
Back view

| No. | Description |
| 1 | Back buttons (left) |
| 2 | Left release button |
| 3 | Thermal fins |
| 4 | Mouse wheel |
| 5 | Back buttons (right) |
| 6 | Right release button |
| 7 | Kick stand |
Avoid constant body contact with specific hot sections

When the console is operating, it should be placed on a hard and flat surface with its back area not in contact with user's bare skin. Under normal operating conditions, the temperature of the back surface will remain within an acceptable range as defined in IEC 62368-1, but such temperatures can still be high enough to cause discomfort or harm to the user if directly touched for over 10 seconds at a time. As such, it is recommended that users avoid prolonged direct contact with the back of the tablet.
Top view

| No. | Description |
| 1 | Volume buttons |
| 2 | USB Type-C |
| 3 | Card reader |
| 4 | Thermal fins |
| 5 | Combo audio jack |
| 6 | Power button |
Bottom view

| No. | Description |
| 1 | USB Type-C |
| 2 | Mouse switch |
| 3 | Mouse sensor |
Specifications for the tablet
Dimensions
| Length | 210 mm |
| Width | 131 mm |
| Thickness | 20 mm |
Display
| Type | LCD |
| Size | 8.8 inch |
| Resolution | 2560 x 1600 |
| Maximum refresh rate | 144 Hz |
| Brightness | 500 nits |
Connectors
| Combo audio jack |
|
| Micro SD card reader |
|
| USB4 |
|
ac power adapter
| Input | 100 V ac–240 V ac, 50 Hz–60 Hz |
| Maximum output | 20 V dc, 3.25 A |
Rechargeable battery pack
| Capacity | 49.2 Wh |
| Cell type | Li-Polymer |
 Note: The battery capacity is the typical or average capacity as measured in a specific test environment. Capacities measured in other environments may differ but are no lower than the rated capacity (see product label).
Memory
| Type | LPDDR5X |
| Installation | on-board |
Mass storage
| Type | SSD |
| Slot | M.2 (2242) |
| Interface | PCIe Gen4 |
Networking
| Wi-Fi | Wi-Fi 6E |
| Bluetooth | Bluetooth 5.2 |
Statement on USB transfer rate
Depending on many factors such as the processing capability of the host and peripheral devices, file attributes, and other factors related to system configuration and operating environments, the actual transfer rate using the various USB connectors on this device will vary and will be slower than the data rate listed below for each corresponding device.
| USB device | Data rate (Gbit/s) |
| USB 3.2 Gen 1 | 5 |
| USB 3.2 Gen 2 | 10 |
| USB4 | 40 |
Operating environment
Maximum altitude (without pressurization): 3048 m (10 000 ft)
Temperature
- At altitudes up to 2438 m (8000 ft)
- Operating: 5°C to 35°C (41°F to 95°F)
- Storage: 5°C to 43°C (41°F to 109°F)
- At altitudes above 2438 m (8000 ft)
- Maximum temperature when operating under the unpressurized condition: 31.3°C (88°F)
Note: When you charge the battery, its temperature must be no lower than 10°C (50°F).
Relative humidity
- Operating: 8% to 95% at wet-bulb temperature 23°C (73°F)
- Storage: 5% to 95% at wet-bulb temperature 27°C (81°F)
Set your Legion Go
Connect Legion Go to external devices
You can connect Legion Go to external devices, such as the smart phone, TV box, or personal computer, through the Bluetooth, 2.4G receiver, or a USB Type-C cable.
Connect via Bluetooth
Legion Go can be connected to Switch, Android phone, iOS phone, and TV box via Bluetooth.
Connect via 2.4G receiver
Legion Go can be connected to PC with Windows System and TV box via 2.4G receiver.
Different states of the receiver
The receiver can be used to connect to Legion Go.
Different indicator status indicates different states of the receiver.
- Auto-connecting mode: when the receiver is inserted, the indicator blinks red slow flashing, enter the connected mode.
- Pairing mode: press the button on the receiver, the receiver LED light will switch from red slow flashing to fast flashing, that has entered the pairing mode, search for available devices.
- Connected mode: After entering the pairing mode, the LED light is always on red, indicating successful connection. The next time you turn on the phone, the handle will automatically connect back.
Connect via Type-C cable
Legion Go can be connected to PC with Windows System via Type-C cable.
Connection priority
In the off state of Legion Go,
- if Legion Go has been connected to an external device via Type-C cable, then the console connects to the external device through the cable prior to Bluetooth when it is turned on.
- if Legion Go was not connected to any external device via Type-C cable, then it will connect to the external device through Bluetooth after it is turned on.
In the power-on state, when Legion Go is connecting to an external device via Bluetooth, Type-C cable only supports charging function even if it is connected to Legion Go.
Start Legion Go
Turn on and off the controllers
Press and hold the key combination for 2 seconds to turn on the controllers.
Note: Choose the proper key combinations for entering the corresponding mode. You can refer to "Switch between connection modes".
The controllers may be powered off in three situations.
- In the pairing mode, the controllers will be automatically shut down if there is no successful connection within two minutes.
- Ten minutes of no operation when the controllers have been connected to the external device.
- Press and hold the Home key for three seconds.
Reset the controllers
Quickly press the pin hole on the back of the controller, it will be forced to power off.
Note: The temporary data in the Memory will be cleared after the controller is powered off.
Switch between connection modes
Before starting the game travel, you should switch Legion Go to the selected mode and then connect it to the right external devices.
Follow the operation guide and check whether you have switched to the correct mode according to the indicator status.
The indicator is embedded in the power button.
Table 1. Operation guide to switching between different connection modes
| Mode | Operation | Indicator status |
| PC mode | Press X button → Hold Home button for 2 seconds → Connect to an external device | Solid green |
| Switch mode | Press Y button → Hold Home button for 2 seconds → Connect to an external device | Solid red |
| Android mode | Press A button → Hold Home button for 2 seconds → Connect to an external device | Solid blue |
| iOS mode | Press B button → Hold Home button for 2 seconds → Connect to an external device | Solid purple |
Notes:
- The mode should be switched under power-off state.
- Under PC mode and Android mode, Legion Go is in X-input mode by default.
- While in X-input mode, press Home, A, and B button at the same time, your console can be switched to D- input mode and the indicator blinks twice means the mode switch is successful.
- While in D-input mode, press Home, A, and B button at the same time, your console can be switched to X- input mode and the indicator blinks once means the mode switch is successful.
Set the Turbo combo keys
Combo keys provides a shortcut in playing games, which can help make faster actions and save your efforts. When you have set the combo keys, you can just press one key to realize the effect of pressing several keys.
Set the Turbo combo keys: Hold the Turbo key, and fast press the key (A/B/X/Y/L1/L2/R1/R2), then the combo key has been remembered by Legion Go.
There are four gears for the speed of the combo keys: off (default) / slow (2Hz) / medium (5Hz) / fast (8Hz).
Toggle between different gears: Hold the Turbo key, then press the Left or Right key to adjust the gear. The indicator flashes once when you set to slow gear, twice when you set to medium gear, and three times when you set to fast gear.
Note: Hold the Clear key for 2 seconds to clear all set combo keys.
Set passwords in UEFI/BIOS setup utility
This section introduces the types of passwords that you can set in the UEFI (Unified Extensible Firmware Interface) or BIOS (Basic Input/Output System) setup utility.
Password types
You can set various types of passwords in the UEFI/BIOS setup utility.
| Password type | Pre-requisite | Usage |
| Administrator password | No | You must enter it to start the setup utility. |
| User password | The administrator password must be set. | You can use the user password to start the setup utility. |
| Master hard disk password | No | You must enter it to start the operating system. |
| User hard disk password | The master hard disk password must be set. | You can use the user hard disk password to start the operating system. |
Notes:
- All passwords set in the setup utility consist of alphanumeric characters only.
- If you start the setup utility using the user password, you can only change a few settings.
Set administrator password
You set the administrator password to prevent unauthorized access to the UEFI/BIOS setup utility.
Attention
If you forget the administrator password, a Lenovo authorized service personnel cannot reset your password. You must take your computer to a Lenovo authorized service personnel to have the system board replaced. Proof of purchase is required and a fee will be charged for parts and service.
| Step 1. | Open the UEFI/BIOS setup utility. |
| Step 2. | Select Security ➙ Set Administrator Password and press Enter. |
| Step 3. | Enter a password string that contains only letters and numbers and then press Enter |
| Step 4. | Enter the password again and press Enter. |
| Step 5. | Select Exit ➙ Exit Saving Changes. |
Next time you start the computer, you must enter the administrator password to open the setup utility. If Power on Password is enabled, you must enter the administrator password or the user password to start the computer.
Change or remove administrator password
Only the administrator can change or remove the administrator password.
| Step 1. | Open the UEFI/BIOS setup utility using the administrator password. |
| Step 2. | Select Security ➙ Set Administrator Password and press Enter. |
| Step 3. | Enter the current password. |
| Step 4. | In the Enter New Password text box, enter the new password. |
| Step 5. | In the Confirm New Password text box, enter the new password again.
|
| Step 6. | Select Exit ➙ Exit Saving Changes. |
If you remove the administrator password, the user password is also removed.
Set user password
You must set the administrator password before you can set the user password.
The administrator of the setup utility might need to set a user password for use by others.
| Step 1. | Open the UEFI/BIOS setup utility using the administrator password. |
| Step 2. | Select Security ➙ Set User Password and press Enter. |
| Step 3. | Enter a password string that contains only letters and numbers and then press Enter. The user password must be different from the administrator password. |
| Step 4. | Enter the password again and press Enter. |
| Step 5. | Select Exit ➙ Exit Saving Changes. |
Enable power-on password
If the administrator password has been set, you can enable power-on password to enforce greater security.
| Step 1. | Open the UEFI/BIOS setup utility. |
| Step 2. | Select Security ➙ Power on Password and press Enter.
|
| Step 3. | Change the setting to Enabled. |
| Step 4. | Select Exit ➙ Exit Saving Changes. |
If power-on password is enabled, a prompt appears on the screen every time you turn on the computer. You must enter the administrator or user password to start the computer.
Set password for the secondary storage device
Permanent data is stored on secondary storage devices. Your computer may include one or more solid-state drive or hard disk drive as secondary storage device(s). You can set passwords for secondary storage devices in the setup utility to prevent unauthorized access to your data.
Attention
Be extremely careful when setting a hard disk password. If you forget the hard disk password, a Lenovo authorized service personnel cannot reset your password or recover data from the hard disk. You must take your computer to a Lenovo authorized service personnel to have the hard disk drive replaced.
Proof of purchase is required and a fee will be charged for parts and service.
| Step 1. | Open the UEFI/BIOS setup utility. |
| Step 2. | Select Security ➙ Set Hard Disk Password and press Enter.
|
| Step 3. | Follow on-screen instructions to set both master and user passwords.
|
| Step 4. | Select Exit ➙ Exit Saving Changes. |
If the hard disk password is set, you must provide the correct password to start the operating system.
Change or remove hard disk password
| Step 1. | Open the UEFI/BIOS setup utility. |
| Step 2. | Select Security. |
| Step 3. | Change or remove the hard disk password.
To change user password, select Change User Password and press Enter.
|
| Step 4. | Select Exit ➙ Exit Saving Changes. |
Enjoy your Legion Go
The Legion Space app
Legion Space is an app developed specifically for Legion Go. In this app, you can
- Manage local games or recently played cloud games.
- Adjust the performance by selecting different thermal mode, power mode, or fan speed.
- Set the display brightness, resolution, or refresh rate.
Note: Periodic improvements to the Legion Space app may be available through online updates. When an update is downloaded, the app will display a notice and prompt you to install it. Features may be added or modified after updates are installed.
Manage the performance
In Legion Space, you can manage the performance for balancing the power consumption and game experience.
Thermal mode
Lenovo has preset several modes in which Legion Go can operate. The maximum attainable performance, power consumption, and speed limit for the heat sink fan vary between the operation modes.
You switch the operation mode in the pre-installed app Legion Space.
The following table lists the available operation modes on your computer and the recommended conditions for each mode.
Table 2. Operation modes and their recommended usage conditions
| Operation mode | Recommended conditions |
| Performance |
|
| Balance | You plan to frequently switch between different tasks over a period time. |
| Quiet |
|
Notes:
- When Legion Go is operating on battery power or is plugged in using an under-rated power adapter, you may not be able to switch it to Performance mode.
- In Balance mode, the system dynamically switches between Performance mode and Quiet mode based on the tasks that are running on Legion Go.
Power mode
Lenovo has preset several power modes.
Switch the mode in the pre-installed app Legion Space. The following table lists the available power modes on your computer and the recommended conditions for each mode.
Table 3. Power modes and their recommended usage conditions
| Power mode | Recommended conditions |
| Performance |
|
| Balanced | You plan to frequently switch between different tasks over a period time. |
| Efficiency |
|
Fan speed
The system fan can help CPU dissipate the heat so that CPU can work for a long time without malfunction. The faster the fan turns, the more heat can be dissipated. However, the fast-spinning fan also leads to excessive power consumption and shortens its life cycle.
The system fan is in Auto mode by default. If you use Legion Go for work and study, this mode is sufficient for thermal functions.
When you begin to play a high-end game, you can adjust the fan to full speed. You can enable the Full Speed Fan mode in the Performance section of Legion Space.
Adjust the display parameter
In Legion Space, you can adjust the display parameter for a better view experience.
Adjustable refresh rate
Your eyes might not notice it but the content displayed on the screen refreshes constantly. Display refresh rate refers to the number of times per second the screen content refreshes itself and is measured in hertz (Hz).
A refresh rate of 60 Hz is adequate for most situations and is energy efficient. However, when viewing videos or playing video games, a higher refresh rate usually provides a smoother viewing experience.
The displays of some Lenovo computers support dual refresh rates. For such a computer, you can manually switch its display to play games at either the higher or lower refresh rate.
You can switch the refresh rate of Legion Go in different usage scenarios, which can be realized in the Display section of Legion Space app.
Get immersive game experience
You can adjust the parameter of the controllers for getting immersive game experience.
Adjustable controller vibration
When you are playing games, the controllers can vibrate for giving feedback. Imagine that when you are playing a fighting game, it is possible that you are beaten, and if this beating is reflected through the vibration of the controller, the feeling of being in the virtual world will be more real.
The controller vibration is caused by the built-in motor.
There are four vibration gears: off, low, medium, strong. The motor is in medium gear by default, and you can toggle between each gear by the Turbo key.
Press and hold the Turbo key, then press Down or Up button to adjust the vibration strength. When you switch the controller to each gear, it will vibrate for two seconds for letting you know the switch has been successful and feel the current vibration strength.
FPS mode
FPS mode is a game mode designed specifically for playing First-Person Shooting games. In this mode, hold the right controller just like holding the pistol, and press the buttons of the right controller just like pulling the trigger.
Detach the controllers, drag the mouse switch of the right controller, and then Legion Go is changed form GamePad mode to FPS mode.
You can select among four key mapping profiles or customize to your preference in the Controller section of Legion Space app.
Note: For stable use of the right controller, you can place it on the dock.
Frequently asked questions
Why does my screen brightness change constantly?
Your computer may include an ambient light sensor and the adaptive brightness feature is enabled. The light sensor can detect the intensity of the surrounding light. Using data provided by the sensor, the operating system can dynamically adjust the screen brightness.
The adaptive brightness feature of the operating system can be disabled. For Windows operating systems, adaptive brightness settings are usually found in Settings ➙ System ➙ Display.
Troubleshooting
Correct the joystick
It is necessary to correct the joystick if you find the following problems:
- the joystick can not return to the center
- the joystick can not reach the edge
- the deadband is wide when the joystick returns to the center
- the deadband is wide when the joystick reaches the edge
How to correct the joystick
| Step 1. | Press the L2 button and hold for three seconds. |
| Step 2. | Press the R2 button and hold for three seconds. |
| Step 3. | Press the L3 button and hold for three seconds. |
| Step 4. | Press the R3 button and hold for three seconds. |
| Step 5. | When the indicator blinks blue and purple alternately, rotate the left and right joysticks three turns at the maximum angle at the same time. |
Self-help resources
Use the following self-help resources to learn more about the computer and troubleshoot problems.
| Resources | How to access? |
| Troubleshooting and frequently asked questions |
|
| Accessibility information | https://www.lenovo.com/accessibility |
| Reset or restore Windows |
|
Use Lenovo Vantage or Lenovo PC Manager to:
| Use Windows Search. |
Product documentation:
|
|
Lenovo Support Web site with the latest support information of the following:
| Visit https://support.lenovo.com |
| Windows help information |
|
Call Lenovo
If you have tried to correct the problem yourself and still need help, you can call Lenovo Customer Support Center.
Before you contact Lenovo
Record product information and problem details before you contact Lenovo.
| Product information | Problem symptoms and details |
|
|
Note: The product name and serial number can usually be found on the bottom of the computer, either printed on a label or etched on the cover.
Lenovo Customer Support Center
During the warranty period, you can call Lenovo Customer Support Center for help.
Telephone numbers
For a list of the Lenovo Support phone numbers for your country or region, go to https://pcsupport.lenovo.com/supportphonelist.
Note: Phone numbers are subject to change without notice. If the number for your country or region is not provided, contact your Lenovo reseller or Lenovo marketing representative.
Purchase additional services
During and after the warranty period, you can purchase additional services from Lenovo at https://pcsupport.lenovo.com/warrantyupgrade.
Service availability and service name might vary by country or region.
Documents / Resources
References
(English) Generic Safety and Compliance Notices - Lenovo Support US
![forums.lenovo.com]() English Community-Lenovo Community
English Community-Lenovo Community![www.lenovo.com]() Product Accessibility | Regulatory Compliance | Lenovo US
Product Accessibility | Regulatory Compliance | Lenovo USOfficial Lenovo Laptop, Accessories & PC Support - Lenovo Support US
![support.microsoft.com]() Microsoft Support
Microsoft SupportSupportPhoneList - Lenovo Support US
Lenovo Warranty Check/Lookup | Check Warranty Status | Lenovo Support US
Download manual
Here you can download full pdf version of manual, it may contain additional safety instructions, warranty information, FCC rules, etc.
Download Lenovo Legion Go, 8APU1, 83E1 - Video Game Console Manual
Advertisement


Need help?
Do you have a question about the Legion Go and is the answer not in the manual?
Questions and answers