Medela Waterless Milk Warmer - Milk Warmer Manual
- Quick start instructions (2 pages) ,
- Manualline (5 pages) ,
- Instructions for use manual (80 pages)
Advertisement
Important Safeguards
When using electrical devices, basic safety precautions should always be followed, including the following:
READ ALL INSTRUCTIONS BEFORE USE
The warning symbol identifies all instructions that are important to safety. Failure to observe these instructions can lead to injury or damage to the breast pump. When used in conjunction with the following words, the warning symbols stand for:
 | Warning Can lead to serious injury or death. |
 | Caution Can lead to minor injury. |
 | Note Can lead to material damage. |
| Tip Useful or important information that is not related to safety. |

To reduce the risk of electrocution:
- Always unplug electrical devices immediately after using. Separation from the power is only assured by removing the plug from the wall socket outlet.
- Do not use while bathing or showering.
- Do not place in or drop unit into water or other liquid.
- Do not reach for any electrical device if it has fallen into water. Unplug immediately from electrical outlet.
- Do not store or use this product where it can fall or be pulled into a tub or sink.
- Always use an outlet with proper protective earthing.


To avoid fire, electrocution, or serious burns:
- The warmer should never be left unattended when plugged into an electric outlet.
- Use the warmer only for its intended use as described in this manual.
- Do not use accessories or attachments not recommended by the manufacturer, as this may create hazardous conditions.
- Never operate an electrical device if it has a damaged cord or plug, if it is not working properly, if it has been dropped or damaged, or if it has been dropped into water.
- Keep the cord and all components away from heated surfaces.
- While cleaning, warmer should be turned off and unplugged.
- Supervision is necessary when this product is used in the vicinity of children.
- Make sure the voltage of the device is compatible with the power source.
- Operate warmer only with the warmer in an upright position.
- There are no user-serviceable parts inside the Medela Waterless Milk Warmer. DO NOT ATTEMPT TO REPAIR THE WARMER YOURSELF.
- ALWAYS FEEL CONTAINER/SYRINGE & CHECK MILK TEMPERATURE BEFORE FEEDING.
- To prevent damage to the unit or injury, do not lift or carry unit by its lid.
- Do not use outdoors.
- Do not warm breast milk storage bags.
- Use caution when warming milk in containers and/or with lids that contain metal.
- Do not warm milk with nipple on container.
- Only use the power cord that comes with the Medela Waterless Milk Warmer.

To avoid health risk and reduce the risk of injury:
- The Medela Disposable Inserts for the warmer are single patient use care items. To prevent cross contamination do not share inserts between patients.
- The warmer should be cleaned between patient use or as needed. See care cleaning section for approved cleaning agents. Do not spray or pour liquid onto the warmer.
- Do not use while sleeping or overly drowsy.
- As with any IV pole mounted device, do not overload IV pole with excess equipment that may cause a tipping hazard.
- Do not place warmer on IV pole at a height over 5 feet to minimize the potential for tipping during operation.

Can lead to minor injury:
- Do not place warmer on a soft surface.
- Make sure the warmer doesn't interfere with any other equipment on IV pole.
- The Waterless Milk Warmer should be cleaned prior to first use.
- Warming small amounts of breast milk or supplement in large containers can reduce warming efficiency.
SAVE THESE INSTRUCTIONS
Contents
Each Medela Waterless Milk Warmer is packaged and shipped separately.
Contents include:
1 – Waterless Milk Warmer
1 – Power Cord
1 – Instructions and Assembly Manual
Parts
| Item order numbers*: | ||
| 87116-100 | |
| 5007005 | |
| 9287013 | |
Call for pricing
*Inserts and IV Pole Adapters are sold separately.
Intended Use
- To warm breast milk or supplement for hospital patients without the use of water.
- To thaw breast milk or supplement from a completely frozen state for hospital patients without the use of water.
Care & Cleaning
The Waterless Milk Warmer should be cleaned prior to first use.
Hygiene

Wash hands before operating the warmer, opening inserts, and/or installing inserts.
- Check with the manufacturer prior to using any cleaning or decontamination method outside of manufacturer's recommendations.
- Do NOT submerge, autoclave, heat, steam, ETO, or radiation sterilize the warmer.
- Grease on metal hinge may be visible and is considered normal. DO NOT remove grease as it may shorten the life of the hinge.
Equipment user has the responsibility for carrying out appropriate decontamination if hazardous material is spilled on or inside the equipment.
Note
These recommendations are not substitutes for official hospital procedures that may differ among institutions. Refer to hospital policy for cleaning of shared capital equipment.
Acceptable cleaning agents
- Cavicide cleaner and/or wipes
- PDI Sani-cloth cleaner and/or wipes
- Isopropyl alcohol
- Hydrogen Peroxide 3% liquid or wipes
- Soap and water
*Not responsible for formula changes by disinfectant wipe manufacturers.
Single/Multiple Patient Use
Use of the warmer by more than one user without proper cleaning may pose a health risk. Inserts are single-patient and limited use items. Use of inserts for more than one patient may pose a health risk.
Disposable Insert Care
Medela recommends changing inserts every 12 hours.
- Remove and discard the Disposable Insert if patient identified on label no longer requires feed warming.
- Inspect the Disposable Insert after each warming and/or thawing session for condensation and/or milk.
- Inspect the disposable insert for visible damage(rips or tears). If insert is damaged immediately discard and replace to avoid human milk coming in contact with the warmer.
Milk Present in Disposable Insert
- Discard insert immediately.
- Install a new insert prior to next use.
Condensation Present in Disposable Insert
- Leave the lid to the warmer open to allow the insert to air dry in between uses.
Tip
Condensation may appear in the insert when a frozen bottle is frosted on the outside and thawed in the warmer.
Warmer Care
- Wipe down the warmer according to cleaning instructions on section "Care & Cleaning" prior to first use and in between patients.
- Wash hands before touching the surface of the warmer and operating the device.
- If the warmer is used for more than one patient, inserts should stay with the patient in a clean location with clear and legible indicators of patient name, date and time.
- Refer to hospital policies for cleaning of shared capital equipment.
Inserts are single-patient use.
Milk Present in Warmer
- Remove and discard the insert and clean the warmer per instructions on "Care & Cleaning" section.
- Refer to hospital policy for equipment decontamination for potential cleaning procedures unique to your facility.
Check with the manufacturer prior to using any cleaning method outside of the manufacturer's recommendations (refer to "Acceptable Cleaning Agents").
Condensation Present in Warmer
- Leave the lid to the warmer open to allow the warmer to air dry in between uses.
Tip
Condensation may appear in the warmer when a frozen bottle is frosted on the outside and thawed in the warmer.
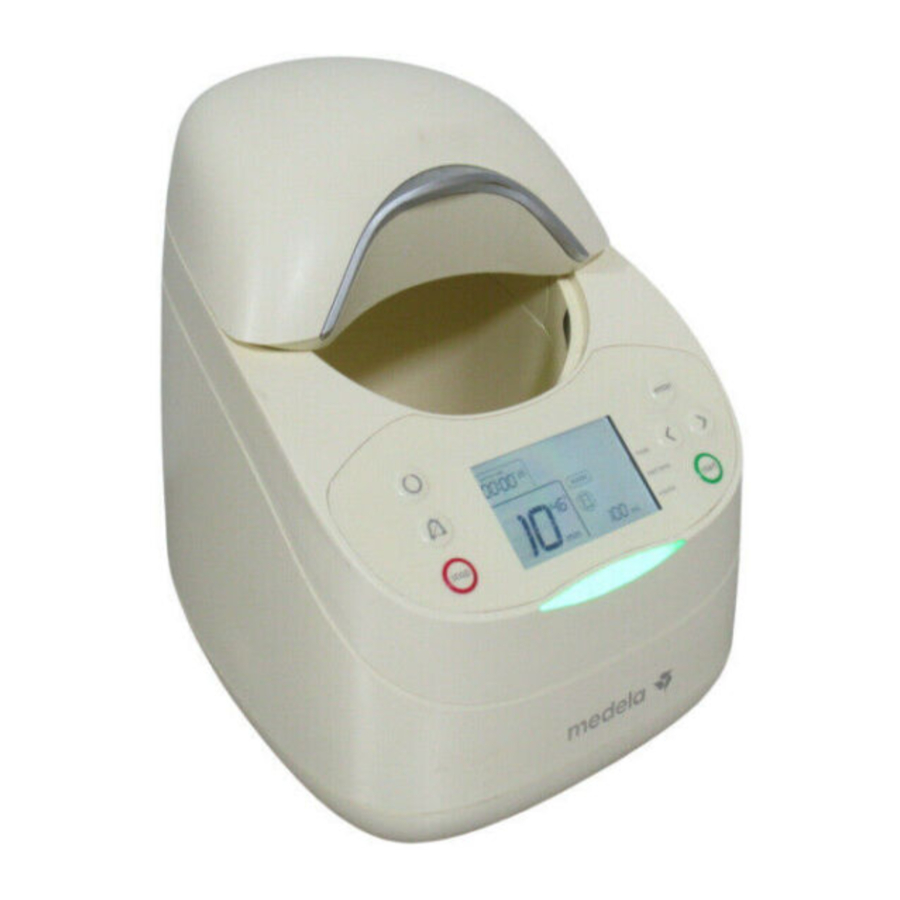
Controls & LCD

LCD display
- Completion Time
- Completion Indicator appears when warm or thaw mode is complete or interrupted
- Elapsed Time
- Elapsed Time Label
- Pause Indicator LCD display
- Error Indicator
- Insert Liner Symbol
- Lid Open Symbol
- Alarm Mute Symbol
- Mode
- Milk Temperature
- Volume amount in mL

Program Warmer
- Plug the 3-prong hospital-grade plug into a wall outlet.
- Press the power button on the warmer panel.
- Note the volume of milk to be warmed.
- The warmer is setup with both a visual indicator located on the front of the unit and a low volume audible indicator. To mute the audible indicator, press the
![]() mute button. To confirm that the audible indicator is muted, the symbol
mute button. To confirm that the audible indicator is muted, the symbol ![]() will appear in the upper right portion of the LCD Display.
will appear in the upper right portion of the LCD Display.
Assembly & Set Up
- Remove warmer from shipping container. Allow unit to reach room temperature before use.
- Review instructions prior to assembly.
- Connect the power cord (provided with the warmer) into the socket located on the back of the unit.
- Push the wire cord retainer (located around the warmer power socket) down over the plug until secure.
Placement on Counter or Hard Surface
- Make sure that the surface is clean and dry.
- Place the warmer on a solid surface. Ensure the surface is secure to avoid the warmer from tipping or falling.
- Place the warmer on a surface low enough for staff to see into the warmer cavity.
- Do NOT block vents on the back of warmer. Do NOT place on a soft surface to avoid blocking the bottom vent on the warmer.


Note
For ideal sound pressure level, the recommended placement location is 1 meter or greater from the patient.
- Remove IV pole adapter from shipping carton (sold separately - #5007005).
- Locate the two positioning slots on either side of the warmer.
![]()
- Make sure the pin on the IV pole adapter is engaged.


Tip
To engage, turn the round knob clockwise until the pin engages.
- While securely holding the warmer in one hand, carefully slide the U-shaped portion of the adapter into a positioning slot located on the warmer until it clicks into place.
![]()
- Securely hold the warmer with one hand and the adapter with your other hand. Position the adapter onto the IV pole.
![]()


To secure, turn the triangular knob clockwise until the clamp is tight onto the IV pole.
Make sure the warmer does not interfere with any other equipment on the IV pole.
- Do not block vents on bottom or rear of unit.


Do not place warmer on a soft surface.
- To remove the warmer from the IV pole adapter, pull pin out, turn ¼ turn, and release. The pin will remain disengaged, allowing the warmer to slide off the adapter.
![]()

Insert Installation
- Open the lid of the warmer.
- Remove Medela Disposable Insert from plastic bag.
- For proper identification, patient labels can be placed on the bag portion of the insert; or using a permanent marker, patient information can be written on the hard surface of the insert, including date and time.
![]()
- Expand liner prior to installing in warmer.
![]()
- Bend insert at the hinge and place into position. Securely install insert using the tabs located on the back and front of the warmer cavity.
![]()


Tip
Warmer will not operate if insert is not installed correctly.
- Evenly spread liner within warmer cavity.
![]()

Note
For good air flow and accurate warming, insert should be spread out against the inner walls of the warmer.
- Place tray, flat-side down, into bottom of warmer.


Note
Always use tray when warming syringes or bottles.
Warming or Thawing in a Container
Always feel container/syringe & check milk temperature prior to feeding.
Acceptable milk containers
- Bottles up to 250 mL (plastic or glass)
Maximum height 162 mm - Syringes up to 60 mL (plastic)
Note
The Waterless Milk Warmer is designed to warm only one container at a time.
- Always use a lid on the milk storage container.
Note
Use the proper size container in comparison to the volume of breast milk or supplement being warmed.
Small amounts of breast milk or supplement in large containers can reduce warming efficiency.
- Make sure insert is installed and insert tray is properly seated in warmer.
![]()
- Place the container on the cent er of warmer.
![]()


Tip
The warmer will not operate if the insert is not installed correctly.
- Use caution when warming milk in containers and/or with lids that contain metal.
- Do not warm milk with nipple on container.
- Do not warm breast milk storage bags.
Warming or Thawing in a Syringe
- Always use a cap on the syringe tip.
- Make sure the insert is installed and insert tray is properly seated in the warmer.
![]()

Tip
The warmer will not operate if the insert is not installed correctly.
- Close the lid to the warmer.
![]()
- Insert the tip of the syringe into the round portion located on the face of the insert. Gently push until the flange of the syringe is lying flat against the insert.

Operation
Warming
Note
If thawing, refer to the Thawing Section within these instructions.
- Press
![]() button to turn on the warmer.
button to turn on the warmer. - Look at the LCD display to confirm the warmer is in
![]() mode.
mode.
 button to turn on the warmer.
 Note
Warmer defaults to  mode.
mode.
- Press
![]() button to confirm mode
button to confirm mode - Select the milk starting temperature (refrigerated, room, or frozen) by using the arrow keys
![]() to highlight the desired starting temperature.
to highlight the desired starting temperature.
 button to confirm mode
 to highlight the desired starting temperature.
 Note
The warmer initially defaults to the milk starting temperature  (refrigerated) based on 4°C or 39.2°F.
- Press the
![]() button to confirm starting temperature.
button to confirm starting temperature. - Use the arrows to enter the volume of milk to be warmed.
![]()

Note
If you hold down the left or right arrow key, it will increase or decrease in increments of 10 mL.
- Press the
![]() button to confirm volume.
button to confirm volume. - The LCD display will flash the information that was entered into the warmer and display the completion time.
![]()
- Confirm that the information is correct and press the
![]() button to begin warming.
button to begin warming.

Note
If the information is incorrect, press the  button and repeat programming steps above.
- There are two timers located on the display. The lower left display will show the total cycle time and will count down to zero. The upper left display shows total elapsed time the milk has been in the warmer.

- If the lid is opened during the warming cycle, the warmer will go into a Pause Mode for 60 seconds. The visual indicator on the front of the unit will flash yellow.
![]()


Note
Open the lid to activate Pause Mode while using a syringe.
If the syringe or container is placed back in the unit, close the lid and press the  button. The cycle will continue until the session is complete.
Note
If 60 seconds is exceeded, the unit will stop and reset.
- When the warming cycle time is zero, the visual indicator on the unit will flash green and the audible indicator (if not muted) will chime.
![]()
- The warmer will automatically go into a hold cycle for up to 30 minutes. During the hold cycle, body temperature air will continue to circulate in the warmer to ensure that the milk does not cool prior to feeding. The visual indicator will continue to flash green. The audible indicator (if not muted) will chime every 5 minutes until hold cycle time expires. Remove the milk before the hold cycle expires.
- If the lid is opened during the hold cycle, the visual indicator will flash green, and the unit will go into Pause Mode for 60 seconds. The syringe or container must be placed back in the unit, the lid must be closed, and the
![]() button pressed. The cycle will continue until the session is complete.
button pressed. The cycle will continue until the session is complete.
![]()


Note
If 60 seconds is exceeded, the unit will stop and reset.
- Once the hold cycle has expired, the unit will no longer maintain temperature. It will beep every 15 seconds (if not muted) until the lid is opened or unit is stopped.
Note
Check elapsed time and refer to your hospital guidelines for breast milk handling.
- Gently mix milk and press stop upon removal.
Tip
The warmer was designed to warm milk from refrigerator temperatures (approximately 4˚C/39.2˚F). If milk contains any ice at the beginning of the cycle, the final temperature of the milk at the end of the warming cycle may fall below the target range of the device.
Thawing
- Press
![]() button to turn on the warmer.
button to turn on the warmer. - The warmer defaults to
![]() mode.
mode.
![]()
- Press the right arrow
![]() to highlight
to highlight ![]() mode.
mode. - Press
![]() to confirm
to confirm ![]() mode.
mode.
![]()
- Use the arrows to enter the volume of milk to be thawed.
![]()
 mode.
mode.
 mode.
mode. to confirm

Note
If you hold down the left or right arrow key, it will increase or decrease in increments of 10 mL.
- Press the
![]() button to confirm volume.
button to confirm volume. - The LCD display will flash the information that was entered into the warmer and display the completion time.
![]()
- Confirm that the information is correct, and press the
![]() button to begin thawing.
button to begin thawing.
![]()


Note
If the information is incorrect, press the  button and repeat steps above.
- There are two timers located on the display. The lower left display will show the total cycle time and will count down to zero. The upper left display shows total elapsed time the milk has been in the warmer.

- If the lid is opened during the thawing cycle, the warmer will go into a Pause Mode for 60 seconds. The visual indicator on the front of the unit will flash orange.
![]()


Note
Open lid to activate Pause Mode while using a syringe.
If the syringe or container is placed back in the unit within 60 seconds, close the lid and press the  button. The cycle will continue until the session is complete.
Note
If 60 seconds is exceeded, the unit will stop and reset.
- When the thawing cycle is complete, airflow will automatically shut off. The visual indicator will continue to flash green and the audible indicator (if not muted) will chime every 15 seconds.
![]()
- Remove milk immediately while ice crystals are present.


If no ice crystals are present, refer to your hospital breast milk handling and storage policy.
Tip
The warmer was designed to thaw milk from recommended freezer temperatures (approximately = -20°C/-4°F). If milk contains any liquid, the final temperature of the milk at the end of the thawing cycle may fall above the designed range of the warmer. Milk should be thawed from a completely frozen state.
Troubleshooting
| Problem | Indicators |
Light indicator is flashing red | Error indicator & Insert Indicator on LCD panel are illuminated |
| Error indicator & close lid indicator on the LCD panel is illuminated | |
| IV pole clamp slips out of the warmer after installed into the pole mount slot on the side of the warmer | |
Milk too warm | Hot to the touch |
Milk too cool | |
Thawed milk has no ice | |
Cannot resume from pause mode | "Pause" indicator |
Unexpected pause mode during operation | "Pause" indicator |
Light indicator is flashing red | Error indicator & error code in the lower left section of the LCD panel where the large timer would be |
| Error Code: 01-08, 11, 12 | |
| Error Code: 09 | |
| Error Code: 13 | |
| Error Code: 14 | |
| Possible Solution | |
| Ensure insert is installed. Open the lid to the warmer and properly install the insert. Press start. Refer to Insert Installation section. | |
| Close the lid and press start. | |
| Make sure that the IV pole adapter pin is engaged prior to installation and snaps into place when the adapter is slid into the pole mount slot. | |
| Allow milk to cool before feeding. Ensure proper settings are used. Note: High temperatures may damage some active immunological properties of breast milk. | |
| |
| Ensure proper settings are used. Retrieve milk promptly when thawing cycle is complete. | |
| Ensure lid is closed and insert is fully seated. | |
| Ensure insert is fully seated. If unit is near an intense infrared emitting light source such as sunlight or heat lamps, move to another location. | |
| Hold power button for at least 4 seconds or unplug the device, wait ten seconds, plug the device back into the wall, and press the power button. Contact Medela Customer Service. | |
| Return for service. | |
| Ensure fan is not blocked. | |
| Turn off and unplug warmer, allow unit to cool down for up to 30 minutes. Warmer should resume operation. If Error Code 13 is frequently generated, contact Medela Customer Service. | |
| Ensure unit is in an area with adequate room temperature ventilation. Ensure vents on bottom and rear of unit are not blocked. | |
If in the US, call Medela at 800-435-8316 or 815-363-1166.
In Canada, call Medela at 800-435-8316 or 905-608-7272.
Visit us on the internet at www.medela.com.
Technical Description
SAFETY INSTRUCTIONS
Caution Hot Surface
 Power Supply | |
| Inlet | IEC C6 |
| V~ | 100-240 |
| Hz | 50/60 |
| A | 2.5 |
| DIMENSIONS: | |
| Width: | 7.6 inches |
| Height: | 9.6 inches |
| Depth: | 9.3 inches |
| WEIGHT: (without packing materials) | |
| 4.2 lbs. | |
IV Pole Bracket (sold separately):

- Quick release spring plunger.
- Mounts to either side of unit to provide mounting flexibility.
- Does not interfere with countertop use of warmer if left attached.
ENVIRONMENTAL CONDITIONS FOR OPERATION:
Temperature: +15°C to +30°C (+59°F to +86°F)
Relative Humidity: 20% to 80%
Atmospheric Pressure: 70 kPa to 106 kPa
ENVIRONMENTAL CONDITIONS TRANSPORT AND STORAGE:
Temperature: -4°F to +122°F
Relative Humidity: 20% to 95%
Atmospheric Pressure: 70 kPa to 106 kPa
Warranty
If you wish to make a claim under this warranty, you must return this product to Medela at the address below. You must contact Medela Customer Service and obtain a Return to Merchant Authorization (RMA) Number and reference the number on your return package. The original Invoice Number or Purchase Order Number must be referenced on the RMA. Customer Service toll free number: 1-800-435-8316.
Medela LLC – Returns, Door 4501
1101 Corporate Dr.
McHenry, IL 60050
ATTENTION: RETURNS
Medela Canada, Inc.
4160 Sladeview Crescent, #8
Mississauga, ON L5L 0A1
ATTENTION: RETURNS
Documents / Resources
References
Download manual
Here you can download full pdf version of manual, it may contain additional safety instructions, warranty information, FCC rules, etc.
Advertisement


Need help?
Do you have a question about the Waterless Milk Warmer and is the answer not in the manual?
Questions and answers