Advertisement
Main Features
- Wireless Speaker for Bluetooth devices
- DAB/DAB+ and FM Radio Tuner
- MP3 Player with USB Reader
- Standard 3.5mm Audio In/Out Socket
- Dual Alarm and Snooze Function
Box Contents

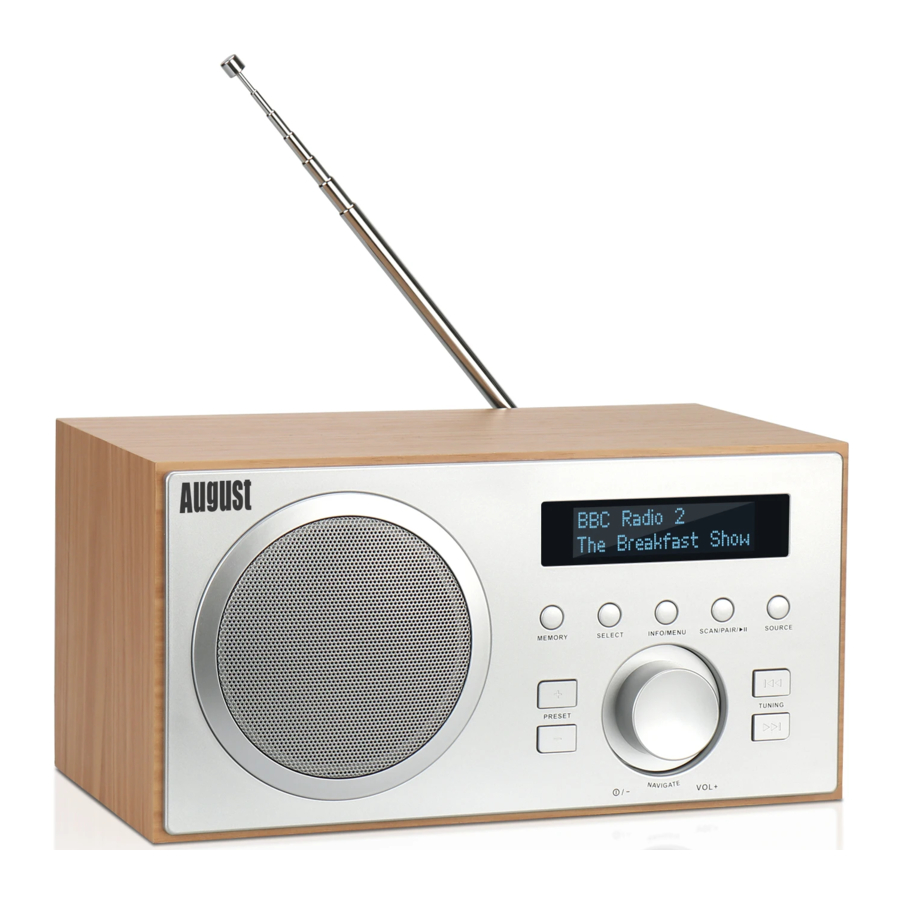
Part Names and Functions

- LCD Display
- MEMORY button
- SELECT button
- INFO/MENU button
- SCAN/PAIW
- SOURCE button
- PRESET +
- PRESET -
- TUNING backward
- TUNING forward
- Volume control/ Power on/off
- Antenna
- DC Input
- USB Socket
- AUXIN
- Headphone Socket
Operation
Power
Use the power adaptor provided to connect the MB420 to a plug socket. Press the Volume Control button (NO.11 In "Device Layout") to turn the radio on and Standby.
Mode
Press Source button repeatedly to cycle through Bluetooth, USB, AUX-IN, DAB+ and FM mode.
DAB radio mode
Press the "Power" button to turn on the device, and then press "Source" button to change to DAB mode. DAB radio mode receives DAB/DAB+ digital radio and displays information about the station and programme.
- Reset and scan DAB/DAB+ station
When using the MB420 for the first time use, or if the station list is empty, theradio automatically performs a full scan to see what stations are available. You may also need to start a scan manually to update the list of stations for one of the following reasons:- New stations may become available from time to time.
- Receive stations close or can no longer. In the station list, a question mark in front of the station name indicates that it is an invalid station.
- If reception was not good for the original scan - for example, the antenna was not fully extended - this may result in an empty or incomplete list of available stations.
- If you have poor reception of some stations causing the audio to break up, you may wish to list only stations with good signal strength.
- Manual Scan
In DAB+ mode, press and hold "Menu/lnfo" button until <Full Scan> displays on the screen. Then Select or press "Scan/Pair" Button, it will then start a full scan. Once a scan is complete, the radio returns to playing the previously selected station or the first station on station list. - Select stations
In DAB+ mode, press "![]() " or "
" or " ![]() " to select through the list of stations. Stop at your preferred station, then press "Select". It will be tuned automatically within a second.
" to select through the list of stations. Stop at your preferred station, then press "Select". It will be tuned automatically within a second.
Note: During the search, operation of the sound level will be muted automatically. - Adjust volume
Turn the Volume Control Button clockwise or anti-clockwlse to increase or decrease volume respectively. - Memory Settings
The Memory Settings allow you to saveyour favourite radio stations. First, choose your preferred radio station and hold down the 'Memory Button' for 2 seconds. Then, use the Volume Control Button to assign your preferred station a number on the station list. After this, press 'Select' to save.
 " or "
  " to select through the list of stations. Stop at your preferred station, then press "Select". It will be tuned automatically within a second.
FM radio mode
FM radio mode receives analogue radio from the FM band and displays RDS (Radio Data System) information about the station and programme, i.e. broadcasting location.
When a FM Radio is playing, the screen displays frequency, or if RDS information is available, station name and any further 'RadioText' information is shown.
If no information is available, just the frequency and the <No Radio Text> message will display.
- Scan FM station
In FM mode, you can also tune the station manually. Press the "![]() " or "
" or " ![]() " button to adjust the FM frequencies with 50 kHz down or up respectively. If press and hold the "
" button to adjust the FM frequencies with 50 kHz down or up respectively. If press and hold the " ![]() " or "
" or " ![]() " button, it will scan to previous or next station. (for details see Scan settings in section "Settings").
" button, it will scan to previous or next station. (for details see Scan settings in section "Settings"). - Adjust volume
Tum the Volume Control Button clockwise or anti-clockwise to increase or decrease volume respectively. - Memory Settings
The Memory Settings allow you to save your favourite radio stations. First, chooseyour preferred radio station and hold down the 'Memory Button' for 2 seconds. Then, use the Rotary Button to assign your preferred station a number on the station list. After this, press 'Select' to save.
Bluetooth mode
Press the 'Power' button to tum on the device and then press 'Source' button to change to Bluetooth mode. Turn on the Bluetooth function on your mobile device and look for "MB420" in the Bluetooth device list. After success fully connecting, adjust the volume on your audio device to the desired volume level.
USB Mode
- Connect your USB device to the unit.(MAX 64GB)
- Press "Source" until "USB" appears on the display screen. Music files stored on the USB will automatically play.
- Press " Scan/Pair/
![]() " to pause or resume playback.
" to pause or resume playback. - Press "
![]() " or "
" or " ![]() " to skip to the previous or next track.
" to skip to the previous or next track.
 " to pause or resume playback.
 " or "
  " to skip to the previous or next track.
Aux-in Mode
Press the 'Power' button to turn on the device and then press "Source" button to change to AUX-IN mode. Use a 3.5mm audio cable to connect the speaker to an audio sourceto play music from the audio source.
Advance settings
Advance Settings allow you to tailor the DAB/DAB+/FM radio with a variety of options to suit you. To access Advance settings from any mode, press and hold the "Menu/lnfo" button for 2 seconds.
DAB+ radio mode
Use the Volume Control Button to cycle through the different menus, then press 'Select' your preferred option. The Advance Setting menu options are:
- Full scan
- Manual tune
- DRC
- Prune
- TA
- System
- INFO
- Full scan
Under advance setting, turn the Volume Control Button to find Full scan through the menu list, then press "Select" to confirm. The radio will automatically start scanning after 3 seconds. Once a scan is complete, the radio returns to playing the previously-selected station or first station on the station list.
Note: If no radio station is found, it shows No DAB Station. For a better reception, extend the antenna or do the full scan again in another place. - Manual tune
You can manualy tune to a particular channel/Frequency. This canbe useful for adjusting your antenna to achieve the best possible reception and scanning a particular channel to update the station list.
Under Advance Settings, turn the Volume Control Button to find "Manual tune" through the menu list, press "Select" then turn the Volume Control Button to select a particular channel/frequency.
The display shows a live indication ofthe received signal strength on the selected frequency. Adjustments to your antenna will be manifested in the received signal strength displayed. - DRC (Dynamic range compression)
This function reduces the difference between the loudest and quietest audio being broadcast. Effectively, this makes quiet sounds comparatively louder, and loud sounds comparatively quieter.
Options: off(default) | low | high
Under advance setting, tum theVolume Control Button to DRC through the menu list, then press "Select". Then turn the Volume Control Button to select particular setting.
Note: DRC only works if it is enabled by the broadcaster for a specific station.
- Prune (remove stations that are listed but unavailable)
This removes all invalid stations indicated in the station list with a '?' in front of the station name.
Under advance setting, turn "Volume control" to find Prune through the menu list, then press Select. Then turn the Volume Control Button to choose "Yes" then press "Select" to confirm removing all invalid stations, it will automatically start the process after 3 seconds. - TA (Traffic Alarm)
Under Advance Settings, turn the Volume Control Button to TA through the menu list, then press "Select" to confirm Then turn "Volume control" to choose "on" or "off' to open or close this function. - System
The System menu options are:- Sleep
- Alann
- Time
- Backlight
- Language
- Factory Reset
- SW version
Note: as you go through the possible values, an asterisk (* ) appearing to the right-hand side of the display indicates the currently selected value for each setting.
- Sleep
Press and hold "Info/Menu". Choose"System" and press "Select". Choose " Sleep" and press " Select". Turn the Volume Control button to choose a time before the device switch off, press "Select" to confirm.
You can set your radio to tum off automatically using the sleep timer.
You can choose a time before switching off: 15,30,45, 60 or 90minutes. - Alarm
- Press and hold "Info/Menu". Choose "System" and press "Select" to confirm. Choose "Alarm" with
![]() or
or ![]() and press "Select" to confirm.
and press "Select" to confirm. - Select "Alarm 1" or "Alarm 2" and press "Select" to confirm.
- Select the Hour of the alarm and press "Select to confirm. Select the minutes of the alarm and press "Select" to confirm
- Select the duration of the alarm (15, 30, 45, 60 or 90) and press "Select" to confirm.
- Select the source of thealarm (DAB, FM, USB, Buzzer) and press "Select" to confirm. If you use the radio, select the station and press "Select" to confirm.
- Select the frequency (Daily, Once, Weekends, Weekdays) and press "Select" to confirm.
- Adjust the volume and press "Select" to confirm
- Select «On» or «Off» to activate or desactivate the alarm, and press "Select" to confirm. When finished, "Alarme Saved» is displayed on the screen.
- Press and hold "Info/Menu". Choose "System" and press "Select" to confirm. Choose "Alarm" with
 or
or  and press "Select" to confirm.
Snooze
When the alarm sounds, Press any key (except Standby, stop Alarms) button to keep Snoozing another 9 minutes.
Stop Alarms
When the alarm sounds, press the standby button to stop;
- Time
In the Time menu, you can set the Time and Date.
Set the time by tuming the Volume Control Button confirm by pressing Select. Set the date by tuming the Volume Control Button and confirm by pressing Select. Once saved, the Time will show on thedisplay.
In the Time menu, you can select other parameter by tuming Volume Control Button. Set the time and date update method: Update from Any / Update from DAB+ / Update from FM /
No update and then press "select" to confirm
Set the 12 /24 hour: Set time format to 24-hour or 12-hour, and then press select to confirm. Set date format to DD/MM/YYYY or MM/DDNYY, and then press Select to confirm.
Note: The time and date will be reset by default after the device is powered off and rebooted. Please turn the radio on and the date will automatically update when a channel is tuned.
- Backlight
Follow the below instructions to select the backlight menu. The sections after explain each setting.- Press and hold the Menu button
- When the 'Full Scan (DAB) or ' Scan Setting (FM) option appears press either Prev. or Next buttonsto cycle through the menu options until you locate 'system'. Press the Select button to select
- Use the Prev. or Next buttons to locate the Backlight option and press the Select button.
Timeout:
Following backlight setting 1-3 steps
- Use the Prev. or Next buttons to locate the Timeout option and press the Select button
- Use the Prev, or Next buttons to cycle through options 10-180 seconds
- Press the Select button to store the setting
On level
Following backlight setting 1-3steps
- Use the Prev. or Next buttons to locate the On level option and press the Select button
- Use the Prev. or Next buttons to cycle through Low or High
- Press the Select button to store the setting
- The Low or High backlight brightness level will be effective immediately and restore the default backlight level according to the selected Timeout option.
Dim level
Following backlight setting 1-3 steps
- Use the Prev. or Next buttons to locate the Dim level option and press the Select button.
- Use the Prev. or Next buttons to cycle through Low or High
- Press the Select button to store the setting.
- The Low or High backlight brightness level will be effective according to the selected Timeout option.
- Language
The language used for display messages can be selected from below options: English | French | German | Italian | Spanish | Portuguese | Polish | Swedish | Danish | Finnish Cycle through Language menu by turn the Volume Control Button to select and stop at a particular language by pressing "Select". - Factory reset
A factory reset clears all user settings, replacing them with the original default values, so time/date, preferences/settings, DAB+ station list and preset stations are all lost.
If you select "Factory reset", you are asked to confirm by selecting "YES". Under advance setting, turn the Volume Control Button to select "Factory reset" through the menu list, you are asked to confirm by selecting "YES". - SW version
This displays the current software version.
Cycle through the menu, turn the Volume Control Button to find "SW version" in the menu list, then press Select.- Info
You can view further information when the unit is working under DAB mode. Press Info/menu Button repeatedly and you can have options include:- DLS (Dynamic Label Segment short text information broadcast with DAB+ audio)
- Signal Strength
- PTY (ProgrammeType)
- Ensemble
- Frequency
- Signal Quality
- Bitrate codec
- Time
- Date
- Info
FM radio mode
Under Advance Settings, turn the Volume Control Button to cycle through the menu list, then stop at your preferred option. The selected function will stan automatically after 1 second. The advance setting menu options are:
- Scan setting
- Audio setting
- System (please refer to System section in "DAB+ radio mode")
- Scan setting
By default, FM scans stop at any available station (All stations). This may result in poor quality audio from weak stations.
Options: All stations Strong stations only
Turn the Volume Control Button, then press Select to choose a particular option in Scan setting. - Audio setting
By default, all stereo stations are reproduced In stereo. For weak stations, this may result in poor quality audio. The audio quality can be improved using mono. Options: Stereo allowed Forced mono
Turn the Volume Control Button, then press Select to choose a particular option in Audio setting. - System
Please refer to System section in "DAB+ radio mode" - Info
You can view further information when the unit is working under FM mode. Press Info/menu Button repeatedly and you can have options include:- Radio Text
- PTY (Programme Type)
- PS (Programme Service)
- Stereo & Mono
- Time
- Date
Bluetooth mode
Under Advance Settings, turn the Volume Control Button to cycle through the menu list, then stop at your preferred option. The advance setting menu options are:
- System (please refer to System section in "DAB+ radio mode")
- Bluetooth Pair Name: MB420
USB mode
Under Advance Settings, turn the Volume Control Button to cycle through the menu list, then stop at your preferred option. The advance setting menu options are:
- System (please refer to System section in "DAB+ radio mode")
Aux-in mode
Under Advance Settings, turn theVolume Control Button to cycle through the menu list, then stop at your preferred option. The advance setting menu options are:
- System (please refer to System section in "DAB+ radio mode")
Troubleshooting
| Problem | Solutions |
No sound |
|
Poor sound quality in Radio mode |
|
Hiss in FM mode or intermittent cut-out in DAB |
|
No audio in Bluetooth mode |
|
Bluetooth does not connect |
|
Poor or intermittent sound via Bluetooth |
|
Specification
| Display | LCD |
| Bluetooth Version | V5.3 |
| Bluetooth Working Range | up to 10m |
| DAB Radio Frequency | 174.928 - 239.2 MHz |
| FM Radio Frequency | 87.5 - 108 MHz |
| Frequency Response | 50HZ - 18KHz |
| Transmission Frequency | 2.4 GHz |
| Tuner | DAB+ SILICON |
| Chipset | SI4684 |
| Pre-set Station | 30 |
| Speaker | 5W RMS (10% THD) |
| USB Port | USB 2.0 |
| USB Play Format | Supports MP3/WMA |
| AUX In Port | 3.5MM |
| Earphone jack | 3.5MM |
| Dimensions | 225x157x116mm |
| Net Weight | 1088g |
| Maximum USB Size | 64GB |
Safety Instructions
Storage and Use
 Do not store or use this device in extreme temperatures. |  Do not store or use this device in wet or damp environments. |
 Do not expose this device to dust, oil or smoke. |  Do not drop or strike this device. |
 When transporting this device store securelyto avoid impact damage. |  Do not scratch this device wit sharp objects. |
Maintenance
Please unplug all leads before cleaning this device.
 Wipe the device and buttons with a soft cloth. |  Never wipe this device with an abrasive cloth or apply detergent, alcohol or chemical based cleaning products. |
Customer Service
You can contact us by phone on: +44(0)845 250 0586 (Carrier Rates Apply) or by email at: service@augustint.com should you require further technical support or customer service
Documents / ResourcesDownload manual
Here you can download full pdf version of manual, it may contain additional safety instructions, warranty information, FCC rules, etc.
Download August MB420 - DAB/DAB+/FM & Bluetooth Radio Manual
Advertisement


Need help?
Do you have a question about the MB420 and is the answer not in the manual?
Questions and answers