Advertisement
- 1 DESCRIPTION OF CONTROLS AND FEATURES
- 2 BEFORE YOU START TO ENJOY YOUR NEW STEREO PLAYER/RECORDER
- 3 PRECAUTIONS FOR HANDLING COMPACT DISCS
- 4 HOW TO PLAY A RECORDED CASSETTE TAPE
- 5 HOW TO PLAY A COMPACT DISC
- 6 RECORD FROM CD PLAYBACK
- 7 RECORD WITH EXTERNAL MICROPHONE
- 8 ABOUT JACKS
- 9 SPECIFICATIONS
- 10 IMPORTANT SAFEGUARDS
- 11 Documents / Resources
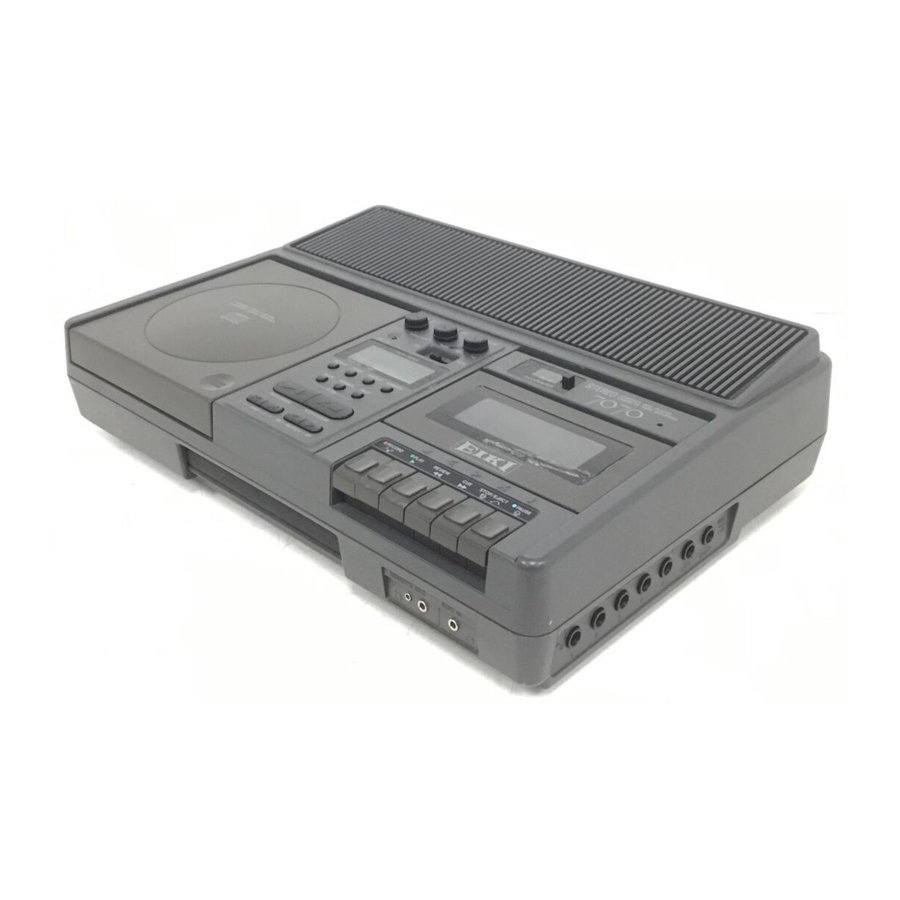
DESCRIPTION OF CONTROLS AND FEATURES


- Built -In Left and Right Speakers
Provide strong amplification with excellent sound reproduction. Are muted automatically when Headphone jacks or speaker jacks are used. - Repeat Button - CD
Push to repeat a track, all tracks on the disc or tracks entered into memory. - AC Indicator (AC — )
Glows when the unit is connected to main supply. - Tone Control Knob
Adjusts the high frequency sound level. - Balance Control Knob
Adjusts the balance of the left and right channels. - AC Line Cord Storage
Located in bottom of unit; holds 5.6 feet (1 7 meter) AC cord during transport. - Function Selector (CD/TAPE)
To select the program sources: CO or TAPE.
Set it to the TAPE mode to operate the tape recorder. Set it to the CD mode to listen to compact disc or to record from the CD. - Volume Control
Adjusts the sound level of the speakers. - Digital Multi Display - CD (DIGITAL DISPLAY)
Displays track number being played, elapsed playback time or remaining time. - Random Button - CD
Push to play tracks in random sequence. - Tape Counter and Reset Button (2 x COUNTER)
Provides method for indexing selections and locating parts of tape when desired. Button resets counter to '000". Conforms to 2X ANSI standards. - Cassette Compartment
To insert a cassette tape for playback or recording. - Symbol Keyboard
Provides added assistance to the visually handicapped. Symbols used are those approved by the Library of Congress. - Pause Button
Push to stop cassette tape temporarily. - Stop/Eject Button
Push to stop the tape.
Push again to eject cassette compartment. - Cue Button
Pressing this button while the tape is playing permits quick forward movement of the tape to another selection. This button also locks down for fast forward when other buttons are not depressed![]()
- Review Button
Pressing button while tape is playing permits quick back up of tape for reviewing a previously played portion. When other buttons are not depressed, this button locks down and rapidly rewinds tape back to the start. - Play Button
Push to play a cassette tape. - Record Button
Push to start recording on cassette tapes - Dlsplay Button - CD
Push once to show the remaining time of the track. Push again to show the total remaining time on the disc. To show the elapsed playback time, push once again. - Stop/CIear Button - CD
Push to stop playing or to cancel pause mode. Push to erase memory. - Forward Search Button (FF > ) - CD
Push and hold it down changes the mode to high speed forward search. Sound can be heard at a reduced level. - Reverse Search Button ( < FR) - CD
Push and hold it down changes the mode to high speed reverse search. Sound can be heard at a reduced level. - Forward Skip Button - CD
Push to skip forward to the next track. - Reverse Skip Button - CD
Push to skip in reverse to the beginning of the playing track. Push again to skip in reverse to the beginning of preceding track. - Play/Pause Button - CD
Push to start playback, Pushing this button during playback activates the pause mode. Playback continues when this button is pushed again. - Pitch Control buttons - CD
Push Fast button to play CD faster. Push Slow button to play CD slower. Push Normal button to return to normal speed. - Program Button CD
Push to enter up to 21 tracks into memory for non-sequential playback. - CD Compartment
To insert a compact disc for playing. - Carrying Handle
- Remote/Microphone Jack (REMOTE MIC)
Provides connection for dual-plug microphone, with remote start-stop switch on microphone. - Aux Input Jack (AUX IN)
This jack allows recording directly from a radio, phonograph, or other source. - Headphone jacks (HEADPHONES) Five 1/4" jacks for group listening.
- Speaker Jacks (SPEAKERS)
Use to connect external speakers (Min, 40, 7W).
BEFORE YOU START TO ENJOY YOUR NEW STEREO PLAYER/RECORDER
ABOUT CASSETTE TAPES
You can use any standard cassette tapes with your unit.
Every cassette tape has two tabs which you can remove to prevent erasure of recordings. If you wish to record on a cassette with the tabs removed) place a piece of tape over the tab holes.
NOTE: If the tabs are removed from the cassette or there is no cassette in the unit, the Record Button cannot be pushed down.
Insert the cassette into the tape compartment with the tape facing up. During recording and play, the tape moves from the left to the right roller of the cassette. When ail of the tape has been wound on the right roller, the unit stops automatically. Remove the cassette, turn it around and re-insert it to record or to play.

Operating on AC current
This unit may be operated on regular 120-volt 60 Hz AC current, 5.6 feet (1.7 meter) AC cord fits snugly within open storage compartment on bottom of unit, Plug cord into a properly grounded wall outlet. The three-prong plug should be used without a two-prong adapter whenever possible. If an adapter is used, be certain the green wire or grounding tab on the adapter is attached to the screw on the wall outlet plate for proper grounding.

If it is necessary to use a power cord adapter. have a trained electrician install the adapter to the outlet and check wiring to be sure there is no shock hazard. Faulty wiring can cause damage to the unit and possible injury to the operator.

Unplug the unit from power supply when not in use.
PRECAUTIONS FOR HANDLING COMPACT DISCS
Did, fingerprints, scratches and warps on a compact disc can cause noise. Observe the following precautions to keep your compact discs sounding their best.
Handling Compact Discs
Do not touch the playback surface (the rainbow colored side).
To prevent fingerprints from getting on the disc, handle it only by the edges or center, as shown in the illustration below.

Do not attach adhesive tape, stickers, etc. to the disc label.

DISC Storage
Avoid storing the discs in locations subject to high temperature, high humidity and direct sunlight. Also do not keep discs inside a closed vehicle as it is often subject to extreme temperatures.
DISC Care
Before playing the disc, wipe off alt dust, dirt and fingerprints on the playing surface with a soft cloth. Do not use benzine or record cleaners designed for LP records. Static prevention treatments can also damage compact discs and should therefore be avoided.

Only compact discs with the mark shown below can be used.

Lens
The lens which reads the digital signals stored on the surface of the compact disc is incorporated on the interior of the disc access cover.
- To protect the lens from dust and other dirt. after removing the disc, make sure to close the disc access door.
- Do not touch the lens with your fingers or any objects. If the lens gets dirty or flawed, sound skip or incorrect operation could occur.
Volume Control
- Compact discs make little noise. In the compact disc unit, if the volume is adjusted in the same manner as a conventional cassette tape while listening to the music, the volume may suddenly increase to extremely high levels.
- When listening with a head set, such a sudden increase could hurt your ears.
Sound Skip
Sound skip occurs in the following cases:
- When a flawed, dirty, or deformed disc is used.
- If a strong shock is applied to the unit (if the playback operation stops, turn off the power and repeat the playback operation from the beginning.)
- When the unit is operated in a place subject to strong vibrations.
- Sound skip may occur depending on the content of the disc. If this happens, lower the volume level.
Power Supply
- If an instantaneous power failure occurs due to a discontinued power supply, the CD playback operation may stop and an incorrect display may occur. If this happens, turn off the power and repeat the playback operation from the beginning.
CD SINGLE
- The disc compartment of this CD player is capable of holding a CD SINGLE (8 cm diameter CD) for playback.
- Place the CD SINGLE on the center of the disc compartment.
HOW TO PLAY A RECORDED CASSETTE TAPE

- Set Function Selector to Tape mode,
- Push down Stop/Eject button to open Cassette Compartment.
- Insert a recorded cassette tape into slides of the open door of the Cassette Compartment. Close the compartment door.
- Push Play button to start playing.
If you are using a remote control microphone, be sure that the on/off switch is turned to "on". - Adjust Volume Control.
- Adjust Balance Control.
- Adjust Tone Control knob to your preference.
- To stop the tape push Stop/Eject button. To eject the cassette, push Stop/ Eject button again.
NOTE: When the end of the tape is reached during playback, the Cassette Recorder will automatically stop.
If you wish to fast-forward the tape, push Cue button.
To rewind the tape) push Review button.
When the end of the tape is reached during fast forward or rewind operation, the button will automatically be released. But when the Pause button is pushed, the Cue button or Review button will not be released automatically. In this case, immediately push the Stop/Eject button.
Using tape counter
The counter provides a means of numerically indexing selections on tape cassettes and allows fast return to specific parts of the tape. To reset counter to '000" at the start of tape, press reset button. The counter conforms to 2X ANSI standards.
The Tape Counter is helpful when recording and re-recording a tape in segments.
Using review and cue buttons
For a quick review, back up the tape by pressing Review button (leaving Play button down) and hold it for the desired time, When Review button is released, unit returns to play mode,
To advance tape to another section, press Cue button (leaving Play button down) and hold it for desired time. When Cue button is released, unit returns to play mode.
Using pause button
The Pause button is used to instantly stop the tape transport without releasing the Play button. Push this button once to stop tape movement; push it again to restart tape.
The Pause button also is useful in recording since it instantly stops the tape.
HOW TO PLAY A COMPACT DISC
NOTE: Do not operate the CD Player while carrying it or with it being stood up. The CD Player should be horizontal when playing.
Do not push buttons too fast one after another - it may cause malfunction.
To Insert a CD

- Set the Function Selector to CD mode.
- Push the this part to open the CD Compartment. 'OPEN" is displayed on the DIGITAL DISPLAY.
- Insert the disc with the label facing up.
Close the CD compartment.
The number of music tracks and total playing time on the disc is shown on the display.
NOTE: "disc" is displayed when disc is not set correctly or not inserted.
CAUTION: To prevent fingerprints from getting on the disc, handle it only by the edges or center.
To Play:
- After inserting the disc into the CD Compartment, push Play/Pause button and the disc will begin playing. The Play Indicator (
![]() ) will light.
) will light. - To stop the play temporarily, push Play/Pause button again, The Pause Indicator ( Il ) will light.
Push Play/Pause button to resume playing. - Push Stop/Clear button to stop playback at any time. When the end of the last track is reached. the play stops automatically.
- Push this part to open the CD Compartment and remove the disc.
 ) will light.
To Skip a Track or Tracks
You can move forward or in reverse (skip) a track directly to a desired track number at any time during play or pause:
- To skip forward, push the Forward Skip button ( >I) until the desired track number appears in the Track Number Display.
- To skip in reverse, push the Reverse Skip button (I<) until the desired track number appears in the Track Number Display.
Audible Search
This feature can allow you to search either forward or backward to find a desired location. In addition, low volume audio can be heard. To search forward, push and hold the Forward Search button (FF > ) during play. To search backward, push and hold the Reverse Search button ( < FR) during play.
Pushing the Forward Search button (FF > ) or Reverse Search button ( < FR) in pause mode will allow you to search faster.
Pitch Control
The playing speed of the CD player is variable within a range of *16% (shown on DIGITAL DISPLAY). To increase the speed, press the Fast button. To decrease the speed, press the Slow button. To return to the standard speed, press the Normal button.
Setting CD Tracks Into Memory
You can select to play a desired number of tracks in any order, set them into memory and skip the tracks you do not want to play. A maximum of 21 tracks can be entered into memory.

- If the disc is playing, push Stop/Clear button to stop.
- Push Program button.
- Push Forward Skip ( >I ) or Reverse Skip ( k) button until the desired track appears in the Track Number Display.
- Push Program button. This enters one track into memory.
- To enter other tracks into memory, repeat Steps 3 and 4, up to a maximum of 21 tracks.
- Push Play/Pause button to begin memory playback.
- To clear the memory, push Program button during stop mode. When Stop/ Clear button is pushed, the track memorized last will be cleared. Every time the button is pushed, the last track is cleared.
NOTE: When the CD compartment is opened, all memories are cleared.
Repeat Playback
To repeat all tracks on a disc:

- Push Repeat button twice. Repeat Indicator (REPEAT ALL) Eights up.
- Push Play/Pause button to begin repeat playback. When the end of the last track is reached, the selection returns to track 1 for repeat play of all tracks. To release repeat function, push Repeat button. Repeat Indicator goes off.
When the end of the last track is reached, the play stops automatically.
To repeat a track on a disc:
- Push the Forward Skip button ( > ) until the desired track number appears in the Track Number Display.
- Push Repeat button. Repeat Indicator (REPEAT i) tights up.
- Push Play/Pause button to begin repeat playback.
When the end of the track is reached, the playback of the track is repeated.
To repeat a program playback:

- Set your desired music into memory according to the procedure in 'Setting CD tracks into memory'.
- Push Repeat button twice. Repeat Indicator (REPEAT ALL) lights up.
- Push Play/Pause button.
- To release repeat function, push Repeat button again.
To play tracks at random:

- Push Random button. "RANDOM" is displayed on the display.
- Push Play/Pause button. A track is selected at random and played.
- To change the track during playback. push Forward Skip button (
![]() ) to select a track at random.
) to select a track at random.
Note: ff Random is turned off during play, the unit will revert to playing tracks in sequence, beginning from that is currently playing.
 ) to select a track at random.
RECORD FROM CD PLAYBACK

- Set Function Selector to CD mode.
- Insert the compact disc in the CD Compartment carefully.
- Push Stop/Eject button to open Cassette Compartment.
- Insert a blank cassette tape into the Cassette Compartment. Close the compartment door.
- Push Record button.
The CD player will automatically start in a few seconds. - Push Stop/Eject button to stop recording after the CD player will automatically stop at the disc end.
NOTE: The Play button will be automatically pushed when the Record button is pushed. When the end of the tape is reached, Play and Record buttons will be automatically released.
RECORD WITH EXTERNAL MICROPHONE

- Connect an external microphone.
- Set Function Selector to Tape mode.
- Push Stop/Eject button to open Cassette Compartment.
- Insert a blank cassette into the slides of the Compartment door with side to be used facing out and tape facing up. Close the Compartment door.
- Push Pause button to delay the start of recording.
- Push Record button.
- Push Pause button to release and to begin recording.
- Speak, sing, or play music directly in front of the microphone.
If you are using a remote control microphone to pause during recording) move microphone switch to "off 'S, then back to "on" when you wish to resume. - To stop recording, push Pause or Stop/Eject button. To rewind the tape, push Review button.
NOTE: The external microphone does not record in stereo. When the end of the tape is reached, Play and Record buttons will be automatically released.
To record from auxiliary source:
To record from sound sources such as a radio, tape player or other device through the AUX input jack, obtain a suitable connecting cord to hook-up the source with the AUX jack.
Follow the recording procedures in the "HOW TO RECORD WITH EXTERNAL MICROPHONE".
Using the unit as a publlc-address system
This unit can be used to make amplified announcements.
- Connect an external microphone to the "MIC" jack.
- Set Function Selector to CD mode.
- insert a CD.
- Insert a blank tape.
- Push Record button.
The CD player will automatically start in a few seconds.
Recording will also start. If recording is not required, push Pause button. - Adjust the Volume Control to the most satisfactory level.
To prevent "howling", hold the microphone as far from the built-in speakers as possible, or reduce the volume level by using the Volume Control.
NOTE: Do not leave CD in stop or pause mode, otherwise the public-address system can not be used.
Instead of "MIC' jack, the "AUX IN" jack can be used.
ABOUT JACKS
Remote Microphone Jack
Jacks for dual-plug external microphone (microphone not provided with the unit) are located on the front of unit. These are marked "REMOTE MIC".
When inserting into jacks, push plugs in firmly until they are seated.
With microphone installed, remote on/off switch will start and stop recorder in either play or record mode.
Auxiliary Input Jack
The Auxiliary Input Jack is used for connection of an auxiliary source such as a radio, phonograph, etc.
Speaker Jacks
The Speaker Jacks are used for connection of external speakers. (Min. 4Q, 7W)
Listening Center Jacks (HEADPHONES)
Located on the right side of the unit, this center consists of five standard 1/4" headphone jacks. Five headphone sets may be plugged into this center at one time for group listening of CD or tape cassette being played.
NOTE: When using more than one headphone, be sure that all headphones are of the same type or impedance so that they will all reproduce at the same volume level.
MAINTENANCE
- Do not expose your Stereo Cassette Recorder to an excessively hot environment for an extended period of time. Extreme heat could cause component failure.
- Clean the cabinet with a damp cloth only. Do not use cleaners, abrasives, or detergents.
- Clean Recorder's tape heads with a cleaning cartridge only.
SPECIFICATIONS
| TYPE: | Combo CD player/Audio tape recorder player |
| DIMENSIONS (H x W x D): | 11-1/4" x 15-3/4" x 4" (285 x 400 x 100 mm) |
| WEIGHT: | Approx. 8.15 lbs (Approx. 3.7 kg) |
CASSETTE TAPE RECORDER SECTION
FREQUENCY RESPONSE: 125 Hz to 8 kHz
WOW AND FLUTTER: 0.17%
SIGNAL TO NOISE RATIO: 45 dB
TAPE SPEED: 1-7/8" per second
HEADS: Record playback & erase
TRACK FORMAT: Cassette stereo
OPERATING KEYS: Record, Play, Review, Pause, Cue/Fast forward, Stop/Eject
TAPE CAPACITY: C30,C60,C90
MAXIMUM REWIND/FAST FORWARD TIME: C-60 1 minute, 50 seconds
CD SECTION
FREQUENCY RESPONSE: 127 Hz to 20 kHz
SIGNAL TO NOISE RATIO: 55 dB
VARIABLE PITCH CONTROL: +16% - 0% - -16% (pitch = 1%)
NO. PROGRAM MEMORY: 21 (Random access)
SAMPLING FREQUENCY: 8fs Digital Filter (1 bit DAC)
OPERATING KEYS: Play/Pause, Stop/Clear, Skip forward/back,
CD SECTION: Search forward/back, Repeat track/Repeat all, Program, Display (Elapsed/Remain, Total remain time), Random, Pitch control (Normal/Slow/Fast)
AMPLIFIER POWER OUTPUT: 7 watts RMS (per channel) 10% (THD)
SPEAKER: 4" Round x 2
OPERATING CONTROLS: Volume, Tone, Balance, Function (CD/Tape)
REMOTE MIC. JACK: 1/8" (3.5 mm) x 1
AUX. INPUT JACK: 1/8" (3.5 mm) x 1
REMOTE PAUSE JACK: 1/10" (2.46 mm) x 1
AVAILABLE 1/4" LISTENING CENTER HEADSET JACKS: 1/4" stereo jacks x 5
EXTERNAL SPEAKER JACKS: 1/4" x 2
POWER REQUIREMENTS: AC 120 volts, 60 Hz
COMPLIANCES: UL listing pending
WARRANTY: 1 year from date of original purchase for parts and labor
Specifications and features are subject to change without notice.
IMPORTANT SAFEGUARDS
WHEN USING THIS EQUIPMENTS BASIC SAFETY PRECAUTIONS SHOULD ALWAYS BE FOLLOWED, INCLUDING THE FOLLOWING:
- READ AND UNDERSTAND ALL INSTRUCTIONS BEFORE USING EQUIPMENT.
- DO NOT OPERATE EQUIPMENT WITH A DAMAGED CORD OR, IF THE EQUIPMENT HAS BEEN DROPPED OR DAMAGED — UNTIL IT HAS BEEN EXAMINED BY A QUALIFIED SERVICEMAN.
- IF AN EXTENSION CORD IS NECESSARY CARE SHOULD BE TAKEN TO ARRANGE THE CORD SO THAT IT WILL NOT BE TRIPPED OVER OR PULLED.
- ALWAYS UNPLUG EQUIPMENT FROM ELECTRICAL OUTLET WHEN NOT IN USE. NEVER YANK CORD TO PULL PLUG FROM OUTLET. GRASP PLUG AND PULL TO DISCONNECT.
- TO PROTECT AGAINST ELECTRICAL SHOCK HAZARDS) DO NOT EXPOSE THIS EQUIPMENT TO RAIN, MOISTURE, OR OTHER LIQUIDS.
- TO AVOID ELECTRIC SHOCK HAZARD, DO NOT DISASSEMBLE THIS EQUIPMENT, BUT TAKE IT TO A QUALIFIED SERVICEMAN WHEN SOME SERVICE OR REPAIR WORK IS REQUIRED, INCORRECT REASSEMBLY CAN CAUSE ELECTRIC SHOCK HAZARD WHEN THE EQUIPMENT IS USED SUBSEQUENTLY,
SAVE THESE INSTRUCTIONS

TO REDUCE THE RISK OF ELECTRIC SHOCK, DO NOT REMOVE COVER(OR BACK).NOUSER.SERVICEABLE PARTS INSIDE. REFER SERVICING QUALIFIED SERVICE PERSONNEL.
 The lightning flash with arrow head symbol, within an equilateral triangle, is intended to alert the user to the presence of uninsulated "dangerous voltage" within the product's enclosure that may be of sufficient magnitude to constitute a risk of electric shock to persons.
 The exclamation point within an equilateral triangle is intended to alert the user to the presence of important operating and maintenance (servicing) instructions in the literature accompanying the appliance.
CLASS 1 LASER PRODUCT
Product complies with DHHS rules 21 CFR subchapter J part 1040: 10 at date of manufacture.

invisible laser radiation when open and interlock failed or defeated. Avoid direct exposure to the beam.
use of all controls, adjustments or performance of procedures other than those specified herein may result in hazardous radiation exposure.
Dew Formation
Window frames inside a warm room during winter will rapidly accumulate dew on the surface. This unit features a precision lens element. This lens element is also subject to dew formation under the following circumstances:
- When subject to sudden changes in temperature.
- When the room in which the unit is placed subject to high humidity.
- When moving the unit suddenly from a cold to a warm place.
This unit will not be able to correctly read the programs under these circumstances, and the player will not operate properly. In such cases, after turning the power switch on, wait for 20 to 30 minutes before operating the unit.
Important Notice: Do not discard shipping carton and packing materials. These items may be needed for storage or future servicing. Before transporting make sure CD Compartment Lid is closed tight.
Documents / ResourcesDownload manual
Here you can download full pdf version of manual, it may contain additional safety instructions, warranty information, FCC rules, etc.
Advertisement

Need help?
Do you have a question about the 7070C and is the answer not in the manual?
Questions and answers