Hyperkin RETRON 5 - Game Console Manual
- Instruction manual (76 pages) ,
- Instruction manual (20 pages) ,
- Instruction manual (20 pages)
Advertisement
Introduction
Experience all of your classics in HD glory and interpolated audio. The RetroN 5 plays NES, Famicom, SNES, Super Famicom, Master System (via Power Base Converter), Genesis, Mega Drive, Game Boy, Game Boy Color, and Game Boy Advance with HDMI output, improved interpolated sound, screenshot capture, and the ability to have on-the-fly save states. The RetroN 5 is the retro gaming console that brings you back to a world where recharging health is cheating, you can have as many guns as you want, and achievements aren't just some numbers on a screen. Be sure to keep up to date with the latest news and firmware at www.RetroN5.com.
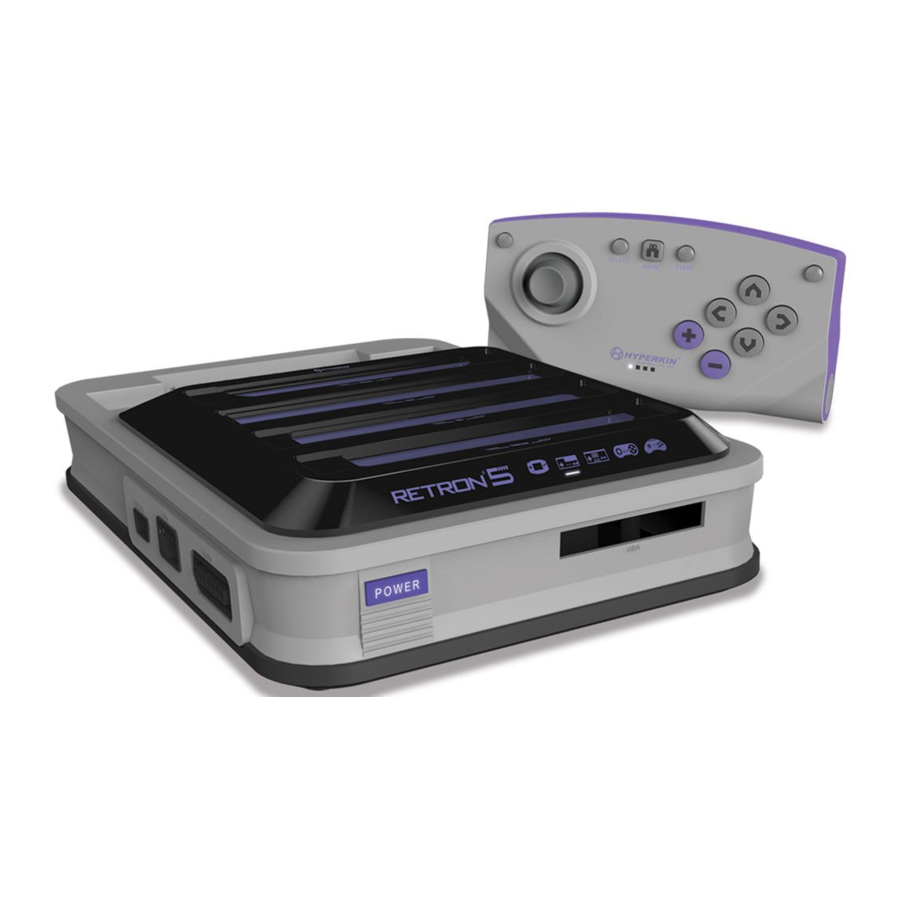
PACKAGE CONTENTS

RETRON 5 CONSOLE FRONT / BACK

*DO NOT INSERT MORE THAN ONE CARTRIDGE SIMULTANEOUSLY, OR RISK DAMAGING YOUR RETRON 5.

*Do not, under any circumstance, press the service button unless instructed to do so by a Hyperkin support technician.
RETRON 5 SETUP

- Insert AC Adapter into the AC Adapter port of the RetroN 5, then plug the AC Adapter into power outlet.*
- Insert the HDMI cable into the HDMI output port of the RetroN 5, then insert the other end of the HDMI cab; e into the HDMI input of your TV, monitor, or projector. **
- Press the POWER button to turn on the RetroN 5.
- The first time you turn on RetroN 5, you will be presented with the first run screen. This will help you to pair your RetroN 5 Wireless Controller and calibrate the screen size for your TV.
*The RetroN 5 comes with 4 variable head sockets; please use the correct head socket for your region, or risk damaging your RetroN 5 console.
Inserting the Power Base Converter

Can only be projected with a HDTV display capable of 720p or greater resolution insetting the Power Base Converter![]()
- Insert the Power Base Convener into the Genesis cartridge slot of the RetroN 5
- Lift the cartridge door of the Power Base Convener, then inset the Master System cartridge,
*Power Base Converter sold separately.
NAVIGATING THE MENU
PLAY
Insert the cartridge and wait for the game to load. Then, select Play to play the game. Do not insert more than one cartridge simultaneously, or risk damaging your RetroN 5.

SETTING
The Settings menu has four categories: Video, Audio, Controllers, and System.

Video
Image Filter
There are several different filter settings you can choose from to enhance the video output.
Scan lines
Enables a row of lines in a raster scanning pattern that was prevalent on CRT TV and Monitor displays. This filter emulates the feel of playing your games on an older model TV. You can toggle this feature ON cr OFF anytime during game play.
Aspect Ratio
Users will be able to change the aspect ratio settings between three different settings:
- Normal — Frames the 4:3 video to 16:9 picture area by displaying it in its original aspect ratio, with vertical black bars on both sides of the screen.
- Stretch — Progressively stretches the picture horizontally, resulting in the entire 16:9 screen being used to display the game without any black bars at the sides. However, this comes at the expense of a slightly altered aspect ratio.
- Zoom - Evenly stretches the picture both horizontally and vertically until the picture fills the entire width of the screen, and crops out the top and the bottom of the picture.
Overscan
CRT TV's used during the area of classic gaming did not actually display the entire image provided by game consoles, but rather cropped a small border on each side of the image. Turning overscan ON will cause RetroN 5 to reproduce this behavior by cropping the outside border of the displayed image. Turning Overscan OFF will display the full image area, ensuring that every last pixel is visible.
Force Original Resolution
When ON, the game displays with it's original resolution, however may not fill the who!e HDTV When OFF, the game is scaled to fit the entire HDTV.
Screen Refresh Rate
The number of times in a second that a display hardware redraws the screen image. There are two main TV encoding systems, NTSC and PAL. NTSC produces a picture frequency of 60Hz, and PAL produces a picture frequency of 50Hz.
- Match Game - The RetroN 5 will automatically detect the region the game is from, and produce a picture frequency that matches the cartridge.
- Force 60Hz - Selecting this option will have al games run at a frequency of 60Hz regardless of their region encoding.
- Force 50Hz - Selecting this option will have all games run at a frequency of 50Hz regardless of their region encoding.
Screen size
Users are able to manually adjust the screen size with the slider.
Audio
Sound Enhancement
Turning this feature ON will enable Audio Interpolation, a method of taking the original audio sample and creating higher quality sample, thereby creating a cleaner, smoother audio output.
Bass Boost
Turning this feature ON will enhance the level of the audio tones of low frequency.
Treble Boost
Turning this feature ON will enhance the level of audio tones of high frequency.
GUI Sound Effects
Turning this feature ON will enable sound effects and transitions within the user interface.
Volume
Users are able to adjust the volume output with the slider.

Controller
Manage RetroN 5 Controllers
- Pair Controller - Pair any RetroN 5 Wireless controller to the console.
- Left Shortcut Button - Change and map the: eft macro button of the RetroN 5 Wireless to the desired command.
- Right Shortcut Button Change and map the right macro button of the RetroN 5 Wireless to the desired command.
- Controller Auto-off — Set the duration for which the controller will power off when idle.
- Power-off — Turn off any RetroN 5 Wireiess controller connected to the console.
Controller to Player Mapping
RetroN 5 support a sophisticated controller mapping system, whereby you can manually select which cf the wired and wireless controllers to assign to each player. This allows you to create a virtual "multi&p", for example, if playing 4 player SNES title you may assign wired controllers SNES port 1 to Player 1, SNES pot 2 to Player 2, Genesis pod 1 to Player 3 and the RetroN 5 Wireless controller to Player 4. To assign controllers tor each system:
- Use System Playing to select the system you wish to configure controllers tor (each system type has its own configuration).
- Use the DAD UP/DOWN buttons to select the player number you wish to assign, then on the individual controller you wish to assign to that particular player, press the "A"/"+" but(on.
Button Mapping
RetroN 5 also supports a powerful button re-mapping system, which allows you to configure customized mappings between buttons on your physical controllers and the corresponding buttons on the target system. For example, you may decide that for playing NES titles, you wish to use a SNES controller and re-map the SNES controller Y to NES B, SNES controller X to NES A etc, Button mappings are created as profiles, catch of which specifies a relationship between a single type of physical controller and a single target system.
- System Playing — Select the game system you wish to play.
- Controller Used - Select the physical controller used for that system.
- Current Profile — Select the current profile you Wish to use.
- Manage Profiles - From here you may add a pew profile, view the default button mapping or edit!remove an existing profile.
To add or edit a button mapping profile, use the D•PAD to configure your new button mapping and then press ![]() to save your changes and return to the previous menu,
to save your changes and return to the previous menu,
For video tutorial on configuring the controller, check http://youtube.com/hyperkingames.
Hotkey Configuration
The RetroN 5 arrows users to create shortcuts for common features (such as opening the in-game menu, enabling fast#forward mode and saving/loading states) which may be activated during game play with a button combination on the wired controllers. Select a button combination to activate each of these features during game play:
- Controller Used - Indicate what controller you are using.
- In-game menu - Choose a hotkey combination for opening the in-game menu during game play.
- Fast Forward - Choose a hotkey combination for fast forwarding game play (You can fast forward gameplay at any time. The feature speeds game play in order to skip long animations or text conversations in game.)
- Save State - Choose a hotkey combination for save states. (You can store a save state at any time during game play.)
- Load Save Slate - Choose a hotkey combination for loading a save state. (You cap load a save state at any time during game play. The last saved save state will be loaded unless you select another slot in the In-Game Menu)
- Screenshot - Choose a hotkey combination for screenshots. (You can take a screenshot at any time during game play.)
Note: Most of these features are also available for use from within the In-Game Menu at any time during gameplay.

System
Console Region
The RetroN 5 gives you the option to automatically select the region based on the current game (i.e the USA region will be selected for USA cartridges), but also allows you to manually select between three different regions: USA, Europe, and Japan
Auto-load Last State
The RetroN 5 has the ability to save the game at any point during game play. By toggling this feature ON, users will be able to start the game where they last left off upon launching the game from the Main Menu. Toggling this feature OFF WII result in the game loading from the beginning to the game's title screen.
Auto-start cartridge on insertion
With this feature ON, RetroN 5 will automatically begin playing a cartridge on insertion. Toggling this OFF will mean that you will need to manually select "Play" from the Main Menu to begin game play after inserting a cartridge.
Automatically import saves on first run
RetcoN 5 has the ability to read saved game data stored on your original cartridges. With this option ON, the first time you insert a particular cartridge that contains save game data, this will be automatically imported from the original cartridge, and when YOU begin playing this game via RetroN 5 your previous saved game will be intact.
Save Data Location
The RetroN 5 has the ability to save your games on either the internal storage or an SD card.
File Manager
This option allows you to manage files on both the internal storage and SD card, either copy; ng from one location to the other or removing files in order to free up space.
Show RetroN quick info on startup
Turning this feature ON will cause the quick info screen to he displayed on boot. The quick info screen shows the current button combinations for opening the in-game menu, as well as the current save data location. Turning this feature OFF disables the quick info screen, meaning, on boot, the user will be brought directly to the Main Menu.
System information displays the version information for your RetroN 5 system (including system software version, application version and hardware version) as well as displaying the status (total capacity and free space) of both internal storage and any connected SD card.
Write Update Request to SD
Updates Wii be available to improve upon the firmware found on RetroN5.com minor issues can be fixed, compatibility issues can be remedied, and new features can be added. For a video tutorial on updating your unit's firmware, visit http://www.youtube.com/hyperkingames.

- Insert an SD card into the RetroN 5's SD card slot.
- Select "Write update request to SD"
![]()
- The update request file will be written to your SD card. This file will be required in order to obtain the update for yow Retrom 5 system,
- Remove the SD card from RetroN 5 and connect to your PC via an SD reader
- YOU will find a fie named "retron-update4equest.dat" on your SD cud, copy this io your PC.
- Login to http://www.retron5.com.
- Locate the latest firmware update and when requested, browse yow PC and select the "retron-update-request.dat" file which you previously copied from the SD card.
- A download of a file named "retroropdate.bin" will begin, Once completed, copy this file to the root of your SD card (this means do not place it in any folders/directories).
- Safely remove the SD from your PC and insert it back into the RetroN 5's SD slot.
- If your RetroN 5 is not already turned on, turn it on now
- You will be presented with a message explaining that an update has been found on the SD card. Select "Install" to begin the update procedure.
GAME MENU
Cartridge must be inserted in order to access the game menu

Cheats: The RetroN 5 comes with support for cheat codes that can be accessed and activated at toy time during game play. It cheat codes are available for the currently inserted cartridge, you may toggle individual cheats cr and off.
NOTE: The cheat codes are available as database files that must be downloaded separately and copied to your SD card - they are not bundled with RetroN 5 itself.
Copy Save to RetroN 5: The RetroN 5 will allow you to save your games onto the internal storage, as well ![]() the SD card. By doing this, users will be able to extract their saves via the SD card and store them onto their PC. This also allows tor users to exchange saves among other owners of the Retrop 5.
the SD card. By doing this, users will be able to extract their saves via the SD card and store them onto their PC. This also allows tor users to exchange saves among other owners of the Retrop 5.
Copy Save to Cartridge: The RetroN 5 will: allow you to transfer your save from the Internal Storage or the GD card to your cartridge, allowing you to play your games without losing your save on any other console or handheld.
IN-GAME MENU
Access the in-game menu by pressing the home button on the RetroN 5 Wireless controller.

- Save State Slot - Choose one of 10 different slots for which the game's current state will save to or load from.
- Save State — Save the game in its current state to the chosen save slot.
- Load State - Load the chosen save Sot.
- Filter — Toggle the current video filter in-game.
- Scanlines - Toggle scanlines on and off in-game.
- Take Screenshots — Save the current game's display frame as a screenshot onto your SD card.
- Volume — Control the level of the game volume.
- Return to Main Menu - Quits the game and returns to the main menu oi the RetroN 5.
- Reset — Restarts the current game.
RetroN 5 WIRELESS CONTROLLER

Each RetroN 5 includes a Retron 5 Wireless Controller, which has the playable distance of up to 30 feet without losing sync and a rechargeable lithium battery that can be charged through any Miri USB port via the Micro USB cable. Users will be able to pair up to four RetroN 5 Wireless Controllers to a single system. The controller has a microstitch directional pad, six face buttons, two shoulder buttons, a start and select button, four LED light indicators, two macro buttons, and a Home Button.
- Home Button -At any point during the game, the user is able to access the in-game menu by pressing the Home Button. This button is also used to pair a controller to the console.
- Macro Buttons - On the top left and top right of the controller, users will be able to program features and in-game button combinations and map them to these buttons.
- Four LED Light Indicators — These lights let the user know what player slot the controller is synced to.
Pairing Controller to the RetroN 5 Console

- Go to Settings > Manage RetroN 5 Controller > Pair Controller.
- Press and hold the Home button on the controller you wish to pair until its 4 LED's start flashing.
- The user interface will display a dialog informing you if the pairing was successful or not.
Once a controller is paired with the console, a sync is created. Subsequently, you may connect the controller to the console simply by briefly pressing any one of the buttons, which will cause the controller to initiate a connection; you will not need to pair a controller again.
Charging the Battery

- Insert the Micro USB cable into the Micro USB port on the controller.
- Insert the other end of the Micro USB cable into the Mini USB port on the RetroN 5.
- The LED light indicator will start to blink.
For troubleshooting, watch our YouTube videos at http://youtube.com/hyperkingames, or contact us at support@hyperkin.com.
www.hyperkin.com
For additional information, please visit www.RetroN5.com
Important Health Warning About Playing Video Games
A very small percentage of people may experience a seizure when exposed to certain visual images, including flashing lights or patterns that may appear in video games. Even people who have no history of seizures or epilepsy may have an undiagnosed condition that can cause these "photosensitive epileptic seizures" while watching video games.
These seizures may have a variety of symptoms, including lightheadedness, altered vision, eye or face twitching, jerking or shaking of arms or legs* disorientation, confusion, or momentary loss of awareness. Seizures may also cause loss of consciousness or convulsions that can lead to injury from falling down or striking nearby objects.
Immediately stop playing and consult a doctor if you experience any of these symptoms. Parents should watch for or ask their children about the above symptoms - children and teenagers are more likely than adults to experience these seizures. The risk of photosensitive epileptic seizures may be reduce by taking the following precautions: sit farther from the screen, use a smaller screen, play in a well-lit room, and do not play when you are drowsy or fatigued.
If you or any of your relatives have a history of seizures or epilepsy, consult a doctor before playing.
Documents / Resources
References

Download manual
Here you can download full pdf version of manual, it may contain additional safety instructions, warranty information, FCC rules, etc.
Advertisement


Need help?
Do you have a question about the RETRON 5 and is the answer not in the manual?
Questions and answers