Table of Contents
Advertisement
Available languages
Available languages
Quick Links
PRESSIO
EN
For optimum positioning of Pressio
Instructions for Use
SUPPORT IRM PRESSIO
FR
Pour le positionnement optimum des Cathéters Pressio
par IRM
Notice d'utilisation
PRESSIO
DE
Zur optimalen Positionierung der Pressio
suchung
Gebrauchsanweisung
SUPPORTO PER RMI PRESSIO
IT
Per il posizionamento ottimale dei Cateteri Pressio
nanza magnetica
Istruzioni per l'uso
PRESSIO
NL
Voor optimale positionering van Pressio
Gebruiksaanwijzing
SUPORTE PARA RM PRESSIO
PT
Para o posicionamento ideal dos Cateteres Pressio
Instruções de Utilização
®
MRI SUPPORT
®
MRT-SUPPORT
®
MRI SUPPORT
®
Catheters during an MRI examination
®
®
-Katheter während einer MRT-Unter-
®
®
durante un esame di riso-
®
-katheters tijdens een MRI-onderzoek
®
®
durante um exame de RM
®
au cours d'un examen
NT501_ML_S1
Rev001_2020-12
Advertisement
Table of Contents

Related Manuals for Sophysa PRESSIO PSO-MRI


Summary of Contents for Sophysa PRESSIO PSO-MRI
- Page 1 ® PRESSIO MRI SUPPORT ® For optimum positioning of Pressio Catheters during an MRI examination Instructions for Use ® SUPPORT IRM PRESSIO ® Pour le positionnement optimum des Cathéters Pressio au cours d’un examen par IRM Notice d’utilisation ® PRESSIO MRT-SUPPORT ®...
-
Page 3: Table Of Contents
Table of Contents ® Pressio MRI Support ................... . . 7 1. - Page 4 10.1. Conditions d’environnement ................16 10.2.
- Page 5 7. Pulizia del Supporto per RMI ................26 7.1.
- Page 6 ® Suporte para RM Pressio ..................37 1.
-
Page 7: Mri Support
MRI Support (PSO-MRI), hereinafter referred to as MRI Sup- port. Any request for information or modification relating to these instructions should be sent to: Sophysa – 5, rue Guy Moquet – 91400 Orsay – France. 2. Intended use 6. Assembling the MRI Support... -
Page 8: Cleaning The Mri Support
70% isopropyl alcohol (IPA) and wipe the surfaces again. NOTE If residues persist after multiple cleanings, stop us- ing the device and send it back to Sophysa for re- placement. 7. Cleaning the MRI Support 7.4. Inspection After each cleaning procedure, visually inspect the MRI Sup- NOTE port for any damage. -
Page 9: Performance Of The Mri Examination
Figure 4. Centering of the MRI Support WARNING The MRI Support is not compatible with every Head Coil. If the device is not compatible, opt for a manual coiling of the Catheter. Take the non-implanted part of the Catheter and coil it behind the top of the patient's head, in 5 cm loops (up to 4 or 5 loops) and perpendic- ular to the primary magnetic field. -
Page 10: Processing The Product After Use
Return to Manufacturer authorization form. Date of manufacture 11.2. Product elimination The used MRI Support should be sent back to Sophysa for proper elimination. CE conformity marking NOTE Clean the product carefully. Once cleaned (see Sec- Consult Instructions for Use tion 7. -
Page 11: Performances And Characteristics Of The Mri Support
® Table 3. Pressio Monitoring System Keep away from sunlight ® PSO-3000 Pressio ICP Monitor Power cable and Catheter extension cable (PSO- EC20) included By prescription only ® PSO-4000 Pressio 2 ICP Monitor Power cable and Catheter extension cable (PSO- 14. - Page 12 This page is intentionally left blank.
-
Page 13: Support Irm Pressio
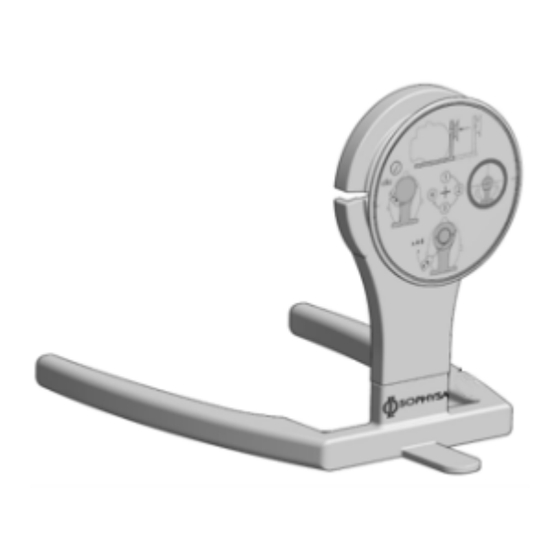
Figure 1. Description du Support IRM port IRM. Toute demande d’information ou de modification concernant ces instructions doit être envoyée à : Sophysa – 5, rue Guy Moquet – 91400 Orsay – France. 2. Usage prévu Le Support IRM est conçu pour permettre le positionnement optimal des cathéters Pressio en vue d’une IRM. -
Page 14: Nettoyage Du Support Irm
8.1. Préparation en vue de l’IRM Pour plus d’informations, contacter le Service Clientèle Étape 1. Après installation du patient sur la table d’examen, de Sophysa à l’adresse contact@sophysa.com ou con- positionner le Support IRM directement sur la table (le pied tacter votre distributeur local. -
Page 15: Réalisation De L'irm
Figure 3. Positionnement du Support IRM Figure 6. Fixation du dongle sur le Support IRM Étape 2. Déplacer le Support IRM de façon à ce qu’il soit positionné au centre de la table (figure 4). Étape 5. Avant de commencer l’IRM, s’assurer que le Sup- port IRM est bien centré... -
Page 16: Conditions D'environnement, Stockage Et Transport
être accompagné d’une fiche de Retour au fa- bricant explicative. Date de fabrication 11.2. Mise au rebut du produit Le Support IRM usagé doit être renvoyé à Sophysa qui pro- cèdera à une mise au rebut appropriée. Marquage CE de conformité NOTE Nettoyer le produit minutieusement. -
Page 17: Performances Et Caractéristiques Du Support Irm
– Nettoyer le Support IRM. Voir la Section 7. Nettoyage du Aligner le Support IRM correctement derrière la tête Support IRM (p. 14). du patient. Laisser le Support IRM dans l’axe du corps du pa- tient. 15. Références Un positionnement incorrect pourrait entraîner une surchauffe. - Page 18 Page laissée intentionnellement blanche...
-
Page 19: Mrt-Support
Alle sonstigen Informationsanfragen oder Änderungen in platziert wird und der den MRT-Support stabilisiert. Bezug auf diese Anleitung sind zu senden an: Sophysa – 5, – Das Gehäuse des Supports (Abbildung 1b), das ein rue Guy Moquet – 91400 Orsay – Frankreich. -
Page 20: Reinigen Des Mrt-Supports
Bleiben die Rückstände nach mehreren Reini- VORSICHTSHINWEIS gungsvorgängen bestehen, das Gerät nicht mehr Den MRT-Support nicht verwenden, wenn sich Ver- verwenden und es zum Austausch an Sophysa schmutzungen oder sichtbare Rückstände auf der zurücksenden. äußeren Oberfläche des Geräts befinden. 7.4. Überprüfung 7.1. -
Page 21: Funktion Des Mrt-Supports
Schritt 4. Den Stecker des Katheters fixieren, indem er seit- am Kopf des Patienten wie möglich positioniert, wobei sein Fuß Kontakt mit dem Tisch haben (Abbildung 3). lich am runden Teil des MRT-Supports festgeklemmt wird (siehe Abbildung 6). Abbildung 3. Positionieren des MRT-Supports Abbildung 6. -
Page 22: Umgebungsbedingungen, Lagerung Und Versand
Folgende Anweisungen beachten: verwendet werden. – Keine Lösungs- oder Reinigungsmittel verwenden, die den Sophysa garantiert die Leistung und Sicherheit dieses Medi- MRT-Support und seine Etiketten beschädigen könnten. zinprodukts unter den normalen Bedingungen des bestim- Siehe Abschnitt 7. Reinigen des MRT-Supports (S. 20) zu mungsgemäßen Gebrauchs des Geräts, angepasst an seinen... -
Page 23: Leistungen Und Eigenschaften Des Mrt-Supports
– Korrekter Zusammenbau des Geräts. CE-Konformitätskennzeichnung – Montagekontrolle des Geräts vor der Verwendung. – Korrekte Position des MRT-Supports auf dem Tisch. – Korrekte Position des MRT-Supports um den Kopf des Gebrauchsanweisung beachten Patienten. – Korrekte Katheteraufwicklung auf dem MRT-Support. – Korrekte Befestigung des Steckers am MRT-Support. Feuchtigkeitsbegrenzung: 5% bis 95% Falls der MRT-Support nicht mehr funktioniert: –... - Page 24 Tabelle 5. Datum der Anbringung der CE-Kennzeichnung PSO-MRI 2017 Änderungen der technischen Daten und Referenznummern vorbehalten. Die Produktverfügbarkeit kann von Land zu Land variieren. Seite 24 von 44...
-
Page 25: Supporto Per Rmi Pressio
Figura 1. Descrizione del Supporto per RMI denominato Supporto per RMI. Eventuali richieste di informazioni o modifiche relative a que- ste istruzioni devono essere inviate a: Sophysa – 5, rue Guy Moquet – 91400 Orsay – Francia. 2. Uso previsto... - Page 26 8.1. Preparazione per l'esame di risonanza magnetica Per ulteriori informazioni, contattare l’Assistenza clienti (pag. 26). Sophysa all’indirizzo contact@sophysa.com oppure contattare il proprio distributore locale. 8.1. Preparazione per l'esame di risonanza magnetica Passaggio 1. Una volta che il paziente è posizionato sul let- 7.2.
- Page 27 Figura 3. Posizionamento del Supporto per RMI Figura 6. Fissaggio del dongle al Supporto per RMI Passaggio 2. Spostare il Supporto per RMI in modo che sia posizionato al centro del lettino (Figura 4). Passaggio 5. Prima di avviare l’esame di risonanza magneti- ca, assicurarsi che il Supporto per RMI sia correttamente Figura 4.
-
Page 28: Garanzia
Non utilizzare un Supporto per RMI che sia danneggiato. 13. Simboli Nell'ambito del suo programma di miglioramento continuo, Sophysa richiede ai propri clienti di informare l'azienda e le Numero di catalogo autorità legali del paese di eventuali problemi gravi e inaspet- tati che si verifichino con il prodotto. - Page 29 – Pulire il Supporto per RMI. Vedere il paragrafo 7. Pulizia del Allineare correttamente il Supporto per RMI dietro Supporto per RMI (pag. 26). alla testa del paziente. Non spostare il Supporto per RMI rispetto all'asse corporeo del paziente. 15. Codici di riferimento Un errato posizionamento potrebbe causare un sur- riscaldamento.
- Page 30 Pagina lasciata intenzionalmente in bianco...
-
Page 31: Contra-Indicaties
Alle verzoeken om informatie of wijziging met betrekking tot – De voet (figuur 1a), waarop de onderzoekstafel moet wor- deze instructie dienen te worden gericht aan: Sophysa – 5, den geplaatst en die stabilisatie van de MRI Support mo- rue Guy Moquet – 91400 Orsay – Frankrijk. - Page 32 Neem voor meer informatie contact op met de klanten- plaatst u de MRI Support op de tafel (de voet van de MRI service van Sophysa op contact@sophysa.com, of Support moet contact maken met de tafel), zo dicht mogelijk neem contact op met uw lokale distributeur.
- Page 33 Afbeelding 3. De MRI Support positioneren Afbeelding 6. De dongle op de MRI Support bevestigen Stap 2. Verplaats de MRI Support totdat deze zich in het midden van de tafel bevindt (figuur 4). Stap 5. Voordat u het MRI-onderzoek start, dient u ervoor te zorgen dat de MRI Support correct is gecentreerd en lood- Afbeelding 4.
- Page 34 Als onderdeel van het doorlopende verbeteringsprogramma vraagt Sophysa haar klanten het bij Sophysa en bij de wette- Tabel 1. Datum eerste gebruik lijke instantie van het betreffende land te melden als er zich onverwachte problemen voordoen met het product.
- Page 35 – Verwijder de MRI Support eerst van het hoofd van de pati- ent en daarna van de tafel. Temperatuurlimieten: -20°C (-4 °F) tot 60°C (140°F) – Reinig de MRI Support. Zie Paragraaf 7. De MRI Support reinigen (p. 32). Lijn de MRI Support correct uit achter het hoofd van de patiënt.
- Page 36 Deze pagina is bewust blanco gelaten...
-
Page 37: Suporte Para Rm Pressio
Suporte para RM Pressio (PSO-MRI), de ora em diante referido como Suporte para RM. Qualquer pedido de informação ou de modificação relativo a estas instruções deverá ser endereçado a: Sophysa – 5, rue Guy Moquet – 91400 Orsay – França. 2. Utilização prevista O Suporte para RM destina-se a permitir o posicionamento dos Cateteres Pressio numa configuração ideal para um exa-... -
Page 38: Limpeza Do Suporte Para Rm
NOTA 7. Limpeza do Suporte para RM Se restarem resíduos após várias limpezas, pare de utilizar o dispositivo e devolva-o à Sophysa para NOTA ser substituído. O Suporte para RM não se destina a uma só utilização. -
Page 39: Desempenho Do Exame De Rm
Passo 2. Desloque o Suporte para RM para que fique no Passo 5. Antes de iniciar o exame de RM, certifique-se de centro da mesa (Figura 4). que o Suporte para RM está bem centrado e perpendicular ao campo magnético primário. Se não estiver, ajuste a posi- Figura 4. -
Page 40: Condições Ambientais
Devolução ao Fabricante. Número de série 11.2. Eliminação do produto O Suporte para RM usado deve ser devolvido à Sophysa pa- Fabricante ra ser devidamente eliminado. NOTA Data de fabrico Limpe o produto com cuidado. -
Page 41: Desempenho E Características Do Suporte Para Rm
– Limpe o Suporte para RM. Consulte a Secção 7. Limpeza Alinhe devidamente o Suporte para RM por detrás do Suporte para RM (p. 38). da cabeça do paciente. Não movimente o Suporte para RM relativamente ao eixo do corpo do paciente. 15. - Page 42 Página intencionalmente deixada em branco...
- Page 43 Página intencionalmente deixada em branco...
- Page 44 Sophysa USA 503 E Summit Street, Suite 5 Crown Point, IN 46307 Tel.: +1 219 663 7711 Fax: +1 219 663 7741 contact@sophysa.us www.sophysa.com ® Pressio is a registered trademark of Sophysa. ©2020 Sophysa. All rights reserved. NT501_ML_S1 Rev001_2020-12...
Need help?
Do you have a question about the PRESSIO PSO-MRI and is the answer not in the manual?
Questions and answers