Table of Contents
Advertisement
Quick Links
Advertisement
Table of Contents

Related Manuals for strada DHCP Series


Summary of Contents for strada DHCP Series
- Page 1 DHCP Domestic Heating Circulation Pump Installation and Operational Manual...
-
Page 2: Table Of Contents
Contents DHCP Installation Requirements General Information Operating Conditions Installation Thermal Insulation of Pump Body Electrical Connection Control Panel Pump Setting Performance Curve Features Technical Parameters Product Dimensions Trouble Shooting Guide... -
Page 3: Installation Requirements
Installation Requirements DHCP Notes Read the installation manual carefully before installation and use. The manufacturer will not be liable for any personal injury, pump damage or any property damage due to failure to comply with contents specified in the safety warning. The installers and operators must comply with local safety regulations. -
Page 4: General Information
General Information DHCP The DHCP series circulation pump is intended for use in domestic heating systems only. This pump is equipped with a permanent magnet motor and differential pressure controller, capable of automatically & continuously adjusting motor performance to meet the actual needs of the system. -
Page 5: Operating Conditions
Operating Conditions DHCP Operating Conditions Ambient Temperature 0~+ 40°C Relative Humidity (RH) Max. Humidity 95% Medium (Liquid Delivery) Temperature * +2°C - 110°C System Pressure Maximum Pressure 1.0 mPa (10 bar) Degree of Protection IP44 * To avoid condensation in the control box and the stator, the temperature of liquid being pumped must always be higher than the ambient temperature. -
Page 6: Installation
Installation DHCP When installing the DHCP circulation pump, the arrow on the pump case indicates the direction of flow of the liquid through the pump. When installing the circulation pump, the two supplied gaskets must be installed on the inlet and outlet. During the installation, the motor shaft of the pump must be fitted in a horizontal position. -
Page 7: Thermal Insulation Of Pump Body
Thermal Insulation of Pump Body DHCP Pumping liquid may be high temperature and high pressure, therefore the liquid in the system must be completely drained or the valves on both sides of the pump must be closed off before removing the socket head screws. To limit heat loss the pump body and pipeline should be thermally insulated. -
Page 8: Electrical Connection
Electrical Connection DHCP All electrical connections must be carried out by a qualified professional in accordance with local regulations. The pump must be earthed The pump must be connected to an external power switch, and the minimum space between all the electrodes is 3mm. The DHCP circulation pump needs no secondary protection. -
Page 9: Control Panel
Control Panel DHCP Position Descriptions Indication lamp area of three operation modes set by pump. Speed Control button for setting the operation modes of the Max A Min pump. Maximum Setting Automatic Setting Minimum Setting The DHCP circulation pump has three settings which can be chosen with the speed control button. The pump settings are indicated with different indication lamp areas. -
Page 10: Pump Setting
Pump Setting DHCP Pump Setting Based on System Type Default setting = AUTO (self-adaptive mode). This is the recommended pump setting. AUTO (self-adaptive mode) adjusts the performance of the pump based on the actual heat demand of the system. As the performance is adjusted gradually, before changing the pump setting, it is recommended to maintain the AUTO (self-adaptive mode) setting for at least one week. -
Page 11: Performance Curve
Performance Curve DHCP Guide on Performance Curve Every setting of the pump has a corresponding performance curve (Q/H curve). However AUTO (self-adaptive mode) covers just one performance scope. The input power curve (P1 curve) belongs to every Q/H curve. Power curve represents the power consumption of the pump in given Q/H curve with the unit of measure in Watts. -
Page 12: Features
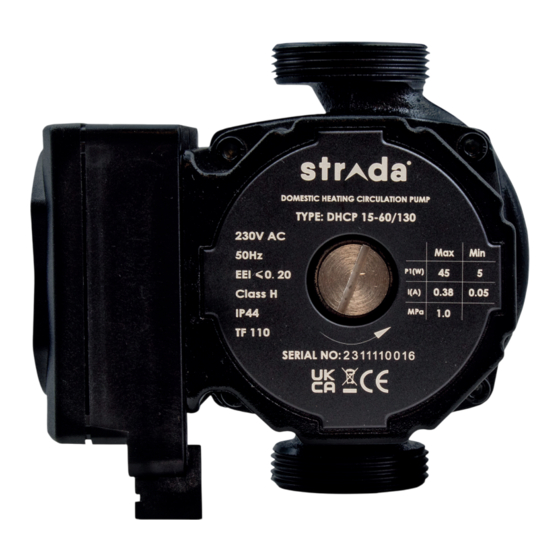
Features DHCP Data Plate Information Descriptions Manufacturer Name Product Model Serial Number Power Rating (P1) Current (Amp) Maximum System Pressure (mPa) Authentication marks Direction of rotation Temperature Class Degree of protection Insulation Class Energy Efficiency Index (EEI Rating) Frequency (Hz) Voltage (V) -
Page 13: Technical Parameters
Technical Parameters DHCP Technical Parameters and Installation Dimensions Power Supply Voltage 220V-240V,50/60Hz,PE Motor Protection The pump does not require any secondary protection Degree of Protection IP44 Insulation Class Relative Humidity (RH) Max. 95% System Load Bearing 1.0 mPa Liquid Temperature Minimum Inlet Pressure ≤+85°C 0.005 mPa... -
Page 14: Product Dimensions
Product Dimensions DHCP Dimension (mm) Product Model DHCP 1 1/2”... -
Page 15: Trouble Shooting Guide
Trouble Shooting Guide DHCP Before conducting any maintenance and repair of the pump, ensure that the power supply has been disconnected. Symptom Control Panel Cause Corrective Action Equipment fuse burned Replace the fuse The circuit breaker of current Connect the circuit breaker control or voltage control opens Indication lamp “Off”... - Page 16 Unit A - 82 James Carter Road, Mildenhall Industrial Estate, Suffolk, IP28 7DE...
Need help?
Do you have a question about the DHCP Series and is the answer not in the manual?
Questions and answers