
Summary of Contents for pasapair FJD20-23ARC
- Page 1 Owner's Manual 3D CIRCULATION FAN Brand: pasapair Model: FJD20-23ARC Input:120V~ 60Hz 24W PLEASE READ INSTRUCTIONS CAREFULLY BEFORE ASSEMBLY RETAIN THIS MANUAL FOR FUTURE REFERENCE...
-
Page 3: Table Of Contents
CONTENT SAFETY INSTRUCTIONS TECHNICAL DATA DESCRIPTION REPLACEMENT OF REMOTE CONTROL BATTERY ASSEMBLY MAINTENANCE AND CLEANING Warranty CONTENU CONSIGNES DE SÉCURITÉ DONNÉES TECHNIQUES DESCRIPTION GUIDE D’ UTILISATION REMPLACEMENT DES PILES DE LA TÉLÉCOMMANDE MONTAGE ENTRETIEN ET NETTOYAGE GARANTIE Made in China MANUFACTURERS: SOULCESS TECHNOLOGY CO., LTD ADD.: No.8 of B06, Jiyue Industrial Zone, Xichong Village, Lunjiao Street, Shunde District, Foshan City, Guangdong Province, P. -
Page 4: Safety Instructions
SAFETY INSTRUCTIONS Before using this electrical appliance, read the instructions below carefully and keep the user manual for future reference: 1.Before connecting the appliance to a wall socket, check that the local power supply matches the one indicated on the appliance rating plate. Always plug your appliance into an earthed socket. 2.If the supply cord is damaged, it must be replaced by the manufacturer, its service agent or similarly qualified persons in order to avoid a hazard. -
Page 5: Technical Data
*During the operation of the fan, prohibited to break the net cover by hand, and it can not be placed next to inflammable and explosive objects or curtains. Technical Data Fan Specification Model No. FJD20-23ARC Rated Voltage 24V DC Rated Frequency Rated Power Net Weight 4.6kg/10.1lb... -
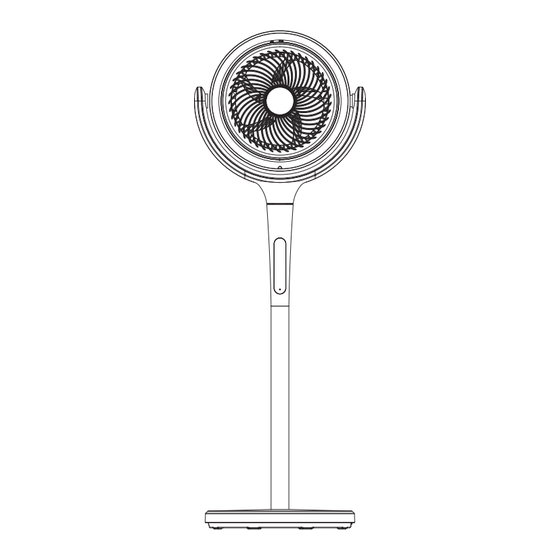
Page 6: Description
DESCRIPTION Back Guard Front Guard Atmosphere light LED Display Oscillation knob control Adapter connection position Stem Base... -
Page 7: Use
Caution: •Make sure that the product is placed on a flat and stable floor. •The power socket must be in the vicinity of the fan and easily accessible. •Always position the power cord so that nobody can trip over or become entangled in it. Control panel and LED display Swing Tilt... - Page 8 On/off •Connect the supplied power cable to the mains socket on the fan stem and to the wall socket. T • , ff “ ” “ l ) ” •Fan start-up, initial default power-on into 3-speed, digital tube displays the current setting, the motor works in 3-speed running state Note: When using the remote control, point it into the fan, and make sure there is no obstacle...
-
Page 9: Replacement Of Remote Control Battery
According to the current speed setting operation, after every 30 minutes to reduce a setting, the lowest reduced to 1 setting. What setting is the normal wind in, and what setting is the sleep wind in. Mood Lamp brightness “ s ”... -
Page 10: Assembly
Assembly Step 1: Take out the body parts, stem parts, and base parts from the packing box. Step 2: Put the stem part to the hole on the base, and tighten the stand tube by turning it clockwise. Step 3: put the body part to the hole on the tube, and tighten both of them by turning it clockwise. Step 4: Insert the adapter output terminal into the corresponding position on the body. -
Page 11: Warranty
Warranty Thank you for choosing PASAPAIR product. We sincerely hope that you are satisfied with it. The manufacturer's warranty covers the product for a period of 12 months from the date of purchase against manufacturing faults. All warranties are automatically kept track of in our system, so there is no need to register your product. -
Page 12: Consignes De Sécurité
CONSIGNES DE SÉCURITÉ Before using this electrical appliance, read the instructions below carefully and keep the user manual for future reference: 1.Avant de brancher l'appareil sur une prise murale, vérifiez que le réseau électrique local correspond à celui indiqué sur la plaque signalétique de l'appareil. Branchez toujours votre appareil sur une prise reliée à... -
Page 13: Données Techniques
*Pendant le fonctionnement du ventilateur, il est interdit de casser le filet à la main et il ne peut pas être placé à côté d'objets ou de rideaux inflammables et explosifs. Données techniques Spécifications du ventilateur Numéro de modèle. FJD20-23ARC 24V DC Tension nominale Fréquence nominale Puissance nominale Poids net 4.6kg/10.1lb... -
Page 14: Description
DESCRIPTION Protection arrière Protection avant Lumière d'ambiance Écran LED Bouton d'oscillation Position de la connexion de l'adaptateur Tige Base... -
Page 15: Guide D' Utilisation
GUIDE D’ UTILISATION Avertissement : •Assurez-vous que le produit est placé sur un sol plat et stable. •La prise de courant doit se trouver à proximité du ventilateur et être facilement accessible. •Placez toujours le cordon d'alimentation de manière à ce que personne ne puisse trébucher ou s'emmêler dedans. - Page 16 Marche/arrêt •Branchez le câble d'alimentation fourni à la prise de courant de la tige du ventilateur et à la prise murale. •Pour allumer ou éteindre le ventilateur, appuyez sur " " sur le panneau de commande (ou sur la télécommande " ") •...
-
Page 17: Remplacement Des Piles De La Télécommande
•Mode vent en veille : appuyez sur la touche" "pour entrer dans ce mode, et l'écran numérique affiche" ", puis appuyez sur le réglage de la vitesse pour ajuster la vitesse du vent, le réglage de la vitesse clignote pour s'afficher ; 12S confirmation après aucune opération affiche" ". -
Page 18: Montage
Montage Étape 1 : Sortez les parties du corps, les parties de la tige et les parties de la base de la boîte d'emballage. Étape 2 : Placez la partie de la tige dans le trou de la base et serrez le tube du support en le tournant dans le sens horaire. -
Page 19: Garantie
GARANTIE Merci d'avoir choisi le produit PASAPAIR. Nous espérons sincèrement que vous en êtes satisfait. La garantie du fabricant couvre le produit pour une période de 12 mois à compter de la date d'achat contre les défauts de fabrication. Toutes les garanties sont automatiquement enregistrées dans notre système, il n'est donc pas nécessaire d'enregistrer votre produit.
Need help?
Do you have a question about the FJD20-23ARC and is the answer not in the manual?
Questions and answers
Fan less than one year old. Won't run. Fan will turn slightly when you press circuit breaker. But otherwise no power to fan.