
Related Manuals for FITSHOP DARWIN TM30

Summary of Contents for FITSHOP DARWIN TM30
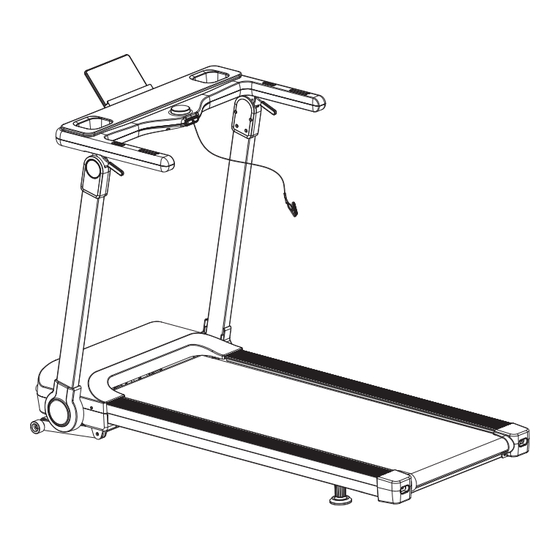
- Page 1 Assembly and Operating Instructions max. 120 kg ~ 30 Min. 57 kg L 158 | W 77 | H 117 FSDFTM30.02.03 Art.-No. DF-TM30-2 DARWIN TM30...
- Page 2 TM30...
-
Page 3: Table Of Contents
Content GENERAL INFORMATION Technical Data Personal Safety Electrical Safety Set-Up Place ASSEMBLY General Instructions Scope of Delivery Assembly Folding Mechanism OPERATING INSTRUCTIONS Console Display Button Functions Fitness Programmes 3.3.1 Quickt Start 3.3.2 Preset Programme Mode 3.3.3 User Programme Mode 3.3.4 Body Fat Test Wireless Connection and Fitness Apps STORAGE AND TRANSPORT General Instructions... - Page 4 ORDERING SPARE PARTS Serial Number and Model Name Parts List Exploded Drawing WARRANTY CONTACT TM30...
- Page 5 European VAT Number: DE813211547 Disclaimer © Darwin is a registered brand of the company Fitshop GmbH. All rights reserved. Any use of this trademark without the explicit written permission of Fitshop is prohibited. Product and manual are subject to change. Technical data can be changed without advance notice.
- Page 6 ABOUT THIS MANUAL Please carefully read the entire manual before installation and fi rst use. The manual will help you to quickly set up the system and explains how to safely use it. Make sure that all persons exercising with the equipment (especially children and persons with physical, sensory, mental or motor disabilities) are informed about this manual and its contents in advance.
- Page 7 Please pay close attention to the safety and maintenance instructions given here. The contract partner cannot be held liable for damage to health, accidents or damage to the equipment when it is not used in accordance with these instructions. The following safety instructions may appear in this manual: ATTENTION This notice indicates potentially hazardous situations which, if not avoided, may result in property damage.
-
Page 8: General Information
GENERAL INFORMATION Technical Data LED Display: Time in minutes Distance in km Speed in km/h Calorie consumption in kcal Incline Motortype: Brushless motor (1.5 HP) Speed: 1 - 16 km/h in steps of 0.1km/h Incline: 15 levels Training programmess in total: Quick keys: Thickness of running mat: 1.6 mm... -
Page 9: Personal Safety
Personal Safety ⚠ DANGER Before you start using the equipment, you should consult your physician that this type of exercise is suitable for you from a health perspective. Particularly aff ected are persons who: have a hereditary disposition to high blood pressure or heart disease, are over the age of 45, smoke, have high cholesterol values, are overweight and/or have not exercised regularly in the past year. -
Page 10: Electrical Safety
The software systems on gym equipment with TFT consoles are set up only for the pre- installed apps. Do not install any additional apps. NOTICE The pre-installed apps on TFT consoles are produced and provided by external manufacturers. Fitshop does not take any responsibility for the availability, functionality or contents of these apps. TM30... -
Page 11: Set-Up Place
Set-Up Place ⚠ WARNING Do not place the equipment in main corridors or escape routes. ⚠ CAUTION Make sure that there is a safety area behind the treadmill with a length of at least 2 m and a width at least equal to the width of the treadmill. The training room should be well ventilated during training and not be exposed to any draughts. -
Page 12: Assembly
ASSEMBLY General Instructions ⚠ DANGER Do not leave any tools, packaging materials such as foils or small parts lying around, as otherwise there is a danger of suff ocation for children. Keep children away from the equipment during assembly. ⚠ WARNING Pay attention to the instructions attached to the equipment in order to reduce the risk of injuries. -
Page 13: Scope Of Delivery
Scope of Delivery The scope of delivery consist of the following parts. At the beginning, check whether all parts and tools belonging to the device are included in the scope of delivery and whether damage has occurred. In the event of complaints, the contractual partner must be contacted directly. ⚠... -
Page 14: Assembly
Assembly Before assembly, take a close look at the individual assembly steps shown and carry out the assembly in the order given. NOTICE First loosely screw all parts together and check that they fi t properly. Tighten the screws using the tool only when you are instructed to do so. - Page 15 Step 2: Setting the Upright Tubes Lift the console unit (A05) along with left and right upright tubes (A03 & A04) upwards.
- Page 16 Step 3: Setting the Console Unit Fold the console unit (A05) forwards. TM30...
- Page 17 Step 4: Assembly of the Covers Place the two covers (C10) on the left and right upright tubes (A03 & A04).
- Page 18 Step 5: Assembly of the Tablet Holder Insert the tablet holder (B) into the socket provided on the console unit (A05). TM30...
- Page 19 Step 6: Attachment of the Safety Key Insert the safety key (C16) into the socket of the console unit (C33).
- Page 20 Step 7: Alignment of the feet If the fl oor is uneven, you can stabilize the treadmill by turning the two setting screws under the main frame. Lift the treadmill on the desired side and rotate the setting screws under the main frame. Rotate the screws clockwise in order to remove them and to raise the running surface.
-
Page 21: Folding Mechanism
Folding Mechanism ⚠ WARNING Do not lift the treadmill by the running mat or the rear transporting wheels. These parts do not lock and are diffi cult to grab. Do not connect the equipment to the power supply when it is folded up. Try not to operate the equipment when it is folded up. -
Page 22: Operating Instructions
OPERATING INSTRUCTIONS NOTICE Familiarise yourself with all the functions and setting options of the device before starting training. Have the proper use of this product explained to you by a specialist. Always start your training with low intensity and increase evenly and gently. End your training with a cool-down phase. -
Page 23: Console Display
Console Display Calories Indicates the burned calories. Pulse Indicates your current heart rate. Time Indicates the training time. Speed Indicates the current speed. Distance Indicates the distance. Incline Indicates the current incline. Button Functions The rotary knob is used for several commands and inputs: Press the rotary knob in the menu to select the corresponding programme. -
Page 24: Fitness Programmes
Fitness Programmes ⚠ WARNING Your training equipment is not a medical device. The heart rate measurement of this equipment may be inaccurate. Various factors can aff ect the accuracy of the heart rate measurement. The heart rate measurement serves only as a training aid. In the main menu, you can choose from many diff erent programmes. -
Page 25: User Programme Mode
3.3.3 User Programme Mode There are 3 available user programmes for you to adjust to your personal preferences. Use the rotary knob to choose the user programme mode from the main menu and press MODE to confi rm. Use the rotary knob to choose from one of the 3 user programmes and press MODE to confi rm. Use the rotary knob to set a desired training time and press MODE to confi rm. -
Page 26: Wireless Connection And Fitness Apps
You will fi nd the fi tness apps in the app stores of Google or Apple. There you will fi nd the apps “Kinomap” or “Zwift”. Please note that these apps are produced by an external manufacturer. Fitshop does not take any responsibility regarding the availability, functionality or contents of these programmes. -
Page 27: Storage And Transport
STORAGE AND TRANSPORT General Instructions ⚠ WARNING The storage location should be chosen so that improper use by third parties or children can be prevented. If your equipment does not have transportation wheels, the equipment must be disassembled before transportation. ATTENTION Make sure that the equipment is protected from moisture, dust and dirt in the selected storage location. -
Page 28: Troubleshooting, Care And Maintenance
TROUBLESHOOTING, CARE AND MAINTENANCE General Instructions ⚠ WARNING Do not make any improper changes to the equipment. ⚠ CAUTION Damaged or worn components may aff ect your safety and the life of the equipment. Therefore, immediately replace damaged or worn components. In such a case, contact the contract partner. -
Page 29: Care And Maintenance
Please note that the video may not be available in your language or with appropriate subtitles. If you cannot scan QR-codes, you can access all Fitshop videos on YouTube by fi rst opening YouTube and entering “Fitshop” in the search fi eld. -
Page 30: Re-Tensioning The Running Mat
5.3.2 Re-tensioning the Running Mat If the running mat slips over the rollers during operation (if this is the case, there is a noticeable jerk during running), the running mat must be re tightened. In most cases, the slipping is caused by stretching of the mat through use. This is perfectly normal. ... -
Page 31: Maintenance And Inspection Calendar
Please note that the video may not be available in your language or with appropriate subtitles. If you cannot scan QR-codes, you can access all Fitshop videos on YouTube by fi rst opening YouTube and entering “Fitshop” in the search fi eld. -
Page 32: Recommended Accessories
RECOMMENDED ACCESSORIES To make your training experience even more effi cient and pleasant, we recommend that you add suiting accessories to your fi tness equipment. For treadmills this could for example be a fl oor mat, which makes your fi tness equipment stand more securely and also protects the fl oor from sweat or silicone spray to keep moving parts in good shape and lubricate the running mat. -
Page 33: Serial Number And Model Name
ORDERING SPARE PARTS Serial Number and Model Name In order to provide you with the best possible service, please have the model name, article number, serial number, exploded drawing and parts list ready. The corresponding contact options can be found in chapter 10 of this operating manual. ... -
Page 34: Parts List
Parts List Name Specifi cation Qty. Lifting Frame Component Main Frame Component Left Column Component Right Column Component Display Basement Component Folding Handlebar Side rail Fixing Panel Motor Fixing Panel Rotating assembly Clearance ring Motor Fixing Base L Motor Fixing Base R Front Roller Back Roller Left Pulse Icon Clip Right Pulse Icon Clip... - Page 35 Outside Decorative Cover of Right Column L Decorative Cover of Inner Column Motor Top Cover Motor Bottom Cover Decorative Cover Left Rear End Cap Right Rear End Cap Handlebar Rubber Sleeve Running Belt Side rail Safety Key Cushion Transportation Wheel Cushion Middle Cushion IPAD Top Cover IPAD Bottom Cover...
- Page 36 Bolt M10*65 Bolt M10*45 Bolt M10*40 Bolt M10*20 Bolt M10*45 Bolt M8*15 Bolt M6*12 Bolt M6*25 Bolt M8*55 Bolt M6*55 Bolt M6*20 Bolt M6*12 Screw ST4.2*12 Bolt M5*10 Bolt M5*8 Screw ST4.2*12 Screw ST4.2*10 Screw ST3.5*10 Screw ST3.5*8 Screw ST2.9*8 Screw ST2.9*8 Screw...
- Page 37 Lock Washer Φ6 Lock Washer Φ5 Spring Washer Φ8 Bolt M5*12 Screw ST4.2*16 Bolt M6*60 Bolt M4*16 Bolt M5*10 Bolt M6*20 Console Control Board Console Top wire Console Bottom wire Smart Adjustment Knob Knob Connection Wire Safety Key Connection Wire Pulse Top Wire Pulse Bottom Wire Incline Top Wire...
- Page 38 Ground Wire Ground Wire Motor Speaker Screw ST2.9*6 USB Module USB Wire Filter ST4.2*12 Inductance AC Single Wire Ground Wire Screw ST4.2*12 B-board Audio socket wire Screw ST2.5*6 B-module B-wire HRC connecting wire Wireless receiver TM30...
-
Page 39: Exploded Drawing
Exploded Drawing... - Page 40 TM30...
-
Page 41: Warranty
WARRANTY Products from Darwin® are subject to strict quality control. However, if a fi tness equipment purchased from us does not work perfectly, we take it very seriously and ask you to contact our customer service as indicated. We are happy to help you by phone via our service hotline. Error Descriptions Your fi tness equipment is developed for long-term, high-quality training. - Page 42 Warranty Conditions For the warranty to be valid, the following steps must be taken: Please contact our customer service by email or phone. If the product under warranty has to be sent in for repair, the seller bears costs. After expiry of the warranty, the buyer bears the costs of transport and insurance.
- Page 43 Sie unserer Homepage: Sie unserer Homepage: https://stg.fi t/statit6 https://stg.fi t/statitb https://stg.fi t/statit9 Please fi nd a detailed overview including address and opening hours for all stores of the Fitshop Group in Germany and abroad on the following website: www.fi tshop.com/en/stores...
- Page 44 Fitshop off ers a wide range of fi tness equipment www.youtube.com/@fi tshop_uk from renowned manufacturers, high-quality in-house developments and comprehensive services, such as a build-up service and sports scientifi c advice before and after the purchase.
- Page 45 Notes...
- Page 46 Notes TM30...
- Page 48 DARWIN TM30...
Need help?
Do you have a question about the DARWIN TM30 and is the answer not in the manual?
Questions and answers