Advertisement
Advertisement
Table of Contents

Related Manuals for Kogan KABKALAMLTA


Summary of Contents for Kogan KABKALAMLTA
- Page 1 ANTI-THEFT BIKE ALARM WITH BUILT-IN BRAKE LIGHT KABKALAMLTA...
-
Page 3: Safety And Warnings
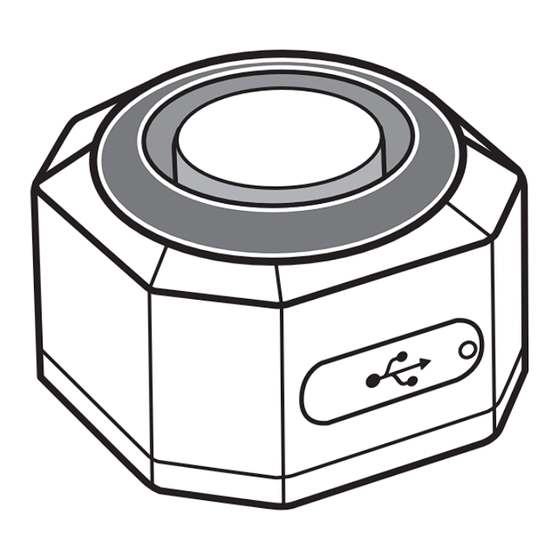
SAFETY & WARNINGS Warning Keep Batteries Out of Reach of Children • Swallowing may lead to serious injury in as little as 2 hours, or death, due to chemical burns and potential perforation of the oesophagus. • If you suspect your child has swallowed or inserted a button battery, immediately call the 24-hour Poisons Information Centre on 13 11 26 for fast, expert advice. - Page 4 OVERVIEW Bracket Installation Speaker 5V USB-C port Brake light Silicone Light mode/pair button Bracket...
- Page 5 Zip Tie Installation Bracket base Zip tie Zip tie fastener WL09C Remote Arm button Disarm button Brake light/Mode button Alarm button...
-
Page 6: Installation
INSTALLATION Note: Fully charge the bike alarm prior to installation. Installation Method 1: Bracket installation Bracket installation is suitable for bikes, electric bikes, and tricycles. The bracket can be secured to the seat tube, head tube, rear backrest, or any other tube. Secure the anti-loosening nut according to the diagram below. - Page 7 Place the 2 silicone pads on the bracket. Align the contours on the silicone pads with the grooves on the inside of the brackets. Place the bracket with silicone pads on the selected tube and tighten the screw until the bracket does not slide on the tube.
- Page 8 Installation Method 2: Zip Tie Installation Zip tie installation is suitable if the bracket diameter does not fit your bike. Rotate the base into the bottom of the bike alarm. Insert the screw into the base and tighten. Secure the base and the bike alarm to your bike with a zip tie. Zip tie Rotate and lock, screw in the screw.
-
Page 9: Operation
OPERATION Multifunctional Brake Light and Smart Brake • When the bike alarm is disarmed, press the Brake light/Mode button [ ] on the remote to select one of the following 5 light modes: Slow Flashing → Breathing → Blinking → Steady Light →... - Page 10 Bike Location Alarm Press the Alarm button [ ] button on the remote to sound the alarm to help you find your bike. The brake light will illuminate while the alarm is sounding, then return to the previous light mode. Note: This function is not available when the bike alarm is armed.
- Page 11 Pair a Remote to the Bike Alarm The provided remote and bike alarm will be paired when you receive them. To pair more remotes to the bike alarm: When the alarm is disarmed, press and hold the Pair button [ ] on the bike alarm for about 3 seconds until you heard a beep.
- Page 12 Low Battery Warning and Charging Bike alarm: • If the bike alarm battery is low, when you press the Arm/Disarm buttons [ ] on the remote, the bike alarm will make a low-battery prompt sound, in addition to the arm/disarm beep. •...
- Page 13 Remote: If the wireless range is reduced, the indicator is no longer illuminating or is only faintly illuminating, the remote control battery is low and needs to be replaced. To replace the battery: Pry at the gap with a small flat-head screwdriver to open the remote casing. Loosen the screw using a Phillips head screwdriver.
-
Page 14: Specifications
SPECIFICATIONS • 3.7V 700mAh lithium battery. • Working time: approx. 1~3 months. Bike Alarm Battery • Standby time: approx. 6 months. Standard USB-C 5V (some quick chargers may Bike Alarm Charging Port not be compatible). • WL03C: 27A(12V) alkaline battery, working time about 1~2 years (5 times per day). -
Page 15: Troubleshooting
TROUBLESHOOTING Problem Solution Check if the remote indicator illuminates. or only illuminates faintly, replace the battery. The bike alarm or The bike alarm battery is low. When you first receive the bike remote is not alarm, the battery will be low. It is recommended to fully charge working. - Page 16 Need more information?
Need help?
Do you have a question about the KABKALAMLTA and is the answer not in the manual?
Questions and answers