Table of Contents
Advertisement
Quick Links
MODEL
525
525 OPERATING INSTRUCTIONS
Zamboni USA
Zamboni Company USA, Inc.
15714 Colorado Ave.
Paramount, CA USA 90723-4211
(562) 633-0751
(562) 633-9365
REV 12/10/19
SERVICE MANUAL
Zamboni Canada
This manual must be kept and stored with the vehicle at all times.
Zamboni Company Ltd.
38 Morton Ave. East, Box 1388
Brantford, ON Canada N3T 5T6
(519) 758-5000
Zamboni Europe AB
Murarmörkret 4
SE-811 74 Österfärnebo Sweden
(519) 758-0500
Zamboni Europe
+46 291 206 80
+46 291 206 83
Advertisement
Table of Contents
Troubleshooting

Related Manuals for Zamboni 525

Summary of Contents for Zamboni 525
- Page 1 MODEL SERVICE MANUAL 525 OPERATING INSTRUCTIONS Zamboni USA Zamboni Canada Zamboni Europe This manual must be kept and stored with the vehicle at all times. Zamboni Company USA, Inc. Zamboni Company Ltd. Zamboni Europe AB 15714 Colorado Ave. 38 Morton Ave. East, Box 1388 Murarmörkret 4...
- Page 2 MODEL SERVICE MANUAL MANUFACTURER’S WARRANTY OPERATING INSTRUCTIONS TROUBLESHOOTING GUIDE PARTS LIST MAINTENANCE SCHEDULE / LOGS ENGINE ® ACCESSORY HYDRAULIC COMPONENTS HYDROSTATIC DRIVE COMPONENTS WATER PUMP SAFETY BULLETIN...
-
Page 3: Manufacturer's Warranty
MANUFACTURER’S WARRANTY... - Page 4 (2) years or 2,000 hours, whichever comes first, following shipment from our factory to the original user. The obligation of ZAMBONI under this warranty is limited to replacing at our factory any part or parts supplied by us, which shall, within the warranty period be returned to us with transportation charges prepaid, and which our examination shall disclose to our satisfaction to have been defective.
- Page 5 OPERATING MODEL INSTRUCTIONS 525 OPERATING INSTRUCTIONS Zamboni USA Zamboni Canada Zamboni Europe This manual must be kept and stored with the vehicle at all times. Zamboni Company USA, Inc. Zamboni Company Ltd. Zamboni Europe AB 15714 Colorado Ave. 38 Morton Ave. East, Box 1388 Murarmörkret 4...
- Page 6 OPERATING INSTRUCTIONS...
- Page 7 525 OPERATING INSTRUCTIONS This manual must be kept and stored with the vehicle at all times.
- Page 8 Propane (LPG) Tank Storage and Handling CNG Fuel System Oils Batteries Lubricants Lines, Tubes and Hoses Safe Operation 1-10 Mounting and Dismounting 1-10 Before Operating the Zamboni machine 1-10 Operation 1-10 Parking 1-11 Maintenance 1-12 Walk-Around Inspection 1-12 Battery Operation and Maintenance...
- Page 9 Contents Starting the Engine Stopping the Engine Machine Not in Use Travel on Highways 3 Safe Operation 4 Ice Rink Air Quality Adequate Ventilation Air Quality Monitoring Engine Emission System Components Engine Control Unit (ECU) Open Loop versus Closed Loop Operation Oxygen Sensor Catalytic Converter Engine Ignition Timing...
- Page 10 Contents Accelerator Foot Pedal Throttle Switch and Hydrostatic Transmission Control Levers Resurfacing Procedures Learning to Resurface Before Going to the Ice On the Ice Shaving or Cutting Reversible Vertical Auger Operation Typical Resurfacing Operation Using the Snow Breaker Washing the Ice Ice Making Water 7-10 Using the Board Brush...
- Page 11 Contents Emergency Hydrostatic Bypass Valve 10-2 11 Storage Information 11-1 Storage Room Information 11-1 Summer Storage Tips 11-1...
- Page 12 We thank you for choosing a ZAMBONI® product and want to assure you of our continuing interest in your satisfaction with your ice resurfacer.
- Page 13 Safety Symbols The safety symbols listed outline basic safety precautions. READ AND UNDERSTAND ALL SAFETY PRECAUTIONS AND WARNINGS BEFORE OPERATING, OR PERFORMING LUBRICATION AND MAINTENANCE. These symbols indicate when your safety or the safety of others may be at risk. DANGER! This safety symbol warns of possible personal injury or death.
- Page 14 Ice Resurfacer Guards The safety guards used on the Zamboni ice resurfacer are illustrated in Figures 1.1 and 1.2. Vertical Auger Coupling Guard Chain and Pulley Guard, Conditioner Covers Horizontal Auger (not shown) Figure 1.1 ce esur acer uards...
- Page 15 Ice Resurfacer Guards Snow Tank Safety Stand Snow Tank Light (Option) Figure 1.2 ce esur acer uards now Tank a et tand viii...
- Page 16 Zamboni® Ice Resurfacer Specifications GM 3.0 Litre L4 Fuel Types: Gasoline, Propane (LPG), Natural Gas (CNG). Available as dual fuel (Gasoline / Propane, Engine Natural Gas / Propane) or dedicated fuel. Load sensing electronic governor enables true “hands- free” operation by the driver.
-
Page 17: Tank Capacities
Zamboni® Ice Resurfacer Specifications Tank Capacities Snow Tank Actual 2.83 m (100 ft Compacted 3.54 m (125 ft Ice Making Water 727 L 192 USG 160 IMP GAL Wash Water 273 L 72 USG 60 IMP GAL Total 1000 L... - Page 18 Zamboni® Ice Resurfacer Specifications Dimensions...
-
Page 19: Operation
It is mandatory that all operators review in detail this manual before performing any operation. • Read - understand - and keep this manual with the Zamboni ice resurfacer. • Some illustrations show details or attachments that may be different from your machine. - Page 20 Please refer to your provincial Health and Safety regulatory body for a complete list of rules and regulations. Regulations vary from province to province as well as country to country; operate your Zamboni ice resurfacer in accordance with local regulations.
- Page 21 General Safety Practices It is the responsibility of the owner to perform a job safety analysis of all hazards associated with the total environment in which the Zamboni machine will operate and to train all personnel annually. The warnings in the manual and on the machine are identified by the symbols:...
- Page 22 Please obtain the most current information from your local distributor or the Zamboni factory before starting any job. For a list of the most current publications please contact: Zamboni Company Ltd., 38 Morton Avenue East, P.O. Box 1388, Brantford, Ontario, Canada N3T 5T6 (519) 758-5000 There are several specific safety signs on your Zamboni machine.
- Page 23 General Safety Practices • Do not allow anyone to stand or pass under the elevated portion of any machine. • Be sure operating surface can safely support machine. • Observe safety rules when handling fuel on engine powered machines and when changing or charging batteries for electric machines.
- Page 24 Never use a match or open flame to check for leaks, use a soap solution. • Always close the LPG tank service valve, remove the tank(s) and store them in an outside, locked cage when the Zamboni machine is parked for the night or for any extended length of time. •...
- Page 25 Only properly trained and designated persons should charge or exchange the LP gas tanks. • The engine should be stopped and no persons should be on the Zamboni machine during refueling. • Always install tanks and make tank connections outdoors or in a well ventilated area away from heat, ignition sources and open flames.
- Page 26 • Always close the LPG tank service valve, remove the tank(s) and store them in an outside, locked cage when the Zamboni machine is parked for the night or for any extended length of time. The installation of distribution, storage and dispensing (charging) systems must be done in accordance with the ANSI/IAS NGV4.1-1999 / CSA 12.5-M99 (R04) and any other...
- Page 27 Do not smoke in areas where batteries are charged or where flammable materials are stored. • Clean and tighten all electrical connections. Check daily for loose or frayed electrical wires. Have all loose or frayed electrical wires tightened, repaired or replaced before operating the Zamboni ice resurfacer. 1 - 8...
- Page 28 • Repair any loose or damaged oil lines, tubes and hoses. Leaks can cause fires. Contact the Zamboni Company or your Zamboni machine dealer for repair or replacement. • Check lines, tubes and hoses carefully. Do not use your bare hand to check for leaks.
- Page 29 Use extra care when wet or slippery conditions exist. • Never get on or off a moving Zamboni machine. Never jump off the machine. • Do not try to climb on or off the ice resurfacer when carrying tools or supplies.
- Page 30 General Safety Practices • Park the Zamboni machine in authorized areas only. • Remove foot from the acceleration foot pedal to place the machine in NEUTRAL. • Lower the conditioner onto blocks. • Turn the ignition switch OFF and remove the key.
- Page 31 General Safety Practices For maintenance and operator personnel safety and maximum service life of the Zamboni machine, make a thorough walk-around inspection when doing lubrication and maintenance work. Look around and under for such items as loose or missing bolts, trash or dirt build- up, oil leaks and cut or gouged tires.
- Page 32 General Safety Practices • Lower the conditioner or other implements to the ground before performing any work on the machine. • Use steps and grab handles (if applicable) when mounting or dismounting a machine. Clean any mud or debris from steps, walkways or work platforms before using.
- Page 33 Caution should be used to avoid breathing dust that may be generated when handling components containing asbestos fibers. If this dust is inhaled, it can be hazardous to your health. Components in Zamboni machine products that may contain asbestos fibers are brake pads, brake band and lining assemblies, and some gaskets.
- Page 34 General Safety Practices • Use exhaust ventilation on permanent machining jobs. • Wear an approved respirator if there is no other way to control the dust. • Comply with applicable rules and regulations for the work place (for example in the U.S.A., OSHA requirements as set forth in a 29 CFR 1910.1001) •...
- Page 35 After cleaning action has stopped, rinse batteries thoroughly with water. Dry the batteries with air pressure. When a Zamboni machine is operated in very cold applications at temperatures as low as -4 degrees Fahrenheit (-20 degrees Celsius), the battery capacity is decreased. Operation at cold temperatures can also cause mechanical failures, short circuits and too much wear due to the formation of ice crystals.
- Page 36 “break-in” period. Service schedules for machine lubrication and preventative maintenance have been established on the basis of hourly, daily, weekly and monthly intervals (see 525 Service Manual). Along with performing regular machine lubrication and preventative maintenance according to these schedules, it is advised that you have the ice resurfacer and its components completely checked over periodically by a competent mechanic.
- Page 37 General Operating and Maintenance Information This engine is designed to operate on unleaded 87 or 89 octane gasoline. The engine, with the proper fuel equipment, can also be operated on dry fuel such as LPG and NG. NOTE: It is highly recommended that a fuel stabilizer additive be used for any length of storage.
- Page 38 General Operating and Maintenance Information To stop the engine: • Return the acceleration foot pedal to Neutral. Set the parking brake, if so equipped. • Return the auger control levers to Off/Neutral. • After the snow tank has been emptied, lower the conditioner onto blocks. •...
- Page 39 General Operating and Maintenance Information The machine is not designed for highway use. Fast driving on the highway and bouncing the vehicle over bumps can seriously damage the machine. Travel over extended distances should be avoided, if possible. If such travel is required: •...
- Page 40 Safe Operation Your Zamboni ice resurfacer is the result of many years of experience in the ice resurfacing field. The engineering and safety features that have gone into your Zamboni machine will be enhanced by you, the safe operator..who knows his machine and all of the controls, ...who maintains his machine properly,...
- Page 41 Safe Operation DANGER! Turn off and remove the ignition key before adjusting, repairing, cleaning, or servicing the conveyors. The vertical and horizontal augers will continue to rotate for a short period of time after the auger control valves have been shut off. Always allow for all auger rotation to stop before working near or on the augers.
- Page 42 Safe Operation DANGER! Internal combustion engines produce exhaust emissions that contain dangerous gases, including carbon monoxide (CO) and nitrogen dioxide (NO These gases can cause serious injury or death. The rink MUST be adequately ventilated during every operation of the ice resurfacer. Also the resurfacer must be kept properly maintained and serviced at all times and the engine timing should always be properly set.
- Page 43 Ice Rink Air Quality In order for a rink to have the best air quality possible, the Zamboni machine must be operated properly in a rink that: • Is adequately ventilated. • Performs daily air quality monitoring/measuring. • Knows which air quality standards or guidelines apply to them.
- Page 44 Ice Rink Air Quality The arena's ventilation system can also dramatically affect the indoor air quality by: • Not being properly operated. • Not being properly maintained. • Not being properly designed such as: • Inadequate size or performance. • Intake air systems drawing in air from other polluted areas, such as a vehicle parking lot or garage.
- Page 45 Ice Rink Air Quality The ECU works to control the engine's air-fuel ratio (AFR) to the ideal levels based on the engine's operating conditions. The ECU monitors the engine for speed, load, air and coolant temperature and then adjusts the AFR via the electronic fuel injection to produce the ideal mixture.
- Page 46 (every 800 hours). The oxygen sensor must be replaced every 1500 hours of operation. Your Zamboni ice resurfacer is equipped with a “three-way” catalytic convertor. The catalytic convertor is designed to reduce the amount of certain exhaust gases. A three way catalytic...
- Page 47 Ice Rink Air Quality The engine’s condition and state of tune refer to how the engine is operating and whether the operating variables of the engine have been adjusted to provide optimal performance. An engine tune-up includes: • Changing the spark plugs and noting their condition and appearance. •...
- Page 48 Ice Rink Air Quality DANGER! Internal combustion engines produce exhaust emissions that contain dangerous gases, including carbon monoxide (CO) and nitrogen dioxide (NO ). These gases can cause serious injury or death. The rink MUST be adequately ventilated during every operation of the ice resurfacer.
- Page 49 Ice Rink Air Quality Levels OK compared to previous testing? Idle Load Idle Load Idle Load Idle Load Idle Load Idle Load Idle Load Idle Load Idle Load Idle Load Idle Load Note: To load the engine, move the conditioner to fully lifted and hold for 15 seconds. 4 - 7...
-
Page 50: Recommended Maintenance Schedule
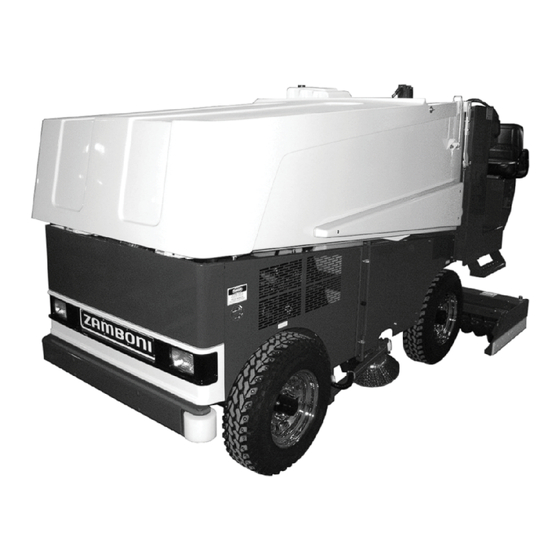
Ice Rink Air Quality Recommended Maintenance Schedule GASOLINE AND LPG CERTIFIED ENGINE MAINTENANCE REQUIREMENTS Interval Hours Install Date Daily 1000 1250 1500 1750 2000 General Maintenance Section Visual Check for Leaks Check Engine Oil Level Check Coolant Level Change Engine Oil and Filter Every 150 Hours or 120 Days of Operation Check LPG/Gas System for Leaks Prior to any Service or Maintenance Activity... - Page 51 Ice Resurfacer Components Snow Tank Snow Tank Lid Snow Tank Vent Guide Wheel Board Brush (Option) Engine Compartment Horizontal Auger Access Door Conditioner Figure 5.1 ce esur acer omponents ront view 5 - 1...
- Page 52 Ice Resurfacer Components Vertical Auger Drive Exhaust Pipe Propane Tank Strap & Buckle LPG Tank Trays Conditioner Chain Guard Conditioner Ice Making Water Squeegee Distribution Pipe Figure 5.2 ce esur acer omponents ear iew 5 - 2...
- Page 53 Ice Resurfacer Components Instrument Panel Snow Breaker Ice Making Water Control Wash Water Control Blade Adjustment Wheel Snow Tank Control Horizontal Auger Control Conditioner Lift Vertical Auger Control Transmission Control Figure 5.3 ce esur acer omponents perator s lat orm 5 - 3...
- Page 54 Ice Resurfacer Components Electronic Pressure Regulator (EPR) / Oil Dipstick Vaporizer Engine Controller (ECU) Flywheel Housing Oil Filter Starter Motor Auxiliary Pump Hydrostatic Exhaust Pipe (Drive) Pump Air Cleaner Radiator Exhaust Manifold Alternator Cooling Fan Figure 5.5 ce esur acer omponents ower acka e 5 - 4...
- Page 55 Ice Resurfacer Components Snow Tank Safety Stand Safety Stand Storage Hooks Snow Tank Light (Option) Wash Water Tank Ice Making Water Tank Figure 5.6 ce esur acer omponents now Tank a et tand 5 - 5...
- Page 56 Operator's Station Instrument Panel Gauges Warning Lights Control Switches Figure 6.1 Operator Area 6 - 1...
- Page 57 Operator's Station Ice Making Water Level Gauge (Option) Horn Lights Tachometer / 4-in-1 / 3-in-1 Hour Meter Gauge Wash Water Pump (Option) Malfunction Indicator Board Brush Light (MIL) Fuel Selector Switch Advanced Water CNG / or Snow Tank Lt (Options) Snow Breaker Manual Override Tire Wash (option)
-
Page 58: Malfunction Indicator Light (Mil)
Alternator voltage, alternator output Malfunction Indicator Light See fault codes (MIL) In all cases, if you are unsure of the cause and remedy for a warning lamp or buzzer, please contact the Zamboni Company for more information. 6 - 3... - Page 59 Operator's Station If the engine oil pressure is low (between 4 and 7 psi), the ECM will take the following action: • Turn on the malfunction indicator light. • Turn on the low oil pressure light. • Shut the engine down after 30 seconds. The operator can cycle the key off and then restart the engine.
- Page 60 Operator's Station The operator can cycle the key off and then restart the engine. If the temperature is still above 235°F it will again shut the engine off after 60 seconds. This will allow the operator to get the machine off of the ice. Check the coolant level in the radiator when it is safe to do so.
- Page 61 Do not operate the machine if the guards are not in place or broken. The Zamboni ice resurfacer has familiar automobile-style driving controls. The ice resurfacer is steered with the steering wheel. It has two foot pedals, one that controls the direction and acceleration and the other one is a brake pedal. It has a hydrostatic transmission that allows for smooth operation.
- Page 62 The electronic governor maintains the engine RPM independent of the load of the engine. See your 525 Service Manual for more details on the electronic governor. When resurfacing, the engine speed should be set between 2200 and 2500 RPM. The operator must not "lug"...
- Page 63 Operating the Ice Resurfacer Throttle Rocker Switch Brake Pedal Accelerator Foot Pedal Figure 7.1 Throttle ontrols Full Forward Neutral Full Reverse Figure 7.2 Transmission ontrol 7 - 3...
- Page 64 You will produce higher quality ice if you read, understand and practice the following information. Historically, the best sheet of ice produced prior to the development of the Zamboni ice resurfacer was usually produced by the following procedures: •...
- Page 65 Operating the Ice Resurfacer • Check the water level in the water tanks. • The blade must be level (see Figure 9.5) and at the correct angle (see Figure 9.6). • The conditioner must be raised completely. • The towel bar should be attached if water is to be applied to the surface. •...
- Page 66 Operating the Ice Resurfacer • Proceed from the storage area onto the ice (see Figure 7.4). • When starting the resurfacing pattern, it is recommended to start down the center of the ice surface so the functions can be started and blade adjustments can be made at some distance from the walls or boards.
- Page 67 Operating the Ice Resurfacer The vertical auger is equipped to rotate in both directions. The normal rotation for resurfacing is FORWARD, as shown by the information decal located near the valve operating handle. Note: Since the vertical and horizontal augers are hydraulically connected in series, both augers will rotate in the reverse direction if the optional reverse auger funtion is enabled.
- Page 68 Operating the Ice Resurfacer Figure 7.4 oin onto the ce Figure 7.5 eavin the ce 7 - 8...
- Page 69 Operating the Ice Resurfacer The operator should use the snow breaker several times a minute (or more as required). The snow breaker helps remove snow or ice that will build up in the corners of vertical auger opening. To use the snow breaker, push down on the snow breaker rod and release. Repeat this action several times.
- Page 70 Operating the Ice Resurfacer Using hot water for the ice making water will generally produce the best ice surface. Do not use water hotter than 160 F (70 C) as this could damage the plastic ice making water tank. To use the ice making water during a resurfacing: •...
- Page 71 Operating the Ice Resurfacer • After a complete lap of the ice surface next to the boards, retract the board brush by turning off the board brush switch. This will also stop the brush motor. • Proceed with the other resurfacing operations over the remainder of the ice surface.
- Page 72 Note: Whenever excess water or slush is being removed from the ice surface and conveyed into the snow tank, the Zamboni ice resurfacer ice making water tank must be empty. Water in both the ice making water tank and the snow tank may load the machine excessively.
- Page 73 Operating the Ice Resurfacer When leaving the ice surface after finishing a resurfacing (or any other time): (See Figure 7.5) • Close the wash water system valve. Turn off water pump (if used). • Turn off the auto snow breaker (if equipped). •...
- Page 74 Operating the Ice Resurfacer The following diagram shows a good resurfacing pattern: Figure 7.6 tandard esur acin attern The ice resurfacer has a power steering system which contains a hydraulic relief valve. This valve only operates when the wheels are jammed up against an object or when the operator turns the steering wheel completely to the left or the right and holds it there against the stop.
- Page 75 Operating the Ice Resurfacer Taking too deep a cut with the shaving blade while driving the machine at it's full ground speed may place an excessive load on the engine. The engine RPM is maintained with only a small RPM drop while resurfacing normally. With an excessive machine load, the engine RPM may drop excessively which will cause the operation of the machine to suffer.
- Page 76 Water System A. Pipe A (Figure 8.3) supplies water from the wash water tank to the conditioner. B. Pipe B (Figure 8.3) carries water picked up in the conditioner to the suction side of the water pump. The pump then pumps the water to the top of the wash water tank, at which point the water can be recirculated through the filtering screen or pumped into the snow tank for quick disposal (Figure 8.5).
- Page 77 Water System Ice Making Ice Making Water Wash Water Fill Water Fill Tank Cover Ice Making Water Tank Figure 8.2 ater Tank nlets Wash Water Pipe (A) Ice Making Water Pipe (C) Figure 8.3a onditioner ipin 8 - 2...
- Page 78 Water System Suction Pipe (B) Wash Water Distribution Pipe Blade Adjustment Screw & Greasable Clevis Wash Water Pickup (Suction) Wash Water Outlet (Both Ends Of Conditioner) Figure 8.3b onditioner ipin (Option) Valve D Connection Valve Handle (Option) Figure 8.4 ptional onnection alve 8 - 3...
- Page 79 Water System Diverting Excess Water from the Ice into the Snow Tank If you do not wish to pump the excess water in to the Wash Water Tank, you may divert the water directly into the snow tank for easy disposal. •...
- Page 80 Maintaining the Cutting Blade It is essential that the blade be sharp if the resurfacer is to operate properly. Conditions vary from one rink to another, but experience has shown that normally the cutting blade is dull and needs re sharpening after 5 to 7 days of operations. WARNING! The cutting blade is extremely sharp and must be handled with care.
- Page 81 Maintaining the Cutting Blade Use REAR mounting holes when blade is 4" wide or less. Note: Hardened material is exhausted when blade is approximately 3" wide. Discard blade. Blade Height Adjusting Screws level each side of the blade in relation to the runners. Down Blade Height Adjusting Screws...
- Page 82 Maintaining the Cutting Blade The center hand wheel control varies the angle of the blade. If the blade is level with each runner, the hand wheel will make uniform changes in depth of cut. Centre Hand Wheel Down Side View Conditioner Runner Blade Figure 9.2...
- Page 83 Maintaining the Cutting Blade Blade Holding Bar (5K-78890) Blade (5K-33630) Bolt Tightening Sequence Blade Holding Bar Blade 0.08" Machined Surface on Blade Holding Bar Blade Figure 9.4 lade oldin The ends of blade holding bar are machined upward approximately 0.08" so that one cut of the ice is feathered into the adjoining cut.
- Page 84 Maintaining the Cutting Blade Step 1: Set blade at approximately 10 angle as shown on the blade angle adjusting plate (Figure 9.6) by rotating center hand wheel control. Step 2: Align leading edge of blade EVEN with BOTH conditioner runners. It is quite helpful to use a flat washer, a large coin or the blade adjusting tool (Part No.
- Page 85 Maintaining the Cutting Blade A blade angle decal is located on the inside of the conditioner left side plate (see Figure 9.6). When the blade holding bar is lined up, parallel to the series of lines, the blade angle is approximately 10 °...
- Page 86 Maintaining the Cutting Blade The purpose of the conditioner down pressure system is to create downward pressure on the shaving blade thus increasing the shaving capability of the machine. Down Pressure Spring Adjustment Procedure • Lift Conditioner slightly off of the ground, just so it clears the floor. •...
- Page 87 Maintaining the Cutting Blade During the normal operation of an ice rink, the edges of the ice surface have a tendency to build up. If not removed, this buildup makes proper shaving of the rink perimeter difficult and may become a safety hazard to skaters. ith ice buildu at edges blade cannot shave ro erly lt n dge...
- Page 88 Maintaining the Cutting Blade Mount the edger on the driver's side of the conditioner and bolt tightly at the three locations shown below. The depth of cut on the edger blade may be adjusted by turning the two blade adjustment set screws. Use the edger as a separate operation in the following manner: •...
- Page 89 Emergency Operation The emergency hand pump is located in the driver area of the machine. The pump handle must be stored where the operator can find it in an emergency. : The emergency hand pump is used to raise the conditioner or the snow tank in the event the engine will not operate.
- Page 90 Emergency Operation Should it be necessary to move the machine when the engine is not operable, the emergency bypass valve, located on the hydrostatic pump, must be opened (see Figure 10.3). This valve is located on the hydrostatic pump and painted red for ease of identification, in the engine compartment.
- Page 91 Storage Information Due to the great amount of water associated with this machine, it should be stored between resurfacing in a room heated above freezing. The room should be as close to the edge of the rink as possible and the surfaces between the storage area and the rink should be paved so dirt will not be tracked onto the ice.
- Page 92 38 Morton Ave. East, Box 1388, Brantford, ON Canada N3T 5T6 Phone (519) 758-5000 Fax (519) 758-0500 ZAMBONI and the configuration of the Zamboni ice resurfacer ® are registered trademarks of Frank J. Zamboni & Co., Inc. Part Number DM-20076...
-
Page 93: Troubleshooting Guide
TROUBLESHOOTING GUIDE... - Page 94 TROUBLESHOOTING GUIDE ® Zamboni Ice Resurfacer Many of the problems and corrective actions noted in this guide are visually demonstrated and discussed in our video presentations: "Conditioner Maintenance" and “Ice Resurfacer Operation” which accompany each new machine shipment. To achieve optimum results from your machine, your operations staff should review the videos and properly maintain your resurfacer.
- Page 95 TROUBLESHOOTING GUIDE - Zamboni Ice Resurfacer Page 2 MALFUNCTION PROBABLE CAUSE CORRECTIVE ACTION Conditioner leaving scratch Nick in blade * Sharpen on ice Foreign matter on runners * Check and remove foreign matter. File. or other parts of conditioner Difficult to adjust blade...
- Page 96 TROUBLESHOOTING GUIDE - Zamboni Ice Resurfacer Page 3 MALFUNCTION PROBABLE CAUSE CORRECTIVE ACTION Ice build-up in front of blade Dull blade * A sharp blade will create more agitation of the shaven snow at the blade edge than a dull blade. Sharpen blade so...
- Page 97 TROUBLESHOOTING GUIDE – Zamboni Ice Resurfacer Page 4 MALFUNCTION PROBABLE CAUSE CORRECTIVE ACTION Inadequate power of Engine RPM too low Check by selecting lower hydrostatic conveyor transmission selector setting and higher engine RPM. Faulty seal on conveyor Disconnect small drain hose from motor...
-
Page 98: Parts List
MODEL PARTS LIST 525 OPERATING INSTRUCTIONS Zamboni USA Zamboni Canada Zamboni Europe This manual must be kept and stored with the vehicle at all times. Zamboni Company USA, Inc. Zamboni Company Ltd. Zamboni Europe AB 15714 Colorado Ave. 38 Morton Ave. East, Box 1388 Murarmörkret 4... - Page 99 PARTS LIST Your machine's updated parts list is available online at Zamboni.com in the Owners Area and Resource Center...
- Page 100 MAINTENANCE SCHEDULE / LOGS...
- Page 101 GM 3.0L ENGINE Recommended Maintenance Schedule GASOLINE AND LPG CERTIFIED ENGINE MAINTENANCE REQUIREMENTS Interval Hours Install Date Daily 1000 1250 1500 1750 2000 General Maintenance Section Visual Check for Leaks Check Engine Oil Level Check Coolant Level Change Engine Oil and Filter Every 150 Hours or 120 Days of Operation Check LPG/Gas System for Leaks Prior to any Service or Maintenance Activity...
- Page 102 ENGINE ®...
- Page 190 Publication Number PSITIER3 - J Tier 3 Certified Mobile Diagnostic and Troubleshooting Manual...
-
Page 191: Table Of Contents
Publication Number PSITIER3 - J Table of Contents General Information ....................3 An overview of this Service Manual Maintenance ......................6 General maintenance and maintenance interval information LPG Fuel System ....................14 An overview of the fuel system and its components GASOLINE Fuel System .................. -
Page 192: General Information
General Information... - Page 193 GENERAL INFORMATION INTRODUCTION This service manual has been developed to pro- vide the service technician with the basic Do not allow LPG to contact the skin. understanding of the PSI certified fuel and emis- LPG is stored in the fuel tank as a liq- sion systems for their GM engine line.
- Page 194 GENERAL INFORMATION PROPER USE OF THIS SERVICE MANUAL, TOOLS AND EQUIPMENT To reduce the potential for injury to the technician or others and to reduce damage to the equipment during service repairs the technician should ob- Always leak check any fuel system serve the following steps: connection after servicing! Use an electronic leak detector and/or a liquid...
-
Page 195: Maintenance
Maintenance... -
Page 196: Cooling System
agents” on belts is not recommended. MAINTENANCE The maintenance of an engine and related com- COOLING SYSTEM ponents are critical to its operating performance and lifespan. Industrial engines operate in envi- It is important that the cooling system of the en- ronments that often include hot and cold gine be maintained properly to ensure proper temperatures and extreme dust. - Page 197 installed by the owner are properly installed in COOLANT the system. The engine manufacturer recommends the cooling Verify that the MIL, charging, and oil pressure system be filled with a 50/50 mixture of antifreeze lights illuminate momentarily during engine start. and water.
- Page 198 To ensure that you are not getting a false reading, An overfilled crankcase (oil level being too make sure the following steps are taken before high) can cause an oil leak, a fluctuation or checking the oil level. drop in oil pressure. When overfilled, the en- gine crankshafts splash and agitate the oil, 1.
- Page 199 Check to make sure filter is securely mounted. FUEL SYSTEM INSPECTION AND MAINTENANCE Check filter housing for external damage or distortion. If damaged replace fuel filter. GASOLINE AND LPG FUEL SYSTEM REPLACING THE FUEL FILTER: The fuel system installed on this industrial engine has been designed to meet the mobile engine 1.
- Page 200 will help the oils to flow freely from the regulator. DIRECT ELECTRONIC PRESSURE REGULATOR (DEPR) MAINTENANCE AND To drain the regulator, follow the steps below: INSPECTION IMPORTANT: 1. Move the equipment to a well ventilated area The Direct Electronic Pressure Regulator (DEPR) and ensure no external ignition sources are components have been specifically designed and present.
- Page 201 The HEGO sensor is sensitive to silicone based AIR FUEL MIXER/THROTTLE CONTROL products. Do not use silicone sprays or hoses DEVICE MAINTENANCE AND INSPECTION which are assembled using silicone lubricants. IMPORTANT: Silicone contamination can cause severe damage The Air Fuel Mixer components have been to the HEGO.
- Page 202 TIER 3 CERTIFIED MOBILE ENGINE MAINTENANCE REQUIREMENTS Perform the following maintenance on the engine at the hours indicated and at equivalent hour intervals thereafter. Interval Hours 1000 1250 1500 1750 2000 Daily General Maintenance Section Visual check for fluid leaks Check engine oil level Check coolant level Change engine oil and filter...
-
Page 203: Lpg Fuel System
LPG Fuel System... - Page 204 MOBILE ENGINE LPG FUEL SYSTEM SCHEMATIC...
- Page 205 DESCRIPTION AND OPERATION OF THE FUEL ELECTRIC FUEL LOCK-OFF VALVE SYSTEMS The Electric Fuel lock-off valve is an integrated as- sembly consisting of a 12 volt solenoid and a NG & LPL FUEL SYSTEM normally closed valve. When energized, the sole- The primary components of the fuel system are noid opens the valve and allows the fuel to flow the fuel supply, direct electronic pressure regu-...
-
Page 206: Air Fuel Mixer
nally using a built in fuel pressure sensor to main- air valve diaphragm between the air valve vacuum tain target fuel pressure/fuel flow rate, until another chamber and the atmospheric pressure below the external command from the ECM is received (inter- diaphragm. -
Page 207: Three Way Catalytic Converter
engine ECM when the operator depresses or re- The tier 3 certified mobile products utilize a 2- lease the foot pedal. The ECM then sends an electrical signal to the motor on the electronic stage vaporizer as part of the fuel system. The throttle control to increase or decrease the angle primary function of this part is to convert liquid of the throttle blade thus increasing or decreasing... - Page 208 To obtain maximum effect from the catalyst and nostic scan tool to retrieve the stored diagnostic accurate control of the air fuel ratio, the emission code and by using the diagnostic charts in this certified engine is equipped with an onboard manual to determine the cause of the malfunc- computer or Engine Control Module (ECM).
-
Page 209: Coolant Temperature Sensor
COOLANT TEMPERATURE SENSOR The Engine Coolant Temperature sensor or ECT is a variable resistance thermistor that changes resistance as the engine's coolant temperature changes. The sensor's output is monitored by the ECM to determine a cold start condition and to regulate various fuel and emission control func- tions via a closed loop emission system. -
Page 210: Gasoline Fuel System
Gasoline Fuel System... - Page 211 MOBILE ENGINE GASOLINE FUEL SYSTEM SCHEMATIC...
- Page 212 GASOLINE MULTI POINT FUEL INJECTON (3.0L Engine) The primary components of the Gasoline Multi Point Fuel Injection (MPFI) fuel system are the gasoline fuel tank, electric fuel pump, fuel pressure and temperature sensor manifold, fuel filter and fuel rail. GASOLINE FUEL STORAGE TANK The gasoline fuel storage tank location may very on equipment applications.
-
Page 213: Fuel Injector Rail
FUEL INJECTOR RAIL The fuel flows from the fuel pressure and temperature manifold assembly to the fuel rails where the fuel is deliv- ered to the fuel injectors. The fuel rail also contains a Schrader valve which is utilized to test the regulated pressure of the fuel system. - Page 214 GASOLINE IAFM Manifold (4.3L Engine) The primary components of the Gasoline IAFM fuel system are the gasoline fuel tank, electric fuel pump, fuel pres- sure and temperature sensor manifold, Intake manifold, and IAFM. GASOLINE FUEL STORAGE TANK The gasoline fuel storage tank location may very on equipment applications. The fuel tank may be integrated into the chassis frame or may be a stand alone vessel mounted on the equipment.
-
Page 215: Fuel Injectors
IAFM Intake Manifold IAFM is the acronym for Intake Air Fuel Module. This style intake manifold incorporates the air intake manifold and gasoline fuel delivery system into one module. The IAFM is used on the 4.3L GM engine. 1) Throttle Body Location 2) MAP Sensor 3) Fuel Injector Connector 4) PCV Circuit... -
Page 216: Fuel System Diagnosis
Fuel System Diagnosis... - Page 217 FUEL SYSTEM DIAGNOSIS Direct Electronic Pressure Regulator Assembly continue to run, refer to Hard Start for prelimi- FUEL SYSTEM DESCRIPTION nary checks. The Engine Control Module (ECM) receives in- formation from various engine sensors in order to Inspect the fuel supply lines to verify they control the operation of the Direct Electronic are properly connected and do not have any...
-
Page 218: Test Description
TEST DESCRIPTION The basis of the fuel system test is to determine if HOW THE CORRECTION FACTORS WORK the fuel is operating within proper fuel control pa- The correction factors are displayed in the DST rameters. This fuel control system operates on as a positive or negative percent. - Page 219 NORMAL & ABNORMAL FUEL CORRECTION Generally, the system is operating within specifi- If total fuel correction is found to be operating cation when total fuel correction falls between - outside of the normal range additional diagnos- 15% and +15%. Operation outside of this range tic procedure will be required to determine the will require further diagnosis to determine the sys- cause.
- Page 220 FUEL SYSTEM SYMPTOM DIAGNOSTICS Checks Action Before using this section, you should have performed On Board Diagnostic (OBD) Check and determined that: 1. The ECM and MIL are operating correctly. Before Using This 2. There are no Diagnostic Trouble Codes (DTCs) stored, or a DTC exists Section but without a MIL.
- Page 221 INTERMITTENT Checks Action DEFINITION: The problem may or may not turn ON the (MIL) or store a Diagnostic Trouble Code (DTC). Do not use the DTC tables. If a fault is an intermittent, the use of the DTC Preliminary Checks tables with this condition may result in the replacement of good parts.
- Page 222 NO START Checks Action DEFINITION: The engine cranks OK but does not start. Preliminary Checks None Use the DST to : Check for proper communication with both the ECM Check all system fuses engine fuse holder. Refer to Engine Controls ECM Checks Schematics.
- Page 223 NO START Checks Action Important: The LPG Fuel system is more sensitive to intake manifold leak- age than the gasoline fuel system. Check for the following: Vacuum leaks. Engine Mechanical Improper valve timing. Checks Low compression. Improper valve clearance. Worn rocker arms. Broken or weak valve springs.
- Page 224 HARD START Checks Action DEFINITION: The engine cranks OK, but does not start for a long time. The engine does eventually run, or may start but immediately dies. Preliminary Checks Make sure the vehicle’s operator is using the correct starting procedure. Check the Engine Coolant Temperature sensor with the DST.
- Page 225 HARD START Checks Action Important: The LPG Fuel system is more sensitive to intake manifold leak- age than the gasoline fuel supply system. Check for the following: Vacuum leaks Improper valve timing Engine Mechanical Low compression Checks Improper valve clearance. Worn rocker arms Broken or weak valve springs Worn camshaft lobes.
- Page 226 CUTS OUT, MISSES Checks Action DEFINITION: A surging or jerking that follows engine speed, usually more pronounced as the engine load increases, but normally felt below 1500 RPM. The exhaust has a steady spitting sound at idle, low speed, or hard acceleration for the fuel starvation that can cause the engine to cut-out. Preliminary Checks None 1.
-
Page 227: Hesitation, Sag, Stumble
HESITATION, SAG, STUMBLE Checks Action DEFINITION: The engine has a momentary lack of response when putting it under load. The condition can occur at any engine speed. The condition may cause the engine to stall if it’s severe enough. Preliminary Checks None. - Page 228 BACKFIRE Checks Action DEFINITION: The fuel ignites in the intake manifold, or in the exhaust system, making a loud popping noise. Preliminary Check None. Important! LPG, being a gaseous fuel, requires higher secondary igni- tion system voltages for the equivalent gasoline operating conditions. The ignition system must be maintained in peak condition to prevent backfire.
- Page 229 LACK OF POWER, SLUGGISHNESS, OR SPONGINESS Checks Action DEFINITION: The engine delivers less than expected power. Refer to the LPG Fuel system OBD System Check. Compare the customer’s vehicle with a similar unit to verify customer has an actual problem. Do not compare the power output of the vehicle oper- ating on LPG to a vehicle operating on gasoline as the fuels do have Preliminary Checks different drive feel characteristics.
- Page 230 ROUGH, UNSTABLE, OR INCORRECT IDLE, STALLING Checks Action DEFINITION: The engine runs unevenly at idle. If severe enough, the engine may shake. Preliminary Check None. Check the Heated Exhaust Gas Oxygen Sensors (HEGO) performance: Check for silicone contamination from fuel or improperly used sealant. If contaminated, the sensor may have a white powdery coating result in a high but false signal voltage (rich exhaust indication).
- Page 231 ROUGH, UNSTABLE, OR INCORRECT IDLE, STALLING Checks Action Check the engine for: Broken motor mounts. Improper valve timing. Low compression. Engine Mechanical Check Improper valve clearance. Worn rocker arms. Broken or weak valve springs. Worn camshaft lobes.
-
Page 232: Electrical Section
Electrical Section NOTE: YOU CAN OBTAIN A FULL SIZE ELECTRONIC WIRE DIAGRAM BY CONTACTING THE OEM. - Page 233 ECM Header Connectors 1.6L LPG 1.6L Duel Fuel...
- Page 234 1.6L Gasoline...
- Page 235 3.0L Duel Fuel 3.0L LPG...
- Page 236 3.0L Gasoline...
- Page 237 4.3L Duel Fuel 4.3L LPG...
- Page 238 4.3L Gasoline...
-
Page 239: Diagnostic Scan Tool
Diagnostic Scan Tool (DST) - Page 240 CONTENTS Installation of the DST package to a personal computer (PC). Software login and password functionality. DST service pages. Updating the ECM calibration using a MOT file. DTC pages. Examples and snapshots used in this manual are based off of the initial DST tool release as of July, 2007.
- Page 241 Insert the CD into your computer and select LATEST_GCP_DISPLAY Open the ECOM_Driver Folder...
- Page 242 Double Click the setup.exe file - - - > This will launch the installation wizard Select “NEXT” until you finish the installation as shown below Return to the LATEST_GCP_DISPLAY folder...
- Page 243 Select the PC Display folder Select the GCP Display icon Select the GCP Display icon - - - > This will launch the installation wizard Select NEXT until it says you are finish Restart your PC Go to the START button on the lower left corner and find the GCP Display Program...
-
Page 244: Password Login
PASSWORD LOGIN Figure 1 shows the password dialog box, which is displayed when a software session begins. Log- in can be accomplished in two ways. 1. Enter an “All S/N Password” which is a password applicable to all ECMs of a given original equipment manufacture (OEM). - Page 245 Should an invalid password be entered, the error prompt shown in figure (2) will be dis- played and the software will not load. This prompt signifies the following: The All S/N password is invalid. The Single S/N password is incorrect for the Single Serial Number entered. An All S/N password is entered for Single Serial Number use.
- Page 246 Figure 4 shows the communication status if a valid software password is entered when attempting to connect to an ECM with a different key. In this instance the software will load but will not con- nect to the target (ECM). Figure 4: Not Authorized to Connect Message In the event you receive this error message call your OEM support group for more information.
- Page 247 Connecting to the PC using the ECOM cable To connect using the ECOM cable you must select ECOM from the COM Port drop down menu.
- Page 248 You will now need to configure the ECOM communication protocol. Select the CAN for systems with CAN enabled or serial for all others. Then select OK. You are now ready to connect using the ECOM USB DLC cable.
- Page 249 DST SERVICE PAGES Gauge Page Provides system data in large easy to read displays. Displays ECM configuration information for the ECM software, hardware, serial numbers and calibration dates.
- Page 250 Raw Volts Page The raw volts page displays the sensor inputs and outputs in a raw voltage format. This page is most commonly used to check values in the diagnostic trouble shooting charts. Service 1...
- Page 251 The Service 1 screen is used to clear the adaptive learn, shows the MIL status and provides a dis- play for rpm, coolant temperature and spark advance. It also provides a large display to monitor the closed loop mixture control. Tests Page Provides diagnostic information voltages and sensor outputs and includes diagnostic engine tools such as spark and injector kill controls.
- Page 252 set. If the engine is running above 1000 rpm, the injector driver will stay disabled for 5 seconds and then re-set. Record the change in rpm while each driver is disabled. DBW TEST MODE The DBW (Drive by Wire) test mode allows the technician to control the throttle directly with the foot pedal or throttle input and is used during the diagnostic routines specified for FPP and TPS for systems that use DBW control.
- Page 253 PLOT/LOG MENU FUNCTIONS The Plot/Log menu allows the user to graphically plot or numerically log variables that have been tagged for plotting/logging. To plot or log variables, a tag must be assigned to each variable of in- terest. A variable is tagged for plotting/logging through a single right-mouse click in the variable’s vicinity.
- Page 254 Select “Plot Tags” to open the snapshot window Other functions available from the Plot/Log menu include: Clear Tags: Releases all plot/log variables. Plot Tags (Ctrl + P, or P): Graphically plot all tagged variables. Load Plot Setup: Loads and tags variables for plotting/logging that have been stored in a plot file (.plt).
- Page 255 Start plot Variable selector Figure 7: DST Plot Click on the “Start” button to start the DST plot function. Click on the variable selector button to view selected sensors Figure 8: DST Plot Snapshot Click on the “Save” button to save the snapshot as a file. To replay the saved file, open the edis_saplot program from the windows start menu.
- Page 256 Start Menu → Programs → PSI GCP Display → edis_saplot DST PLOT INTERFACE FUNCTIONS A graphic tool incorporated in the plotter is the snapshot function. This function allows data col- lected in a plot to be transferred into a second window for quick graphical post-processing. The snapshot allows the user to zoom in/out, pan left/right, and move cursors along the signal traces to measure the variable values in virtual real-time.
-
Page 257: Malfunction Indicator Lamp (Mil)
DST LOGGER Another data capture function incorporated in the software is the DST logger. This tool serves as a PC data logger for any variable available in the ECM through the interface software. Figure 9 shows the interface display for configuring the DST Log. The interface allows the user to create the filename, set the sample rate for acquisition, set the time interval for sampling, and display the progress of acquisition. - Page 258 the DTC does not reset within 50 to 100 consecutive engine run cycles. While a Diagnostic Trouble Code is current for a sensor, the ECM may assign a default “limp home” value and use that value in its control algorithms. All of the system diagnostic self-tests run contin- uously during normal vehicle operation.
- Page 259 BLINK CODE FUNCTION Although the DST is considered a required tool to access the DTC codes, codes may be retrieved without a laptop computer using the blink code function. To enable this function follow the steps below: Jump pins 1 and 4 at the DLC connector (see illustration below) Turn the ignition key to the on position The system will now enter the self diagnostic blink code mode.
-
Page 260: Intermittent Problems
Diagram 1 When using the DST program to clear a DTC, always select the “Clear All Faults” function to im- mediately turn the MIL OFF after a successful repair (as shown in diagram 1 above). INTERMITTENT PROBLEMS Intermittent fuel system problems can prove to be the most challenging to repair. It is most im- portant to remember when looking to find the cause of these problems, to operate the system in the condition when and where the problem occurs. -
Page 261: Engine Wire Harness Repair
Engine Wire Harness Repair... -
Page 262: Connectors And Terminals
ON-VEHICLE SERVICE REPAIRING TWISTED/SHIELDED CABLE WIRE HARNESS REPAIR The ECM harness electrically connects the ECM to a various components in both the en- gine and passenger compartments. Remove outer jacket Wire harnesses should be replaced with proper part number harnesses. When wires are spliced Unwrap aluminum/Mylar tape. - Page 263 REPAIRING TWISTED LEADS METRI-PACK Some connectors use terminals called Metri- Pack Series 150. They are also called “Pull-To- Seat” terminals because of the method of instal- lation. The wire is inserted through the seal and connector, the terminal is crimped on the wire Locate Damaged Wire.
- Page 264 WEATHER-PACK TERMINAL REPAIR 4. Replace terminal. a. Slip new seal onto wire b. Strip 5 mm (.2”) of insulation from wire. c. Crimp terminal over wire and seal. 5. Push terminal and connector and engage locking tangs. 6. Close secondary lock hinge. 1.
-
Page 265: Diagnostic Trouble Codes (Dtcs)
Diagnostic Trouble Codes (DTCs) - Page 266 Malfunction Indicator Lamp (MIL) Operation How does my MIL work? The emissions control system utilizes a MIL to warn the operator or technician of a possible issue with the engine or emissions control system. The system will keep the MIL illuminated for the entire key cycle in which the trouble code was set.
- Page 267 DIAGNOSTIC TROUBLE CODE (DTC) CHART – SORTED BY DTC # (1 of 4) DTC Set 2 DTC Set 2 Description SPN-2 FMI-2 Description SPN-2 FMI-2 DTC 11: Intake cam / distributor position error 520800 DTC 268: Injector 3 coil shorted DTC 16: Crank and/or cam could not synchronize during start DTC 270: Injector 4 open or short to ground DTC 24: Exhaust cam position error...
- Page 268 DIAGNOSTIC TROUBLE CODE (DTC) CHART – SORTED BY DTC # (2 of 4) DTC Set 2 DTC Set 2 Description SPN-2 FMI-2 Description SPN-2 FMI-2 13 DTC 1175: MegaJector voltage supply low 520260 DTC 601: Microprocessor failure - FLASH DTC 604: Microprocessor failure - RAM 12 DTC 1176: MegaJector internal actuator fault detection 520260 DTC 606: Microprocessor failure - COP...
- Page 269 DIAGNOSTIC TROUBLE CODE (DTC) CHART – SORTED BY DTC # (3 of 4) DTC Set 2 DTC Set 2 Description SPN-2 FMI-2 Description SPN-2 FMI-2 520221 DTC 1546: AUX analog Pull-Up/Down 3 low voltage DTC 1662: PWM6 short to power DTC 1547: AUX analog Pull-Up/Down 4 high voltage DTC 1663: PWM7 open / ground short DTC 1548: AUX analog Pull-Up/Down 4 low voltage...
- Page 270 DIAGNOSTIC TROUBLE CODE (DTC) CHART – SORTED BY DTC # (4 of 4) DTC Set 2 Description SPN-2 FMI-2 DTC 2618: Tach output ground short DTC 2619: Tach output short to power DTC 8901: UEGO microprocessor internal fault 3221 DTC 8902: UEGO heater supply high voltage 3222 3222 DTC 8903: UEGO heater supply low voltage...
- Page 271 DIAGNOSTIC TROUBLE CODE (DTC) CHART – SORTED BY SPN:FMI (1 of 4) DTC Set 2 DTC Set 2 Description SPN-2 FMI-2 Description SPN-2 FMI-2 DTC 1561: AUX analog Pull-Down 2 high voltage DTC 107: MAP voltage low DTC 1561: AUX analog Pull-Down 3 high voltage DTC 108: MAP pressure high DTC 1561: AUX analog Pull-Down 2 low voltage DTC 2229: BP pressure high...
- Page 272 DIAGNOSTIC TROUBLE CODE (DTC) CHART – SORTED BY SPN:FMI (2 of 4) DTC Set 2 DTC Set 2 Description SPN-2 FMI-2 Description SPN-2 FMI-2 DTC 16: Crank and/or cam could not synchronize during start DTC 1661: PWM6 open / ground short DTC 1629: J1939 TSC1 message receipt loss DTC 1664: PWM7 short to power 12 DTC 1663: PWM7 open / ground short...
- Page 273 DIAGNOSTIC TROUBLE CODE (DTC) CHART – SORTED BY SPN:FMI (3 of 4) DTC Set 2 DTC Set 2 Description SPN-2 FMI-2 Description SPN-2 FMI-2 DTC 304: Cylinder 4 emissions/catalyst damaging misfire 1326 31 DTC 175: Adaptive-learn gasoline bank2 low 520201 DTC 1315: Cylinder 5 misfire detected 1327 11 DTC 1161: Adaptive-learn LPG high...
- Page 274 DIAGNOSTIC TROUBLE CODE (DTC) CHART – SORTED BY SPN:FMI 4 of 4) DTC Set 2 Description SPN-2 FMI-2 DTC 188: Gaseous fuel temperature sender high voltage 520240 DTC 187: Gaseous fuel temperature sender low voltage 520240 DTC 331: Knock2 excessive or erratic signal 520241 DTC 332: Knock2 sensor open or not present 520241...
- Page 275 OBD System Check/MIL (Malfunction Indicator Lamp) C012 GRN/YEL +12 volts in start and run Ground Circuit Description The fuel system is equipped with OBD (On-Board Diagnostics). The system has a dash mounted MIL (Malfunction Indicator Lamp). The MIL serves as notification of an engine or fuel system related problem.
- Page 276 OBD System Check Step Action Value(s) Key ON engine Off Go to Step (2) Go to Step (3) MIL is working Go to Step (10) Start the engine properly. Does the MIL Lamp Turn off? OBD System Check is complete Go to Step (4) Repair MIL Key ON engine OFF...
- Page 277 OBD System Check Step Action Value(s) Repair the Go to Step (7) Key is off shorted Disconnect ECM wire harness connector ground circuit at customer interface connector as necessary. Using a DVOM check for continuity be- Refer to wiring tween ECM terminal 80 and battery voltage repairs in en- gine electrical Do you have continuity?
- Page 278 Starter Circuit System Diagnostics STEP Action Value(s) Remove the back off of the fuse and relay block assembly. Locate and Go to Step (2) Repair the wiring issue. inspect all wires/terminals for the starter relay circuit. Insure that all crimps are good and that all terminals are completely engaged into the block.
- Page 279 HVS Ignition Control System Diagnostics 4.3L, 5.0L, 5.7L - SHOWN BELOW Before using the Ignition Control Diagnostic chart be sure to check the following items: Spark plug wires: Be sure spark plug wires are in good condition. Check for cuts, breaks, burns, hardness or swelling. LPG fuel requires much higher peak firing voltages compared to gasoline.
- Page 280 Ignition Control System Diagnostic Chart Step Action Value(s) Did you perform the On-Board (OBD) System Go to Step Go to OBD Sys- Check? tem Check Section 125 RPM Go to Step Go to Step (3) DST connected and in the system data mode. Crank the engine and observe the engine speed signal on the DST Is the value greater than the specified value?
- Page 281 Step Action Value(s) Repair the Go to Step (12) Using a DVOM check for continuity between shorted to ignition module connector pin B and engine ground igni- ground tion control Do you have continuity between them? circuit. See wiring harness repair section.
- Page 282 DTC 11 – Intake cam / distributor position error (SPN 520800:FMI 7) Conditions for setting the DTC Camshaft Position sensor Check Condition- Engine cranking Fault Condition- Engine RPM’s greater than 2,000 and difference between the desired CAM position and actual CAM position is greater than 30 CAD MIL Command-ON Circuit Description The CAM position sensor is utilized to distinguish the cylinder event (compression or exhaust),...
- Page 283 DTC 16-Never Crank Synchronized at Start (SPN 636:FMI 8) (4.3L, 5.0, & 5.7L Shown Below) Conditions for setting the DTC Crankshaft Position sensor Check Condition- Engine cranking Fault Condition- Cranking rpm above 90 and more than 4 cranking revolutions without syn- chronization Adaptive Disabled MIL Command-ON...
- Page 284 DTC 16-Never Crank Synchronized at Start (SPN 636:FMI 8) Step Action Value(s) Did you perform the On-Board (OBD) System Go to Step Go to OBD Check? System Check Sec- tion Repair the Go to Step Check that the ECM ground terminals C010, circuit as C022 and C023 are clean and tight necessary.
- Page 285 Step Action Value(s) Go to Step Replace CKP sensor (10) Is the replacement complete? Go to Step Replace ECM (11) Is the replacement complete? Remove all test equipment except the DST. System OK Go to Step Connect any disconnected components, fus- es, etc.
-
Page 286: Circuit Description
DTC 16-Never Crank Synced At Start (3.0L ONLY) (SPN 636:FMI 8) Conditions for setting the DTC • Crankshaft Position sensor • Check Condition- Engine cranking • Fault Condition- Cranking RPM above 90 and more than 4 cranking revolutions without sync •... - Page 289 DTC 87 – Fuel Pressure Low (SPN 87:FMI 1) Conditions for setting the DTC Fuel Pressure is less than 55 psia Fault must be active for 3.0 seconds to activate DTC MIL light on during fault Forced idle is enabled Circuit Description This engine is equipped with a fuel injector rail that does not have a pressure regulator or a return circuit to the fuel tank.
- Page 291 DTC 88 – Fuel Pressure High (SPN 94:FMI 0) Conditions for setting the DTC Fuel Pressure is greater than 90 psia Fault must be active for 3.0 seconds to activate DTC MIL light on during fault Forced idle is enabled Circuit Description This engine is equipped with a fuel injector rail that does not have a pressure regulator or a return circuit to the fuel tank.
- Page 292 DTC 88 – Fuel Pressure High STEP Action Value(s) Did you perform the On-Board (OBD) System Check? Go to Step (2) Go to OBD System Check Section Key On Intermittent problem. DST (Diagnostic Scan Tool) connected 90 psia or Go to Step (3) Go to intermittent greater section...
- Page 293 DTC 91-Gasoline Fuel Pressure Sensor Low Voltage (SPN 94: FMI 4) Conditions for Setting the DTC Gasoline fuel temperature sensor voltage Fuel pressure sensor voltage less than 0.2v for greater than 1 second MIL-On for active fault and for 2 seconds after active fault Adaptive Learn is disabled during fault condition Forced idle is enabled Circuit Description...
- Page 294 DTC 92-Gasoline Fuel Pressure Sensor High Voltage (SPN 94:FMI 3) Conditions for Setting the DTC Gasoline fuel temperature sensor voltage Fuel pressure sensor voltage greater than 4.8v for greater than 1 second MIL-On for active fault and for 2 seconds after active fault Adaptive Learn is disabled during fault condition Forced Idle is enabled Circuit Description...
- Page 295 DTC 107-MAP Low Voltage (SPN 106:FMI 4) Conditions for Setting the DTC Manifold Absolute Pressure Sensor Check Condition-Engine cranking or running Fault Condition-MAP voltage less than 0.050 with throttle position greater than 2.0% and engine RPM less than 3000. MIL-ON Adaptive-Disabled Fueling is based on RPM and TPS Limp-Home Condition during this fault.
- Page 296 DTC 107-MAP Low Voltage Step Action Value(s) Did you perform the On-Board (OBD) System Go to Step Go to OBD Check? System Check Sec- tion Go to Step Intermittent Key ON, Engine running. problem DSC (Diagnostic Scan Tool) connected in Go to Inter- System Data Mode mittent...
- Page 297 Step Action Value(s) Go to Step Go to Step Probe MAP connector signal circuit pin 4 (13) with a test light connected to battery volt- age. Does the DST display MAP voltage of 4.0 or greater? Go to Step Repair the Key OFF (10) circuit as...
- Page 298 Step Action Value(s) Go to Step Replace ECM. Refer to ECM replacement (18) in the Engine Controls Section. Is the replacement complete? Go to Step Replace MAP sensor (18) Is the replacement complete? System OK Go to OBD Remove all test equipment except the System DST.
- Page 299 DTC 108-MAP High Pressure (SPN 106:FMI 16) Conditions for Setting the DTC MAP pressure test Check condition-engine running Fault Condition-MAP greater than 17.00 psia with TPS less than 10% and engine rpm greater than 800. MIL-ON Adaptive-disabled Circuit Description The MAP (Manifold Absolute Pressure) is estimated from the MAP sensor. The MAP pressure value is used for fuel, airflow and spark calculations.
- Page 300 DTC 108-MAP High Pressure Step Action Value(s) Go to Step Did you perform the On-Board (OBD) System Go to OBD Check? System Check Sec- tion Go to Step Intermittent Key ON, Engine running at full operating problem temperature. Go to Inter- DST (Diagnostic Scan Tool) connected in mittent System Data Mode...
- Page 301 Step Action Value(s) Go to Step Repair the Disconnect ECM connector and check for circuit as continuity between MAP connector sensor necessary. ground pin 1 and ECM sensor ground pin 20. Refer to Wir- Do you have continuity between them? ing Repairs in Engine Elec- trical.
- Page 302 DTC 111-IAT Higher Than Expected 1 (SPN 105:FMI 15) Conditions for Setting the DTC Intake Air Temperature Check Condition-Engine Running Fault Condition-Intake Air Temperature greater than 200 degrees F. with engine rpm greater than 700 Condition must be present for a minimum of 60 seconds MIL-ON Adaptive-Disabled during active fault Derate level 1 will occur...
- Page 303 DTC 111-IAT Higher Than Expected 1 (SPN 105:FMI 15) Diagnostic Aid This fault will set when inlet air is much hotter than normal. The most common cause of high inlet air temperature is a problem with the inlet air system. Ensure that the air inlet is not obstructed, modified or damaged.
- Page 304 DTC 112-IAT Low Voltage (SPN 105:FMI 4) Conditions for Setting the DTC Intake Air Temperature Check Condition Engine Cranking or Running Fault Condition-IAT Sensor Voltage less than 0.050 MIL-ON during active fault Adaptive-Disabled during active fault Circuit Description The TMAP is a combined IAT (Intake Air Temperature) and MAP (Manifold Absolute Pres- sure) sensor.
- Page 305 DTC 112-IAT Voltage Low Step Action Value(s) Go to Step Go to OBD Did you perform the On-Board (OBD) System System Check? Check Sec- tion Go to Step Intermittent Key ON problem DST (Diagnostic Scan Tool) connected in Go to Inter- System Data Mode mittent Does DST display IAT voltage of 0.050 or less?
- Page 306 Step Action Value(s) Go to Step Replace ECM. Refer to ECM replacement in the Engine Controls Section. Is the replacement complete? System OK Go to OBD Remove all test equipment except the DST. System Connect any disconnected components, fus- Check es, etc.
- Page 307 DTC 113-IAT High Voltage (SPN 105:FMI 3) Conditions for Setting the DTC Intake Air Temperature Check Condition-Engine Running Fault Condition-IAT Sensor Voltage greater than 4.950 volts MIL-ON during active fault Adaptive-Disabled during active fault Circuit Description The TMAP is a combined IAT (Intake Air Temperature) and MAP (Manifold Absolute Pres- sure) sensor.
- Page 308 DTC 113-IAT Voltage High Step Action Value(s) Did you perform the On-Board (OBD) System Go to Step Go to OBD Check? System Check Sec- tion Go to Step Intermittent Key ON problem DST (Diagnostic Scan Tool) connected in Go to Inter- System Data Mode mittent Does DST display IAT voltage of 4.950 or great-...
- Page 309 Step Action Value(s) Go to Step Replace the ECM. (11) Is the replacement complete? Repair the Re-check wire harness and TMAP sensor Go to Step circuit as connector for damage corrosion or contami- necessary. nation Refer to Wir- Any problems found? ing Repairs in Engine Elec- trical...
- Page 310 DTC 116-ECT Higher Than Expected 1 (SPN 110:FMI 15) Conditions for Setting the DTC Engine Coolant Temperature Check Condition-Engine Running Fault Condition-Engine Coolant Temperature reading or estimate greater than 236 degrees F. for greater than 20 seconds MIL-On Power derate (level 1) Adaptive-Disabled during active fault Circuit Description The ECT (Engine Coolant Temperature) sensor is a temperature sensitive resistor located in the engine coolant...
- Page 311 DTC 116-ECT Higher Than Expected 1...
- Page 312 DTC 117-ECT/CHT Low Voltage (SPN 110:FMI 4) Conditions for Setting the DTC Engine Coolant Temperature Check Condition-Engine Running Fault Condition-ECT sensor voltage less than 0.050 MIL-ON during active fault Adaptive-Disabled during active fault Temp Ohms (deg F) +/-10% Circuit Description 242.4 231.9 The ECT (Engine Coolant Temperature) sensor is a temperature sensitive...
- Page 313 DTC 117-ECT/CHT Voltage Low Step Action Value(s) Go to Step Go to OBD Did you perform the On-Board (OBD) System System Check? Check Sec- tion Go to Step Intermittent Key ON problem DST (Diagnostic Scan Tool) connected in Go to Inter- System Data Mode mittent Does DST display ECT voltage of 0.050 or less?
- Page 314 Step Action Value(s) Go to Step Replace ECM. Refer to ECM replacement in the Engine Controls Section. Is the replacement complete? System OK Go to OBD Remove all test equipment except the DST. System Connect any disconnected components, fus- Check es, etc.
- Page 315 DTC 118-ECT/CHT High Voltage (SPN 110:FMI 3) Conditions for Setting the DTC Temp Ohms (deg F) +/-10% Engine Coolant Temperature 242.4 Check Condition-Engine Running 231.9 Fault Condition-ECT sensor voltage exceeds 4.950 volts 211.6 MIL-ON during active fault 201.4 Adaptive-Disabled 181.9 163.1 Circuit Description 144.9...
- Page 316 DTC 118-ECT/CHT Voltage High Step Action Value(s) Go to Step Go to OBD Did you perform the On-Board (OBD) System System Check? Check Sec- tion Go to Step Intermittent Key ON problem DST (Diagnostic Scan Tool) connected in Go to Inter- System Data Mode mittent Does DST display ECT voltage of 4.95 or great-...
- Page 317 Step Action Value(s) Go to Step Go to Step Jump the ECT signal pin A at the ECT con- (12) nector to engine ground Does DST display ECT voltage of 0.05 or less? Go to Step Repair the Key OFF (10) circuit as Disconnect ECM wire harness connector...
- Page 318 DTC 121-TPS 1 Lower Than TPS 2 (SPN 51:FMI 1) Conditions for Setting the DTC Throttle Position Sensor 1 & 2 Check Condition-Key ON Fault Condition-TPS 1 20% lower than TPS 2 MIL-ON for remainder of key on cycle Engine shutdown Circuit description Dual throttle Position Sensors are used within the throttle that use variable resistors to deter- mine signal voltage based on throttle plate position.
- Page 319 DTC 121 TPS 1 Lower Than TPS 2 Step Action Value(s) Go to Step Go to OBD Did you perform the On-Board (OBD) System System Check Check? Section Go to Step Intermittent Key ON, Engine OFF problem DST (Diagnostic Scan Tool) connected in Go to Intermit- System Data Mode tent section...
- Page 320 Step Action Value(s) Go to Step Repair the Using a DVOM check for continuity between (10) open circuit as throttle connector signal ground pin 2 and necessary. ECM connector signal ground pin 20 Refer to Wir- Do you have continuity between them? ing Repairs in Engine Elec- trical.
- Page 321 DTC 122-TPS 1 Low Voltage (SPN 51:FMI 4) Conditions for Setting the DTC Throttle Position Sensor 1 Check Condition-Cranking or Running Fault Condition-TPS sensor less than 0.200 volts MIL-ON during active fault Engine shutdown Circuit Description Dual throttle Position Sensors are used within the throttle that use variable resistors to deter- mine signal voltage based on throttle plate position.
- Page 322 DTC 122 TPS 1 Signal Voltage Low Step Action Value(s) Go to Step Go to OBD Did you perform the On-Board (OBD) System System Check Check? Section Go to Step Go to Step (3) Key ON, Engine OFF DST (Diagnostic Scan Tool) connected in DBW (Drive by Wire) throttle test mode Does the DST display TPS 1 voltage of 0.200 volts or less with the throttle closed?
- Page 323 Step Action Value(s) System OK Go to OBD Remove all test equipment except the DST. System Check Connect any disconnected components, fus- es, etc. Using the DST clear DTC information from the ECM. Turn the ignition OFF and wait 30 seconds. Start the engine and operate the vehicle to full operating temperature Observe the MIL...
- Page 324 DTC 123-TPS 1 High Voltage (SPN 51:FMI 3) Conditions for Setting the DTC Throttle Position Sensor 1 Check Condition-Cranking or Running Fault Condition-TPS sensor voltage exceeds 4.800 volts MIL-ON during active fault Engine shutdown Circuit Description Dual throttle Position Sensors are used within the throttle that use variable resistors to determine signal voltage based on throttle plate position.
- Page 325 DTC 123 TPS 1 Signal Voltage High Step Action Value(s) Did you perform the On-Board (OBD) System Go to Step Go to OBD Check? System Check Section Go to Step (3) Go to Step Key ON, Engine OFF DST (Diagnostic Scan Tool) connected Does the DST display TPS 1 voltage of 4.800 volts or greater with the throttle closed? Go to Step...
- Page 326 Step Action Value(s) Remove all test equipment except the DST. System OK Go to OBD System Check Connect any disconnected components, fus- es, etc. Using the DST clear DTC information from the ECM. Turn the ignition OFF and wait 30 seconds. Start the engine and operate the vehicle to full operating temperature Observe the MIL...
- Page 327 DTC 127-IAT Higher Than Expected 2 (SPN 105:FMI 0) Conditions for Setting the DTC Intake Air Temperature Check Condition-Engine Running Fault Condition-Intake Air Temperature greater than 210 degrees F. with engine speed greater than 700 rpm Fault condition must be active for longer than 120 seconds MIL-ON for active fault Engine will de-rate to 1,400 rpms.
- Page 328 DTC 127-IAT Higher Than Expected 2 Diagnostic Aid This fault will set when inlet air is much hotter than normal. The most common cause of high inlet air temperature is a problem with the inlet air system. Ensure that the air inlet is not obstructed, modified or damaged.
- Page 329 DTC 129-BP Low Pressure (SPN 108: FMI 1) Conditions for Setting the DTC Barometric Pressure Check Condition-Key ON Fault Condition-BP less than 8.30 psia MIL-ON for active fault Adaptive-Disabled Circuit Description The BP (Barometric Pressure) is estimated from the TMAP sensor. The barometric pressure value is used for fuel and airflow calculations.
- Page 330 DTC 129-BP Low Pressure Step Action Value(s) Did you perform the On-Board (OBD) System Go to Step Go to OBD Check? System Check Sec- tion Intermittent Go to Step Key ON. problem. Go DST (Diagnostic Scan Tool) connected in to Intermittent System Data Mode section Does DST display BP pressure of 8.30 psia or...
- Page 331 Step Action Value(s) Go to Step Go to Step Remove the Jumper that was installed during (13) step 3 Probe TMAP connector signal circuit pin 4 with a test light connected to battery voltage Does the DST display BP pressure of 16.00 psia or greater? Go to Step Repair the...
- Page 332 Step Action Value(s) Repair the Go to Step Inspect ECM connector and wire harness circuit as (16) connector pins for corrosion, contamination necessary. or mechanical damage Refer to Wir- Any problems found? ing Repairs in Engine Elec- trical. Go to Step Replace ECM.
- Page 333 DTC 134-EGO 1 Pre Cat Open/Lazy (SPN 724:FMI 10) Conditions for Setting the DTC Heated Oxygen Sensor Check condition-Engine running Fault condition-EGO 1 pre catalyst persistently cold for more than 120 seconds MIL-ON during active fault Adaptive-Disabled during active fault Closed Loop-Disabled during active fault Circuit Description The EGO 1 sensor is used to determine if the fuel flow to the engine is correct by measuring the...
- Page 334 DTC 134-EGO 1 Open/Inactive Step Action Value(s) Did you perform the On-Board (OBD) System Go to Step Go to OBD Check? System Check Sec- tion Intermittent Go to Step Key ON, Engine Running problem. See DST (Diagnostic Scan Tool) connected in Electrical System Data Mode Section In-...
- Page 335 Step Action Value(s) Go to Step Repair open Key OFF EGO 1 circuit Disconnect ECM wire harness connector C001 Using a DVOM check for continuity between EGO 1 pin B and ECM connector pin 1 Do you have continuity? Go to Step Repair open Using a DVOM check for continuity between (10)
- Page 336 DTC 154-EGO 2 Post Cat Open/Lazy (SPN 520208:FMI 10)
- Page 339 DTC 171-Adaptive Learn High Gasoline (SPN 520200:FMI 0) Conditions for Setting the DTC Heated Oxygen Sensor Check Condition-Engine Running Fault Condition-Adaptive multiplier out of range greater than 30% MIL-ON Circuit Description The EGO 1 sensor is used to determine if the fuel flow to the engine is correct by measuring the oxy- gen content in the exhaust gas.
- Page 340 DTC 171-Adaptive Learn High Gasoline Step Action Value(s) Go to Step Go to Step Perform the On-Board (OBD) System Check? Are any other DTCs present? Visually and physically check the following items: Go to Step Go to Step The air intake duct for being collapsed or re- stricted The air filter for being plugged System power fuses are good and in the...
- Page 341 Step Action Value(s) Repair the Go to Step Using a high impedance DVOM check for shorted circuit continuity between EGO 1 connector signal as necessary. ground pin C and EGO 1 signal pin A Refer to Wir- Do you have continuity? ing Repairs in Engine Elec- trical.
- Page 342 DTC 172-Adaptive Learn Low (Gasoline) (SPN 520200:FMI 1) Conditions for Setting the DTC Heated Oxygen Sensor Check Condition-Engine running Fault Condition-Adaptive multiplier out of range greater than -30% MIL-ON Circuit Description The EGO1 sensor is used to determine if the fuel flow to the engine is correct by measuring the oxygen content in the exhaust gas.
- Page 343 DTC 172-Adaptive Learn Low (Gasoline) Step Action Value(s) Go to Step Go to Step Perform the On-Board (OBD) System Check? Are any other DTCs present? Visually and physically check the following items: Go to Step Go to Step The air intake duct for being collapsed or re- stricted The air filter for being plugged The EGO sensor is installed securely and the...
- Page 344 DTC 182-Gasoline Fuel Temperature Low (SPN 174:FMI 4) Conditions for Setting the DTC Gasoline fuel temperature low Faulty fuel temp sensor Fuel temperature sensor voltage lower than .05v for 5 seconds or greater Fuel temperature is -35F or less for 5 seconds or greater MIL-On for active fault and for 2 seconds after active fault Adaptive Learn is disabled while this fault is active.
- Page 345 DTC 183-Gasoline Fuel Temperature High (SPN 174:FMI 3) Conditions for Setting the DTC Gasoline fuel temperature high Faulty fuel temp sensor Fuel temperature sensor voltage greater than 4.95v for 5 seconds or greater Fuel temperature is 130F or higher for 5 seconds or greater MIL-On for active fault and for 2 seconds after active fault Adaptive Learn is disabled while this fault is active.
- Page 346 DTC 217-ECT Higher Than Expected 2 (SPN 110:FMI 0) Conditions for Setting the DTC Engine Coolant Temperature Check Condition-Engine Running Fault Condition-Engine Coolant Temperature reading or estimate greater than 250 degrees F. for greater than 5 seconds while engine is above 700 rpms MIL-On Engine will derate to 1,400 rpms Circuit Description...
- Page 347 DTC 217-ECT Higher Than Expected 2...
- Page 348 DTC 219-Max Govern Speed Override (SPN 515:FMI 15) Conditions for Setting the DTC Max Govern Speed Override Check Condition-Engine Running Fault Condition-Engine rpm greater than 2,850 Fault condition active for 2 or more seconds MIL-ON during active fault Circuit description This fault will set anytime the engine rpm exceeds 2,850 for longer than 2 seconds.
- Page 349 DTC 219-Max Govern Speed Override Step Action Value(s) Did you perform the On-Board (OBD) System Go to Step Go to OBD Check? System Check Sec- tion Go to Step Go to Step Key ON, Engine OFF DST connected Are any other DTC codes present with DTC 219? Go to Step Diagnose and repair any other DTC codes stored before proceeding with this chart.
- Page 350 DTC 221-TPS 1 Higher Than TPS 2 (SPN 51:FMI 0) Conditions for Setting the DTC Throttle Position Sensor 1 & 2 Check Condition-Key ON Fault Condition-TPS 1 20% higher than TPS2 MIL-ON for remainder of key on cycle Engine shutdown Circuit Description Dual throttle Position Sensors are used within the throttle that use variable resistors to determine signal voltage based on throttle plate position.
- Page 351 DTC 221 TPS 1 Higher Than TPS 2 Step Action Value(s) Did you perform the On-Board (OBD) System Go to Step Go to OBD Check? System Check Section Go to Step Intermittent Key ON, Engine OFF problem DST (Diagnostic Scan Tool) connected in Go to Intermit- System Data Mode tent section...
- Page 352 Step Action Value(s) Go to Step Repair the Using a DVOM check for continuity between (10) open circuit as throttle connector signal ground pin 2 and necessary. ECM connector signal ground pin 3 Refer to Wir- Do you have continuity between them? ing Repairs in Engine Elec- trical.
- Page 353 DTC 222-TPS 2 Signal Voltage Low (SPN 520251:FMI 4) Conditions for Setting the DTC Throttle Position Sensor 2 Check Condition-Cranking or Running Fault Condition-TPS 2 sensor voltage less than 0.200 volts MIL-ON during active fault Engine will Shutdown Circuit Description Dual throttle Position Sensors are used within the throttle that use variable resistors to de- termine signal voltage based on throttle plate position.
- Page 354 DTC 222 TPS 2 Signal Voltage Low Step Action Value(s) Did you perform the On-Board (OBD) System Go to Step Go to OBD Check? System Check Section Go to Step (3) Go to Step Key ON, Engine OFF DST (Diagnostic Scan Tool) connected in DBW (Drive by Wire) throttle test mode Does the DST display TPS 2 voltage of 0.200 volts or less with the throttle closed?
- Page 355 Step Action Value(s) Remove all test equipment except the DST. System OK Go to OBD System Check Connect any disconnected components, fus- es, etc. Using the DST clear DTC information from the ECM. Turn the ignition OFF and wait 30 seconds. Start the engine and operate the vehicle to full operating temperature Observe the MIL...
- Page 356 DTC 223-TPS 2 Signal Voltage High (SPN 520251:FMI 3) Conditions for Setting the DTC Throttle Position Sensor 2 Check Condition-Cranking or Running Fault Condition-TPS 2 sensor exceeds 4.800 volts MIL-ON during active fault Engine will shutdown Circuit Description Dual throttle Position Sensors are used within the throttle that use variable resistors to de- termine signal voltage based on throttle plate position.TPS1 will read lower voltage when closed and TPS2 will read higher voltage when closed.
- Page 357 DTC 223 TPS 2 Signal Voltage High Step Action Value(s) Did you perform the On-Board (OBD) System Go to Step Go to OBD Check? System Check Section Go to Step Go to Step (3) Key ON, Engine OFF DST (Diagnostic Scan Tool) connected in DBW (Drive by Wire) throttle test mode Does the DST display TPS 2 voltage of 4.800 volts or greater with the throttle closed?
- Page 358 Step Action Value(s) Remove all test equipment except the DST. System OK Go to OBD System Check Connect any disconnected components, fus- es, etc. Using the DST clear DTC information from the ECM. Turn the ignition OFF and wait 30 seconds. Start the engine and operate the vehicle to full operating temperature Observe the MIL...
- Page 359 DTC 261: Injector driver 1 (cyl 1) open or short to ground SPN 651:FMI 5 Conditions for Setting the DTC Injector is in the Off State Low side voltage is less than 4.0 volts Battery voltage is above 9.0 volts MIL Light turned on Closed Loop is disabled while this fault is active Adaptive Learn is disabled while this fault is active.
- Page 360 DTC 264: Injector driver 2 (Cyl 6) open or short to ground SPN 264:FMI 5 Conditions for Setting the DTC Injector is in the Off State Low side voltage is less than 4.0 volts Battery voltage is above 9.0 volts MIL Light turned on Closed Loop is disabled while this fault is active Adaptive Learn is disabled while this fault is active.
- Page 361 DTC 267: Injector driver 3 (Cyl 5) open or short to ground SPN 653:FMI 5 Conditions for Setting the DTC Injector is in the Off State Low side voltage is less than 4.0 volts Battery voltage is above 9.0 volts MIL Light turned on Closed Loop is disabled while this fault is active Adaptive Learn is disabled while this fault is active.
- Page 362 DTC 270: Injector driver 4 (Cyl 4) open or short to ground SPN 654:FMI 5 Conditions for Setting the DTC Injector is in the Off State Low side voltage is less than 4.0 volts Battery voltage is above 9.0 volts MIL Light turned on Closed Loop is disabled while this fault is active Adaptive Learn is disabled while this fault is active.
- Page 363 DTC 273: Injector driver 5 (Cyl 3) open or short to ground SPN 655:FMI 5 Conditions for Setting the DTC Injector is in the Off State Low side voltage is less than 4.0 volts Battery voltage is above 9.0 volts MIL Light turned on Closed Loop is disabled while this fault is active Adaptive Learn is disabled while this fault is active.
- Page 364 DTC 276: Injector driver 6 (Cyl 2) open or short to ground SPN 656:FMI 5 Conditions for Setting the DTC Injector is in the Off State Low side voltage is less than 4.0 volts Battery voltage is above 9.0 volts MIL Light turned on Closed Loop is disabled while this fault is active Adaptive Learn is disabled while this fault is active.
- Page 365 DTC 262: Injector driver 1 (Cyl 1) Coil Shorted (SPN 651:FMI 6) Conditions for Setting the DTC Injector is in the On State Low side voltage is greater than 4.0 volts Battery voltage is less than 16.0 volts MIL Light turned on Closed Loop is disabled while this fault is active Adaptive Learn is disabled while this fault is active.
- Page 366 DTC 265: Injector driver 2 (Cyl 6) Coil Shorted (SPN:652:FMI 6) Conditions for Setting the DTC Injector is in the On State Low side voltage is greater than 4.0 volts Battery voltage is less than 16.0 volts MIL Light turned on Closed Loop is disabled while this fault is active Adaptive Learn is disabled while this fault is active.
- Page 367 DTC 268: Injector driver 3 (Cyl 5) Coil Shorted (SPN 653:FMI 6) Conditions for Setting the DTC Injector is in the On State Low side voltage is greater than 4.0 volts Battery voltage is less than 16.0 volts MIL Light turned on Closed Loop is disabled while this fault is active Adaptive Learn is disabled while this fault is active.
- Page 368 DTC 271: Injector driver 4 (Cyl 4) Coil Shorted (SPN 654:FMI 6) Conditions for Setting the DTC Injector is in the On State Low side voltage is greater than 4.0 volts Battery voltage is less than 16.0 volts MIL Light turned on Closed Loop is disabled while this fault is active Adaptive Learn is disabled while this fault is active.
- Page 369 DTC 274: Injector driver 5 (Cyl 3) Coil Shorted (SPN 655: FMI 6) Conditions for Setting the DTC Injector is in the On State Low side voltage is greater than 4.0 volts Battery voltage is less than 16.0 volts MIL Light turned on Closed Loop is disabled while this fault is active Adaptive Learn is disabled while this fault is active.
- Page 370 DTC 277: Injector driver 6 (Cyl 2) Coil Shorted (SPN 656:FMI 6) Conditions for Setting the DTC Injector is in the On State Low side voltage is greater than 4.0 volts Battery voltage is less than 16.0 volts MIL Light turned on Closed Loop is disabled while this fault is active Adaptive Learn is disabled while this fault is active.
- Page 371 DTC 336-Crank Sync Noise (SPN 636:FMI 2) Conditions for setting the DTC Crankshaft Position sensor Check Condition- Engine running Fault Condition- 1 invalid crank re-sync in less than 800 ms Adaptive- Disabled MIL- On during active fault Circuit Description The Crankshaft position sensor is a 5 volt powered sensor mounted to the lower front engine block.
- Page 372 DTC 336 Crank Sync Noise Step Action Value(s) Did you perform the On-Board (OBD) System Go to Step Go to OBD Check? System Check Sec- tion Repair the Go to Step Check that the ECM ground terminals C010, circuit as C022 and C023 are clean and tight necessary.
- Page 373 Step Action Value(s) Go to Step Replace CKP sensor (10) Is the replacement complete? Go to Step Replace ECM (11) Is the replacement complete? Remove all test equipment except the DST. System OK Go to Step Connect any disconnected components, fus- es, etc.
- Page 374 DTC 337-Crank Loss (SPN 636:FMI 4) Conditions for setting the DTC Crankshaft position sensor Check Condition- Engine cranking Fault Condition- 6 cam pulse signals without crankshaft activity MIL- On during active fault Adaptive- Disabled Circuit Description The Crankshaft position sensor is a 5 volt powered sensor mounted to the lower front engine block.
- Page 375 DTC 337-Crank Loss Step Action Value(s) Did you perform the On-Board (OBD) System Go to Step Go to OBD Check? System Check Sec- tion Repair the Go to Step Check that the ECM ground terminals C010, circuit as C022 and C023 are clean and tight necessary.
- Page 376 Step Action Value(s) Go to Step Replace the CKP sensor (10) Is the replacement complete? Go to Step Replace ECM (11) Is the replacement complete? Remove all test equipment except the DST. System OK Go to Step Connect any disconnected components, fus- es, etc.
- Page 377 DTC 341-Camshaft Sync Noise (SPN 723:FMI 2) Conditions for Setting the DTC Camshaft position sensor Check Condition-Cranking or Running Fault Condition-1 invalid cam re-sync in 700ms or less Adaptive Learn disabled MIL-ON Circuit Description The CMP (Camshaft Position Sensor) is used to synchronize the fuel and ignition systems. This fault will set if the ECM detects erroneous pulses from the camshaft position sensor causing invalid cam re-sync.
- Page 378 DTC 341-Camshaft Sensor Noise Step Action Value(s) Did you perform the On-Board (OBD) System Go to Step Go to OBD Check? System Check Sec- tion Repair the Go to Step Check that the ECM ground terminal C010 is circuit as clean, tight and in the proper location necessary.
- Page 379 Step Action Value(s) Go to Step Replace ECM (11) Is the replacement complete? Remove all test equipment except the DST. System OK Go to Step Connect any disconnected components, fus- es, etc. Using the DST clear DTC information from the ECM. Turn the ignition OFF and wait 30 seconds.
- Page 380 DTC 342-Camshaft Sensor Loss (SPN 723:FMI 4) Conditions for Setting the DTC CMP (Camshaft Position Sensor) Check Condition-Engine Cranking or Running Fault Condition-No cam pulse in 2.5 cycles with engine speed greater than 100 rpm MIL-ON for active fault Adaptive-Disabled Circuit Description The CMP (Camshaft Position Sensor) is used to synchronize the fuel and ignition systems.
- Page 381 DTC 342-Camshaft Sensor Loss Step Action Value(s) Did you perform the On-Board (OBD) System Go to Step Go to OBD Check? System Check Sec- tion Go to Step Repair the Check that the ECM ground terminal C010 is circuit as clean, tight and in the proper location necessary.
- Page 382 Step Action Value(s) Go to Step Replace the CMP. (10) Is the replacement complete? Go to Step Replace ECM (11) Is the replacement complete? System OK Go to Step Remove all test equipment except the DST. Connect any disconnected components, fus- es, etc.
- Page 383 DTC-359 Fuel Run-out Longer Than Expected (SPN 1239:FMI 7) Conditions for Setting the DTC LPG lock-off valve Check Condition-Key OFF Fault Condition-Engine run down time greater than 20 seconds MIL-ON Circuit Description The LPG lock off valve is supplied system battery power from the VSW fused source. The ECM then provides a path to ground to turn the valve on.
- Page 384 DTC-359 Fuel Run-out Longer Than Expected Step Action Value(s) Did you perform the On-Board (OBD) System Go to Step Check? System Go to Step Go to Step Disconnect the LPG shut off solenoid con- Voltage nector C003 Using a DVOM check for power across ter- minals A and B while cranking the engine, then turn the key to the OFF position Did the voltage immediately turn OFF with the...
-
Page 385: Diagnostic Aids
DTC 420 Gasoline Catalyst Monitor (SPN 520211:FMI 10) Conditions for Setting the DTC • Catalyst Function • Check condition- Engine running • Fault condition- EGO 1 signal = EGO 2 signal for 100 updates • MIL- On during active fault and for 1 second after active fault •... - Page 386 DTC 502 – Loss of Road Speed (SPN 84:FMI 1) Conditions for setting the DTC Road speed input is less than 0.1 km/hr Fault must be active for 5.0 seconds to activate DTC Engine speed is greater than 1,500 rpms MAP pressure is greater than 10.00 PSIA SPDF signal indicates vehicle is moving MIL light on during fault...
- Page 387 DTC 502 – Loss of Road Speed STEP Action Value(s) Did you perform the On-Board (OBD) System Check? Go to Step (2) Go to OBD System Check Section Key Off Repair wire circuit between Pin N and Pin Go to Step (3) Resistance Check the wiring for continuity between terminals 25 at the GCP Connector and Pin N of the VIC 1...
- Page 388 DTC 520-Oil Pressure Low Stage 1 (SPN 100:FMI 18) Conditions for Setting the DTC Engine Oil Pressure low. Engine running with engine speed less than 1200 rpm and oil pressure is less than 15 psi for 5 or more seconds Engine running with engine speed greater than 1450 rpm and oil pressure is less than 20 psi for 5 or more seconds MIL is active...
- Page 389 DTC 520-Oil Pressure Low Stage 1 Step Action Value(s) Did you perform the On-Board (OBD) System Go to Step Go to OBD Check? System Check Sec- tion 15 psi Go to Step Repair faulty Verify that the engine has oil pressure using Oiling System a mechanical oil pressure gauge before pro- ceeding with this chart.
- Page 390 Step Action Value(s) Go to Step Replace ECM Is the replacement complete? System OK Go to OBD Remove all test equipment except the DST. System Connect any disconnected components, fus- Check es, etc. Using the DST clear DTC information from the ECM.
- Page 391 DTC 521- Oil Pressure High (SPN 100:FMI 0) Conditions for Setting the DTC Engine Oil Pressure high. Check Condition-Engine running for 5 seconds. Fault Condition- Oil pressure greater than 95 psi for 5 or more seconds Forced idle is active Circuit Description The Oil Pressure Sender is used to communicate the oil pressure condition to the ECM.
- Page 392 DTC 521-Oil Pressure High Step Action Value(s) Did you perform the On-Board (OBD) System Go to Step Go to OBD Check? System Check Sec- tion Repair faulty Go to step (3) Verify that the engine has oil pressure using oiling system a mechanical oil pressure gauge before pro- ceeding with this chart.
- Page 393 DTC 522- Oil Pressure Sender low voltage (SPN 100:FMI 4) Conditions for Setting the DTC Engine Oil Pressure low. Check Condition-Engine running for 20 seconds or more with engine speed greater than 600 rpm. Fault Condition- Voltage on terminal 25 is less than 0.2v for more than 1 second MIL-ON during active fault and for 2 seconds after active fault.
- Page 394 DTC 522- Oil Pressure Sender low voltage Step Action Value(s) Did you perform the On-Board (OBD) System Go to Step Go to OBD Check? System Check Sec- tion < 0.2v Go to Step Check for Using the Diagnostic Service Tool (DST) faulty harness with the key on engine running, check the or intermittent...
- Page 395 DTC 523- Oil Pressure Sender high voltage (SPN 100:FMI 3) Conditions for Setting the DTC Engine Oil Pressure sender voltage is high Check Condition-Engine running for 20 seconds or more with engine speed greater than 600 rpm. Fault Condition- Voltage on terminal 25 is greater than 4.8v for more than 1 second MIL-ON during active fault and for 2 seconds after active fault.
- Page 396 DTC 523- Oil Pressure Sender high voltage Step Action Value(s) Did you perform the On-Board (OBD) System Go to Step Go to OBD Check? System Check Sec- tion > 4.8v Go to Step Check for Using the Diagnostic Service Tool (DST) faulty harness check the OILP_raw value on the “RAW or intermittent...
- Page 397 DTC 524-Oil Pressure Low Stage 2 (SPN 100:FMI 1) Conditions for Setting the DTC Engine Oil Pressure low. Fault Condition- Oil pressure less than 8 psi for 5 or more seconds Engine Shut Down. Circuit Description The Oil Pressure Sender is used to communicate the oil pressure condition to the ECM. Engine damage can occur if the engine is operated with low oil pressure.
- Page 398 DTC 524-Oil Pressure Low Step Action Value(s) Did you perform the On-Board (OBD) System Go to Step Go to OBD Check? System Check Sec- tion 8 psi Go to Step Repair faulty Verify that the engine has oil pressure using Oiling System a mechanical oil pressure gauge before pro- ceeding with this chart.
- Page 399 Step Action Value(s) Go to Step Replace ECM Is the replacement complete? System OK Go to OBD Remove all test equipment except the DST. System Connect any disconnected components, fus- Check es, etc. Using the DST clear DTC information from the ECM.
- Page 400 DTC 562-System Voltage Low (SPN 168:FMI 17) Conditions for Setting the DTC System Voltage to ECM Check Condition-Key on with engine speed greater than 1000 RPM Fault Condition-Battery voltage at ECM less than 9.0 Fault Condition is present for longer than 5 seconds. MIL-ON for active fault Adaptive-Disabled Circuit Description...
- Page 401 DTC 562-System Voltage Low Step Action Value(s) Did you perform the On-Board (OBD) System Go to Step Go to OBD Check? System Check Sec- tion Intermittent Go to Step Key ON, Engine Running problem DST (Diagnostic Scan Tool) connected in Go to Engine System Data Mode Electrical In-...
- Page 402 DTC 563-System Voltage High (SPN 168:FMI 15) Conditions for Setting the DTC System Voltage to ECM Check Condition-Cranking or Running Fault Condition-System battery voltage at ECM greater than 18 volts Fault must be present for 3 or more seconds MIL-ON for active fault Adaptive-Disabled Circuit Description The battery voltage powers the ECM and must be measured to correctly operate injector drivers,...
- Page 403 DTC 563-System Voltage High Step Action Value(s) Did you perform the On-Board (OBD) System Go to Step Go to OBD Check? System Check Sec- tion Intermittent Go To Step Key ON, Engine Running problem DST (Diagnostic Scan Tool) connected in Go to Engine System Data Mode Electrical In-...
- Page 404 DTC 601-Flash Checksum Invalid (SPN 628:FMI 13) Microprocesso Microprocessor Flash Conditions for Setting the DTC Engine Control Module Check Condition-Key on Fault Condition-Internal microprocessor error MIL-ON Engine Shutdown will occur Circuit Description The ECM has several internal checks that must be satisfied each time an instruction is executed. Several different things can happen within the microprocessor that will cause this fault.
- Page 405 DTC 601-Flash Checksum Invalid Step Action Value(s) Did you perform the On-Board (OBD) System Go to Step Go to OBD Check? System Check Sec- tion Go to Step Intermittent Key ON, Engine Running problem DST (Diagnostic Scan Tool) connected in Go to In- System Data Mode termittent...
- Page 406 DTC 604-RAM Failure (SPN 630:FMI 12) Microprocesso Microprocessor Flash Conditions for Setting the DTC Engine Control Module Check Condition-Key on Fault Condition-Internal microprocessor error MIL-ON Engine Shutdown will occur Circuit Description The ECM has several internal checks that must be satisfied each time an instruction is executed. Several different things can happen within the microprocessor that will cause this fault.
- Page 407 DTC 604-RAM Failure Step Action Value(s) Did you perform the On-Board (OBD) System Go to Step Go to OBD Check? System Check Sec- tion Go to Step Intermittent Key ON, Engine Running problem DST (Diagnostic Scan Tool) connected in Go to Inter- System Data Mode mittent Clear system fault code...
- Page 408 DTC 606-COP Failure (SPN 629:FMI 31) Microprocesso Microprocessor Flash Conditions for Setting the DTC Engine Control Module Check Condition-Key on Fault Condition-Internal microprocessor error MIL-ON Engine Shutdown will occur Circuit Description The ECM has several internal checks that must be satisfied each time an instruction is executed. Several different things can happen within the microprocessor that will cause this fault.
- Page 409 DTC 606-COP Failure Step Action Value(s) Did you perform the On-Board (OBD) System Go to Step Go to OBD Check? System Check Sec- tion Go to Step Intermittent Key ON, Engine Running problem DST (Diagnostic Scan Tool) connected in Go to Inter- System Data Mode mittent Clear system fault code...
- Page 410 DTC 627-Fuel Pump Relay Coil Open (SPN 1348:FMI 5) Conditions for Setting the DTC Fuel Pump relay check Check Condition-Key ON Fault Condition-Relay coil open Circuit Description The fuel pump relay switches power out to the gasoline fuel pump. This fault will set if the ECM detects an open circuit on the relay control output.
- Page 411 DTC 627-Fuel Pump Relay Coil Open Step Action Value(s) Did you perform the On-Board (OBD) System Go to Step Go to OBD Check? System Check Sec- tion Go to Step Go to Step DST connected and in the system data mode Key OFF Remove the power relay from the fuse block Using a DVOM check the resistance of the...
- Page 412 Step Action Value(s) Go to Step Replace the ECM Is the replacement complete? System OK Remove all test equipment except the DST. Go to OBD System Connect any disconnected components, fus- Check es, etc. Using the DST clear DTC information from the ECM.
- Page 413 DTC 628- Fuel Pump Relay Control Ground Short (SPN 1347:FMI 5) Conditions for Setting the DTC Fuel Pump relay ground control Check Condition-Key ON Fault Condition-Relay control shorted to ground Circuit Description The fuel pump relay switches power out to the gasoline fuel pump. This fault will set if the ECM detects an open circuit on the relay control output Diagnostic Aid Relay coil resistance changes with temperature.
- Page 414 DTC 628- Fuel Pump Relay Control Ground Short Step Action Value(s) Did you perform the On-Board (OBD) System Go to Step Go to OBD Check? System Check Sec- tion Go to Step Intermittent Key ON, DST connected in the System Data problem mode Go to Inter-...
- Page 415 DTC 629- Fuel Pump Relay Coil Short to Power (SPN 1347:FMI 3) Conditions for Setting the DTC Fuel pump relay check Check Condition-Key ON Fault Condition-Relay coil shorted to power Circuit Description The fuel pump relay switches power out to the gasoline fuel pump. This fault will set if the ECM detects an open circuit on the relay control output Diagnostic Aid Relay coil resistance changes with temperature.
- Page 416 DTC 629- Fuel Pump Relay Coil Short to Power Step Action Value(s) Did you perform the On-Board (OBD) System Go to Step Go to OBD Check? System Check Sec- tion Go to Step Go to Step DST connected and in the system data mode Key OFF Remove the power relay from the fuse block Using a DVOM check the resistance of the...
- Page 417 Step Action Value(s) Go to Step Replace the ECM Is the replacement complete? System OK Remove all test equipment except the DST. Go to OBD System Connect any disconnected components, fus- Check es, etc. Using the DST clear DTC information from the ECM.
- Page 418 DTC 642-External 5 Volt 1 Reference Low (SPN 1079:FMI 4) Conditions for Setting the DTC External 5 volt reference Check Condition-Engine cranking or running Fault Condition-5 volt reference voltage lower than 4.60 volts MIL-ON during active fault Adaptive-Disabled during active fault Circuit Description The External 5 volt supply powers many of the sensors and other components of the fuel system.
- Page 419 DTC 642 External 5 Volt 1 Reference Low Step Action Value(s) Did you perform the On-Board (OBD) System Go to Step Go to OBD Check? System Check Sec- tion Go to Step Intermittent Key ON, Engine Running problem DST (Diagnostic Scan Tool) connected in Go to Inter- System Fault Mode mittent...
- Page 420 Step Action Value(s) Remove all test equipment except the DST. System OK Go to OBD System Connect any disconnected components, fus- Check es, etc. Using the DST clear DTC information from the ECM. Turn the ignition OFF and wait 30 seconds. Start the engine and operate the vehicle to full operating temperature Observe the MIL...
- Page 421 DTC 643-External 5 Volt 1 Reference High (SPN 1079:FMI 3) Conditions for Setting the DTC External 5 volt reference Check Condition-Engine cranking or running Fault Condition-5 volt reference higher than 5.40 volts MIL-ON during active fault Adaptive-Disabled during active fault Circuit Description The External 5 volt supply powers many of the sensors and other components in the fuel system.
- Page 422 DTC 643 External 5 Volt 1 Reference High Step Action Value(s) Did you perform the On-Board (OBD) System Go to Step Go to OBD Check? System Check Sec- tion Go to Step Intermittent Key ON, Engine running problem DST (Diagnostic Scan Tool) connected in Go to Inter- System Data Mode mittent...
- Page 423 DTC 650-MIL Control Open (SPN:1213:FMI 5) Conditions for setting the DTC MIL check Check Condition-Key ON engine OFF Fault Condition-ECM MIL circuit open MIL Command-ON Circuit Description The fuel system is equipped with OBD (On-Board Diagnostics). The system has a dash mounted MIL (Malfunction Indicator Lamp).
- Page 424 DTC 650-MIL Control Open Step Action Value(s) Did you perform the On-Board (OBD) System Go to Step Go to OBD Check? System Check Sec- tion Go to Step Intermittent Key ON, Engine Running problem DST (Diagnostic Scan Tool) connected in Go to Inter- System Data Mode mittent...
- Page 425 Step Action Value(s) Remove all test equipment except the DST. System OK Go to OBD System check Connect any disconnected components, fus- es, etc. Using the DST clear DTC information from the ECM. Turn the ignition OFF and wait 30 seconds. Start the engine and operate the vehicle to full operating temperature Observe the MIL...
- Page 426 DTC 652-External 5 Volt 2 Reference Low (SPN 1080:FMI 4) LT GRN/PPL + 5 Volts Conditions for Setting the DTC External 5 volt reference Check Condition-Engine cranking or running Fault Condition-5 volt reference voltage lower than 3.00 volts MIL-On during active fault Adaptive-Disabled during active fault Circuit Description The External 5 volt supply is normally dedicated to the FPP sensor 5 volt supply circuit.
- Page 427 DTC 652 External 5 Volt 2 Reference Low Step Action Value(s) Did you perform the On-Board (OBD) System Go to Step Go to OBD Check? System Check Sec- tion Go to Step Intermittent Key ON, Engine Running problem DST (Diagnostic Scan Tool) connected in Go to Inter- System Fault Mode mittent...
- Page 428 DTC 653-External 5 Volt 2 Reference High (SPN 1080:FMI 3) LT GRN/PPL + 5 Volts Conditions for Setting the DTC External 5 volt reference Check Condition-Engine cranking or running Fault Condition-5 volt reference higher than 5.40 volts MIL-On during active fault Adaptive-Disabled during active fault Circuit Description The External 5 volt supply is normally dedicated to the FPP sensor 5 volt supply circuit.
- Page 429 DTC 653 External 5 Volt 2 Reference High Step Action Value(s) Did you perform the On-Board (OBD) System Go to Step Go to OBD Check? System Check Sec- tion Go to Step Intermittent Key ON, Engine running problem DST (Diagnostic Scan Tool) connected in Go to Inter- System Data Mode mittent...
- Page 430 DTC 685-Relay Coil Open (SPN 1485:FMI 5) Conditions for Setting the DTC Power relay check Check Condition-Key ON Fault Condition-Relay coil open Circuit Description The power relay switches power out to various sensors, actuators and solenoids in the fuel sys- tem.
- Page 431 DTC 685-Relay Coil Open Step Action Value(s) Did you perform the On-Board (OBD) System Go to Step Go to OBD Check? System Check Sec- tion Go to Step Go to Step DST connected and in the system data mode Key OFF Remove the power relay from the fuse block Using a DVOM check the resistance of the relay coil between terminals 1 and 2...
- Page 432 Step Action Value(s) Go to Step Replace the ECM Is the replacement complete? System OK Remove all test equipment except the DST. Go to OBD System Connect any disconnected components, fus- Check es, etc. Using the DST clear DTC information from the ECM.
- Page 433 DTC 686-Relay Control Ground Short (SPN 1485:FMI 4) Conditions for Setting the DTC Power relay ground control Check Condition-Key ON Fault Condition-Relay control shorted to ground Circuit Description The power relay switches power out to various sensors, actuators and solenoids in the fuel sys- tem.
- Page 434 DTC 686-Relay Control Ground Short Step Action Value(s) Did you perform the On-Board (OBD) System Go to Step Go to OBD Check? System Check Sec- tion Go to Step Intermittent Key ON, DST connected in the System Data problem mode Go to Inter- Clear DTC 686 mittent...
- Page 435 DTC 687-Relay Coil Short to Power (SPN 1485:FMI 3) Conditions for Setting the DTC Power relay check Check Condition-Key ON Fault Condition-Relay coil shorted to power Circuit Description The power relay switches power out to various sensors, actuators and solenoids in the fuel sys- tem.
- Page 436 DTC 687-Relay Coil Short to Power Step Action Value(s) Did you perform the On-Board (OBD) System Go to Step Go to OBD Check? System Check Sec- tion Go to Step Go to Step DST connected and in the system data mode Key OFF Remove the power relay from the fuse block Using a DVOM check the resistance of the...
- Page 437 Step Action Value(s) Go to Step Replace the ECM Is the replacement complete? System OK Remove all test equipment except the DST. Go to OBD System Connect any disconnected components, fus- Check es, etc. Using the DST clear DTC information from the ECM.
- Page 438 DTC 1111-Fuel Rev Limit (SPN 515:FMI 16) Conditions for Setting the DTC Fuel Rev Limit Check Condition-Engine Running Fault Condition-Engine rpm greater than set limit MIL-ON during active fault Circuit Description This fault will set anytime the engine rpm exceeds the specified speed settings in the cali- bration.
- Page 439 DTC 1111-Fuel Rev Limit Step Action Value(s) Did you perform the On-Board (OBD) System Go to Step Go to OBD Check? System Check Sec- tion Go to Step Go to Step Key ON, Engine OFF DST in Active Fault Mode Are any other DTC codes present with DTC 1111? Go to Step...
- Page 440 DTC 1112-Spark Rev Limit (SPN 515: FMI 0) Conditions for Setting the DTC Spark Rev Limit Check Condition-Engine running Fault Condition-Engine rpm greater than set limit MIL-ON during active fault Engine Shut Down Circuit description This fault will set anytime the engine rpm exceeds the specified speed settings installed in the calibration.
- Page 441 DTC 1112-Spark Rev Limit Step Action Value(s) Did you perform the On-Board (OBD) System Go to Step Go to OBD Check? System Check Sec- tion Go to Step Go to Step Key ON, Engine OFF DST connected Are any other DTC codes present with DTC 1112? Go to Step Diagnose any other DTC codes before pro-...
- Page 442 DTC 1121 FPP 1 And 2 Redundancy Lost (SPN 91: FMI 31) C012 5 volts LT GRN/RED FPP 1 Signal DK BLU/ORN FPP 1 Sensor Ground BLK/LT GRN 5 volts LT GRN/PPL FPP 2 Signal PPL/YEL FPP 2 Sensor Ground LT GRN/BLK Conditions for Setting the DTC Foot pedal position sensor 1 and 2...
- Page 443 DTC-1121 FPP 1 And 2 Redundancy Lost Step Action Value(s) Did you perform the On-Board (OBD) System Go to Step Go to OBD Check? System Check Go to Step Go to Step Diagnose any other lower numerical value codes that may be present first Did this resolve the problem? Go to Step Go to Step...
- Page 444 DTC 1151-Closed Loop Multiplier High LPG (SPN 520206:FMI 0) Conditions for Setting the DTC Heated Oxygen Sensor Check Condition-Engine running Fault Condition-Closed Loop multiplier out of range (greater than 35%) MIL-ON Circuit description The EGO sensor is used to determine if the fuel flow to the engine is correct by measuring the oxy- gen content in the exhaust gas.
- Page 445 DTC 1151-Closed Loop High LPG Step Action Value(s) Go to Step Go to Step Perform the On-Board (OBD) System Check? Are any other DTCs present? Visually and physically check the following items: Go to Step Go to Step The air intake duct for being collapsed or re- stricted The air filter for being plugged System power fuses are good and in the...
- Page 446 Step Action Value(s) Repair the Go to Step Using a high impedance DVOM check for shorted circuit continuity between EGO 1 connector signal as necessary. ground pin A and EGO 1 signal pin B. Refer to Wir- Do you have continuity? ing Repairs in Engine Elec- trical.
- Page 447 DTC 1152-Closed Loop Multiplier Low LPG (SPN 520206:FMI 1) Conditions for Setting the DTC Heated Oxygen Sensor Functional Fault-Closed Loop multiplier out of range (at limit of -35%) MIL Disabled Circuit Description The EGO 1 sensor is used to determine if the fuel flow to the engine is correct by measuring the oxy- gen content in the exhaust gas.
- Page 448 DTC 1152 –Closed Loop Low LPG Step Action Value(s) Go to Step Go to Step Perform the On-Board (OBD) System Check? Are any other DTCs present? Visually and physically check the following items: Go to Step Go to Step The air intake duct for being collapsed or re- stricted The air filter for being plugged The EGO sensor installed securely and the...
- Page 449 DTC 1155-Closed Loop Multiplier High Gasoline (SPN 520204 :FMI 0) Conditions for Setting the DTC Heated Oxygen Sensor Check Condition-Engine running Fault Condition-Closed Loop multiplier out of range (greater than 35%) MIL-ON Circuit description The EGO sensor is used to determine if the fuel flow to the engine is correct by measuring the oxy- gen content in the exhaust gas.
- Page 450 DTC 1155-Closed Loop Multiplier High Gasoline Step Action Value(s) Go to Step Go to Step Perform the On-Board (OBD) System Check? Are any other DTCs present? Visually and physically check the following items: Go to Step Go to Step The air intake duct for being collapsed or re- stricted The air filter for being plugged System power fuses are good and in the...
- Page 451 Step Action Value(s) Repair the Go to Step Using a high impedance DVOM check for shorted circuit continuity between EGO 1 connector signal as necessary. ground pin C and EGO 1 signal pin A Refer to Wir- Do you have continuity? ing Repairs in Engine Elec- trical.
- Page 452 DTC 1156-Adaptive Learn Low (Gasoline) (SPN 520204:FMI 1) Conditions for Setting the DTC Heated Oxygen Sensor Check Condition-Engine running Fault Condition-Adaptive multiplier out of range greater than -30% MIL-ON Circuit Description The EGO1 sensor is used to determine if the fuel flow to the engine is correct by measuring the oxygen content in the exhaust gas.
- Page 453 DTC 1156-Adaptive Learn Low (Gasoline) Step Action Value(s) Go to Step Go to Step Perform the On-Board (OBD) System Check? Are any other DTCs present? Visually and physically check the following items: Go to Step Go to Step The air intake duct for being collapsed or re- stricted The air filter for being plugged The EGO sensor is installed securely and the...
- Page 454 DTC 1161-Adaptive Learn High LPG (SPN 520202:FMI 0) Conditions for Setting the DTC Heated Oxygen Sensor Check Condition-Engine Running Fault Condition-Adaptive multiplier out of range greater than 30% MIL-ON Circuit Description The EGO 1 sensor is used to determine if the fuel flow to the engine is correct by measuring the oxy- gen content in the exhaust gas.
- Page 455 DTC 1161 Adaptive Learn High LPG Step Action Value(s) Go to Step Go to Step Perform the On-Board (OBD) System Check? Are any other DTCs present? Visually and physically check the following items: Go to Step Go to Step The air intake duct for being collapsed or re- stricted The air filter for being plugged System power fuses are good and in the...
- Page 456 Step Action Value(s) Repair the Go to Step Using a high impedance DVOM check for shorted circuit continuity between EGO 1 connector signal as necessary. ground pin C and EGO 1 signal pin A Refer to Wir- Do you have continuity? ing Repairs in Engine Elec- trical.
- Page 457 DTC 1162-Adaptive Learn Low (LPG) (SPN 520202:FMI 1) Conditions for Setting the DTC Heated Oxygen Sensor Check Condition-Engine running Fault Condition-Adaptive multiplier out of range greater than -30% MIL-ON Circuit Description The EGO1 sensor is used to determine if the fuel flow to the engine is correct by measuring the oxygen content in the exhaust gas.
- Page 458 DTC 1162-Adaptive Learn Low LPG Step Action Value(s) Go to Step Go to Step Perform the On-Board (OBD) System Check? Are any other DTCs present? Visually and physically check the following items: Go to Step Go to Step The air intake duct for being collapsed or re- stricted The air filter for being plugged The EGO sensor is installed securely and the...
- Page 459 DTC 1165-LPG Catalyst Monitor (SPN 520213:FMI 10) Conditions for Setting the DTC • Catalyst Function • Check condition- Engine running • Fault condition- EGO 1 signal = EGO 2 signal for 100 updates • MIL- On during active fault and for 1 second after active fault •...
- Page 460 DTC 1171-EPR Pressure Higher Than Expected (SPN 520260:FMI 0) Conditions for Setting the DTC EPR delivery pressure Check condition-Engine running or cranking MIL-ON during active fault Fault condition-EPR actual pressure greater than 1.5 inches above commanded pressure Adaptive disabled Closed loop disabled Circuit Description The EPR (Electronic Pressure Regulator) unit measures and controls the amount of fuel that is able to pass to the fuel mixer.
- Page 461 DTC 1171-EPR Pressure Higher Than Expected Step Action Value(s) Did you perform the On-Board (OBD) System Go to Step Go to OBD Check? System Check Sec- tion Go to Step Did you run the fuel pressure diagnostic test in Go to Step the fuel system diagnostic section with no prob- lems found? Go to Step...
- Page 462 DTC 1172-EPR Pressure Lower Than Expected (SPN 520260:FMI 1) Conditions for Setting the DTC EPR delivery pressure Check condition-Engine running or cranking MIL-ON during active fault Fault condition-EPR actual pressure less than 1.5 inches below commanded pressure Adaptive disabled Closed loop disabled Circuit Description The EPR (Electronic Pressure Regulator) unit measures and controls the amount of fuel that is able to pass to the fuel mixer.
- Page 463 DTC 1172-EPR Pressure Lower Than Expected Step Action Value(s) Did you perform the On-Board (OBD) System Go to Step Go to OBD Check? System Check Sec- tion Go to Step Did you run the fuel pressure diagnostic test in Go to Step the fuel system diagnostic section with no prob- lems found? Go to Step...
- Page 464 DTC 1173-EPR Communication Lost (SPN 520260:FMI 31) Conditions for Setting the DTC EPR CAN communication Check condition-Engine running or cranking MIL-On during active fault Fault condition-No packets received within 500 ms Adaptive disabled Circuit Description The EPR (Electronic Pressure Regulator) unit measures and controls the amount of fuel that is able to pass to the fuel mixer.
- Page 465 DTC 1173-EPR Communication Lost Step Action Value(s) Did you perform the On-Board (OBD) System Go to Step Go to OBD Check? System Check Sec- tion Intermittent Go to step (3) Key ON problem. Go DST (Diagnostic Scan Tool) connected in the to Intermittent system data mode Problem sec-...
- Page 466 Step Action Value(s) Go to step (9) Repair the Key OFF open circuit Disconnect the EPR connector C018 as necessary. Disconnect the ECM connector C001 Refer to wir- Using a DVOM check for continuity between ing repairs in EPR pin 5 and ECM pin 15 engine elec- Do you have continuity? trical...
- Page 467 Step Action Value(s) Remove all test equipment and reconnect Go to step System OK the DST. (16) Connect any disconnected components, fus- es, etc. Using the DST clear DTC information from the ECM. Turn the ignition OFF and wait 30 seconds. Start the engine and operate the vehicle to full operating temperature Observe the MIL...
- Page 468 DTC 1174-EPR Supply Voltage High (SPN 520260:FMI 3) Conditions for Setting the DTC EPR supply voltage Check condition-Engine running or cranking MIL-ON during active fault Fault condition-internal EPR supply voltage too high Adaptive disabled Closed loop disabled Circuit Description The EPR (Electronic Pressure Regulator) unit measures and controls the amount of fuel that is able to pass to the fuel mixer.
- Page 469 DTC 1174-EPR Voltage Supply High Step Action Value(s) Did you perform the On-Board (OBD) System Go to Step Go to OBD Check? System Check Sec- tion Repair the Go to Step DST connected and in the system data mode charging sys- Engine running Check the system battery voltage.
- Page 470 DTC 1175-EPR Supply Voltage Low (SPN 520260:FMI 4) Conditions for Setting the DTC EPR supply voltage Check condition-Engine running or cranking MIL-ON during active fault Fault condition-EPR internal supply voltage low Adaptive disabled Circuit Description The EPR (Electronic Pressure Regulator) unit measures and controls the amount of fuel that is able to pass to the fuel mixer.
- Page 471 DTC 1175-EPR Voltage Supply Low Step Action Value(s) Did you perform the On-Board (OBD) System Go to Step Go to OBD Check? System Check Sec- tion Repair the Go to Step DST connected and in the system data charging sys- mode Engine running Check the system battery voltage.
- Page 472 Step Action Value(s) Less than Go to Step Repair the Key OFF 0.5 ohms poor EPR Disconnect the ECM connector C001 power ground Using a DVOM check the resistance reading circuit. See between EPR connector pin 6 and ECM wiring har- connector pin 69 and 81.
- Page 473 DTC 1176-EPR Internal Actuator Fault (SPN 520260:FMI 12) Conditions for Setting the DTC EPR internal actuator test Check condition-Engine running or cranking MIL-ON during active fault Fault condition-Failed actuator Adaptive disabled Circuit Description The EPR (Electronic Pressure Regulator) unit measures and controls the amount of fuel that is able to pass to the fuel mixer.
- Page 474 DTC 1176-EPR Internal Actuator Fault Step Action Value(s) Did you perform the On-Board (OBD) System Go to Step Go to OBD Check? System Check Sec- tion Go to Step Go to Step DST connected and in the system data mode. Check for any other current or active DTCs Does the DST show any other codes set? Go to Step...
- Page 475 DTC 1177-EPR internal Circuitry Fault (SPN 520260:FMI 12) Conditions for Setting the DTC EPR internal circuitry test Check condition-Engine running or cranking MIL-ON during active fault Fault condition- Adaptive disabled Circuit Description The EPR (Electronic Pressure Regulator) unit measures and controls the amount of fuel that is able to pass to the fuel mixer.
- Page 476 DTC 1177-EPR Internal Circuitry Failure Step Action Value(s) Did you perform the On-Board (OBD) System Go to Step Go to OBD Check? System Check Sec- tion Go to Step Go to Step DST connected and in the system data mode Check for any other current or active DTCs Does the DST show any other codes set? Go to Step...
- Page 477 DTC 1178-EPR Internal Communication Error (SPN 520260:FMI 12) Conditions for Setting the DTC EPR internal communication test Check condition-Engine running or cranking MIL-ON during active fault Fault condition- Adaptive disabled Circuit Description The EPR (Electronic Pressure Regulator) unit measures and controls the amount of fuel that is able to pass to the fuel mixer.
- Page 478 DTC 1178-EPR Internal Comm Fault Step Action Value(s) Did you perform the On-Board (OBD) System Go to Step Go to OBD Check? System Check Sec- tion Go to Step Go to Step DST connected and in the system data mode. Check for any other current or active DTCs Does the DST show any other codes set? Go to Step...
- Page 479 DTC 1511 – Auxiliary Analog PU 1 High Voltage (SPN 520216:FMI 3) Conditions for setting the DTC Voltage on Aux Analog PU1 is 5.0v or greater for longer than 1 second Wiring issue between Vehicle Interface Connector 1 (VIC 1) and pin 46 at ECM Wiring issue between VIC 1 and OEM supplied speed computer MIL light on during fault Power Derate 2 enabled...
- Page 480 DTC 1511 – Auxiliary Analog PU 1 High Voltage STEP Action Value(s) Did you perform the On-Board (OBD) System Check? Go to Step (2) Go to OBD System Check Section Intermittent problem Key ON Go to Intermittent DST (Diagnostic Scan Tool) connected 4.9v or Go to Step (3) section...
- Page 481 DTC 1552: AUX digital 1 low voltage (SPN 520222: FMI 04) Conditions for setting the DTC Engine RPM between 60 rpm and 220 rpm Voltage at Aux Dig 1 at the ECM (Pin 42) is less than 4 volts for greater than 1 second Check Condition- Engine cranking Circuit Description Aux Digital 1 is used to detect when the operator is cranking the engine by monitoring the key switch...
- Page 482 DTC 1552: AUX digital 1 low voltage (SPN 520222: FMI 04) STEP Action Value(s) Did you perform the On-Board Go to Go to OBD (OBD) System Check? Step (2) System Check Sec- tion Engine Cranking ECM De- DST (Diagnostic Scan fective, Tool) connected on the Raw volts Go to...
- Page 483 DTC 1612-RTI 1 Loss (SPN 629:FMI 31) Microprocesso Microprocessor Flash Conditions for Setting the DTC Engine Control Module Check Condition-Key on Fault Condition-Internal microprocessor error MIL-ON Adaptive-Disabled for the remainder of the key-ON cycle Circuit Description The ECM has several internal checks that must be satisfied each time an instruction is executed. Several different things can happen within the microprocessor that will cause this fault.
- Page 484 DTC 1612-RT 1 Loss Step Action Value(s) Did you perform the On-Board (OBD) System Go to Step Go to OBD Check? System Check Sec- tion Go to Step Intermittent Key ON, Engine Running problem DST (Diagnostic Scan Tool) connected in Go to Inter- System Data Mode mittent...
- Page 485 DTC 1613-RTI 2 Loss (SPN 629:FMI 31) Microprocesso Microprocessor Flash Conditions for Setting the DTC Engine Control Module Check Condition-Key on Fault Condition-Internal microprocessor error MIL-ON Adaptive-Disabled for the remainder of the key-ON cycle Circuit Description The ECM has several internal checks that must be satisfied each time an instruction is exe- cuted.
- Page 486 DTC 1613-RTI 2 Loss Step Action Value(s) Did you perform the On-Board (OBD) System Go to Step Go to OBD Check? System Check Sec- tion Go to Step Intermittent Key ON, Engine Running problem DST (Diagnostic Scan Tool) connected in Go to Inter- System Data Mode mittent...
- Page 487 DTC 1614-RTI 3 Loss (SPN 629:FMI 31) Microprocesso Microprocessor Flash Conditions for Setting the DTC Engine Control Module Check Condition-Key on Fault Condition-Internal microprocessor error MIL-ON Adaptive-Disabled for the remainder of the key-ON cycle Circuit Description The ECM has several internal checks that must be satisfied each time an instruction is executed. Several different things can happen within the microprocessor that will cause this fault.
- Page 488 DTC 1614-RTI 3 Loss Step Action Value(s) Did you perform the On-Board (OBD) System Go to Step Go to OBD Check? System Check Sec- tion Go to Step Intermittent Key ON, Engine Running problem DST (Diagnostic Scan Tool) connected in Go to Inter- System Data Mode mittent...
- Page 489 DTC 1615-A/D Loss (SPN 629:FMI 31) Microprocesso Microprocessor Flash Conditions for Setting the DTC Engine Control Module Check Condition-Key on Fault Condition-Internal microprocessor error MIL-ON Adaptive-Disabled for the remainder of the key-ON cycle Circuit Description The ECM has several internal checks that must be satisfied each time an instruction is executed. Several different things can happen within the microprocessor that will cause this fault.
- Page 490 DTC 1615-A/D Loss Step Action Value(s) Did you perform the On-Board (OBD) System Go to Step Go to OBD Check? System Check Sec- tion Go to Step Intermittent Key ON, Engine Running problem DST (Diagnostic Scan Tool) connected in Go to Inter- System Data Mode mittent Clear system fault code...
- Page 491 DTC 1616-Invalid Interrupt (SPN 629:FMI 31) Microprocesso Microprocessor Flash Conditions for Setting the DTC Engine Control Module Check Condition-Key on Fault Condition-Internal microprocessor error MIL-ON Adaptive-Disabled for the remainder of the key-ON cycle Circuit Description The ECM has several internal checks that must be satisfied each time an instruction is executed. Several different things can happen within the microprocessor that will cause this fault.
- Page 492 DTC 1616-Invalid Interrupt Step Action Value(s) Did you perform the On-Board (OBD) System Go to Step Go to OBD Check? System Check Sec- tion Go to Step Intermittent Key ON, Engine Running problem DST (Diagnostic Scan Tool) connected in Go to Inter- System Data Mode mittent Clear system fault code...
- Page 493 DTC 1625 - J1939 Shutdown Request (SPN 1384:FMI 31) Conditions for Setting the DTC Fault signal from OEM device Check Condition-Engine running MIL-ON Circuit description The OEM can connect to the J1939 circuit (CAN circuit) at the customer interface connector 2. The terminals are N and P and continue through the engine wire harness into the GCP header con- nector.
- Page 494 DTC 1626-CAN Tx Failure Conditions for Setting the DTC CAN Tx Check Condition-Engine running Fault Condition-CAN Tx error 120 packets lost within 1 second MIL-ON Circuit description The CAN bus (controller area network) is used by the ECM to communicate with other digital de- vices used throughout the fuel system.
- Page 495 DTC 1626-CAN Tx Failure Step Action Value(s) Did you perform the On-Board (OBD) System Go to Step Go to OBD Check? System Check Sec- tion Go to Step Intermittent Key ON, Engine Running problem DST (Diagnostic Scan Tool) connected in Go to Inter- System Data Mode mittent...
- Page 496 Step Action Value(s) Remove all test equipment except the DST. System OK Go to OBD System Connect any disconnected components, fus- Check es, etc. Using the DST clear DTC information from the ECM. Turn the ignition OFF and wait 30 seconds. Start the engine and operate the vehicle to full operating temperature Observe the MIL...
- Page 497 DTC 1627-CAN Rx Failure (SPN 639:FMI 12) Conditions for Setting the DTC CAN Rx Check Condition-Engine running Fault Condition-CAN Rx error 120 packets lost within 1 second MIL-ON Circuit description The CAN bus (controller area network) is used by the ECM to communicate with other digital de- vices used throughout the fuel system.
- Page 498 DTC 1627-CAN Rx Failure Step Action Value(s) Did you perform the On-Board (OBD) System Go to Step Go to OBD Check? System Check Sec- tion Go to Step Intermittent Key ON, Engine Running problem DST (Diagnostic Scan Tool) connected in Go to Inter- System Data Mode mittent...
- Page 499 Step Action Value(s) Remove all test equipment except the DST. System OK Go to OBD System Connect any disconnected components, fus- Check es, etc. Using the DST clear DTC information from the ECM. Turn the ignition OFF and wait 30 seconds. Start the engine and operate the vehicle to full operating temperature Observe the MIL...
- Page 500 DTC 1628-CAN Address Conflict (SPN 639:FMI 13) Conditions for Setting the DTC CAN Rx Check Condition-Engine running Fault Condition-5 or more address conflict errors MIL-ON Circuit description The CAN bus (controller area network) is used by the ECM to communicate with other digital de- vices used throughout the fuel system.
- Page 501 DTC 1628-CAN Address Conflict Step Action Value(s) Did you perform the On-Board (OBD) System Go to Step Go to OBD Check? System Check Sec- tion Go to Step Intermittent Key ON, Engine Running problem DST (Diagnostic Scan Tool) connected in Go to Inter- System Data Mode mittent...
- Page 502 DTC 1644-MIL Control Ground Short (SPN 1213:FMI 4) Conditions for setting the DTC Check Condition-Key ON engine OFF Fault Condition-ECM MIL output shorted to ground MIL Command-ON Circuit Description The Spectrum Fuel system is equipped with OBD (On-Board Diagnostics). The system has a dash mounted MIL (Malfunction Indicator Lamp).
- Page 503 DTC 1644-MIL Control Ground Short Step Action Value(s) Did you perform the On-Board (OBD) System Go to Step Go to OBD Check? System Check Sec- tion Go to Step Intermittent Key ON, Engine Running problem DST (Diagnostic Scan Tool) connected in Go to Inter- System Data Mode mittent...
- Page 504 Step Action Value(s) Remove all test equipment except the DST. System OK Go to OBD System check Connect any disconnected components, fus- es, etc. Using the DST clear DTC information from the ECM. Turn the ignition OFF and wait 30 seconds. Start the engine and operate the vehicle to full operating temperature Observe the MIL...
- Page 505 DTC 1645-MIL Control Ground Short To Power (SPN 1213:FMI 3) Conditions for setting the DTC MIL check Check Condition-Key ON engine OFF Fault Condition-ECM MIL output shorted to voltage MIL Command-ON Circuit Description The Spectrum Fuel system is equipped with OBD (On-Board Diagnostics). The system has a dash mounted MIL (Malfunction Indicator Lamp).
- Page 506 DTC 1645-MIL Control Short to Power Step Action Value(s) Did you perform the On-Board (OBD) System Go to Step Go to OBD Check? System Check Sec- tion Go to Step Intermittent Key ON, Engine Running problem DST (Diagnostic Scan Tool) connected in Go to Inter- System Data Mode mittent...
- Page 507 Step Action Value(s) Remove all test equipment except the DST. System OK Go to OBD System check Connect any disconnected components, fus- es, etc. Using the DST clear DTC information from the ECM. Turn the ignition OFF and wait 30 seconds. Start the engine and operate the vehicle to full operating temperature Observe the MIL...
- Page 508 DTC 2111-Unable To Reach Lower TPS (SPN 51:FMI 7) Conditions for Setting the DTC Throttle Position Sensor Check Condition-Cranking or Running Fault Condition-Actual throttle position is 20% greater than the throttle command MIL-ON during active fault Engine shutdown Circuit Description Dual throttle Position Sensors are used within the throttle that use variable resistors to determine sig- nal voltage based on throttle plate position.
- Page 509 DTC 2111 Unable To Reach Lower TPS Step Action Value(s) Go to Step Go to OBD Did you perform the On-Board (OBD) System System Check Check? Section Go to Step Intermittent Key ON, Engine OFF problem DST (Diagnostic Scan Tool) connected in Go to Intermit- DBW (Drive By Wire) test mode tent section...
- Page 510 Step Action Value(s) Repair the Go to Step Inspect the throttle wire harness connector circuit as (12) terminals for damage, corrosion or contami- necessary. nation Refer to Wir- Did you find the problem? ing Repairs in Engine Elec- trical. Go to Step Replace throttle (13) Is the replacement complete?
- Page 511 DTC 2112-Unable To Reach Higher TPS (SPN 51:FMI 7) Conditions for Setting the DTC Throttle Position Sensor Check Condition-Cranking or Running Fault Condition-Actual throttle position is 20% less than the throttle command MIL-ON during active fault Engine shutdown Circuit Description Dual throttle Position Sensors are used within the throttle that use variable resistors to determine signal voltage based on throttle plate position.
- Page 512 DTC 2112-Unable To Reach Higher TPS Step Action Value(s) Did you perform the On-Board (OBD) System Go to Step Go to OBD Check? System Check Section Go to Step Intermittent Key ON, Engine OFF problem DST (Diagnostic Scan Tool) connected in Go to Intermit- DBW (Drive By Wire) test mode tent section...
- Page 513 Step Action Value(s) Remove all test equipment except the DST. System OK Go to OBD System Check Connect any disconnected components, fus- es, etc. Using the DST clear DTC information from the ECM. Turn the ignition OFF and wait 30 seconds. Start the engine and operate the vehicle to full operating temperature Observe the MIL...
- Page 514 DTC 2121-FPP 1 Lower Than FPP 2 (SPN 91:FMI 18) C012 5 volts LT GRN/RED FPP 1 Signal DK BLU/ORN FPP 1 Sensor Ground BLK/LT GRN 5 volts LT GRN/PPL FPP 2 Signal PPL/YEL FPP 2 Sensor Ground LT GRN/BLK Conditions for Setting the DTC Foot pedal position sensor 1 and 2 Check Condition-Key ON...
- Page 515 DTC 2121 FPP 1 Lower than FPP 2 Step Action Value(s) Did you perform the On-Board (OBD) System Go to Step Go to OBD Check? System Check Sec- tion Go to Step Go to Step DST (Diagnostic Scan Tool) connected and in the system data mode Clear DTC 2126 Start and run the engine to full operating...
- Page 516 Step Action Value(s) Repair the Go to Step Using a DVOM check for continuity between signal shorted (10) ECM connector signal pin 9 and engine to ground cir- ground cuit as Do you have continuity? required. See wiring har- ness repair section Inspect FPP connector and ECM connector Repair the...
- Page 517 DTC 2122-FPP 1 High Voltage (SPN 91:FMI 3) FPP 1 C012 5 volts LT GRN/RED Signal DK BLU/ORN Sensor Ground BLK/LT GRN *Check OEM chassis wiring diagram for specific pin numbers and wire colors Conditions for Setting the DTC Foot Pedal Position Check Condition-Key On Fault Condition-FPP1 sensor voltage exceeds 4.800 volts MIL-On during active fault...
- Page 518 DTC 2122 FPP 1 Voltage High Step Action Value(s) Did you perform the On-Board (OBD) System Go to Step Go to OBD Check? System Check Sec- tion Go to Step Greater than Go to Step Key ON, Engine OFF 4.800 volts DST (Diagnostic Scan Tool) connected in System Data Mode Does the DST display FPP voltage of 4.800 volts...
- Page 519 Step Action Value(s) Remove all test equipment except the DST. System OK Go to OBD System Connect any disconnected components, fus- Check es, etc. Using the DST clear DTC information from the ECM. Turn the ignition OFF and wait 30 seconds. Start the engine and operate the vehicle to full operating temperature Observe the MIL...
- Page 520 DTC 2123-FPP 1 Low Voltage (SPN 91:FMI 4) FPP 1 C012 5 volts LT GRN/RED Signal DK BLU/ORN Sensor Ground BLK/LT GRN *Check OEM chassis wiring diagram for specific pin numbers and wire colors Conditions for Setting the DTC Foot Pedal Position Check Condition-Key On Fault Condition-FPP sensor voltage less than 0.200 MIL-On during active...
- Page 521 DTC 2123 FPP 1 Voltage Low Step Action Value(s) Did you perform the On-Board (OBD) System Go to Step Go to OBD Check? System Check Sec- tion Go to Step 0.200 volts Go to Step Key ON, Engine OFF or less DST (Diagnostic Scan Tool) connected in System Data Mode Does the DST display FPP 1 voltage of 0.200...
- Page 522 Step Action Value(s) Repair the Go to step Key ON signal shorted (10) Using a DVOM check for continuity between to ground cir- ECM connector signal pin 9 and engine cuit as ground required. See Do you have continuity? wiring har- ness repair section Inspect FPP1, C012 and ECM connectors for...
- Page 523 DTC 2126-FPP 1 Higher Than FPP 2 (SPN 91:FMI 16) C012 5 volts LT GRN/RED FPP 1 Signal DK BLU/ORN FPP 1 Sensor Ground BLK/LT GRN 5 volts LT GRN/PPL FPP 2 Signal PPL/YEL FPP 2 Sensor Ground LT GRN/BLK Conditions for Setting the DTC Foot pedal position sensor 1 and 2 Check Condition-Key ON...
- Page 524 DTC 2126 FPP 1 Higher Than FPP 2 Step Action Value(s) Did you perform the On-Board (OBD) System Go to Step Go to OBD Check? System Check Sec- tion Go to Step Go to Step DST (Diagnostic Scan Tool) connected in System Data Mode Clear DTC 2126 Start the engine and run to full operating...
- Page 525 Step Action Value(s) Remove all test equipment except the DST. System OK Go to OBD System Connect any disconnected components, fus- Check es, etc. Using the DST clear DTC information from the ECM. Turn the ignition OFF and wait 30 seconds. Start the engine and operate the vehicle to full operating temperature Observe the MIL...
- Page 526 DTC 2127-FPP 2 Low Voltage (SPN 29:FMI 4) FPP 2 C012 5 volts LT GRN/PPL FPP 2 Signal PPL/YEL LT GRN/BLK Sensor Ground *Check OEM chassis wiring diagram for specific pin numbers and wire colors Conditions for Setting the DTC Foot Pedal Position Check Condition-Key On Fault Condition-FPP sensor voltage less than 0.400...
- Page 527 DTC 2127 FPP 2 Voltage Low Step Action Value(s) Did you perform the On-Board (OBD) System Go to Step Go to OBD Check? System Check Sec- tion Go to Step Less than Go to Step Key ON, Engine OFF 0.400 volts DST (Diagnostic Scan Tool) connected in System Data Mode Does the DST display FPP 2 voltage of less than...
- Page 528 Step Action Value(s) Repair the Go to step Using a DVOM check for continuity between signal shorted (10) ECM connector signal pin 10 and engine to ground cir- ground cuit as Do you have continuity? required. See wiring har- ness repair section Inspect FPP connector C012 and ECM con- Repair the...
- Page 529 DTC 2128-FPP 2 High Voltage (SPN 29:FMI 3) FPP 2 C012 5 volts LT GRN/PPL FPP 2 Signal PPL/YEL Sensor Ground LT GRN/BLK *Check OEM chassis wiring diagram for specific pin numbers and wire colors Conditions for Setting the DTC Foot pedal position sensor 2 Check Condition-Key On Fault Condition-FPP2 sensor voltage exceeds 4.800 volts...
- Page 530 DTC 2128 FPP 2 Voltage High Step Action Value(s) Did you perform the On-Board (OBD) System Go to Step Go to OBD Check? System Check Sec- tion Go to Step 4.800 volts Go to Step Key ON, Engine OFF or greater DST (Diagnostic Scan Tool) connected in System Data Mode Does the DST display FPP voltage of 4.800 volts...
- Page 531 Step Action Value(s) System OK Go to OBD Remove all test equipment except the DST. System Connect any disconnected components, fus- Check es, etc. Using the DST clear DTC information from the ECM. Turn the ignition OFF and wait 30 seconds. Start the engine and operate the vehicle to full operating temperature Observe the MIL...
- Page 532 DTC 2135: TPS1/2 simultaneous voltages out-of-range (SPN 51:FMI 31) Conditions for Setting the DTC Throttle Position Sensor 1 & 2 Check Condition-Key ON Fault Condition-TPS 1 20% higher than TPS2 MIL-ON for remainder of key on cycle Engine shutdown Circuit Description Dual throttle Position Sensors are used within the throttle that use variable resistors to determine signal voltage based on throttle plate position.
- Page 533 DTC 2135: TPS1/2 simultaneous voltages out-of-range Step Action Value(s) Did you perform the On-Board (OBD) System Go to Step Go to OBD Check? System Check Section Go to Step Intermittent Key ON, Engine OFF problem DST (Diagnostic Scan Tool) connected in Go to Intermit- System Data Mode tent section...
- Page 534 Step Action Value(s) Go to Step Repair the Using a DVOM check for continuity between (10) open circuit as throttle connector signal ground pin 2 and necessary. ECM connector signal ground pin 3 Refer to Wir- Do you have continuity between them? ing Repairs in Engine Elec- trical.
- Page 535 DTC 2229-BP High Pressure (SPN 108:FMI 0) Conditions for Setting the DTC Barometric Pressure Check Condition-Key ON Fault Condition-BP greater than 16 psia MIL-ON for active fault Adaptive-Disabled Circuit Description The BP (Barometric Pressure) is estimated from the TMAP sensor. The barometric pressure val- ue is used for fuel and airflow calculations.
- Page 536 DTC 2229-BP High Pressure Step Action Value(s) Did you perform the On-Board (OBD) System Go to Step Go to OBD Check? System Check Sec- tion Go to Step Intermittent Key ON problem DST (Diagnostic Scan Tool) connected in Go to Inter- System Data Mode mittent Does DST display MAP pressure of 16 psia or...
- Page 537 Definitions...
- Page 538 Air Valve Vacuum (AVV): The vacuum signal tak- CNG: Compressed Natural Gas. en from below the air valve assembly and above CKP: Crankshaft Position Sensor the throttle butterfly valve. CMP: Camshaft Position Sensor ADP: Adaptive Digital Processor. Conductor: A material, normally metallic, that Air/Fuel Ratio: The amount or balance of air and permits easy passage of electricity.
- Page 539 Ethanol: Grain alcohol (C OH), generally pro- Hydrocarbon: A chemical compound made up of duced by fermenting starch or sugar. hydrogen and carbon (HC). Gasoline and almost Evaporative Emissions Controls: An automotive all other fuels are hydrocarbons. emission control system designed to reduce hy- Hydrostatic Relief Valve: A pressure relief device drocarbon emissions by trapping evaporated fuel installed in the liquid LPG hose on a LPG fuel...
- Page 540 (mercury) = 27.72” H O (water column). At sea Ozone: A radical oxygen module (O ) that is found level atmospheric pressure is 29.92” Hg. in the upper atmosphere and filters out ultraviolet Methanol: Known as wood alcohol (CH OH), a radiation from the sun.
- Page 541 Spark Line: The portion of an oscilloscope pattern Technical Service Bulletin. TSB: that represents the time during which the air/fuel ULEV: Ultra Low Emission Vehicle. mixture is being burned in the combustion cham- Universal Serial Bus. A plug or interface sup- USB: ber.
- Page 542 ZAMBONI® 3L GM COOLANT FILLING AND PURGING PROCEDURE IT IS IMPORTANT TO BLEED THE COOLING SYSTEM FROM THE UNDERSIDE OF THE THERMOSTAT HOUSING TO BE SURE ALL AIR IS OUT PRIOR TO WARM-UP. CAUTION: Make sure engine is cool before starting!
- Page 543 IMPORTANT NOTES: A properly purged cooling system will yield a warm upper radiator hose (gasoline & LPG engine) and a warm LPG regulator (LPG engine only). If the upper radiator hose and/or LPG regulator are not warm to the touch after the engine has run for 5-8 minutes, the system may still contain air. It may be necessary to repeat the above steps.
- Page 546 ACCESSORY HYDRAULIC COMPONENTS...
- Page 547 D Series ™ Gear Motors OpenCircuitGear MEMBER OF THE SAUER-DANFOSS GROUP Service Manual...
- Page 548 D Series Gear Motors ™ Service Manual OpenCircuitGear MEMBER OF THE SAUER-DANFOSS GROUP History of Revisions Table of Revisions Date Page Changed Rev. November 2010 Turolla colors March 2010 Added shaft seal kit number February 2010 last Fix Osaka address April 2009 First edition ©...
- Page 549 D Series Gear Motors ™ Service Manual Contents OpenCircuitGear MEMBER OF THE SAUER-DANFOSS GROUP Introduction Overview ................................4 Warranty ................................4 Safety Precautions............................4 Unintended Machine Movement ......................4 Flammable Cleaning Solvents ......................4 Fluid Under Pressure ..........................4 Personal Safety ............................4 Hazardous Material ..........................
-
Page 550: Overview
D Series Gear Motors ™ Service Manual Introduction OpenCircuitGear MEMBER OF THE SAUER-DANFOSS GROUP Overview This manual includes instructions for the installation, maintenance, and minor repair of D Series Motors. It includes a description of the units and their individual components, troubleshooting information, and minor repair procedures. -
Page 551: Symbols Used In Sauer-Danfoss Literature
D Series Gear Motors ™ Service Manual Introduction OpenCircuitGear MEMBER OF THE SAUER-DANFOSS GROUP Symbols Used in Sauer- Tip, helpful suggestion Danfoss literature CAUTION may result in damage to Lubricate with clean hydraulic fluid product or property ... -
Page 552: General Description
D Series Gear Motors ™ Service Manual Introduction OpenCircuitGear MEMBER OF THE SAUER-DANFOSS GROUP General Description A Sauer-Danfoss electrohydraulic proportional fan drive system consists of a combination of fixed or variable displacement open circuit hydraulic pump and an D gear motor with or without proportional relief valve or standard relief valve and check valve to control fan speed. -
Page 553: Design
D Series Gear Motors ™ Service Manual Introduction OpenCircuitGear MEMBER OF THE SAUER-DANFOSS GROUP CANBUS J1939 System Illustration Microcontroller (PLUS+1 RESERVOIR Filter Temperature sensors D Series D Series gear pump gear motor DIESEL ENGINE P107 929E Design Sauer-Danfoss fixed displacement open circuit gear motors convert hydraulic power into support the shaft. -
Page 554: Fluid Specifications
D Series Gear Motors ™ Service Manual Technical Specifications OpenCircuitGear MEMBER OF THE SAUER-DANFOSS GROUP Technical Specifications Technical data for D Motors Ratings Units /rev 17.0 19.0 20.5 22.5 25.4 29.0 31.8 36.1 38.0 41.0 45.0 Displacement /rev 1.04 1.16 1.25 1.37 1.55... -
Page 555: Pressure
D Series Gear Motors ™ Service Manual Operating Parameters OpenCircuitGear MEMBER OF THE SAUER-DANFOSS GROUP Overview Definitions of the D Series motors operating parameters appear below. Consult Sauer- Danfoss technical support for applications running outside of these parameters. Pressure Peak pressure Pressure vs. -
Page 556: Temperature And Viscosity
D Series Gear Motors ™ Service Manual Operating Parameters OpenCircuitGear MEMBER OF THE SAUER-DANFOSS GROUP Temperature and Viscosity Use petroleum/mineral-based fluids. Temperature High temperature limits apply at the inlet port of the motor. The motor should run at or below the maximum continuous temperature. ability of oil to flow and transmit power. -
Page 557: Pressure Measurements
D Series Gear Motors ™ Service Manual Pressure Measurements OpenCircuitGear MEMBER OF THE SAUER-DANFOSS GROUP Required Tools You can perform the service procedures described in this manual using common protect gauges. Port locations and Gauge For economical reasons, the motors do not contain any designated gauge installation Installation ports. - Page 558 D Series Gear Motors ™ Service Manual Initial Start-Up Procedures OpenCircuitGear MEMBER OF THE SAUER-DANFOSS GROUP General Follow this procedure when starting-up a new motor installation or when restarting an installation in which the motor has been removed. Prior to installing the motor, inspect for damage incurred during shipping. Make certain all system components (reservoir, hoses, valves, fittings, heat exchanger, etc.) are clean prior to filling with fluid.
- Page 559 D Series Gear Motors ™ Service Manual Fluid and Filter Maintenance OpenCircuitGear MEMBER OF THE SAUER-DANFOSS GROUP Recommendations Gear motors are manufactured using a process known as cut-in, during which the gears, or replacement of some internal components will modify their critical dimensions. or replacement of internal components may be detrimental to motor efficiency.
-
Page 560: Fan Speed Not Controlled By Current To Coil
D Series Gear Motors ™ Service Manual Troubleshooting OpenCircuitGear MEMBER OF THE SAUER-DANFOSS GROUP Fan Speed Locked High at High Engine Speed (cold conditions) To determine minimum fan speed at high engine rpm, connect coil to battery voltage to lock coil in open position. Follow steps 1 - 3. -
Page 561: Fan Does Not Turn
D Series Gear Motors ™ Service Manual Troubleshooting OpenCircuitGear MEMBER OF THE SAUER-DANFOSS GROUP Fan Does Not Turn Item Description Action Not enough flow through If engine is left at idle at start-up of machine, there is not motor. enough flow or pressure to turn fan motor. the fan begins to turn, and continues to turn when the engine returns to idle, the pump and motor are OK. -
Page 562: Fan Too Slow At High Engine Rpm
D Series Gear Motors ™ Service Manual Troubleshooting OpenCircuitGear MEMBER OF THE SAUER-DANFOSS GROUP Fan Too Slow at High Engine rpm Disconnect coil to send fan to maximum speed at high engine rpm. If problem remains, follow steps 1 thru 8 below. If fan attains maximum speed, follow step 9 . -
Page 563: System Noise
D Series Gear Motors ™ Service Manual Troubleshooting OpenCircuitGear MEMBER OF THE SAUER-DANFOSS GROUP System Noise Item Description Action Aeration of the oil Low oil in reservoir Find location where air is entering into the system and fix. Air in system decreases efficiency of units and controls. Problem is often found in inlet line to pump. - Page 564 D Series Gear Motors ™ Service Manual OpenCircuitGear MEMBER OF THE SAUER-DANFOSS GROUP Shaft Seal Replacement Replacing the shaft seal awl, (2) sheet metal screws, (2) wire Dust cutting pliers, installation sleeve (PVC protector tube approximately 0.5 mm [0.02 in] smaller than flange hole diameter), wide Seal cellophane packaging tape, and grease.
- Page 565 D Series Gear Motors ™ Service Manual OpenCircuitGear MEMBER OF THE SAUER-DANFOSS GROUP Shaft Seal Replacement (continued) P107 973E 6. Using side cutting wire pliers, remove the seal by prying it out as shown. Take care not to damage the shaft. 7.
- Page 566 D Series Gear Motors ™ Service Manual OpenCircuitGear MEMBER OF THE SAUER-DANFOSS GROUP Shaft Repair Parts PB shaft option TK shaft option TK key PB key P107 964E Hexagon socket 15/16 inch P107 969E Description Part number Item Description Part number Shaft nut (5/8-18 UNF) 163M2013 163M4001 Tapered 1:8...
- Page 567 D Series Gear Motors ™ Service Manual OpenCircuitGear MEMBER OF THE SAUER-DANFOSS GROUP Coil Replacement specifications. Remove the coil 1. Disconnect the electrical connection from the coil. Install the coil 1. Install new coil. 2. Install O-ring on the valve stem. Warning 4.
- Page 568 D Series Gear Motors ™ Service Manual OpenCircuitGear MEMBER OF THE SAUER-DANFOSS GROUP Valves Proportional Relief Valve Hexagon 22 mm or 28 mm 12 point socket 26mm Anti-cavitation check valve Section A-A P107 965E Fixed Relief Valve Hexagon 22 mm or 28 mm [33 lbf.ft] Anti-cavitation check valve Section A-A...
- Page 569 D Series Gear Motors ™ Service Manual OpenCircuitGear MEMBER OF THE SAUER-DANFOSS GROUP Valves Valve Repair Parts (continued) Coil Proportional Fixed Relief Relief Valve Valve Pilot Seal kit Seal kit P107 968E Seal kit P107 967E Description Part number Description Part number Coil 12 VDC, P1, P2 11057054...
- Page 570 ™ OpenCircuitGear MEMBER OF THE SAUER-DANFOSS GROUP Our Products Turolla OpenCircuitGear™ Aluminum Gear Pumps Turolla OCG, with more than 60 years of experience in designing and manufacturing gear pumps, gear motors and fan drive motors Aluminum Gear Motors of superior quality, is the ideal partner ensuring robustness and Cast Iron Gear Pumps reliability to your work functions.
- Page 571 ITEMID QTY_PER DESCRIPTION 163S8143 SERVICE KIT D-DUAL 104 & UP (D-MOD) SP494-51 TEST SPEC D PUMPS W / FLOW DIVIDER 0010 163D0023 PLATE, WEAR, D SERIES 0020 163D0024 PLATE, WEAR, D SERIES 0040 163D0069 COUPLING-SPLINED D, 1.75" 0050 163D2221 BODY, SAE "B", RH SPECIAL 0070 163D3208 GEAR PLATE, 125D...
- Page 572 HEREON ARE THE PROPERTY AND INVENTION OF Mode 525 Vert. A . Seria No. 8628-9940 PERMCO, INC. THIS PRINT IS FURNISHED WITH Mode 525 Hori . A . Seria No. 8628-9936 THE UNDERSTANDING THAT IT IS NOT TO BE TRANSFERRED, TRACED, REPRODUCED, STORED IN...
- Page 573 HYDRAULIC DRIVE COMPONENTS...
- Page 574 MAKING MODERN LIVING POSSIBLE Service Manual Series 40 M46 Variable Pumps powersolutions.danfoss.com...
- Page 575 Service Manual Series 40 M46 Variable Pumps Revision history Table of revisions Date Changed June 2014 Danfoss layout - add HC EDC Control October 2010 corrections to port location illustration March 2010 Fix Osaka address March 2009 added spool alignment illustration May 2008 Fixed the illustrations October 2007...
- Page 576 Service Manual Series 40 M46 Variable Pumps Contents Introduction Overview......................................5 Warranty......................................5 General instructions..................................5 Remove the unit..................................5 Keep it clean....................................5 Replace all O-rings and gaskets............................. 5 Safety precautions....................................6 Unintended machine movement............................6 Flammable cleaning solvents..............................6 Fluid under pressure.................................. 6 Personal safety.....................................
- Page 577 Service Manual Series 40 M46 Variable Pumps Contents Control Neutral Adjustment..............................25 Minor repair Standard procedures, removing the pump..........................28 Displacement limiter..................................28 Pressure filtration adapter................................29 Charge pump....................................30 Shaft seal, roller bearing and shaft replacement........................32 SCR valves......................................33 Charge pressure relief valve...............................34 Bypass valve.....................................
-
Page 578: Overview
Service Manual Series 40 M46 Variable Pumps Introduction Overview This manual includes information for the installation, maintenance, and minor repair of the Series 40 M46 pump. It includes a description of the unit and its individual components, troubleshooting information, and minor repair procedures. Performing minor repairs requires the unit to be removed from the vehicle/machine. -
Page 579: Safety Precautions
Service Manual Series 40 M46 Variable Pumps Introduction Safety precautions Always consider safety precautions before beginning a service procedure. Protect yourself and others from injury. Take the following general precautions whenever servicing a hydraulic system. Unintended machine movement Warning Unintended movement of the machine or mechanism may cause injury to the technician or bystanders. To protect against unintended movement, secure the machine or disable/disconnect the mechanism while servicing. -
Page 580: Symbols Used In Danfoss Literature
Service Manual Series 40 M46 Variable Pumps Introduction Symbols used in Danfoss literature WARNING may result in injury Tip, helpful suggestion CAUTION may result in damage to product or Lubricate with hydraulic fluid property Reusable part Apply grease / petroleum jelly Non-reusable part, use a new part Apply locking compound Non-removable item... -
Page 581: The System Circuit
Service Manual Series 40 M46 Variable Pumps Introduction The angle of the swashplate controls the volume of fluid displaced into the system. The servo piston sets swashplate angle. The pump control modulates servo piston position by varying differential pressure across the piston. Cross section view Gerotor Ball bearing... -
Page 582: Pump Schematic
Service Manual Series 40 M46 Variable Pumps Introduction System circuit diagram Reservoir Heat exchanger bypass Control handle Filter Displacement Heat control exchanger valve Variable Cylinder block displacement assembly motor Cylinder block assembly Charge relief valve Bypass valve Output shaft Charge pump Loop flushing module... -
Page 583: Fluid And Filter Maintenance
Service Manual Series 40 M46 Variable Pumps Fluid and filter maintenance Fluid and filter recommendations To ensure optimum life, perform regular maintenance of the fluid and filter. Contaminated fluid is the main cause of unit failure. Take care to maintain fluid cleanliness when servicing. Check the reservoir daily for proper fluid level, the presence of water, and rancid fluid odor. -
Page 584: Initial Startup Procedures
Service Manual Series 40 M46 Variable Pumps Initial startup procedures General Follow this procedure when starting-up a new pump installation or when restarting an installation in which the pump was removed. Ensure pump is thoroughly tested on a test stand before installing. Warning Unintended movement of the machine or mechanism may cause injury to the technician or bystanders. -
Page 585: Required Tools And Pressure Measurements
Service Manual Series 40 M46 Variable Pumps Required tools and pressure measurements Required tools The service procedures described in this manual can be performed using common mechanic’s hand tools. Special tools, if required, are shown. When testing system pressures, calibrate pressure gauges frequently to ensure accuracy. - Page 586 Service Manual Series 40 M46 Variable Pumps Required tools and pressure measurements Port locations P106 604E 11026743 • Rev BA • June 2014...
-
Page 587: Troubleshooting
Service Manual Series 40 M46 Variable Pumps Troubleshooting Overview This section provides general steps to follow if undesirable system conditions occur. Follow these steps until you solve the problem. Some of the items are system specific. For areas this manual covers, we reference the section. -
Page 588: System Will Not Operate In One Direction
Service Manual Series 40 M46 Variable Pumps Troubleshooting Item Description Action SCR (System Check / Relief) Valves A partially activated SCR valve or SCR valves with Verify that the SCR valve is seating properly and is relief settings too low may generate heat within at the correct relief setting. -
Page 589: Neutral Difficult Or Impossible To Find
Service Manual Series 40 M46 Variable Pumps Troubleshooting Item Description Action Servo pressure There is an insufficient pressure differential across Check servo pressures to verify sufficient pressure the servo piston. delta. Verify that the servo supply and drain paths are unobstructed and that each orifice is of the correct size and free of debris. -
Page 590: Electrical Troubleshooting
Service Manual Series 40 M46 Variable Pumps Troubleshooting Item Description Action Charge pressure (in stroke) There is low charge pressure resulting from internal Repair or replace the component or components leakage within the system. within the system causing the internal leakage. Servo pressure There is insufficient pressure differential across the Check servo pressures at port M4 and M5 to verify... -
Page 591: Adjustments
Service Manual Series 40 M46 Variable Pumps Adjustments Standard procedures, inspections, and adjustments Before working on the pump, clean all dirt and grime from the outside of the pump and surrounding area. Caution Contamination can damage internal components and void the manufacturer’s warranty. Take precautions to ensure system cleanliness when removing and reinstalling system lines. -
Page 592: Engaging The Bypass Function
Service Manual Series 40 M46 Variable Pumps Adjustments Charge pressure adjustment 1 in. 11/16 in Charge pressure gage port P106 634E Engaging the bypass function Test the bypass function with the pump installed on the machine. The bypass function is engaged by unscrewing the bypass valve. -
Page 593: System Check/Relief (Scr) Valves
Service Manual Series 40 M46 Variable Pumps Adjustments Using the bypass function Bypass check valve 5/8 in P106 633E System check/relief (SCR) valves The SCR valve is a high pressure relief valve and a system check valve in combination. Whenever an SCR valve is replaced or opened, opperate the pump in its full range of functions to ensure proper machine operation. -
Page 594: Displacement Limiter Adjustment
Service Manual Series 40 M46 Variable Pumps Adjustments Installing the SCRs 1-1/4 in 176 Nm [130 ft•lb] 1103 1103 1-1/4 in 176 Nm [130 ft•lb] P106 635E Displacement limiter adjustment Pump may have a displacement limiter on each side of the servo. Each limiter may be adjusted to a different setting. -
Page 595: Swashplate Neutral Adjustment
Service Manual Series 40 M46 Variable Pumps Adjustments Displacement limiter adjustment 9/16 in P106 626E Swashplate neutral adjustment With the pump properly plumbed, primed, and mounted on a vehicle or test stand, use this procedure to adjust mechanical neutral. If pump is on a vehicle, securely block the wheels to prevent movement. Measured data •... -
Page 596: Manual Displacement Control Neutral-Return Bracket Adjustment
Service Manual Series 40 M46 Variable Pumps Adjustments 6. Use a 1/4 hex wrench to hold the servo adjustment screw in place, and a 9/16 hex wrench to tighten servo lock nut (115). Torque to 37 N•m [27 lbf•ft]. 7. Shut down prime mover and remove previously installed gauges and fittings. Plug ports MA, MB, M4, and M5. -
Page 597: Electric Displacement Control/Hydraulic Displacement Control Neutral Adjustment
Service Manual Series 40 M46 Variable Pumps Adjustments 6. Shut down prime mover and remove previously installed gauges. Plug ports M4, M5. Torque to 37 N•m [27 lbf•ft] Manual displacement control bracket adjustment 1210 3/8 in Neutral bracket P106 631E Electric Displacement Control/Hydraulic Displacement Control Neutral Adjustment With the pump properly plumbed, primed, and mounted on a vehicle or test stand, use this procedure to adjust the pump displacement control to neutral position. -
Page 598: Hc Edc Control
Service Manual Series 40 M46 Variable Pumps Adjustments EDC / HDC control adjustment Adjustment screw 5/32 in Lock nut 9/16 in P106 643 HC EDC Control Control Neutral Adjustment All functions of the Electric Displacement Control (EDC), are preset at the factory. If necessary, adjust the pump to neutral with the pump running on a test stand or on the vehicle/machine with the prime mover operating. - Page 599 Service Manual Series 40 M46 Variable Pumps Adjustments Locknut 13 mm Adjusting screw 12 N•m [9 lbf•ft] 4 mm Servo pressure gauge port M5 0 - 50 bar [0 - 1000 psi] 3/16 in 19 N•m [14 lbf•ft] Servo pressure gauge port M4 0 - 50 bar [0 - 1000 psi] 3/16 in 19 N•m [14 lbf•ft]...
- Page 600 Service Manual Series 40 M46 Variable Pumps Adjustments Neutral Adjustment (EDC) (bottom view) Solenoid shaft Control spool Adjusting screw (cam) Feedback pin Maximum adjustment less than 120° P106 046E Illustration shows how cam on adjusting pin rotates to adjust for neutral position after pump is re- installed.
-
Page 601: Minor Repair
Service Manual Series 40 M46 Variable Pumps Minor repair Standard procedures, removing the pump Before working on the pump, clean all dirt and grime from the outside. If the pump has an auxiliary pump attached, remove both pumps as a single unit.Tag all hydraulic lines as they are disconnected and plug all open ports to ensure that dirt and contamination do not get into the pump. -
Page 602: Pressure Filtration Adapter
Service Manual Series 40 M46 Variable Pumps Minor repair Inspection Inspect all parts for damage. Inspect the mating surfaces of the servo cover (902) and pump housing for scratches, grooves, and other damage. Inspect threads of screws and nuts for damage. Replace any damaged parts. -
Page 603: Charge Pump
Service Manual Series 40 M46 Variable Pumps Minor repair 2. Using a 1/2 hex wrench, install three screws (806). Torque to 30 N•m [22 lbf•ft]. 3. Lubricate and install O-ring (810A) onto plug (810). Using an 11/16 in. hex wrench, install plug (810). Torque to 37 N•m [27 lbf•ft]. - Page 604 Service Manual Series 40 M46 Variable Pumps Minor repair Charge pump removal/installation 1506 9/16 in 30Nm [20 ft•lb] 1502 9/16 in 43Nm [32 ft•lb] 1503 1505 1504 P106 636E Inspection Inspect the gerotor (603) and gerotor cover (155) for wear, scratches or pitting. If any component shows signs of wear, scratching, or pitting, relpace all components.
-
Page 605: Shaft Seal, Roller Bearing And Shaft Replacement
Service Manual Series 40 M46 Variable Pumps Minor repair Shaft seal, roller bearing and shaft replacement The shaft assembly is serviceable without removing the front cover of the pump, but the charge pump must be removed first. Orient the pump on the work surface so the shaft is pointing up with the charge pump (603) and key (605) removed from shaft. -
Page 606: Scr Valves
Service Manual Series 40 M46 Variable Pumps Minor repair Reassembly 1. Using a snap ring pliers, install snap-ring (133 ). Lubricate and press bearing (131) onto shaft. Install second snap-ring (133). 2. Install shaft and bearing assembly into front cover. Rotate shaft to align with block-splines. Ensure bearing is installed deep enough to clear snapring groove. -
Page 607: Charge Pressure Relief Valve
Service Manual Series 40 M46 Variable Pumps Minor repair SCR valves 1-1/4 in 176 Nm [130 ft•lb] 1103 1103 1-1/4 in 176 Nm [130 ft•lb] P106 635E Charge pressure relief valve Replace the charge pressure relief valve components if they are damaged or if you suspect failure. See Charge pressure relief valve on page 18, for adjustment instructions. -
Page 608: Bypass Valve
Service Manual Series 40 M46 Variable Pumps Minor repair Charge pressure relief valve 1 in P106 638E Bypass valve Removal 1. Using a 5/8 in. hex wrench, remove bypass valve (1001). 2. Remove and discard O-ring (1003) and backup ring (1002). Inspection Inspect the sealing surfaces of the pump for nicks or scratches. -
Page 609: Manual Displacement Control
Service Manual Series 40 M46 Variable Pumps Minor repair Bypass valve 1001 5/8 in 20 Nm [15 ft•lb] 1002 1003 P106 653E Manual displacement control Removal 1. Using a 3/8 in. hex wrench, remove screw (1210). Remove manual control spool assembly from pump housing. -
Page 610: Electronic Displacement Control/Hydraulic Displacement Control
Service Manual Series 40 M46 Variable Pumps Minor repair Alignment slot Servo piston P107 958E 3. Install neutral return spring (1214), neutral return bracket (1216), handle (1215), and washer (1235) onto spool (1207). 4. Using a 1/2 in. hex wrench, install lock nut (1213). Torque to 15 N•m [11 lbf•ft]. 5. -
Page 611: Mdc Orifice Repair
Service Manual Series 40 M46 Variable Pumps Minor repair Inspection Inspect control spool for scratches, grooves, and other damage. If spool is damaged, or you suspect control malfunction, replace entire control unit. Inspect sleeve bore in housing for damage. Reassembly 1. -
Page 612: Edc/Hdc Orifice Repair
Service Manual Series 40 M46 Variable Pumps Minor repair Install Pipe plug (1219) with thread lock. Apply a few drops before installation. MDC orifice repair 1401 1/8 in 1219 3/16 in P106 654E EDC/HDC orifice repair Removal 1. Remove servo covers. See Displacement limiter on page 28, for servo cover removal and installation instructions. -
Page 613: Hc Edc Control Repair
Service Manual Series 40 M46 Variable Pumps Minor repair EDC/HDC orifice repair 3/8 in 2161 1403 1404 3/8 in 9/16 in P106 655E HC EDC Control Repair 1. Using a 5 mm internal hex wrench, remove the six cap screws (D250). 2. - Page 614 Service Manual Series 40 M46 Variable Pumps Minor repair Proper screen orientation P106 519E 6. Install the control module and six cap screws (D250). Remove plug on top of control to ensure the swashplate feedback pin is properly positioned in the center of the control module when installing control.
- Page 615 Service Manual Series 40 M46 Variable Pumps Minor repair Torque sequence 11026743 • Rev BA • June 2014...
-
Page 616: Torque Chart
Service Manual Series 40 M46 Variable Pumps Torque chart Fastener size and torque chart Item Fastener Wrench size Torque Servo piston cover screws 3/8 hex 15 N•m [11 lbf•ft] Servo piston cover screws 3/8 hex 15 N•m [11 lbf•ft] Front cover screw T50 Torx 58 N•m [43 lbf•ft] Front cover screws... - Page 617 Service Manual Series 40 M46 Variable Pumps Torque chart Hardware locations 1210 1213 (2places) (6 places) Side (2 places) Front 1506 Rear (3 places) (3 places) (2 places) 1102 1001 (2 places) (5 places) P106 604E (2 places) (5 places) Bottom 1101 11026743 •...
- Page 618 Service Manual Series 40 M46 Variable Pumps 11026743 • Rev BA • June 2014...
- Page 619 Service Manual Series 40 M46 Variable Pumps 11026743 • Rev BA • June 2014...
- Page 620 Service Manual Series 40 M46 Variable Pumps 11026743 • Rev BA • June 2014...
- Page 621 Products we off er: Danfoss Power Solutions is a global manufacturer and supplier of high-quality hydraulic and electronic components. We specialize in providing state-of-the-art technology and solutions that • excel in the harsh operating conditions of the mobile off -highway market. Building on our extensive Bent Axis Motors applications expertise, we work closely with our customers to ensure exceptional performance for a •...
-
Page 622: Technical Information
MAKING MODERN LIVING POSSIBLE Technical Information Axial Piston Pumps Series 40 M46 powersolutions.danfoss.com... - Page 623 Technical Information Series 40 M46 Pumps Revision history Table of revisions Date Changed May 2015 more corrections to tandem pumps model code March 2015 correction to tandem pumps model code January 2015 minor edits January 2015 added port callouts - HC EDC drawings November 2014 corrections to shaft options July 2014...
- Page 624 Technical Information Series 40 M46 Pumps Contents Specifications Design Specifications..................................5 Technical Specifications.................................5 Operating Parameters..................................5 Options.........................................6 Fluid specifications..................................6 General Information M46 Pumps......................................7 M46 Variable Pumps..................................7 System Circuit Diagram..................................8 Schematic Diagram..................................8 Features and Options Features........................................9 Options.........................................9 Operating Parameters Fluids........................................10 Viscosity......................................10 Temperature....................................10 Charge Pressure....................................10...
- Page 625 Technical Information Series 40 M46 Pumps Contents Auxiliary Mounting Pads and Auxiliary Pumps........................35 Manual Displacement Control (MDC) - Options AB, AC, AK, AW, and GB..............36 Hydraulic Displacement - Options BA, BB and BC......................39 Electrical Displacement Control- Options CE, CG, CM, and CN..................41 High Current Electric Displacement Control - Options HA (12Vdc) and HB (24Vdc)..........44 Control signal requirements..............................46 Connector....................................46...
-
Page 626: Specifications
Technical Information Series 40 M46 Pumps Specifications Design Specifications Series 40 Pumps Product line In-line, axial piston, variable, positive displacement pumps Pump type Clockwise (CW) or counterclockwise (CCW) available Direction rotation Discretionary, the housing must be filled with hydraulic fluid Installation position Suction or charge pressure filtration Filtration configuration... -
Page 627: Options
Technical Information Series 40 M46 Pumps Specifications Minimum (intermittent cold degrees C [degrees F] - 40° C [- 40° F] Fluid Temperature start) 82.2° C [180° F] Continuous 104.4° C [220° F] Maximum Intermittent (1) Intermittent equals a short period of time at less than one minute per incident and not exceeding two percent of duty cycle based on load life. -
Page 628: General Information
Technical Information Series 40 M46 Pumps General Information M46 Pumps M46 pumps are designed for medium power applications with maximum loads of 345 bar [5000 psi]. These pumps can be combined with other products in a system to transfer and control hydraulic power. M46 pumps provide an infinitely variable speed range between zero and maximum in both forward and reverse modes of operation. -
Page 629: System Circuit Diagram
Technical Information Series 40 M46 Pumps General Information System Circuit Diagram Reservoir Heat exchanger bypass Control handle Filter Displacement Heat control exchanger valve Fixed displacement motor Cylinder Cylinder block block assembly assembly Charge relief valve Bypass valve Output shaft Charge pump Loop flushing module... -
Page 630: Features And Options
Technical Information Series 40 M46 Pumps Features and Options Features • Efficient Axial Piston Design • Compact, Lightweight Pumps • Worldwide Support • Low Noise • Single and Tandem Integrated Tandem Configurations • Manual, Hydraulic or Electric Control Options High Pressure Relief Valve (HPRV) - A high pressure relief valve limits the system pressure to protect the system from over-pressure. -
Page 631: Operating Parameters
Technical Information Series 40 M46 Pumps Operating Parameters Fluids Ratings and performance data are based on operating with premium hydraulic fluids containing oxidation, rust, and foam inhibitors. These include premium turbine oils, API CD engine oils per SAE J183, M2C33F or G automatic transmission fluids (ATF), Dexron II (ATF) meeting Allison C-3 or Caterpillar T0‑2 requirements, and certain specialty agricultural tractor fluids. -
Page 632: Control Pressure
Technical Information Series 40 M46 Pumps Operating Parameters Control Pressure Control pressure is the pressure in the servo system needed to position and hold the pump on stroke. Servo pressure depends on system pressure and speed. At minimum control pressure, the pump will run at reduced stroke depending on speed and pressure. Minimum control pressure at corner power holds the pump on full stroke at maximum speed and maximum pressure. -
Page 633: Inlet Pressure
Technical Information Series 40 M46 Pumps Operating Parameters For more information consult Pressure and Speed Limits BLN-9884, when determining speed limits for a particular application. During hydraulic braking and downhill conditions, the prime mover must be capable of providing sufficient braking torque in order to avoid pump over speed. This is especially important to consider for turbocharged and Tier 4 engines. -
Page 634: System Design Parameters
Technical Information Series 40 M46 Pumps System Design Parameters Sizing Equations Use these equations to help choose the right pump size and displacement for your application. Based on SI units Based on US units • n • η • n • η Flow (l/min) (US gal/min) -
Page 635: Suction Filtration
Technical Information Series 40 M46 Pumps System Design Parameters Cleanliness level and β -ratio Filtration (recommended Cleanliness per ISO 4406 22/18/13 minimum) Efficiency (charge pressure β-ratio β = 75 (β ≥ 10) 15-20 filtration) Efficiency (suction and β = 75 (β ≥... -
Page 636: Redundant Braking System Requirement
Technical Information Series 40 M46 Pumps System Design Parameters Charge filtration Strainer Reservoir Filter To Low Pressure with bypass side of loop and servo control Charge relief valve Charge pump To pump case P106102 Redundant Braking System Requirement Warning Unintended vehicle or machine movement hazard The loss of hydrostatic drive line power, in any mode of operation (forward, neutral, or reverse) may cause the system to lose hydrostatic braking capacity. -
Page 637: Case Drain Usage For Tandem Pumps
Technical Information Series 40 M46 Pumps System Design Parameters Case Drain Usage for Tandem Pumps The tandem housings are connected through the center section via a drilled hole. The charge relief valve discharges oil into the front housing. In order to provide positive flow through both housings, use a case drain in the rear housing. -
Page 638: Hydraulic Unit Life
Technical Information Series 40 M46 Pumps System Design Parameters Shaft loading parameters (continued) Force of cylinder block Thrust external load Force of charge pump Maximum external shaft moments Standard Bearing Me/N•m [in·lbf ] 186 [1650] External radial shaft load 270 R 90 R 180 R P100594... - Page 639 Technical Information Series 40 M46 Pumps System Design Parameters + ... +W + ... +W Refer to the Installation Drawings section to find pump length (L). Refer to the table Technical Specifications in the Specifications section, to find pump weight (W). An exact measure of W will depend on the pump’s features.
-
Page 640: Shaft Torques
Technical Information Series 40 M46 Pumps System Design Parameters G-factors for sample applications (continued) Application Continuous (vibratory) Maximum (shock) acceleration acceleration (G Turf care vehicle Vibratory roller * Applications which experience extreme resonant vibrations require addition pump support. Shaft Torques Shaft selection Base shaft selection on a review of the maximum torque required by the application and the maximum torque available from the prime mover. -
Page 641: Model Code - Single Pumps
Technical Information Series 40 M46 Pumps Model Code - Single Pumps Single Pumps Product Frame Type C Swashplate Description Code Remarks Standard D - Seal Group Description Code Remarks Seal group for MDC Must select an MDC control Seal group for EDC/HDC/FNR Must select an EDC/HDC/FNR control E - Input Shaft/Auxiliary Spline Description... - Page 642 Technical Information Series 40 M46 Pumps Model Code - Single Pumps H - Charge pressure Description Code Remarks 19.5 bar 21.5 bar 25.0 bar EDC/HDC controls calibrated at 20.7 bar charge J - Filtration Description Code Remarks Suction, with charge pump Requires G: with charge pump Remote pressure, with charge pump Requires G: with charge pump...
- Page 643 Technical Information Series 40 M46 Pumps Model Code - Single Pumps N - Control type Description Code Remarks MDC handle with (2) 10 mm diameter holes, standard spring Recommend AW with metered spool MDC with (3) 10 mm diameter holes, standard spring Recommend AK with metered spool MDC with (3) 10 mm diameter holes, U shaped, standard spring, metered spool...
- Page 644 Technical Information Series 40 M46 Pumps Model Code - Single Pumps HC EDC - Servo A and B Servo A&B 0.046 inch 0.055 inch 0.037 inch 0.024 inch None S - Auxiliary mounting flange Description Code Remarks SAE A, side #2 lift bracket location E: Shaft to include 9T or 11T aux..
-
Page 645: Model Code - Tandem Pumps
Technical Information Series 40 M46 Pumps Model Code - Tandem Pumps Tandem Pumps Product Frame Type Front Section Rear Section E - Input Shaft Description Code Remarks 15T 16/32 Spline Requires S: None aux.. pad 19T 16/32 Spline Requires S: SAE-B aux.. pad Tapered, 1 inch dia., 1.5 in/foot, square key without thru hole Includes key and nut. - Page 646 Technical Information Series 40 M46 Pumps Model Code - Tandem Pumps C - Swashplate group, front pump/Q - Swashplate group, rear pump Description Code Remarks Balanced D - Seal Group Description Code Remarks Seal group for MDC - Front pump Must select an MDC control Seal group for EDC/HDC/FNR - Front pump Must select an EDC/HDC/FNR control...
- Page 647 Technical Information Series 40 M46 Pumps Model Code - Tandem Pumps N - Control type, front pump /Y - Control type, rear pump (continued) Description Code Remarks MDC handle with (2) 10 mm diameter holes, standard spring, metered spool MDC heavy duty handle with (4) 10 mm diameter holes, heavy P;...
- Page 648 Technical Information Series 40 M46 Pumps Model Code - Tandem Pumps S - Auxiliary mounting flange and coupling (continued) Description Code Remarks SAE A, 11 tooth 16/32 spline SAE B, 11 tooth 16/32 spline T - Special hardrare Description Code Remarks Black paint, Danfoss tag, Layout A High capacity shaft bearing, black paint, Danfoss tag, Layout A NNR...
-
Page 649: Options
Technical Information Series 40 M46 Pumps Options Shaft options Recommended mating splines for Series 40 splined output shafts should be in accordance with ANSIB 92.1 Class 5. Danfoss external splines are modified Class 5 Fillet Root Side Fit. The external splined Major Diameter and Circular Tooth Thickness dimensions are reduced in order to assure a clearance fit with the mating spline. - Page 650 Technical Information Series 40 M46 Pumps Options Code Description Maximum torque rating Rated torque Drawing Nm [lbf in] Nm [lbf in A, B, L, D 13-tooth 16/32 pitch (ANSI 226 [2000] 124 [1100] B92.1 1970 - Class 5) Coupling must not protrude beyond this surface G, H, J, K 15-tooth 16/32 pitch (ANSI...
-
Page 651: Tandem Pumps
Technical Information Series 40 M46 Pumps Options Tandem pumps Code Description Maximum torque Drawing rating Nm [lbf in] Ø 25.4 mm [1.000 in] 362 [3200] 6.35 [0.250] sq. key Straight keyed - 44.45 [1.75] long Shipped with key 0.38 [0.015] min. R. on edges Mounting flange 25.4 [1.00] dia. -
Page 652: Charge Pump
Technical Information Series 40 M46 Pumps Options Shaft options Length Shaft Full spline Major Pitch No. teeth diameter diameter diameter 37.7 [1.485] 22.3 [0.88] 23.4 [0.92] 24.89 [0.9800] 20.638 [0.9375] 15 37.7 [1.497] 28.7 [1.13] 24.1 [0.95] 31.24 [1.230] 30.163 [1.1875] 19 Other shaft options may exist. -
Page 653: Charge Pump Output Flow
Technical Information Series 40 M46 Pumps Options Charge Pump Output Flow Flow at 19.5 bar charge relief setting, 70°C [160°F] inlet l/min US Gal/min M46 PT M46 PV 1000 2000 3000 4000 Speed min (rpm) T101302 Charge Pump Power Requirements Power at 19.5 bar charge relief setting, 70°C [160°F] inlet M46PT M46PV... -
Page 654: High Pressure Relief Valve (Hprv) And Charge Check
Technical Information Series 40 M46 Pumps Options The charge relief valve is factory set. If necessary, it can be field adjusted with shims. Charge Relief Valve Specs Type Cone poppet valve Available Setting 19.5-26.2 bar [285-380 psi] Adjustment Via shims inside of valve cartridge* Rise Rate Adjustment 2.3 bar [33 psi]/mm... -
Page 655: Bypass Function
Technical Information Series 40 M46 Pumps Options Check/high pressure relief valve specs Cartridge-style poppet valve Type 140-345 bar (2030-5000 psi) Setting Check only - no relief valve Option High pressure relief valve locations Bypass valve High pressure relief valve P100590 Bypass Function All M46 pumps are equipped with a loop bypass valve that connects the A and B sides of the working loop. -
Page 656: Auxiliary Mounting Pads And Auxiliary Pumps
Technical Information Series 40 M46 Pumps Options M46 Displacement limiter (side #2) Neutral Adjustable adjustment displacement Fixed screw limiter screw displacement limiter P100 592E Auxiliary Mounting Pads and Auxiliary Pumps Auxiliary mounting pads are available on all pumps. A sealed shipping cover is included as standard equipment on all mounting pads. -
Page 657: Manual Displacement Control (Mdc) - Options Ab, Ac, Ak, Aw, And Gb
Technical Information Series 40 M46 Pumps Options max. F min spline max. engagement Mounting for full flange (ref.) torque rating With undercut P Dia. Without undercut 0.8 [0.03] max. R Coupling max. 2.3 [0.090] recommended max. cutter clearance P100 636E Manual Displacement Control (MDC) - Options AB, AC, AK, AW, and GB The Manual Displacement Control (MDC) converts a mechanical input signal to a hydraulic signal with a spring centered 4-way servo valve, and ports hydraulic pressure to either side of a double acting servo... - Page 658 Technical Information Series 40 M46 Pumps Options • Simple-low cost design. • Pump output is maintained regardless of load. • Pump will return to neutral after prime mover shuts down. • Pump returns to neutral if external control linkage becomes disconnected from the control handle or if there is a loss of charge pressure.
- Page 659 Technical Information Series 40 M46 Pumps Options MDC Response time Orifice diameter* mm [in] Average response time [seconds] Supply Drain Acceleration Deceleration 0.9 [0.036] 0.8 [0.031] 0.9 [0.036] 1.2 [0.046] 1.4 [0.054] 1.2 [0.046] None None *Contact Danfoss for special orifice combinations. External control handle torque requirements Standard spring Heavy duty spring...
-
Page 660: Hydraulic Displacement - Options Ba, Bb And Bc
Technical Information Series 40 M46 Pumps Options Hydraulic Displacement - Options BA, BB and BC The Hydraulic Displacement Control (HDC) is a two stage design which uses a hydraulic input signal to operate a spring centered 4-way servo valve, which ports hydraulic pressure to either side of a double acting servo piston. - Page 661 Technical Information Series 40 M46 Pumps Options Pump flow direction with HDC control (continued) Rear Tandem Higher pressure into control port: Port C Flow Port D Flow High Servo Gauge Port Refer to pump installation drawing for port locations. Response Time The time required for the pump output flow to change from neutral to full flow (acceleration) or full flow to neutral (deceleration) is a function of the size of the supply orifice in the control inlet passage and the size of the drain orifice in the control sleeve.
-
Page 662: Electrical Displacement Control- Options Ce, Cg, Cm, And Cn
Technical Information Series 40 M46 Pumps Options HDC signal required for swashplate position Swashplate position (refer to above chart) Swashplate movement begins (point A) Full displacement reached (point B) Configuration [psid] [psid] 1.3±0.5 [19±7] 11.7±1.1 [170±16] 3.0±0.7 [44±10] 13.8±1.4 [200±20] 4.8±0.7 [70±10] 15.2±1.4... - Page 663 Technical Information Series 40 M46 Pumps Options EDC on M46 PV P100600 Pump flow direction with EDC control Input Shaft Rotation Positive signal to pin Single or Front Single coil or Dual coil in parallel A or C B or D A or C B or D Tandem...
- Page 664 Technical Information Series 40 M46 Pumps Options EDC Hydraulic Schematic P104368 Response time The time required for the pump output flow to change from neutral to full flow (acceleration) or full flow to neutral (deceleration) is a function of the size of the orifices in the servo and supply passages. A range of orifice sizes is available to assist in matching the rate of swashplate response to the acceleration and deceleration requirements of the application.
-
Page 665: High Current Electric Displacement Control - Options Ha (12Vdc) And Hb (24Vdc)
Technical Information Series 40 M46 Pumps Options Pump displacement vs electrical control 100% Current in MA Current in MA 100% T101312 EDC Input Options Coil configuration (Point a) mA (Point b) mA Pin Connections Dual coil, using only one coil 23 ±... - Page 666 Technical Information Series 40 M46 Pumps Options Under some circumstances, such as contamination, the control spool could stick and cause the pump to stay at some displacement. A serviceable 125 μm screen is located in the supply line immediately before the control porting spool. P003 191 Pump displacement vs.
-
Page 667: Control Signal Requirements
Technical Information Series 40 M46 Pumps Options Schematic diagram flow out B P108759 Control signal requirements Control current Voltage b mA Pin connections 12 V 1640 any order 24 V Factory test current, for vehicle movement or application actuation expect higher or lower value. Connector P003 480 Description... -
Page 668: Response Times
Technical Information Series 40 M46 Pumps Options Solenoid data (continued) Voltage Inductance 33 mH 140 mH IP Rating (IEC 60 529) + DIN 40 050, part 9 IP 67 IP Rating (IEC 60 529) + DIN 40 050, part 9 with mating connector IP 69K PWM signal required for optimum control performance. -
Page 669: Three-Position Electrical Control - Options Da And Db
Technical Information Series 40 M46 Pumps Options Unintended MOR operation will cause the pump to go into stroke. The vehicle or device must always be in a safe condition (i.e. vehicle lifted off the ground) when using the MOR function. The MOR plunger has a 4 mm diameter and must be manually depressed to be engaged. - Page 670 Technical Information Series 40 M46 Pumps Options FNR Control on M46 PV P100601 Pump flow direction with FNR control Input Shaft Rotation Single or Front Solenoid energized: Tandem Port A Flow Port B Flow Rear Tandem Solenoid energized: Port C Flow Port D Flow High Servo Gauge Port Refer to pump installation drawing for solenoid and port locations.
- Page 671 Technical Information Series 40 M46 Pumps Options Response time The time required for the pump output flow to change from neutral to full flow (acceleration) or full flow to neutral (deceleration) is a function of the size of the orifices in the servo, supply and drain passages. A range of orifice sizes is available to assist in matching the rate of swashplate response to the acceleration and deceleration requirements of the application.
-
Page 672: Port Locations
Technical Information Series 40 M46 Pumps Port Locations Single Pump Charge Pump Inlet Case Outlet L1 1-1/16-12 Bypass Relief Valve (optional relief valve) (for port A) Servo Pressure Gage Port M4 All ports are straight thread O-ring boss 9/16 - 18 Charge Pressure per ISO 11926-1 and SAE J1926/1 Relief Valve... -
Page 673: Tandem Pump
Technical Information Series 40 M46 Pumps Port Locations Tandem Pump To remote filter D System Port D (pressure filter option) 1-5/16 - 12 Port C 7/8 - 14 Charge Pump Inlet S 1-5/16 - 12 Case Outlet L1 1-5/8 - 12 1-1/16 - 12 From remote filter E Bypass Front... -
Page 674: Installation Drawings - Single Pump Dimensions
Technical Information Series 40 M46 Pumps Installation Drawings - Single Pump Dimensions Auxiliary Mounting Flanges Contact Danfoss for individual dimension drawings Rear view (no pads shown) 7.4 min. 3/8-16 thd. [0.29] 20.3 [0.80] min. full thd. depth 1.96 (2) holes [0.077] 0.5 max R 106.38... -
Page 675: Pump, Filtration/Charge Pump Options, Mdc, Displacement Limiter
Technical Information Series 40 M46 Pumps Installation Drawings - Single Pump Dimensions Pump, filtration/charge pump options, MDC, displacement limiter 80.8 [3.18] 260.61 [10.26] Side #2 212.3 [8.36] 211.8 [8.34] 171.7 [6.76] 143.8 [5.66] 0.8 R max. [0.03] Pump [0.09] [0.28] 72.6 33.5 [1.32] Mounting... -
Page 676: Installation Drawings - Tandem Pump Dimensions
Technical Information Series 40 M46 Pumps Installation Drawings - Tandem Pump Dimensions Auxiliary mounting flange 91.8 1/2-13 [3.61] 26.4 [1.04] 59.7 [2.35] min. full thd. 89.9 79.8 [3.54] [3.14] 51.3 [2.02] 79.8 [3.14] No auxiliary mounting flange Mounting 474.9 8.38 flange (ref .) min. -
Page 677: Rear Mounting Boss
Technical Information Series 40 M46 Pumps Installation Drawings - Tandem Pump Dimensions Rear mounting boss 32.51 [1.28] M12 x 1.75 349 [13.74] 6H Thd. X2 P104425 L1001029 • Rev BG • May 2015... -
Page 678: Pumps, Filtration/Charge Pump Options, Mdc, Displacement Limiters
Technical Information Series 40 M46 Pumps Installation Drawings - Tandem Pump Dimensions Pumps, filtration/charge pump options, MDC, displacement limiters 212.3 [8.36] 493.0 [19.41] max 171.7 [6.76] Side #2 341.4 [13.44] 274.8 [10.82] 203.7 [8.02] Pump 13.2 0.8 R max. [0.52] [0.09] [0.03] [0.28]... -
Page 679: Control Options - Installation Drawings
Technical Information Series 40 M46 Pumps Control Options - Installation Drawings Control options, AC, AK Three hole control handle with standard spring Mounting flange location (ref .) 141.5 20° 20° [5.57] 3.18 19.05 [0.75] [0.125] 10.08 [0.397] 50.8 dia. (3) [2.00] R 29.5 [1.16] R... -
Page 680: Options Ab, Aw
Technical Information Series 40 M46 Pumps Control Options - Installation Drawings Options AB, AW Two hole control handle with standard spring Mounting flange location (ref .) 141. 5 20° 20° [5.57] 3.18 19.05 [0.75] [0.125] 10.08 [0.397] 50.8 dia. (3) [2.00] R 29.5 [1.16] R... -
Page 681: Hc Edc Control
Technical Information Series 40 M46 Pumps Control Options - Installation Drawings HC EDC Control Charge filtration port E ISO 11926-1 7/8-14 Bypass valve From remote filter (full open at two revolutions) 121.9 ± 2.5 103 ± 1.5 Charge gauge port for remote filtration with or w/o charge pump option System gauge port A 193.5 ±... -
Page 682: Hydraulic Displacement Control (Hdc)
Technical Information Series 40 M46 Pumps Control Options - Installation Drawings Hydraulic displacement control (HDC) 177.8 max. [7.00] 39.6 [1.56] to ports Port X1 Port X2 7/16 -20* 49.0 [1.93] 141.7 [5.58] Control pressure ports To ports (2) places 118.1 [4.65] Side view View X Variable pump with HDC... -
Page 683: Option Ce
Technical Information Series 40 M46 Pumps Control Options - Installation Drawings Option CE Electronic displacement control (EDC) 177.8 max. [7.00] Packard Weather-Pack Danfoss mating parts kit 4-way tower connector part no.K03384 (male terminals) (female terminals) View V 124.2 max. [4.89] Packard "Weather Pack"... -
Page 684: Options Da, Db
Technical Information Series 40 M46 Pumps Control Options - Installation Drawings Options DA, DB Three-position electric displacement control (FNR) Connector per ISO 4400 8.61 (2) Places [218.6] Side view View X front view Variable pump with FNR control Variable pump with FNR control not connected Terminal 1 Terminal 2... -
Page 685: Reference Literature
Technical Information Series 40 M46 Pumps Reference Literature Literature M46 systems may consist of a variety of pump, motor, valve and control combinations. Refer to the literature listed below for product information and specifications for M46 pumps and other Danfoss components. - Page 686 Technical Information Series 40 M46 Pumps L1001029 • Rev BG • May 2015...
- Page 687 Technical Information Series 40 M46 Pumps L1001029 • Rev BG • May 2015...
- Page 688 Technical Information Series 40 M46 Pumps L1001029 • Rev BG • May 2015...
- Page 689 Products we offer: Danfoss Power Solutions is a global manufacturer and supplier of high-quality hydraulic and electronic components. We specialize in providing state-of-the-art technology and solutions • Bent Axis Motors that excel in the harsh operating conditions of the mobile off-highway market. Building on •...
- Page 690 MAKING MODERN LIVING POSSIBLE Technical Information Axial Piston Pumps Series 40 M46 powersolutions.danfoss.com...
- Page 691 Technical Information Series 40 M46 Pumps Revision history Table of revisions Date Changed May 2015 more corrections to tandem pumps model code March 2015 correction to tandem pumps model code January 2015 minor edits January 2015 added port callouts - HC EDC drawings November 2014 corrections to shaft options July 2014...
- Page 692 Technical Information Series 40 M46 Pumps Contents Specifications Design Specifications..................................5 Technical Specifications.................................5 Operating Parameters..................................5 Options.........................................6 Fluid specifications..................................6 General Information M46 Pumps......................................7 M46 Variable Pumps..................................7 System Circuit Diagram..................................8 Schematic Diagram..................................8 Features and Options Features........................................9 Options.........................................9 Operating Parameters Fluids........................................10 Viscosity......................................10 Temperature....................................10 Charge Pressure....................................10...
- Page 693 Technical Information Series 40 M46 Pumps Contents Auxiliary Mounting Pads and Auxiliary Pumps........................35 Manual Displacement Control (MDC) - Options AB, AC, AK, AW, and GB..............36 Hydraulic Displacement - Options BA, BB and BC......................39 Electrical Displacement Control- Options CE, CG, CM, and CN..................41 High Current Electric Displacement Control - Options HA (12Vdc) and HB (24Vdc)..........44 Control signal requirements..............................46 Connector....................................46...
-
Page 694: Specifications
Technical Information Series 40 M46 Pumps Specifications Design Specifications Series 40 Pumps Product line In-line, axial piston, variable, positive displacement pumps Pump type Clockwise (CW) or counterclockwise (CCW) available Direction rotation Discretionary, the housing must be filled with hydraulic fluid Installation position Suction or charge pressure filtration Filtration configuration... -
Page 695: Options
Technical Information Series 40 M46 Pumps Specifications Minimum (intermittent cold degrees C [degrees F] - 40° C [- 40° F] Fluid Temperature start) 82.2° C [180° F] Continuous 104.4° C [220° F] Maximum Intermittent (1) Intermittent equals a short period of time at less than one minute per incident and not exceeding two percent of duty cycle based on load life. -
Page 696: General Information
Technical Information Series 40 M46 Pumps General Information M46 Pumps M46 pumps are designed for medium power applications with maximum loads of 345 bar [5000 psi]. These pumps can be combined with other products in a system to transfer and control hydraulic power. M46 pumps provide an infinitely variable speed range between zero and maximum in both forward and reverse modes of operation. -
Page 697: System Circuit Diagram
Technical Information Series 40 M46 Pumps General Information System Circuit Diagram Reservoir Heat exchanger bypass Control handle Filter Displacement Heat control exchanger valve Fixed displacement motor Cylinder Cylinder block block assembly assembly Charge relief valve Bypass valve Output shaft Charge pump Loop flushing module... -
Page 698: Features And Options
Technical Information Series 40 M46 Pumps Features and Options Features • Efficient Axial Piston Design • Compact, Lightweight Pumps • Worldwide Support • Low Noise • Single and Tandem Integrated Tandem Configurations • Manual, Hydraulic or Electric Control Options High Pressure Relief Valve (HPRV) - A high pressure relief valve limits the system pressure to protect the system from over-pressure. -
Page 699: Operating Parameters
Technical Information Series 40 M46 Pumps Operating Parameters Fluids Ratings and performance data are based on operating with premium hydraulic fluids containing oxidation, rust, and foam inhibitors. These include premium turbine oils, API CD engine oils per SAE J183, M2C33F or G automatic transmission fluids (ATF), Dexron II (ATF) meeting Allison C-3 or Caterpillar T0‑2 requirements, and certain specialty agricultural tractor fluids. -
Page 700: Control Pressure
Technical Information Series 40 M46 Pumps Operating Parameters Control Pressure Control pressure is the pressure in the servo system needed to position and hold the pump on stroke. Servo pressure depends on system pressure and speed. At minimum control pressure, the pump will run at reduced stroke depending on speed and pressure. Minimum control pressure at corner power holds the pump on full stroke at maximum speed and maximum pressure. -
Page 701: Inlet Pressure
Technical Information Series 40 M46 Pumps Operating Parameters For more information consult Pressure and Speed Limits BLN-9884, when determining speed limits for a particular application. During hydraulic braking and downhill conditions, the prime mover must be capable of providing sufficient braking torque in order to avoid pump over speed. This is especially important to consider for turbocharged and Tier 4 engines. -
Page 702: System Design Parameters
Technical Information Series 40 M46 Pumps System Design Parameters Sizing Equations Use these equations to help choose the right pump size and displacement for your application. Based on SI units Based on US units • n • η • n • η Flow (l/min) (US gal/min) -
Page 703: Suction Filtration
Technical Information Series 40 M46 Pumps System Design Parameters Cleanliness level and β -ratio Filtration (recommended Cleanliness per ISO 4406 22/18/13 minimum) Efficiency (charge pressure β-ratio β = 75 (β ≥ 10) 15-20 filtration) Efficiency (suction and β = 75 (β ≥... -
Page 704: Redundant Braking System Requirement
Technical Information Series 40 M46 Pumps System Design Parameters Charge filtration Strainer Reservoir Filter To Low Pressure with bypass side of loop and servo control Charge relief valve Charge pump To pump case P106102 Redundant Braking System Requirement Warning Unintended vehicle or machine movement hazard The loss of hydrostatic drive line power, in any mode of operation (forward, neutral, or reverse) may cause the system to lose hydrostatic braking capacity. -
Page 705: Case Drain Usage For Tandem Pumps
Technical Information Series 40 M46 Pumps System Design Parameters Case Drain Usage for Tandem Pumps The tandem housings are connected through the center section via a drilled hole. The charge relief valve discharges oil into the front housing. In order to provide positive flow through both housings, use a case drain in the rear housing. -
Page 706: Hydraulic Unit Life
Technical Information Series 40 M46 Pumps System Design Parameters Shaft loading parameters (continued) Force of cylinder block Thrust external load Force of charge pump Maximum external shaft moments Standard Bearing Me/N•m [in·lbf ] 186 [1650] External radial shaft load 270 R 90 R 180 R P100594... - Page 707 Technical Information Series 40 M46 Pumps System Design Parameters + ... +W + ... +W Refer to the Installation Drawings section to find pump length (L). Refer to the table Technical Specifications in the Specifications section, to find pump weight (W). An exact measure of W will depend on the pump’s features.
-
Page 708: Shaft Torques
Technical Information Series 40 M46 Pumps System Design Parameters G-factors for sample applications (continued) Application Continuous (vibratory) Maximum (shock) acceleration acceleration (G Turf care vehicle Vibratory roller * Applications which experience extreme resonant vibrations require addition pump support. Shaft Torques Shaft selection Base shaft selection on a review of the maximum torque required by the application and the maximum torque available from the prime mover. -
Page 709: Model Code - Single Pumps
Technical Information Series 40 M46 Pumps Model Code - Single Pumps Single Pumps Product Frame Type C Swashplate Description Code Remarks Standard D - Seal Group Description Code Remarks Seal group for MDC Must select an MDC control Seal group for EDC/HDC/FNR Must select an EDC/HDC/FNR control E - Input Shaft/Auxiliary Spline Description... - Page 710 Technical Information Series 40 M46 Pumps Model Code - Single Pumps H - Charge pressure Description Code Remarks 19.5 bar 21.5 bar 25.0 bar EDC/HDC controls calibrated at 20.7 bar charge J - Filtration Description Code Remarks Suction, with charge pump Requires G: with charge pump Remote pressure, with charge pump Requires G: with charge pump...
- Page 711 Technical Information Series 40 M46 Pumps Model Code - Single Pumps N - Control type Description Code Remarks MDC handle with (2) 10 mm diameter holes, standard spring Recommend AW with metered spool MDC with (3) 10 mm diameter holes, standard spring Recommend AK with metered spool MDC with (3) 10 mm diameter holes, U shaped, standard spring, metered spool...
- Page 712 Technical Information Series 40 M46 Pumps Model Code - Single Pumps HC EDC - Servo A and B Servo A&B 0.046 inch 0.055 inch 0.037 inch 0.024 inch None S - Auxiliary mounting flange Description Code Remarks SAE A, side #2 lift bracket location E: Shaft to include 9T or 11T aux..
-
Page 713: Model Code - Tandem Pumps
Technical Information Series 40 M46 Pumps Model Code - Tandem Pumps Tandem Pumps Product Frame Type Front Section Rear Section E - Input Shaft Description Code Remarks 15T 16/32 Spline Requires S: None aux.. pad 19T 16/32 Spline Requires S: SAE-B aux.. pad Tapered, 1 inch dia., 1.5 in/foot, square key without thru hole Includes key and nut. - Page 714 Technical Information Series 40 M46 Pumps Model Code - Tandem Pumps C - Swashplate group, front pump/Q - Swashplate group, rear pump Description Code Remarks Balanced D - Seal Group Description Code Remarks Seal group for MDC - Front pump Must select an MDC control Seal group for EDC/HDC/FNR - Front pump Must select an EDC/HDC/FNR control...
- Page 715 Technical Information Series 40 M46 Pumps Model Code - Tandem Pumps N - Control type, front pump /Y - Control type, rear pump (continued) Description Code Remarks MDC handle with (2) 10 mm diameter holes, standard spring, metered spool MDC heavy duty handle with (4) 10 mm diameter holes, heavy P;...
- Page 716 Technical Information Series 40 M46 Pumps Model Code - Tandem Pumps S - Auxiliary mounting flange and coupling (continued) Description Code Remarks SAE A, 11 tooth 16/32 spline SAE B, 11 tooth 16/32 spline T - Special hardrare Description Code Remarks Black paint, Danfoss tag, Layout A High capacity shaft bearing, black paint, Danfoss tag, Layout A NNR...
-
Page 717: Options
Technical Information Series 40 M46 Pumps Options Shaft options Recommended mating splines for Series 40 splined output shafts should be in accordance with ANSIB 92.1 Class 5. Danfoss external splines are modified Class 5 Fillet Root Side Fit. The external splined Major Diameter and Circular Tooth Thickness dimensions are reduced in order to assure a clearance fit with the mating spline. - Page 718 Technical Information Series 40 M46 Pumps Options Code Description Maximum torque rating Rated torque Drawing Nm [lbf in] Nm [lbf in A, B, L, D 13-tooth 16/32 pitch (ANSI 226 [2000] 124 [1100] B92.1 1970 - Class 5) Coupling must not protrude beyond this surface G, H, J, K 15-tooth 16/32 pitch (ANSI...
-
Page 719: Tandem Pumps
Technical Information Series 40 M46 Pumps Options Tandem pumps Code Description Maximum torque Drawing rating Nm [lbf in] Ø 25.4 mm [1.000 in] 362 [3200] 6.35 [0.250] sq. key Straight keyed - 44.45 [1.75] long Shipped with key 0.38 [0.015] min. R. on edges Mounting flange 25.4 [1.00] dia. -
Page 720: Charge Pump
Technical Information Series 40 M46 Pumps Options Shaft options Length Shaft Full spline Major Pitch No. teeth diameter diameter diameter 37.7 [1.485] 22.3 [0.88] 23.4 [0.92] 24.89 [0.9800] 20.638 [0.9375] 15 37.7 [1.497] 28.7 [1.13] 24.1 [0.95] 31.24 [1.230] 30.163 [1.1875] 19 Other shaft options may exist. -
Page 721: Charge Pump Output Flow
Technical Information Series 40 M46 Pumps Options Charge Pump Output Flow Flow at 19.5 bar charge relief setting, 70°C [160°F] inlet l/min US Gal/min M46 PT M46 PV 1000 2000 3000 4000 Speed min (rpm) T101302 Charge Pump Power Requirements Power at 19.5 bar charge relief setting, 70°C [160°F] inlet M46PT M46PV... -
Page 722: High Pressure Relief Valve (Hprv) And Charge Check
Technical Information Series 40 M46 Pumps Options The charge relief valve is factory set. If necessary, it can be field adjusted with shims. Charge Relief Valve Specs Type Cone poppet valve Available Setting 19.5-26.2 bar [285-380 psi] Adjustment Via shims inside of valve cartridge* Rise Rate Adjustment 2.3 bar [33 psi]/mm... -
Page 723: Bypass Function
Technical Information Series 40 M46 Pumps Options Check/high pressure relief valve specs Cartridge-style poppet valve Type 140-345 bar (2030-5000 psi) Setting Check only - no relief valve Option High pressure relief valve locations Bypass valve High pressure relief valve P100590 Bypass Function All M46 pumps are equipped with a loop bypass valve that connects the A and B sides of the working loop. -
Page 724: Auxiliary Mounting Pads And Auxiliary Pumps
Technical Information Series 40 M46 Pumps Options M46 Displacement limiter (side #2) Neutral Adjustable adjustment displacement Fixed screw limiter screw displacement limiter P100 592E Auxiliary Mounting Pads and Auxiliary Pumps Auxiliary mounting pads are available on all pumps. A sealed shipping cover is included as standard equipment on all mounting pads. -
Page 725: Manual Displacement Control (Mdc) - Options Ab, Ac, Ak, Aw, And Gb
Technical Information Series 40 M46 Pumps Options max. F min spline max. engagement Mounting for full flange (ref.) torque rating With undercut P Dia. Without undercut 0.8 [0.03] max. R Coupling max. 2.3 [0.090] recommended max. cutter clearance P100 636E Manual Displacement Control (MDC) - Options AB, AC, AK, AW, and GB The Manual Displacement Control (MDC) converts a mechanical input signal to a hydraulic signal with a spring centered 4-way servo valve, and ports hydraulic pressure to either side of a double acting servo... - Page 726 Technical Information Series 40 M46 Pumps Options • Simple-low cost design. • Pump output is maintained regardless of load. • Pump will return to neutral after prime mover shuts down. • Pump returns to neutral if external control linkage becomes disconnected from the control handle or if there is a loss of charge pressure.
- Page 727 Technical Information Series 40 M46 Pumps Options MDC Response time Orifice diameter* mm [in] Average response time [seconds] Supply Drain Acceleration Deceleration 0.9 [0.036] 0.8 [0.031] 0.9 [0.036] 1.2 [0.046] 1.4 [0.054] 1.2 [0.046] None None *Contact Danfoss for special orifice combinations. External control handle torque requirements Standard spring Heavy duty spring...
-
Page 728: Hydraulic Displacement - Options Ba, Bb And Bc
Technical Information Series 40 M46 Pumps Options Hydraulic Displacement - Options BA, BB and BC The Hydraulic Displacement Control (HDC) is a two stage design which uses a hydraulic input signal to operate a spring centered 4-way servo valve, which ports hydraulic pressure to either side of a double acting servo piston. - Page 729 Technical Information Series 40 M46 Pumps Options Pump flow direction with HDC control (continued) Rear Tandem Higher pressure into control port: Port C Flow Port D Flow High Servo Gauge Port Refer to pump installation drawing for port locations. Response Time The time required for the pump output flow to change from neutral to full flow (acceleration) or full flow to neutral (deceleration) is a function of the size of the supply orifice in the control inlet passage and the size of the drain orifice in the control sleeve.
-
Page 730: Electrical Displacement Control- Options Ce, Cg, Cm, And Cn
Technical Information Series 40 M46 Pumps Options HDC signal required for swashplate position Swashplate position (refer to above chart) Swashplate movement begins (point A) Full displacement reached (point B) Configuration [psid] [psid] 1.3±0.5 [19±7] 11.7±1.1 [170±16] 3.0±0.7 [44±10] 13.8±1.4 [200±20] 4.8±0.7 [70±10] 15.2±1.4... - Page 731 Technical Information Series 40 M46 Pumps Options EDC on M46 PV P100600 Pump flow direction with EDC control Input Shaft Rotation Positive signal to pin Single or Front Single coil or Dual coil in parallel A or C B or D A or C B or D Tandem...
- Page 732 Technical Information Series 40 M46 Pumps Options EDC Hydraulic Schematic P104368 Response time The time required for the pump output flow to change from neutral to full flow (acceleration) or full flow to neutral (deceleration) is a function of the size of the orifices in the servo and supply passages. A range of orifice sizes is available to assist in matching the rate of swashplate response to the acceleration and deceleration requirements of the application.
-
Page 733: High Current Electric Displacement Control - Options Ha (12Vdc) And Hb (24Vdc)
Technical Information Series 40 M46 Pumps Options Pump displacement vs electrical control 100% Current in MA Current in MA 100% T101312 EDC Input Options Coil configuration (Point a) mA (Point b) mA Pin Connections Dual coil, using only one coil 23 ±... - Page 734 Technical Information Series 40 M46 Pumps Options Under some circumstances, such as contamination, the control spool could stick and cause the pump to stay at some displacement. A serviceable 125 μm screen is located in the supply line immediately before the control porting spool. P003 191 Pump displacement vs.
-
Page 735: Control Signal Requirements
Technical Information Series 40 M46 Pumps Options Schematic diagram flow out B P108759 Control signal requirements Control current Voltage b mA Pin connections 12 V 1640 any order 24 V Factory test current, for vehicle movement or application actuation expect higher or lower value. Connector P003 480 Description... -
Page 736: Response Times
Technical Information Series 40 M46 Pumps Options Solenoid data (continued) Voltage Inductance 33 mH 140 mH IP Rating (IEC 60 529) + DIN 40 050, part 9 IP 67 IP Rating (IEC 60 529) + DIN 40 050, part 9 with mating connector IP 69K PWM signal required for optimum control performance. -
Page 737: Three-Position Electrical Control - Options Da And Db
Technical Information Series 40 M46 Pumps Options Unintended MOR operation will cause the pump to go into stroke. The vehicle or device must always be in a safe condition (i.e. vehicle lifted off the ground) when using the MOR function. The MOR plunger has a 4 mm diameter and must be manually depressed to be engaged. - Page 738 Technical Information Series 40 M46 Pumps Options FNR Control on M46 PV P100601 Pump flow direction with FNR control Input Shaft Rotation Single or Front Solenoid energized: Tandem Port A Flow Port B Flow Rear Tandem Solenoid energized: Port C Flow Port D Flow High Servo Gauge Port Refer to pump installation drawing for solenoid and port locations.
- Page 739 Technical Information Series 40 M46 Pumps Options Response time The time required for the pump output flow to change from neutral to full flow (acceleration) or full flow to neutral (deceleration) is a function of the size of the orifices in the servo, supply and drain passages. A range of orifice sizes is available to assist in matching the rate of swashplate response to the acceleration and deceleration requirements of the application.
-
Page 740: Port Locations
Technical Information Series 40 M46 Pumps Port Locations Single Pump Charge Pump Inlet Case Outlet L1 1-1/16-12 Bypass Relief Valve (optional relief valve) (for port A) Servo Pressure Gage Port M4 All ports are straight thread O-ring boss 9/16 - 18 Charge Pressure per ISO 11926-1 and SAE J1926/1 Relief Valve... -
Page 741: Tandem Pump
Technical Information Series 40 M46 Pumps Port Locations Tandem Pump To remote filter D System Port D (pressure filter option) 1-5/16 - 12 Port C 7/8 - 14 Charge Pump Inlet S 1-5/16 - 12 Case Outlet L1 1-5/8 - 12 1-1/16 - 12 From remote filter E Bypass Front... -
Page 742: Installation Drawings - Single Pump Dimensions
Technical Information Series 40 M46 Pumps Installation Drawings - Single Pump Dimensions Auxiliary Mounting Flanges Contact Danfoss for individual dimension drawings Rear view (no pads shown) 7.4 min. 3/8-16 thd. [0.29] 20.3 [0.80] min. full thd. depth 1.96 (2) holes [0.077] 0.5 max R 106.38... -
Page 743: Pump, Filtration/Charge Pump Options, Mdc, Displacement Limiter
Technical Information Series 40 M46 Pumps Installation Drawings - Single Pump Dimensions Pump, filtration/charge pump options, MDC, displacement limiter 80.8 [3.18] 260.61 [10.26] Side #2 212.3 [8.36] 211.8 [8.34] 171.7 [6.76] 143.8 [5.66] 0.8 R max. [0.03] Pump [0.09] [0.28] 72.6 33.5 [1.32] Mounting... -
Page 744: Installation Drawings - Tandem Pump Dimensions
Technical Information Series 40 M46 Pumps Installation Drawings - Tandem Pump Dimensions Auxiliary mounting flange 91.8 1/2-13 [3.61] 26.4 [1.04] 59.7 [2.35] min. full thd. 89.9 79.8 [3.54] [3.14] 51.3 [2.02] 79.8 [3.14] No auxiliary mounting flange Mounting 474.9 8.38 flange (ref .) min. -
Page 745: Rear Mounting Boss
Technical Information Series 40 M46 Pumps Installation Drawings - Tandem Pump Dimensions Rear mounting boss 32.51 [1.28] M12 x 1.75 349 [13.74] 6H Thd. X2 P104425 L1001029 • Rev BG • May 2015... -
Page 746: Pumps, Filtration/Charge Pump Options, Mdc, Displacement Limiters
Technical Information Series 40 M46 Pumps Installation Drawings - Tandem Pump Dimensions Pumps, filtration/charge pump options, MDC, displacement limiters 212.3 [8.36] 493.0 [19.41] max 171.7 [6.76] Side #2 341.4 [13.44] 274.8 [10.82] 203.7 [8.02] Pump 13.2 0.8 R max. [0.52] [0.09] [0.03] [0.28]... -
Page 747: Control Options - Installation Drawings
Technical Information Series 40 M46 Pumps Control Options - Installation Drawings Control options, AC, AK Three hole control handle with standard spring Mounting flange location (ref .) 141.5 20° 20° [5.57] 3.18 19.05 [0.75] [0.125] 10.08 [0.397] 50.8 dia. (3) [2.00] R 29.5 [1.16] R... -
Page 748: Options Ab, Aw
Technical Information Series 40 M46 Pumps Control Options - Installation Drawings Options AB, AW Two hole control handle with standard spring Mounting flange location (ref .) 141. 5 20° 20° [5.57] 3.18 19.05 [0.75] [0.125] 10.08 [0.397] 50.8 dia. (3) [2.00] R 29.5 [1.16] R... -
Page 749: Hc Edc Control
Technical Information Series 40 M46 Pumps Control Options - Installation Drawings HC EDC Control Charge filtration port E ISO 11926-1 7/8-14 Bypass valve From remote filter (full open at two revolutions) 121.9 ± 2.5 103 ± 1.5 Charge gauge port for remote filtration with or w/o charge pump option System gauge port A 193.5 ±... -
Page 750: Hydraulic Displacement Control (Hdc)
Technical Information Series 40 M46 Pumps Control Options - Installation Drawings Hydraulic displacement control (HDC) 177.8 max. [7.00] 39.6 [1.56] to ports Port X1 Port X2 7/16 -20* 49.0 [1.93] 141.7 [5.58] Control pressure ports To ports (2) places 118.1 [4.65] Side view View X Variable pump with HDC... -
Page 751: Option Ce
Technical Information Series 40 M46 Pumps Control Options - Installation Drawings Option CE Electronic displacement control (EDC) 177.8 max. [7.00] Packard Weather-Pack Danfoss mating parts kit 4-way tower connector part no.K03384 (male terminals) (female terminals) View V 124.2 max. [4.89] Packard "Weather Pack"... -
Page 752: Options Da, Db
Technical Information Series 40 M46 Pumps Control Options - Installation Drawings Options DA, DB Three-position electric displacement control (FNR) Connector per ISO 4400 8.61 (2) Places [218.6] Side view View X front view Variable pump with FNR control Variable pump with FNR control not connected Terminal 1 Terminal 2... -
Page 753: Reference Literature
Technical Information Series 40 M46 Pumps Reference Literature Literature M46 systems may consist of a variety of pump, motor, valve and control combinations. Refer to the literature listed below for product information and specifications for M46 pumps and other Danfoss components. - Page 754 Technical Information Series 40 M46 Pumps L1001029 • Rev BG • May 2015...
- Page 755 Technical Information Series 40 M46 Pumps L1001029 • Rev BG • May 2015...
- Page 756 Technical Information Series 40 M46 Pumps L1001029 • Rev BG • May 2015...
- Page 757 Products we offer: Danfoss Power Solutions is a global manufacturer and supplier of high-quality hydraulic and electronic components. We specialize in providing state-of-the-art technology and solutions • Bent Axis Motors that excel in the harsh operating conditions of the mobile off-highway market. Building on •...
-
Page 758: Water Pump
WATER PUMP... - Page 759 SERVICE INSTRUCTIONS ZAMBONI MODEL 11870-0011 Parts list Description Qty. 11870-0011 Screw End Cover (3 Per Kit) 18753-0332 End Cover 12062-0000 Gasket 816-0000 Impeller Natural Rubber 836-0008-P Wearplate 2574-0000 Body 11874-0000 Screw Cam (3 Per Kit) 91005-0040 Cam – Brass 834-0001...
- Page 760 SERVICE INSTRUCTIONS Press seal seat assembly from bearing bore end towards im- IMPELLER REPLACEMENT: Remove end cover gasket. Pull peller bore. Remove bearing to shaft retaining ring. Support impeller out by grasping impeller with a Jabsco impeller puller. bearing and press on clutch drive end of shaft to remove shaft With a rotary motion in the direction the pump will be turn- from the bearing.
- Page 761 SAFETY BULLETIN...
-
Page 762: Important Reminders
“CONDITIONER MAINTENANCE” AND BEING PROPERLY TRAINED FOR ITS SAFE OPERATION. OBSERVE ALL LABELS AND INSTRUCTIONS. The Zamboni ice resurfacer is to be operated by one person. The machine is not designed nor built to accommodate riders. See the Zamboni Company’s position on second seats and “riders” here: https://zamboni.com/no-riders/... - Page 763 Zamboni Safety Bulletin DM-2022F Familiarize yourself and your staff with these and other areas of potential hazard or danger: Conveyor intake Conveyor discharge opening Horizontal conveyor screw (view safety guard list DM-2021G) (view safety guard list DM-2021G) (view safety guard list...
- Page 764 Inspect your machine to make sure that it is properly equipped with these guards and that all safety labels are in place. If safety labels are missing or painted over, replacements are available at no cost. Contact your Zamboni Authorized Distributor or Zamboni Customer Service. (https://zamboni.com/register-as-a-zamboni-product-owner/).
-
Page 765: Building Ventilation
Zamboni Safety Bulletin DM-2022F Everyone interacting with the ice resurfacer should be made aware of and held accountable for the use of PPE. Staff should have access to equipment and must be instructed on the importance of the proper use of PPE. Make sure that your facility follows local and regional standards and regulations regarding PPE. - Page 766 Zamboni Safety Bulletin DM-2022F U.S. EPA Information on air quality: https://www.epa.gov/indoor-air-quality-iaq/indoor-air-quality-and-ice-arenas The Ontario Recreational Facilities Association shares their air quality reference materials here: https://zamboni.com/air-quality-and-emissions/ Never operate ice resurfacing equipment in an enclosed rink without adequate ventilation. Make sure your ventilation system is working properly and turned on when operating the resurfacer.
- Page 767 The Zamboni Company continues to build the Zamboni ice resurfacer with safety as a primary consideration. We have an ongoing effort to instruct arena owners and operators in the safe and proper operation of our machines.
-
Page 768: General Safety Practices
Safety Bulletin This bulletin should be printed or saved digitally and shared with all staff working on or around the Zamboni ice resurfacer. If you retain digital files on your machine's digital service manual (USB key ring) add this information and advise your staff of the update. -
Page 769: Warning Signs And Labels
You must replace a label if it is damaged, missing or cannot be read. If a label is on a part that is replaced, make sure a new label is installed on the replaced part. Contact Zamboni or your Zamboni Authorized Distributor for new labels at no cost. - Page 770 • Keep all guards in place. Do not operate the Zamboni machine if any guard is damaged or missing. • Check all controls and warning devices for proper operation.
-
Page 771: Fire Or Explosion Prevention
CNG powered vehicles before trying to extinguish. Make sure your staff knows how to properly use it. • Always have a properly maintained fire extinguisher located in the Zamboni machine room. Make sure your staff knows how to properly use it. - Page 772 Never use a match or open flame to check for leaks, use a soap solution. • Always close the LPG tank service valve when the Zamboni machine is parked for the night or for any extended length of time. •...
- Page 773 Zamboni Safety Bulletin DM-2022F CNG Fuel System The installation of distribution, storage and dispensing (charging) systems and CNG cylinder charging must be done in accordance with locally applicable codes and standards. U.S. machine owners can reference the National Fire Prevention Association (NFPA) NFPA 52 Compressed Natural Gas (CNG) Vehicular Fuel Systems and any other applicable regulations.
- Page 774 Do not bend or strike high pressure lines. Do not install bent or damaged lines, tubes or hoses. • Repair any loose or damaged oil lines, tubes and hoses. Leaks can cause fires. Contact Zamboni or your Zamboni Authorized Distributor for repair or replacement.
-
Page 775: Safe Operation
• Mount and dismount the ice resurfacer only where steps and/or handholds are provided. • Use both hands and face the Zamboni machine when mounting and dismounting. Use extra care when wet or slippery conditions exist. • Never get on or off a moving Zamboni machine. Never jump off the machine. - Page 776 Zamboni Safety Bulletin DM-2022F Parking • Park the Zamboni machine in authorized areas only. • Move the hydrostatic transmission control lever or directional switch to NEUTRAL. • Turn the key switch OFF and remove the key. • If possible, park the machine on a flat and level surface. If the machine is parked on any kind of grade, the wheels must be blocked with wheel chocks to prevent the vehicle from rolling away after it has been parked.
- Page 777 Zamboni Safety Bulletin DM-2022F Optional Emission System Components Machines may be equipped with the following emission systems components: catalytic converter (two way and three way), engine controller and oxygen sensor(s). Some are optional and some are standard with all current model machines featuring them as standard equipment.
- Page 778 All other kits contain physical guard panels to restrict operator access to moving components like augers and belts. Please note that for the installation of the KZ-77500 conditioner guard kit, drilling and assembly is required. To order, please contact your Zamboni Authorized Distributor and have your machine model number and serial number available.
- Page 779 INTERLOCK KIT - 440 - 445 - 446 To order, please contact your Zamboni Authorized Distributor and have your machine model number and serial number available. Find your Local Zamboni Authorized Distributor at zamboni.com/distributor-locator ZAMBONI DM-2021G REV March, 2019 PAGE 2 OF 2...
- Page 780 DM-2021G CONSIGNES DE SÉCURITÉ ET MATÉRIAUX IMPORTANTS DISPONIBLES POUR VOTRE MACHINE ZAMBONI Les éléments suivants sont offerts aux propriétaires et les opérateurs de nos machines. Si vous avez besoin de matériel de sécurité de remplacement (étiquettes d’avertissement et de sécurité; ou une affiche de sécurité), ils sont disponibles sans frais pour remplacer ceux qui ont été...
- Page 781 - 440 - 445 - 446 Pour commander, communiquez avec votre distributeur autorisé Zamboni et ayez en main le numéro de modèle et le numéro de série de votre machine. Pour trouver le distributeur autorisé Zamboni le plus près, consultez zamboni.com/distributor-locator...
Need help?
Do you have a question about the 525 and is the answer not in the manual?
Questions and answers